(Foam safe CA, Shoe Goo or E6000, Styrene Glue, Epoxy Hobby Knife Side Cutters Cross head screwdriver (Small) I
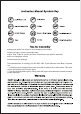
Glue Ŷ 8VH JRRG TXDOLW\ KH[ GULYHUV WR DYRLG VWULSSLQJ VFUHZ KHDGV Ŷ 2SHQ NLW EDJV LQ RUGHU RI DVVHPEO\ VWHSV Ŷ 8VH ³6WHS´ LQGH[ IRU TXDQWLW\ DQG VL]H RI KDUGZDUH WR EH XVHG IRU DVVHPEO\ Ŷ 'R QRW RYHUWLJKWHQ VFUHZV Ŷ 8VH WKUHDG ORFN VSDULQJO\ 5HFRPPHQGDWLRQV IRU EXLOGLQJ \RXU 5& :' 7R\RWD 5XQQHU +DUG %RG\ &RPSOHWH 6HW &DUHIXOO\ UHPRYH DOO SLHFHV IURP SDUWV WUHHV ZLWK D KREE\ NQLIH RU VLGH FXWWHUV 7DNH FDUH WR WULP WKH LQMHFWLRQ SRLQW IURP WKH SDUWV 7HVW ILW HYHU\WKLQJ EHIRUH JOXLQJ
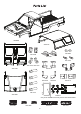
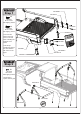
2 1 1 4 4 5 1 3 3 9 8 7 6 2 10 3 2 11 12 1 325-0087 325-0109 325-0083 5 1 1 4 3 3 2 2 3 6 7 2 1 5 4 4 7 8 6 9 325-0115 5 7 7 5 6 4 2 325-0093 325-0092 1 2 3 325-0106 3 3 5 6 4 5 4 6 2 8 1 12 1 11 10 325-0068 6 7 325-0072 III 9 325-0931
325-0082 325-0124 325-0981 450-0108 350-1180 350-1182 350-1072 350-1073 325-0100 450-0114 325-0119 500-0106 500-0107 450-0113 350-1375 325-0090 Z-B0112 *Tray is not needed for this body set and can be discarded.
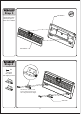
325-0068-4 Step 1 325-0931-7 X2 150-0207 M1.6 x 10mm Self Tapping Screws X2 130-0300 150-0300 M1.6 x 12mm Self Tapping Screws 130-0207 325-0931-9 *Pre-screw the holes in the inner mounts. This will make installing the brackets much easier. *Use Tamiya Translucent Paint in the areas labeled with colors on the lights. 130-0300 130-0207 325-0082 325-0068-5 325-0931-6 325-0931-10 Step 2 X4 150-0238 M2 x 6mm Self Tapping Screws *Recommend styrene solvent glue.
Step 3 325-0092-5 *Recommend foam safe super glue or Shoe Goo or E6000. 325-0092-2 Step 4 X4 150-0238 M2 x 6mm Self Tapping Screws Note direction: There is a short and long side to the hinge. Short side of hinge attaches to Tailgate.
Step 5 *Recommend styrene solvent glue or Foam Safe Super Glue. Press firmly. 325-0931-8 Step 6 *Recommend foam safe super glue or Shoe Goo or E6000.
Step 7 *Recommend foam safe super glue or Shoe Goo or E6000. 325-0092-3 Step 8 X4 150-0238 M2 x 6mm Self Tapping Screws *Locking posts are designed for a very snug fit when the tailgate is closed. These may be trimmed slightly to allow the tailgate to open more easily if desired.
Step 9 X4 150-0238 M2 x 6mm Self Tapping Screws 450-0114 450-0114 Step 10 X2 325-0109-1 150-0238 M2 x 6mm Self Tapping Screws 325-0931-5 325-0931-4 5
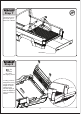
Step 11 *Do not glue until proper alignment is achieved in Step 12. 325-0092-6 325-0092-7 Align notch with edge of body. Step 12 X6 150-0238 M2 x 6mm Self Tapping Screws *After proper alignment of bumper is achieved glue 325-0913 in place. *Recommend foam safe super glue or Shoe Goo or E6000.
Step 13 500-0106 X4 150-0002 M2 x 4mm SHCS 500-0107 Step 14 325-0109-4 X2 150-0208 M3 x 6mm Self Tapping Screws 325-0109-3 7
Step 15 X2 150-0208 M3 x 6mm Self Tapping Screws 325-0109-2 Step 16 325-0931-11 X6 150-0237 M2 x 5mm Self Tapping Screws 325-0931-11 8
Step 17 *Recommend styrene solvent glue or Foam Safe Super Glue. *Use Tamiya Translucent Paint in the areas labeled with colors on the lights. 325-0072-6 325-0072-5 Note Direction. Step 18 *Recommend styrene solvent glue or Foam Safe Super Glue. 325-0072-7 Ora n ge **Recommend Shoe Goo or E6000 for emblem. *Use Tamiya Translucent Paint in the areas labeled with colors on the lights.
Step 19 150-0208 X4 150-0238 M2 x 6mm Self Tapping Screws X2 150-0208 M3 x 6mm Self Tapping Screws 150-0238 Step 20 325-0090 10
Step 21 X4 325-0087-10 150-0255 M2 x 5mm Self Tapping Screws Step 22 *Install Chrome Mirror Stickers 101-0074.
Step 23 *Recommend foam safe super glue or Shoe Goo or E6000. 325-0931-12 Step 24 *Recommend styrene solvent glue or Foam Safe Super Glue.
Step 25 X2 150-0239 M3 x 4mm Self Tapping Screws 500-0108 450-0113 Step 26 325-0115-4 (L) 325-0115-3 (R) *Glue the magnet in place with Shoe Goo or E6000.
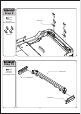
*Do not glue until proper alignment is achieved in Step 29. Step 27 *Recommend styrene solvent glue or Foam Safe Super Glue. 325-0092-4 325-0092-1 Take your time to align the hinge mounts before gluing. This is essential to have properly operating doors.
*Assure doors are properly aligned and glue piece from Step 28 in place. Step 29 Use 2 part epoxy or E6000 to glue the hinge mounts in place *Recommend 2 part epoxy or E6000 glue. Take care when installing door to make sure it is aligned properly. Use Styrene Solvent or Foam Safe Glue. Step 30 325-0087-3 *Install mirror sticker before gluing in place. *Recommend styrene solvent glue or Foam Safe Super Glue. *Install Chrome Mirror Stickers 101-0074.
Step 31 325-0068-1 X2 150-0002 M2 x 4mm SHCS *Align these with posts in the roof before tightening screws. Glue can be used to secure Windshield permanently. Step 32 *Recommend styrene solvent glue or Foam Safe Super Glue.
Step 33 325-0087-5 325-0087-8 325-0087-4 *Recommend styrene solvent glue or Foam Safe Super Glue. 325-0093-5 325-0100 325-0093-2/3 Step 34 *Recommend styrene solvent glue or Foam Safe Super Glue. *Seats can be glued in place permanently. For easy removal, do not glue as the seats snap lightly into place.
325-0087-9 Step 35 325-0087-7 *Recommend styrene solvent glue or Foam Safe Super Glue.
Fitment of the interior Tray: 1. Insert rear first. 2. Front posts will require flexing of the main body. USE CAUTION AND BE GENTLE. Step 37 X4 350-1072 150-0208 M3 x 6mm Self Tapping Screws 350-1073 X2 150-0064 M3x6mm BHCS Step 38 325-0083-1 325-0093-1 X2 150-0208 M3 x 6mm Self Tapping Screws X2 150-0195 M3 x 8mm Self Tapping Screws *Recommend foam safe super glue or Shoe Goo or E6000.
Step 39 *Recommend styrene solvent glue or Foam Safe Super Glue. 325-0068-7 325-0072-3 325-0072-4 325-0124 325-0068-3 325-0068-2 Step 40 *Recommend styrene solvent glue or Foam Safe Super Glue.
Step 41 X4 150-0238 M2 x 6mm Self Tapping Screws Step 42 21
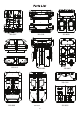
How to Install Body Decals 17 13 10* Chrome Mirror Decals 100-0074 11 5 9* 8* 18* 16 12 * Can use stickers in place of metal emblem Certain decal sheets are supplied with multiple styles, giving you the option to choose whichever best fits your personal style! Many of the decals supplied can be freely applied in any location.
How to install the RC4WD Toyota 4Runner Body Set on a Trail Finder 2 Chassis. *Remove stock bumpers and bumper mounts.
Step 45 *Move the fuel cell to the rear of the chassis. Notice:Remove these parts Step 46 *Servo removal is only needed if you have a 2 speed transmission.
Step 47 Notice: Remove these parts Notice:Remove these parts Step 48 25
Step 49 Step 50 Notice: Remove these parts Install Z-B0112 and Z-B0205 X4 150-0253 M3x10mm FHCS 26
Step 51 Step 52 X2 150-0064 M3x12mm BHCS X2 150-0065 150-0065 M3x14mm BHCS 150-0064 27
Step 53 X4 150-0063 M3 x 10mm BHCS 150-0063 X2 150-0099 M3 x 6mm FHCS 150-0099 Step 54 X2 325-0093 150-0100 M3 x 8mm FHCS 28
Step 55 X4 150-0099 M3 x 6mm FHCS Step 56 X3 150-0063 M3 x 10mm BHCS *Servo removal is only needed if you have a 2 speed transmission.
Step 57 X4 150-0062 M3 x 8mm BHCS Step 58 30
How to install the RC4WD Toyota 4Runner Body Set on a Trail Finder 2 Marlin Chassis. *Remove stock bumpers and bumper mounts.
Step 61 Step 62 Notice: Remove these parts Notice: Remove these parts 32
Step 63 Step 64 Notice: Remove these parts Install Z-B0112 and Z-B0205 X4 150-0253 M3x10mm FHCS 33
Step 65 Step 66 X4 150-0064 M3x12mm BHCS 34
Step 67 X4 150-0063 M3 x 10mm BHCS 150-0063 X2 150-0099 M3 x 6mm FHCS 150-0099 150-0063 Step 68 X4 150-0099 M3 x 6mm FHCS 35
Step 69 X4 150-0062 M3 x 8mm BHCS Step 70 36
www.rc4wd.com 720 N. Gateway St. Visalia, CA 93291 Web: www.rc4wd.com - Email: support@rc4wd.