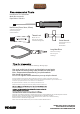
Herramientas recomendadas Outils Recommandés Empfohlenes Zubehör Hex Drivers (1.5mm, 2mm, 2.
Warranty RC4WD non-electrical products are warranted to be free of defects in materials and workmanship when new. Our limited warranty does not cover damages due to normal wear and tear, user error of assembly or installation, user modifications, user's failure to perform routine maintenance, addition of aftermarket parts oroption parts. This warranty lasts 30 days after arrival for original purchaser.
Garantia Los productos no eléctricos RC4WD están garantizados como libres de defectos en materiales y mano de obra cuando son nuevos. Nuestra garantía limitada no cubre los daños debidos al desgaste normal, a errores de montaje o instalación por parte del usuario, a modificaciones del usuario, a la falta de mantenimiento rutinario por parte del usuario, a la adición de piezas de recambio o a piezas opcionales. Esta garantía dura 30 días después de la fecha de entrega para el comprador original.
Garantie Les produits non électriques RC4WD sont garantis comme étant exempts de défauts de matériaux et de fabrication lorsqu'ils sont neufs. La garantie limitée ne couvre pas les dommages dus à l'usure normale, aux erreurs de montage ou d'installation de l'utilisateur, aux modifications apportées par l'utilisateur, au défaut d'entretien courant de l'utilisateur, à l'ajout de pièces de rechange ou de pièces optionnelles. Cette garantie dure 30 jours à compter de la date d'arrivée de l'acheteur initial.
Garantie Verarbeitung. Die Garantie deckt nicht Schäden aufgrund normaler Abnutzung, Benutzerfehler bei der Montage oder Installation, Änderungen durch den Benutzer, unterlassen der routinemäßigen Wartung durch den Benutzer, hinzufügen von Fremdteilen oder Optionsteile.Diese Garantie beträgt 30 Tage nach Kauf und Erhalt der Ware durch den Käufer.
Failure to operate your model in a safe and responsible manner may result in property damage and serious injury. The precautions outlined in this manual should be strictly followed to help ensure safe operation. battery packs without the supervision of a knowledgeable and You alone must see that the instructions are followed and the responsible adult. Dispose of used batteries according to the precautions are adhered to. instructions.
• DO NOT exceed the maximum manufacturer recommended charge Rate. • Keep a Class D fire extinguisher nearby in case of fire. • While charging or discharging, ALWAYS place the battery (all types of batteries) in a fire retardant/fire proof container and on a non-flammable surface such as concrete. • If a battery gets hot to the touch during the charging process (temperature greater than 110°F / 43°C), immediately disconnect the battery from the charger and discontinue charging.
Si no se utiliza el modelo de forma segura y responsable, se pueden producir daños materiales y lesiones graves. Las precauciones descritas en este manual deben ser seguidas estrictamente para ayudar a asegurar una operación segura. Sólo usted debe ver que se sigan las instrucciones y se respeten las precauci.on. RC4WD no recomienda que nadie menor de 14 años use o maneje los paquetes de baterías LiPo sin la supervisión de un adulto responsable. Disponga de las baterías de acuerdo a las instrucciones.
- NO exceda la tasa máxima de carga recomendada por el fabricante. - Mantenga un extintor de incendios de clase D cerca en caso de incendio. - NO deje que los contactos o cables de la batería expuestos se toquen entre sí. Esto causará que la batería se cortocircuite y creará el riesgo de incendio. - NO desmonte, aplaste, haga un cortocircuito o exponga las baterías a la llama o a otra fuente de ignición. Podrían liberarse materiales tóxicos. Si hay contacto con los ojos o la piel, enjuague con agua.
RC4WD recommande à toute personne de moins de 14 ans de ne pas utiliser ou manipuler les batteries LiPo sans la supervision d'un adulte responsable et bien informé. Éliminez les batteries usagées conformément aux instructions. Le non-respect des règles de sécurité et de responsabilité peut entraîner des dommages matériels et des blessures graves. Les précautions décrites dans ce manuel doivent être strictement respectées pour garantir un fonctionnement sûr.
• Ne pas dépasser le taux de charge maximum recommandé par le fabricant. • Gardez un extincteur de classe D à proximité en cas d'incendie. • NE PAS démonter, écraser, court-circuiter ou exposer les batteries à des flammes ou à une autre source d'inflammation. Des matières toxiques pourraient être libérées. En cas de contact avec les yeux ou la peau, rincer à l'eau. • Ne laissez pas les contacts ou les câbles de la batterie exposés se toucher.
Wenn Sie Ihr Modell nicht sicher und verantwortungsbewusst betreiben, kann dies zu Problemen, Schäden und schweren Verletzungen führen. Die in diesem Handbuch beschriebenen Vorsichtsmaßnahmen sollten strikt befolgt werden, um einen sicheren Betrieb zu gewährleisten. Sie sind verantwortlich, dass diese Anweisungen und Vorsichtsmaßnahmen befolgt werden. automatische Abschaltung, wenn diese Mindestentladespannung erreicht wird. Wenn dies eintrifft, schalten Sie das Fahrzeug ab und laden Sie den LiPo neu auf.
CARBON ASSAULT 1/10TH MONSTER TRUCK MANUAL Manual de Electronica para Carbon Assault 1/10 Monster Truck Manuel électronique / Carbon Assault 1/10 Monster Truck Elektronik Bedienungsanleitung This is a step by step overview of your new Carbon Assault 1/10 Monster Truck electrical items and how they connect. Este es una explicación de paso por paso para los artículos de electrónica de su nuevo Carbon Assault 1/10 Monster Truck y cómo se conectan.
3.This shows the ESC to radio’s receiver (Z-R0008) connected to the CH2 port Esto muestra el ESC al receptor de radio (Z-R0008) conectado al puerto CH2 Cela montre le récepteur de l'ESC à la radio (Z-R0008) connecté au port CH2 Anschluß des Fahrtenreglers in den Empfänger (Z-R0008) auf Kanal 2 (CH2) Receiver Motor Electronic Speed Controller Switch 4 .
5.Shows the battery (Z-E0090) connected to the ESC Muestra de la batería (Z-E0090) conectada al ESC Indique la batterie (Z-E0090) connectée à l'ESC Der Fahrakku (Z-E0090) wird mit dem Fahrtenregler verbunden. Battery Receiver Motor Electronic Speed Controller Switch 6.This final step shows all the items as they are connected on the truck Este último paso muestra todos los artículos como están conectados en el camion.
Brushed Electronic Speed Controller SPECIFICATIONS Type Outcry Extreme Speed Controller ESC Model Cont. / Peak Current Motor Type Motor Limit Applications 540/550/590 size motors Z-E0118 80A / 400A for 540 / 550 / 775 size motors 1/10th Crawler - 1/10 buggy or truggy - 1/10 on-road 540/550/590 size motors Motor Limit with 2S LiPo / 6S NiMH: 12T or RPM < 30,000 @7.4V Motor Limit with 3S LiPo / 9S NiMH: 16T or RPM < 20,000 @7.4V BEC Output 6V / 7.
ESC Setup 1. Radio Calibration Begin using your ESC by calibrating with your tramistter. We strongly recommend all users to use the “Fail Safe” function on the radio system and set (F/S) IMPORTANT to “Output OFF” or “Neutral Position” . Example of calibrating Neutral range and Endpoint. Press and hold Press the ON/OFF button Release the set button once the LED flashes. the SET button 1. Turn on the transmitter, ensure all parameters (D/R, Curve, ATL) on the throttle channel are at default (100%).
2. Battery Type: This ESC supports NIMH and Lipo battery types. The correct voltage should be selected using the program card 3. Cutoff Voltage: Sets the voltage at which the ESC lowers or removes power to the motor in order to keep the battery at a safe minimum voltage (for LiPo batteries). The ESC monitors the battery voltage all the time; it will immediately cut off the output when the voltage goes below the cutoff threshold. The RED LED will use a short repeated flash to indicate cutoff is activated.
(2) Program your ESC with a LED Program Card A standard LED program card is included in the product box or sold separately if you do not have one. The interface can be used to quickly program the ESC.
4 Step 1 X2 150-0009 M2 x 16mm SHCS 175-0008 M4 Black Lock Nut Install all 4 wheels and the hubs caps. Step 2 Battery can be installed in the front or rear location. You will have to relocate the RX and ESC. Battery 20 RC4WD Carbon Assault 1/10th Monster Truck w/ Manticore Lexan Body Set FOR MORE INFO VISIT WWW.RC4WD.
Step 3 Put the body posts in the sixth hole. You can adjust to your preference. Step 4 21 RC4WD Carbon Assault 1/10th Monster Truck w/ Manticore Lexan Body Set FOR MORE INFO VISIT WWW.RC4WD.
Step 5 Inward Shock Location The sway bars and shocks can be located inward or outward on the chassis. Outward Shock Location Outward Shock Location Step 6 Demonstrates the two locations for the suspension setup Inward Shock Location 22 RC4WD Carbon Assault 1/10th Monster Truck w/ Manticore Lexan Body Set FOR MORE INFO VISIT WWW.RC4WD.
SPARE PARTS Z-S2006 Carbon Monster Truck Chassis Z-S2027 Steering Links for Carbon Assault Monster Truck Z-B0224 Monster Truck Body Z-A0137 RC4WD Plastic D44 Wide Rear Axle Parts Z-G0069 Heavy Duty Bevel Gear Set 38T/13T Z-S0990 D44 Wide Straight Rear Axle Shafts (Wraith Width) Z-S0620 4mm Lock Nuts Z-S0686 5 x 10 x 4mm Bearings Z-S0683 5 x 11 x 4mm Bearings Z-S0837 10 x 15 x 4mm Bearings Z-S0238 12mm Hex Z-A0136 RC4WD Plastic D44 Wide Front Axle Parts Z-S1020 XVD Shafts for D44 Wide Front Axle (Wraith Widt
OPTIONAL PARTS Z-T0018 B&H 2.
European Union Declarations of Conformity (This page contains a list of PDF documents. To view these files, download the following free software. Get Adobe® Reader®) RC4WD hereby declares, that the product Z-RTR0041 "RC4WD Carbon Assault 1/10th Monster Truck w/ Manticore Lexan Body Set” complies with the Directive 2014/53/EU when used for its intended purpose. The full-length version of the DoC can be found here: https://rc4wd.
www.rc4wd.com 720 N. Gateway St, Visalia, CA 93291 www.RC4WD.com support@rc4wd.