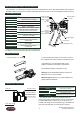
OWNER’s MANUAL
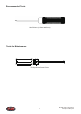
Recommended Tools Hex Drivers (1.
Warranty RC4WD non-electrical products are warranted to be free of defects in materials and workmanship when new. Our limited warranty does not cover damages due to normal wear and tear, user error of assembly or installation, user modifications, user's failure to perform routine maintenance, addition of aftermarket parts oroption parts. This warranty lasts 30 days after arrival for original purchaser.
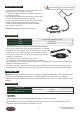
BATTERY CHARGING Do not leave battery and charger unattended 1. Only charge batteries that are cool to the touch and are not damaged (swollen, bent, broken or punctured). 2. Connect the charger to USB 2.0 compatible charging block (ie. cell phone charger) 3. Plug the battery's balance port (white plug) into the charger's connector. The LED will be red when it is charging. 4. The charger will have a bright red LED when charging. When charging is complete the LED light will dim and turn off. 5.
Failure to follow instructions associated with this symbol risks injury or even death! Avoid battery liquid contact with skin and clothing. If contact occurs, remove contaminated clothing and wash skin thoroughly with water. Before Use: Read and understand the battery and charger operating instructions before recharging. NEVER place a battery into water. ONLY use genuine charger unit for recharging brand LiPo batteries.
XR2 Ultimate Micro Radio and ESC/Receiver The following is an overview of the various functions and adjustments found on XR2 Ultimate Micro radio system for RC4WD models. It is important to read and understand about all of these functions and adjustments before driving. 1. Transmitter Functions Description Specifications Steering Wheel Controls direction (Left / Right) 2.4 Antenna Transmits signal to the model Throttle Trigger Controls speed (Forward / Brake / Backward) TH.
XR2 Ultimate Micro ESC/Receiver 1. ESC/Receiver Features Type 2.4GHz RX with Crawler ESC Servo Port Standard 3 Pin Servo Port BEC For Servo Battery 5V,1A 7.2V NiMH or 2S LiPo, JST connector (Use setup key to select battery type) 2. ESC/Receiver Status TX Off Normal Operation: LiPo Mode Normal Operation: NiMH Mode Remark LED LED Off: If after 4 sec with no TX detected, it will flash 2 times repeatedly to indicate loss of signal.
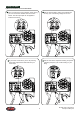
2. Pairing to Radio 1 Power off the Radio 2 Press and hold the program button of the RX/ESC and turn on RX/ESC, the LED will flash slowly. Program Button 3 Hold the Radio's bind button, and proceed to power the Radio on. The Radio's LED will flash when binding starts. 4 When the RX LED is solid on, this means that the RX has successfully paired to the Radio. If the Radio LED stops flashing, the RX is not bound. Move closer and start over from Step 1.
3. Setup Your Radio a) Reverse Switches, Trim and ATV Knob 1 If the truck turns the wrong direction when driving, you can reverse the direction with the reverse switch. The same principle can be applied to forward and reverse. 2 Use the steering dial to make minor adjustment to keep your truck driving straight on it's own. 3 If your truck moves when you're not pressing the throttle, adjust the throttle dial until your truck stops. 4 Use the ATV dial to adjust the steering end points.
b) Programming the End-points To set the Right End-point of Steering 1 Turn on Radio and RX. 2 Turn and hold the steering wheel to its right-most position, and hold the set up key on the RX for 10+ seconds until LED flashes. 3 Move the steering wheel until the front wheel is at the right-most position. Then hold the steering wheel at this position and press the setup key to save this End-point. 4 The LED will blink 4 times and then return the Radio back to normal operation.
To set the Left End-point of Steering Throttle End-points Programming 1 Similar to setting the Right End-point. The only difference is the steering wheel should be held at it's left-most position. Proceed to hold the setup key for 10+ seconds. 1 Similar to steering end-point programming, hold the throttle at forward-most position to set forward end-point, (Reverse-most position to set reverse end-point) hold the setup key for 10+ seconds. 4.
Introduction This is an advanced hobby grade product. It must be operated with caution and common sense. Basic mechanical aptitude is required to operate this model: Failure to operate this product in a safe and responsible manner could result in injury, damage the product or other properties. This product is not intended for use by children without direct adult supervision. The product manual contains instructions for safe operation and maintenance.
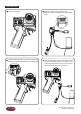
1/24 Trail Finder 2 RTR Truck Electronic Manual This is a step-by-step overview of your new truck's electrical items and how they connect. 2.Connect the motor into the XR2 Ultimate Micro ESC. 3. Connect the Servo to the the XR2 Ultimate Micro ESC. Note the metal terminals for the servo plug need to be facing up.
4. Install batteries into the radio. Phillips Screw (M3 x 10) 5. Lastly, connect the battery to the XR2 Ultimate Micro ESC.
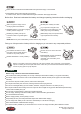
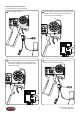
Time to get your new truck setup and running Step 1. Read the Instructions Step 2. Installing the Batteries Remove the battery cover and install 4 new RC4WD AA batteries in the transmitter. Replace the battery cover. Phillips Screw (M3 x 10) Remove the battery and charger and read through the charging instructions as the battery will need to be charged before you can use your new truck. Warning: LED will flash when the battery is low. Replace immediately. Step 3.
Step 4. Install the Battery Step 5. Plug in Battery Install your new RC4WD 7.4V 320mAh LiPo battery using the included elastic band. Step 6. Turn On the Transmitter Step 7.
Step 9. Reinstall the Body Step 8. Transmitter Adjustments Get familiar with the steering and throttle. Steering Wheel Throttle Trigger Go create an adventure and share it with us. Make sure to use @rc4wd on Facebook and hashtag #rc4wd on Instagram.
Decal Instructions 17 RC4WD 1/24 Trail Finder 2 w/ Mojave II Body set
Replacement Parts Z-A0141 Z-A0142 Z-B0243 Z-E0098 Z-E0120 Z-E0121 Z-S2043 Z-S2044 Z-S2045 Z-S2046 Z-S2070 Z-T0198 Z-U0041 Z-W0329 RC4WD 1/24 D44 Plastic Complete Front Axle RC4WD 1/24 D44 Plastic Complete Rear Axle RC4WD 1/24 Mojave II Body Set XR2 Ultimate Micro Radio and ESC/Receiver Twister 5g Micro Servo Micro Motor for R6 1/24 Mini Transmission 1/24 Trail Finder 2 Chassis Suspension Link Set for 1/24 Trail Finder 2 Ultra Punisher Shafts for 1/24 Trail Finder 2 Spring Damper for 1/24 Trail Finder 2 Mai
European Union Declarations of Conformity (This page contains a list of PDF documents. To view these files, download the following free software. Get Adobe®Reader®) RC4WD hereby declares, that the products Z-RTR0051 "RC4WD 1/24 Trail Finder 2 w/ Mojave Body Set (Yellow)," Z-RTR0052 "RC4WD 1/24 Trail Finder 2 w/ Mojave Body Set (Blue)," and Z-RTR0053 "RC4WD 1/24 Trail Finder 2 w/ Mojave Body Set (Red)" complies with the Directive 2014/53/EU when used for its intended purpose.
www.rc4wd.com 720 N. Gateway St. Visalia, CA 93291 Web: www.rc4wd.com - Email: support@rc4wd.