INSTRUCTION MANUAL Before using the TV, please read this manual thoroughly, and retain it for future reference. cus Model: RNSMU8615 LISTED, “This products manufactured and sold by Curtis International Ltd ad RCA, tha RCA logo, the two dogs (Nipper and Chipper) logo, are regulated trademarks or trademarks of RCA ‘Trademark Management and are used under license by Curtis International Lid.
English CONTENTS 4 Typeset 1 PRECAUTION IMPORTANT 2 SAFETY 2 CONSTRUCTIONS 3 ACCESSORIES 3 4 Bertie 3 STARTED Remote Control 4 CONTROL Front View 5 & REFERENCE Bottom View 5 SpE Back View & 8 WALL MOUNT 7 INSTALLATION installation 8 Antennae Inaction 8 AV Connection 8 Ypres Connection 10 CONNECTIONS HDMI Connection 10 Power Cord Connection 11 Optical audio cutout Conn action 12 Putting The Unit On A Proper Place 13 8 Peristalses Turning The Unit On For The First Tums 13 Source Selection 13 Pictures Menu 14
CONTENTS Use ena PLAYER SMART TV ITERATION pis Play ) MODE Video Formats SPECIFICATION TROUBLE SHOOTING TV Symptom BIDE WARRANTY CARD The pictures, functions and other information provided in the manual are for reference only. If it does not match the actual object, please refer to the actual product.
SAFETY PRECAUTION # CAUTION MARKING WAS LOCATED AT THE REAR OF THE APPARATUS, CAUTION RISK OF ELECTRIC SHOCK DO ROT OP 0) HOT EXPOSE THIS UNIT TO RAM OR MOISTURE AVIS RISQUE DE CHOW ELECTRIC —HE PAS OVARIAN WARNING: TO REDUCE THE RISK OF ELECTRIC SHOCK, DO NOT REMOVE COVER (OR BACK) NO TUBER SERVICEABLE PARTS INSIDE. REFER SERVICING TO QUALIFIED SERVICE PERSONNEL.
IMPORTANT SAFETY INSTRUCTIONS 1)Reed these incrustations. 2)anp these instructions. joe ail whamming. folio aif instructions. 5)D0 not uss this apparatus near water, cloaca only with a dry cloth. 71D nat block any ventilation openings. glazing in accordance with the manufacturer's instructions. 8)Da nat Install reds any heat sources suet as radiators, heat registers, stoves, or otter apparatus (including amplifiers) that produce hast. )iJo not defeats safety purposes of ths polarized or grounding-type plug.
ACCESSORIES Please chest and identify the supplied accessories. He mots cilantro . Battery) institution Manual Min AV In Cable. Mini Ypres in Cable. Bass stand .. Base stand screws GETTING STARTED USING THE REMOTE CONTROL Point the remote control at tha remote sensor lactated on the unit, “When thees is a strong ambulant light source, the performance of the infrared remote sensor ‘may bs degraded, causing unreliable separation.
CONTROL REFERENCE GUIDE REMOTE CONTROL POWER((): Tuna the TV on or off. Mutilate: Mute or restore the sound Number bunions: Chinos the Chan! directly Decimal Paint; Input the decimal point, Return(Back): Re tum to the previously-views chains! MENU: Access the man menu SOURCE: Salsa he Input sours mode. Navigation buttons: » /A/ ¥) Navigate the menu OK: Confirm the selection HOME{ £3): Enter the home page. EXIT: Exit the current screen. NETFLIX: Access the Netflix Interface.
NONINTERFERENCE GUIDE FRONT VIEW About remote control working distance and angle, see next page. Powerlessness Loincloth: Blue and red dual-color LED. It shows red when the TV is turned off and blue when fumed on. Remote Control Sensor: Remote control IF sensor, which receives infrared ray sent by remote control. NOTE: therapist Is a proactive fim around the sacristan, Moves the predicative fim bears using the TV. Standpoint Indicator Remote Control Sensor BOTTOM VIEW GHa: Scans down though the channel lst.
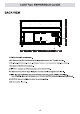
CONTROL REFERENCE GUIDE BACK VIEW OPTICAL: Digital TV sound output. USB: Conn act the USB device such as the flash di: to access the TV media function HDMI: (High-Definition Multimedia Interface) Provides an uncompressed digital connection VGA: Connect the PC to these Jacks MINI Y Ppr: Connect the Ypres output jack of the DVD or VCR. RF: Connect receive tha signal from your antenna or cable through a coaxial cable. MINI AV: Connect an AV device that has composite video Jacks,such as a VCR or DVD Player.
WALL MOUNT INSTALLATION INSTALLING / REMOVING THE BASE STAND WARNING : The LED Display i# very fragile. and must be protected stall times when removing the base tend 8 sure that no hard or sharp abject or anything that souls orator or damage the LED display comes nits contact with it Do NOT extort pressure an tha grant of tha unit at any Lima because tha screen could crack 1.
Installation Your TV is packaged with the stand and the cabinet separated. Before using the TV, install the stand as described below, or if you want to mount it to a wall, see page 7 for mounting advice; the wall mount itself is not supplied. IMPORTANT! + Make sure the TV set is unplugged from the power supply before installing or removing the stand. + The TV panel may be awkward to install on your own. We recommend you ask someone to help with installation and/or removal of the stand.
CONNECTIONS CONNECTING ATTY ANTENNA / CABLE / SATELLITE Te vise television channels correctly, 8 signal must be received from one of the following sources: ~An indoor or outdoor serial antenna «A cable system -Satellite system WROTE Far receiving over-the-air TV broadcasts, we recommend they you use an externals! fixed antenna. Should you require the use of a temporary antenna, please ensure that you purchase an antenna with sufficient ability to receive In weak signal arches.
CONNECTIONS CONNECTING A PC Connections 15-pin D-SUB PC/VGA connector from your computer the 15-pin D-SUB PC/VGA Input on this unit using a monitor cable and an audio cable {not Included) as shown. Marks sure yau connect the cable from the computer (VGA and AUDIO PC OUT }toothily (VGA and AUDI -PIN ). CONNECTING THE POWER CORD CONNECTING HEADPHONES «Tum down the volume before connecting headphones to the unit, then adjust the volume to your desired level.
CONNECTIONS Connection to a Home Theater Audio System For BEST audio performance . Connecting to a Home Theater System How To Setup Digital Audio Output Dolby Dig h i Press the MENU button on the remote control y Digital can deliver optimal 2 ch: / foe Press the right »arrow button to select sound stereo or surround sound with five di: Lo full range channels plus a sixth channel for ~~ Fro the down ¥ arrow button to highlight a sub woofer. Digital Audio Output » Audio, PCM.
INITIAL SETUP PUTTING THE UNIT ON PROPER PLACE ‘When you turn on your television set for the first time, be sure to place it on a solid stable surface. To avoid danger, do not expose the TV to water, or a heat source {e.g.lamp, candle, radiator). Do not obstruct the ventilation grid at the rear and be sure to leave sufficient gaps around the unit. TURNING THE UNIT ON FOR THE FIRST TIME After you have Initially connected your TV antenna or cable, turn the television ON.
SETUP Picture Menu Press MENU button to display the main menu. Press «/ > button to select PICTURE in the main menu, it will highlight the first option. [010 Picture Mode Sound Lois Function EGE] i) [el Sharpness hi Option Lock Back light Channel Le TT Ty LTE Picture Mode: Choose among Sports, Normal, Mild, Save and User. The following five tams (Contrast, Brightness, Color, Sharpness and Tint) can be adjust only when the picture mode is set to “User” mode.
SETUP Sound Menu Press MENU button to display the main menu. Press «/ I button to select SOUND in the main menu, it will highlight the first option. Sound Mode Balance Fa" Surround Sound Video Description Option Digital Audio output Audio Languages Channel Li Sound Mode: Choose among Standard, Music, Movie, Sports and User. Tha value of 120Hz, 500Hz, 1.5KHz, kHz or kHz can be adjusted only when the sound mode is set to "User"mode. Balance: Control the sound balance between the right and left speaker.