2-9398 Caller ID Telephone User’s Guide We bring good things to life.
FCC REGISTRATION INFORMATION Your GE telephone equipment is registered with the Federal Communications Commission and is in compliance with parts 15 and 68, FCC Rules and Regulations. 1 Notification to the Local Telephone Company On the bottom of this equipment is a label indicating, among other information, the FCC Registration number and Ringer Equivalence Number (REN) for the equipment. You must, upon request, provide this information to your telephone company.
INTRODUCTION Your GE Caller ID Telephone is designed to give you flexibility in use and high quality performance. To get the most from your new Caller ID Telephone, we suggest that you take a few minutes right now to read through this instruction manual. TABLE OF CONTENTS INTRODUCTION ................................... 1 GETTING STARTED .............................. 2 BEFORE YOU BEGIN ........................ 2 POWERING THE CALLER ID TELEPHONE .................................
GETTING STARTED This section shows you how to install and setup your Caller ID Telephone. It’s important that you follow the instructions in this section in order to get your new phone correctly installed and set up.
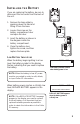
INSTALLING THE BATTERY THIS END UP FOR DESK USE THIS END UP FOR WALL USE If you are replacing the battery, be sure to disconnect the line cords from the back of the unit. 1. Remove the base plate by pressing down the tabs and lifting it from the base. 2. Loosen the screw on the battery compartment door and open the door. 3. Insert the battery as shown in the diagram inside the battery compartment. BATTERY 4. Close the battery door, tighten the screw, and then replace the base plate.
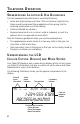
TELEPHONE INSTALLATION DESK OR TABLETOP INSTALLATION NOTE: Be sure to read the preceding pages for information about using the 9-volt battery backup before you begin the telephone installation. 4 2 3 1 1. Plug the handset cord into the handset and into the telephone jack on the left side of the unit. 2. Set the PULSE/TONE switch (located on the side of the unit) to TONE if you have touch-tone service; set it to PULSE if you have rotary service. 3.
WALL MOUNT INSTALLATION 1. Rotate the handset hook. 1 9 2 10 3 11 4 12 5 13 6 14 7 15 LOWER 8 16 2. Remove the base plate from the back by pressing down on the snap tabs located at the top, and then lifting the base plate off. THIS END UP FOR DESK USE THIS END UP FOR WALL USE 3. Plug the phone line cord into the phone jack on the back of the unit, wrap the extra line cord around the cord wrap on the bottom of the base, and then thread it through the bottom of the base plate. 4.
SETUP The telephone will prompt the initial setup after the 9V battery or AC power supply is connected. The initial setup procedure needs to be completed with the phone ”on-hook“, which means that the phone line is inactive (the handset in the cradle and the SPEAKER function off). Do not pick up the handset or press the SPEAKER button during the setup.
STEP 3: SETTING THE RINGER TONE SET RINGER TONE STORE 10/22 STORE 10/22 → RINGER=1 07:15 AM ➔ 07:15 AM RINGER=2 1. Press the STORE button. STORE 10/22 2. Enter your area code. ___ SET AREA CODE → → 3. Press STORE within 15 seconds to save the desired ringer tone and go to the next step. 07:15 AM ➔ 2. Press REVIEW (up) or REVIEW (down) to sample each of the available settings. → 1. Press the STORE button.
TELEPHONE OPERATION SPEAKERPHONE LOCATION & USE GUIDELINES For best speakerphone performance, avoid the following: • Areas with high background noise. (The microphone might pick up these sounds and prevent the speakerphone from going into the receiving mode when you finish talking.) • Surfaces affected by vibration. • Recessed areas such as in a corner, under a cupboard, or next to a cabinet, which can generate an echo effect.
THE DISPLAY The LCD also gives you visual feedback as you use the phone. The preceding illustration shows you the various elements of the display. In order to help you to better understand the role of the display, this User’s Guide also shows you some of the specific screens you will encounter as you use your phone. USING THE MENU BUTTON You already may have used the menu system to set up the phone. If not, you should go back to the preceding section and set up the phone.
ADJUSTING VOLUMES Use the VOLUME and buttons to adjust the volume of the ringer, the speaker, and the handset. You can fast forward or rewind through volume level choices by pressing and holding the VOLUME or button. To return to the normal volume settings, press both volume arrows at the same time. ADJUSTING THE RINGER VOLUME 1. With the phone on-hook, press VOLUME or button to adjust volume. During the adjusting, the phone will provide a sample of the programmed ringer tones and the volume level.
BUSY REDIAL When you call and get a busy signal, press the BUSY/REDIAL button and then replace the handset to hang up. (If you're using the speakerphone, the unit will automatically hang up.) The phone automatically redials the number (up to 10 times). When it autodials and does not get a busy signal, the phone beeps to let you know that your call has gone through. Then, you can pick up the handset or continue to use the speaker mode.
HOLD NOTE: While a call is on hold, the HOLD Use the HOLD button to interrupt a phone indicator will flash, and conversation without hanging up; then the phone will beep resume the conversation on the same about every 15 seconds phone or an extension. to remind you that the 1. Press HOLD to place a call on hold. If line is on hold. you're using the handset, you can put it back in the cradle. 2.
TEMPORARY TONE If you have Pulse (rotary) service, and want to access customer calling services that require Tone dialing (such as getting information from a local bank), you can use this feature. 1. Press the TONE button ( * ) after you have connected to the customer calling service to enable Tone dialing. 2. When you hang up, the phone automatically resumes Pulse dialing.
USING THE ALARM This phone has a built-in alarm feature that you can use as an alarm clock. SETTING THE ALARM 1. Press the ALARM button. _ _:_ _ ENT ALARM HOUR ➔ 2. Press the STORE button. STORE 3. Use the number keys to enter the alarm set hour (it must be a 2-digit entry). 5. Press 1 for AM or 2 for PM. ➔ 4. Use the number keys to enter the alarm set minutes (it must be a 2-digit entry). 11:_ _ ENT ALARM MIN STORE 11:30 ENTER AM=1 PM=2 ➔ 6. Press the STORE button to set the alarm.
MEMORY DIALING Each of the 10 memory buttons is capable of storing two separate phone numbers that are up to 31 digits. Each MEMORY button accesses an upper and a lower memory position. You can dial the phone numbers stored in the upper position with one touch (press the MEMORY location button). You can dial the phone numbers in the lower memory position by pressing two buttons (SHIFT and the MEMORY location button).
STORING THE LAST NUMBER DIALED 1. Press the STORE button. 2. Press BUSY/REDIAL. 3. Press the STORE button again. 4. Press a MEMORY location button, or press SHIFT and then a MEMORY location button to store the number. STORING A CALLER ID NUMBER STORE 10/22 07:15 AM 555-6789 JANE DOE 1. Press the STORE button. 2. Use the REVIEW or button to select a Caller ID record. 3. Press the STORE button again. 4. Press a MEMORY location button, or press SHIFT and then a MEMORY location button to store the number.
REMOVING IMPORTANT CALL STATUS 1. Press the MEMORY location button, or SHIFT and the memory location button to bring up the entry. 2. Press the # button to remove the important call status from the memory location. 10/22 07:15 AM 555-6789 IMPORTANT CALL 10/22 07:15 AM 555-6789 IMPORTANT CALL is removed from the display. 3. Press the MEMORY location button, or SHIFT and the MEMORY location button to confirm the change.
CHANGING A STORED NUMBER To change a stored number, you just replace it with a different number using the procedure for storing a number. DIALING A STORED NUMBER METHOD 1 1. Pick up the handset or press SPEAKER. 2. Press the MEMORY location button or Press SHIFT and then the MEMORY location button. METHOD 2 CAUTION: If you make test calls to emergency numbers, remain on the line and explain the reason for the call to the dispatcher.
LINK DIALING Having stored the necessary numbers in separate memory locations, follow these steps to store a link dial number: 1. Press STORE. 2. Press the access code’s MEMORY location button. 3. Press PAUSE (if needed). 4. Dial the phone number (or press the number’s MEMORY location button). 5. Press PAUSE (if needed). 6. Press the security/personal code’s MEMORY location button. 7. Press STORE, followed by the MEMORY location in which you want to store the linked number.
REVIEWING MESSAGES As calls are received and stored, the display is updated to let you know how many calls have been received and how many have been reviewed. Use the REVIEW buttons to scroll through the list of received calls. • Press REVIEW to scroll toward more recent calls (higher numbers). • Press REVIEW to scroll toward older calls (lower numbers).
DELETING RECORDS Use the DELETE button to delete the record currently shown in the display, or all records. DELETING THE CURRENT RECORD 1. Press DELETE. The selected record is immediately deleted. DELETING ALL R ECORDS 1. Press and hold DELETE (for approximately 3 seconds). The display asks you to confirm that you want to delete all records. #3 10/22 07:15 AM 555-6789 ALL DELETE ? Display asks you to confirm that you want to delete all messages. 2. Press DELETE again to delete all records.
CALLING OUTSIDE YOUR AREA CODE The unit automatically displays “1” plus the area code of the caller when it is different than the area code you entered during setup. To call someone from a different area code, press the DIAL button. # 3 NEW 10/22 07:15 AM 1-234-555-6789 JANE DOE 1+Area Code+Number is displayed when a call is received from an area code that is different from the one entered during setup.
MESSAGE INDICATORS The following indicators show the status of a message or the unit: BLOCKED CALL Caller ID information is withheld. BLOCKED NAME BLOCKED NUMBER END OF LIST In REVIEW mode indicates that there is no additional information in caller ID memory. DATA ERROR Caller information has been interrupted during transmission or the telephone is excessively noisy. MESSAGE WAITING There is a voice-mail message waiting in your mailbox.
TROUBLESHOOTING TIPS CALLER ID Problem Solution No Display • If you are using battery power, try replacing the battery. • If you are using AC power, make sure that the unit is connected to a non-switched electrical outlet. Disconnect the unit from the plug and plug it in again. Either the message WAITING or the most recent record is displayed. • Did you order Caller ID service from your local telephone company? This unit requires that you subscribe to Caller ID service in order to work.
TROUBLESHOOTING TIPS TELEPHONE Problem Solution No dial tone. Won't dial out • Check hook switch to make sure it pops up. • Make sure TONE/PULSE is set to correct position. • Unplug the phone, wait 30 seconds and plug the phone back in. Phone doesn’t ring • Check RINGER VOLUME. • Could have too many phones on one line. Low handset volume • Check the volume settings. Light and tone feedback flutter when dialing in PULSE mode. • This is normal as power is fluctuating with phone outpulsing.
GENERAL PRODUCT CARE To keep your Caller ID phone working and looking good, follow these guidelines: • Avoid putting it near heating appliances and devices that generate electrical noise (for example, motors or fluorescent lamps). • DO NOT expose to direct sunlight or moisture. • Avoid dropping the unit and/or other rough treatment. • Clean with a soft cloth. • Never use a strong cleaning agent or abrasive powder because this will damage the finish.
INDEX B Base plate, removing 3 Battery installation 3 BUSY REDIAL button 11 Busy Redial feature 11 C Caller ID operation 19 Chain Dialing feature 18 Cleaning the phone 26 MUTE button 12 used with Do Not Disturb feature 12 Mute feature 12 P PAUSE Button 15 Product Care 26 R Do Not Disturb feature 12 REDIAL button 10 Redial feature 10 REPLACE BATTERY message 3 Replacing the battery 3 F S FLASH button 13 SPEAKER button 9 Speakerphone 8 Stored numbers, changing 18 Stored numbers, clearing 18 Stored nu
LIMITED WARRANTY What your warranty covers: • Any defect in materials or workmanship. For how long after your purchase: • One year. (The warranty period for rental units begins with the first rental or 45 days from date of shipment to the rental firm, whichever comes first.) What we will do: • Provide you with a new, or at our option, a refurbished unit. • The exchange unit is under warranty for the remainder of the original product’s warranty period.