2-9925 900MHz Two-Line Cordless Telephone User’s Guide We bring good things to life.
FCC REGISTRATION INFORMATION Your GE telephone equipment is registered with the Federal Communications Commission and is in compliance with parts 15 and 68, FCC Rules and Regulations. 1 Notification to the Local Telephone Company On the bottom of this equipment is a label indicating, among other information, the FCC Registration number and Ringer Equivalence Number (REN) for the equipment. You must, upon request, provide this information to your telephone company.
INTRODUCTION Your GE 900 MHz Cordless Telephone is designed to give you flexibility in use and high quality performance. To get the most from your new cordless telephone, we suggest that you take a few minutes right now to read through this instruction manual. TABLE OF CONTENTS GETTING STARTED ................................ 2 BEFORE YOU BEGIN .......................... 2 MODULAR JACK REQUIREMENTS ...... 2 INSTALLATION OPTIONS ...................... 3 DESKTOP INSTALLATION ......................
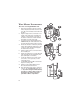
GETTING STARTED Make sure your package includes the items shown here.
INSTALLATION OPTIONS Although you can use your GE 2-line cordless telephone with a single phone line, you must have two lines (separate phone numbers) to use a two-line system. The following diagrams show two possible systems: Two Lines on Single Modular Jack One type of two-line phone system uses a single RJ14 modular jack which contains both phone lines. Connect the phone cord to the L1 or L2 jack. You must use a 4-conductor telephone line cord like the ones that are packed with your unit.
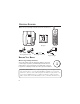
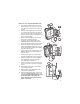
DESKTOP INSTALLATION 6 7 3 5 1 2 T/P switch Two Lines on a Single Modular Jack 1. Attach the base plate. 2. Set the T/P switch to T for touch-tone service, or P for pulse (rotary) service. If you don’t know which type of service you have, check with the phone company. 3. Raise the base antenna. 4. Set the RING switch to ON so the handset rings for incoming calls. 5. Plug the telephone line cord into the L1 or L2 jack located on the back of the phone and into a dual line modular jack. 6.
6 7 3 5 1 2 T/P switch Each Line on a Separate Modular Jack 1. Attach the base plate. 2. Set the T/P switch to T for touch-tone service, or P for pulse (rotary) service. If you don’t know which type of service you have, check with the phone company. 3. Raise the base antenna. 4. Set the RING switch to ON so the handset rings for incoming calls. 5. Plug one of the telephone line cords into the L2 jack and into a single line modular jack.
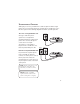
WALL MOUNT INSTALLATION 1 2 Two Lines on a Single Modular Jack 1. Remove the handset hook; turn it upside down, and put it back in the slot. You need to do this so the handset doesn’t fall out of the base. 2. Plug the telephone line cord into the L1 or L2 jack on the back of the unit. Wrap the extra line cord around the cord wrap on the bottom of the base and then thread it through the top of the base plate. 3. Connect the power supply adapter to the POWER 9V DC jack on the back of the unit.
Each Line on a Separate Modular Jack 1. 2. 3. 4. 5. 6. 7. 1 Remove the handset hook; turn it upside down, and put it back in the slot. You need to do this so the handset doesn’t fall out of the base. Plug one of the telephone line cords into the L1 or L2 jack on the back of the unit, wrap the extra line cord around the cord wrap on the bottom of the base, and then thread it through the top of the base plate. Plug the remaining telephone line cord into the L2 jack on the back of the unit.
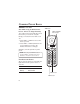
CORDLESS PHONE BASICS MAKING A CALL After initial set up, put handset in the base for 12 hours to charge the battery. TALK button LINE 1 and LINE 2 indicator lights The cordless phone automatically selects the last line you used. The only two things you need to know to make a call are: 1. Press LINE 1 or LINE 2 to select a line before you dial. 2. Press LINE 1 or LINE 2 (whichever line you are talking on) or place the handset in the base to hang up. TALK Otherwise, it works just like any other phone.
DUAL RINGER TONES Your cordless telephone has separate and distinct ringer sounds for LINE 1 and LINE 2. This will allow you to determine the line of an incoming call, even in another room. If you are talking on one line and someone calls on the other line, the phone alerts you by sending a signal to the handset’s earpiece. TALK button REDIAL(RE/PA) Press the TALK button, then press the RE/ PA (redial/pause) button to redial the last number you called (up to 32 digits).
VOL (VOLUME) SWITCH Controls the volume of the handset's earpiece. VOL switch (on the side of the handset) RING/PWR ( RINGER AND POWER) SWITCH This is a 3-position switch that controls the ringer and handset power. When you move the switch to the left, the power is on and the ringer is on. When you move the switch to the middle position, the power is on, but the ringer is off. When you move the switch to the far right, the power is off and the ringer is off which saves battery power.
MUTE BUTTON Use the MUTE button to interrupt a phone conversation to talk privately with someone else in the room. 1. Press MUTE to activate mute feature. 2. Press MUTE again to turn it off. TEMPORARY TONE This feature enables pulse (rotary) service phone users to access touch-tone services offered by banks, credit card companies, etc., by pressing the TONE button to temporarily make the phone touch-tone compatible. To get information about your bank account, for example, you would: TALK LINE 1 3.
HOLD button HOLD BUTTON You can use the HOLD button to interrupt a phone conversation without hanging up. 1. Press HOLD to place the party on hold. 2. Press HOLD again to resume the conversation. CONFERENCE BUTTON You can use the conference call feature when you have callers on both lines and want to have a three-way conversation. TALK LINE 1 1. Press HOLD to place the party on hold. LINE 1 LINE 2 CHAN HOLD LINE 2 1 ABC 2 DEF 3 GHI 4 JKL 5 MNO 6 PQRS 7 8 WXYZ 9 2.
ADVANCED FEATURES CHANNEL BUTTON (CHAN) CHAN button If you ever experience any interference or don’t have clear voice quality, press the CHAN button on the handset to advance to another channel. THE MEMORY FEATURE Store up to 10 numbers in memory for quick dialing. STORING A NUMBER IN MEMORY The phone must be off (PWR button on, but no dial tone) when you store numbers. 1. Press the MEM button 2. Dial the number (up to 24 digits). 3. Press MEM. 4.
CHANGING A STORED NUMBER Use the same procedure to change a stored number as you do to store a number— you’re just moving the phone number to a different memory location. STORING A REDIAL NUMBER 1. Press MEM. 2. Press RE/PA (redial/pause). 3. Press MEM. 4. Press any number key (0-9) to store the phone number in that memory location.
DIALING A STORED NUMBER 1. Press the TALK button to get a dial tone. 2. Press MEM and then press the number for that memory location. CHAIN DIALING FROM MEMORY Use this feature to make calls which require a sequence of numbers, for instance if you use a calling card for a frequently called long distance number. Basically, you dial each part of the sequence from memory.
CONNECTING A HEADSET TO THE HANDSET For hands free conversation, a headset (not included) can be connected to the HEADSET jack as shown. The handset receiver and microphone are disabled when the headset is connected. Headset plug (2.5mm) • Press the TALK button or the LINE 1 or LINE 2 button to answer or place a call before using the headset. Refer to the headset manual for more details. Headset jack HEADSET NOTE: The HEADSET jack is compatible with 2.5 mm headset plugs only.
CONNECTING THE BELT CLIP There are two slots, one on each side of the handset. • Attach the belt clip (not included) by inserting the sides of the belt clip into the slots. Snap the ends of the belt clip into place.
CHANGING THE BATTERY Make sure phone is OFF before you replace battery. 1. Remove the battery compartment door. 2. Disconnect the cord attached to the battery pack and remove the battery pack from the handset. 3. Insert the new battery pack and connect the cord into the jack inside the handset. 4. Put the battery compartment door back on. 5.
TROUBLESHOOTING GUIDE In case of difficulty, please check the following Troubleshooting Guide before seeking service.
TROUBLESHOOTING GUIDE (CONTINUED) Problem Solution Cannot hear the Page alert tone • Set the RING/PWR switch on the handset to ON (the far left position). Range is shorter than normal • Press the CHAN button during the conversation to select a new channel. • Position the base antenna upward. Battery will not hold a charge OR is fully charged and the BAT LOW lights • Be sure you are sufficiently charging the battery.
GENERAL PRODUCT CARE To keep your telephone working and looking good, follow these guidelines: • Avoid putting the phone near heating appliances and devices that generate electrical noise (for example, motors or fluorescent lamps). • DO NOT expose to direct sunlight or moisture. • Avoid dropping the handset, as well as other rough treatment to the phone. • Clean the phone with a soft cloth. • Never use a strong cleaning agent or abrasive powder because this will damage the finish.
SERVICE The FCC requires this product to be serviced only by the manufacturer or its authorized service agents. In accordance with FCC requirements, changes or modifications not expressly approved by Thomson Consumer Electronics could void the user’s authority to operate this product. For instructions on how to obtain service, refer to the warranty included in this guide or call customer service at 1-800-448-0329.
23 $14.95 $9.95 $4.75 $26.35 5-2358 5-2420A or B 5-2426 TOTAL City ________________________State________ ZIP_________________ Address_____________________________________ Apt.____________ Name________________________________________________________ To: This is your return label. Please print clearly. Ronks, PA 17573-8419 P.O. Box 8419 Mail Order Department Consumer Electronics Mail order form and money order or check (in U.S. currency) made payable to Thomson Consumer Electronics, Inc.
24 Should you wish to purchase, insist on the GE brand for all your communicating needs. All are carefully engineered to offer you high quality and dependability, modern easy-to-use features, and elegant styling at an affordable price. Just stop by your nearest retailer and ask to see the wide range of GE telephone products. To fulfill your communicating needs and enhance your life-style, a wide range of GE extension phones, main phones, cordless phones and answering systems is available.
INDEX A M Accessory Order Form 23 Making a call 8 MEM button 13, 14, 15 Memory feature 13 Memory location 13 B Battery installation 18 Battery safety 18 Buttons CHAN 13 FLASH 9 MEM 13, 14, 15 MUTE 11 PAGE 12 PWR–ON OFF 10 RE/ PA 9 RING – OFF ON 10 TONE 11 C Chain dialing 15 Changing a stored number 14 CHAN (channel) button 13 CHARGE/PAGE light 4, 5, 6, 7 Cleaning the phone 21 D Dialing a stored number 15 F P PAGE button 12 Paging the handset 11 Poor reception 21 Product care 21 R Receiving a call 9
LIMITED WARRANTY What your warranty covers: • Any defect in materials or workmanship. For how long after your purchase: • One year. (The warranty period for rental units begins with the first rental or 45 days from date of shipment to the rental firm, whichever comes first.) What we will do: • Provide you with a new or, at our option, a refurbished unit. • The exchange unit is under warranty for the remainder of the original product’s warranty period. How to make a warranty claim: • Properly pack your unit.