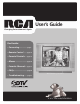
User’s Guide Changing Entertainment. Again. Find Inside: • Connecting............... page 5 • Remote Control....... page 16 • Parental Controls.... page 18 • Menus....................... page 24 • Favorite Channels... page 27 • FAQs.......................... page 30 • Troubleshooting...... page 31 Model 20F524T is pictured above. www.rca.
Important Information CAUTION RISK OF ELECTRIC SHOCK DO NOT OPEN This symbol indicates that this product incorporates double insulation between hazardous mains voltage and user accessible parts. When servicing use only identical replacement parts. Caution: To reduce the risk of electric shock, do not remove cover (or back). No user serviceable parts inside. Refer servicing to qualified service personnel.
Important Information IMPORTANT SAFETY INSTRUCTIONS Read before operating equipment Read these instructions. 1. 2. 3. 4. 5. 6. 7. 8. 9. 10. 11. 12. 13. 14. 15. 16. Keep these instructions. Heed all warnings. Follow all instructions. Do not use this apparatus near water. Clean only with a dry cloth. Do not block any of the ventilation openings. Install in accordance with the manufacturer’s instructions.
Table of Contents Chapter 1: Connections & Setup Things to Consider Before You Connect ......................................................................... 4 Protect Against Power Surges..................................................................................... 4 Protect Devices from Overheating............................................................................. 4 Position Cables Properly to Avoid Audio Interference.............................................. 4 Use Indirect Light..
Table of Contents Blocking Canadian V-Chip Movie Ratings................................................................ 22 Unrated Programs..................................................................................................... 22 Front Panel................................................................................................................. 23 Change Your Password..............................................................................................
Chapter 1: Connections & Setup Things to Consider Before You Connect Protect Against Power Surges • Connect all devices before you plug any of their power cords into the wall outlet. • Turn off the TV and/or device before you connect or disconnect any cables. • Using a surge protector can help prevent damage to your TV from electrical power surges. In case of lightning, unplug your TV. • Make sure all antennas and cables are properly grounded. Refer to the Important Safety Instructions on page 1.
Connections & Setup Get the Picture The first part of connecting your TV is to get the picture, also known as a signal. The back panel of your TV allows you to receive analog and digital channels by using the ANTENNA/CABLE INPUT. Receiving Cable Channels What You Need Coaxial cable Coaxial cable from a cable outlet. Plug the coaxial cable into the ANTENNA/CABLE INPUT to receive your analog and digital cable channels.
Connections & Setup Receiving Channels with an Antenna What You Need or Indoor Antenna Outdoor Antenna Antenna (“rabbit ears”) or outdoor antenna with a coaxial cable. Plug the antenna or coaxial cable from the wall outlet into the ANTENNA/CABLE INPUT to receive free off-air local analog and digital channels (where available). What You Need to Know • Visit www.antennaweb.org to get help deciding what type of antenna to use to receive the off-air local digital channels available to you.
Connections & Setup Choose Your Connection There are several ways to connect your TV, depending on the devices you want to connect and the quality of the signal you want to achieve. A connection using Y Pb Pr (component) jacks is excellent, composite is good and antenna or cable input is fair. Connections will vary according to the types of outputs jacks each external device can accommodate. Please use the following chart to determine which connection is best for you.
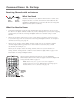
Connections & Setup Y Pb Pr (Component Video) Connection Back of TV ANTENNA/ CABLE INPUT COMPONENT (CVID) INPUT AUDIO/ VIDEO OUTPUT R- AUDIO -L DIGITAL/ ANALOG VIDEO COMPOSITE (VID) INPUT COMPONENT (CVID) INPUT AUDIO/ VIDEO OUTPUT R- AUDIO -L Don’t forget! If necessary, connect antenna or cable to get a picture. Go to page 5 for instructions. Note: This back panel graphic is for representation only. Your TV’s back panel might be different.
Connections & Setup Connecting the Device This connection allows you to connect a device that has Y Pb Pr jacks (Component Video), for example, a DVD player. If the device you are connecting also has S-Video or composite video, we recommend you use the component video input for better quality. Using the example of a DVD player: 1. If necessary, connect your cable and/or antenna as described on page 5. 2. Connect your Y Pb Pr component video cables.
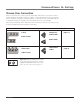
Connections & Setup Using the Front/Side Jacks VIDEO L AUDIO R Front/side of TV 2 If necessary, connect antenna or cable to get a picture. Go to page 5 for instructions. Note: This front/side panel graphic is for representation only. Your TV’s jacks might be different. 3 OUTPUT L L VIDEO R AUDIO R AUDIO S-VIDEO OUT Video Game Console Connecting the Device This connection allows you to connect a device such as a video game console, that has Audio/Video output jacks.
Connections & Setup Explanation of Jacks This section describes the jacks you can use to make connections. There are several combinations available to connect devices to your TV. ANTENNA/ CABLE INPUT COMPONENT (CVID) INPUT AUDIO/ VIDEO OUTPUT R- AUDIO -L Note: This back panel graphic is for representation only. Your TV’s back panel might be different.
Connections & Setup L AUDIO R VIDEO VIDEO L AUDIO Note: If you have model 13V424T, you’ll have two jacks (Video and L Audio). Front/Side (Input) (Models 14F514T, 20V414T, 20V504T, 20F424T, 20F524T, 24V414T and 24V504T only) These jacks are located on the side/front of the TV. Lets you connect devices that have composite outputs such as VCRs, DVD players, satellite receivers, cable boxes, video game consoles and camcorders. • AUDIO-L white. Provides left audio connection.
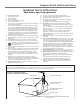
Connections & Setup Plug in the TV and Turn It On Plug the end of the power cord into a grounded wall outlet. Insert the plug completely into the outlet. Press ON•OFF on the remote, or press POWER on the TV’s front panel. Put Batteries in the Remote • Remove the battery compartment cover from the back of the remote by pushing down and sliding off the cover. • Insert 2 fresh “AA” batteries. Make sure the polarities (+ and -) are aligned correctly to the diagram inside the battery compartment.
Connections & Setup SETUP Complete the Initial Setup Go back Auto Channel Search List & Labels Closed Caption Favorite Channel Language Eng. Format Normal Auto Vol. Level Off To set the language, use the arrow buttons to highlight Language. The default language is English. To choose another language, press the right arrow button on the remote, choose the language. SETUP Go back Auto Channel Search List & Labels AUTO CHANNEL SEARCH Closed Caption Favorite Channel Go back Language Eng.
Connections & Setup What to Expect Watching TV • Your product allows you to change the format of the picture you’re viewing. Press the ZOOM– or ZOOM+ buttons to choose different screen formats. Depending on the type of signal you’re viewing and how it’s being formatted, a different format might not be available. The Format option in the Setup menu also changes the screen format. The options are Normal, Letterbox, Crop, or Squeeze. Go to page 27 for examples of screen formats.
Connections & Setup Remote Buttons +•? ABC DEF GHI JKL MNO PQRS TUV WXYZ ANTENNA, DIG•ANA Toggles digital or analog channels. Refer to page 5 for a full description. Arrow buttons ( , , , ) Use to highlight different items in the TV menu. The right and left arrows select highlighted items. (0-9) Number buttons Enter channel numbers (refer to page 14), time settings (refer to page 28), labels (refer to page 25) and notepad messages (refer to page 29). CC Toggles closed captioning on and off.
Connections & Setup Using the INPUT Button +•? ABC DEF GHI JKL MNO Use the INPUT button to scroll through the available Video Input Channels to view components you have connected to the TV. PQRS TUV WXYZ 1. Make sure the component you want to view (e.g. DVD player) is turned ON. 2. Press INPUT to tune to an available Video Input Channel and view the component. 3. Press the INPUT button until you return to the previous channel.
Chapter 2: Using the TV Features TV-14 DSLV Analog 11 CNN CC 7:18 AM Skip: 0:30 Normal X Channel Banner menu for an analog channel. TV-14 DSLV Digital 11-2 CNN English Skip: 0:30 Normal CC 7:18 AM X Channel Banner menu for a digital channel. Channel Banner There are several items that might appear on-screen when you press the INFO button on the remote. This display is called the Channel Banner. The following list describes the items on the Channel Banner screen.
Using the TV’s Features Go back Create Password _ _ _ _ Confirm Password _ _ _ _ Activate Parental Control This feature lets you activate and deactivate parental control features. Follow the on-screen instructions to create your password using the number buttons on the remote. Note: If you don’t activate Master Enable ( ) and set the password, then none of the Parental Control features will take effect.
Using the TV’s Features Content Ratings The following is an example of where items are located within the USA Content Ratings screen. USA TV CONTENT RATINGS Content Themes Rating Status Field Go back FV V S L D Lets you select whether to view or block. Rating Field C Lets you select from a list of age-based ratings you can block or view.
Using the TV’s Features PARENTAL CONTROL Blocking USA V-Chip Movie Ratings Go back V-chip Setting Downloadable V-chip Master Enable Front Panel Change Password The Movie Ratings menu lets you decide which Movies on TV can and cannot be viewed. V-CHIP SETTING Go back Movie Ratings USA TV Content Ratings Canada English Ratings Canada French Ratings Unrated MOVIE RATINGS Go back Reset G PG PG-13 R NC-17 X To set Movie programming limits: 1.
Using the TV’s Features PARENTAL CONTROL Blocking Canadian V-Chip Movie Ratings Go back V-chip Setting Downloadable V-chip V-CHIP SETTING Master Enable Front Panel Go back Change MoviePassword Ratings If you receive Canadian programs you can lock Canadian English and Canadian French ratings. When you lock a particular rating, you automatically lock the higher rated programs as well.
Using the TV’s Features PARENTAL CONTROL Front Panel Go back V-chip Setting Downloadable V-chip Master Enable Front Panel Change Password Selecting this option lets you lock (disable) or unlock (enable) the TV’s front panel buttons. The remote still tunes to any channel so, remember to remove access to any remote that can operate the television. Go back New Password ____ Confirm Password _ _ _ _ 1. Choose Parental Control from the Main Menu and press the OK button. 2. Enter your password. 3.
Chapter 3: Using the TV’s Menu System PICTURE Picture Menu Go back Color 45 Brightness 50 Contrast 50 Sharpness 50 Tint ± 0 Blue Background On C. Temp Cool The PICTURE menu options apply to the video for the main TV and Video Input Channels. As you scroll through the options available, the background image will change to fit that choice. Choose the setting that is best for your programs.
Using the TV’s Menu System SETUP Go back Auto Search List & Labels Closed Caption List & Labels Favorite Channel Language Eng. Go back Format Normal Channel 8 Auto Vol. Level Off In List Label ABC LIST & LABELS menu for analog signals. List & Labels Edit the channels in the list or choose labels for each channel. Select Lists & Labels from the SETUP menu and press the right or left arrow button. Channel Press the right or left arrow button to select the channel number that you want to label.
Using the TV’s Menu System CLOSED CAPTION Go back CC Display CC Type CC Mode CC Size CC Font CC Opacity CC Color CC Bkgrnd. On Service1 Broadcast Standard Font 1 Solid White CLOSED CAPTION menu for digital signals. The following Closed Caption options are available for digital signals: CC Display Choose the way closed captioning information is shown on the screen. Off No captioning information displayed. On Captioning information always appears, when available.
Using the TV’s Menu System Favorite Channels Store up to five of your preferred channels for each signal source into a favorite list. There is one list for the analog channels and a separate list for the digital channels. Depending on which mode you’re in, that list is created. To set your favorite channels, go to the Favorite Channels option under the SETUP menu and press OK.
Using the TV’s Menu System TIME Time Menu Go back Clock Calendar Time Zone Daylight Sav. Time Setting This menu lets you control several time related functions. Scroll to the item you want to set. Use the right or left arrow button to change the setting. 7:25 AM Eastern On Enables you to set the date easily. Time Zone Select the time zone you live in. Choose from 9 selections: Central, Eastern, Mountain, Atlantic, Pacific, Alaska, Hawaii, Newfoundland and Samoa.
Using the TV’s Menu System MAIN MENU Notepad Menu Exit Picture Setup Parental Control Time Notepad Enter messages that will appear on you TV screen at times you select. From the MAIN MENU select Notepad and press OK. NOTEPAD Go back Edit note Delete note Display note At switch on On time On date Date Edit note notepad: Follow the procedure below to enter a message into the 1. Use the number buttons to enter your new label. For example, above the number button 7 is the label PQRS.
Chapter 4: Other Information Frequently Asked Questions (FAQs) How do I tell an analog channel from a digital channel? There are several ways to tell if your channel is digital or not. Press the INFO button to display the channel banner. Look at the left side for a channel number. Channels with a primary channel and a subchannel are digital channels. Remember that not all digital channels have subchannels.
Other Information Troubleshooting Most problems you encounter with your TV can be corrected by consulting the following troubleshooting list. TV Problems TV won’t turn on • Make sure the TV is plugged in. • Check the wall receptacle (or extension cord) to make sure it is “live” by plugging in something else. • Something might be wrong with your remote control. Press the POWER button on the front of the TV. If the TV turns on, check the remote control. • The Front Panel might be locked.
Other Information Sound okay, picture poor (analog channels only) • Check your connections. Make sure all of the cables are firmly connected to the jacks. • Try adjusting the Sharpness menu item to improve weak signals. Go to page 24 for more instructions. Black box appears on the screen • Closed caption might be on. Check this setting in the SETUP menu. Go to page 24 for more instructions. The Remote Control Doesn’t Work • • Something might be between the remote and the remote sensor on the device.
Other Information USA V-Chip Rating System TV-MA (Mature Audience Only) Specifically designed to be viewed by adults and may be unsuitable for children under 17. It contains one or more of the following content themes: crude indecent language (L), explicit sexual activity (S), or graphic violence (V). TV-14 (Parents Strongly Cautioned) Contains some material that many parents would find unsuitable for children under 14.
Other Information Canadian English V-Chip Rating System (continued) G (General Audience) Programming considered acceptable for all age groups. While not designed specifically for children, it is understood younger viewers may be part of the audience. Violence Guidelines: Will contain very little violence, either physical or verbal or emotional.
Other Information Limited Warranty What your warranty covers: • Defects in materials or workmanship. For how long after your purchase: • 90 days from date of purchase for labor charges. At our option we will either pay an Authorized RCA Service Center the labor to repair your television or replace your television with a new or refurbished unit. • One year from date of purchase for parts.
Other Information Product registration: • Please complete and mail the Product Registration Card packed with your TV. It will make it easier to contact you should it ever be necessary. The return of the card is not required for warranty coverage. Limitation of Warranty: • THE WARRANTY STATED ABOVE IS THE ONLY WARRANTY APPLICABLE TO THIS PRODUCT. NO VERBAL OR WRITTEN INFORMATION GIVEN BY TTE TECHNOLOGY, INC.
Other Information Care and Cleaning CAUTION: Turn OFF your TV before cleaning. You can clean the TV as required, using a soft lint-free cloth. Be sure to occasionally dust the ventilation slots in the cabinet to help assure adequate ventilation. The TV’s screen may be cleaned with a soft, lint-free cloth as well. Take care not to scratch or mar the screen. If necessary, you may use a cloth dampened with warm water. Never use strong cleaning agents, such as ammonia-based cleaners, or abrasive powder.
Visit the RCA website at www.rca.com/television Please do not send any products to the Indianapolis address listed in this manual or on the carton. This will only add delays in service for your product. TTE Technology, Inc. 101 West 103rd Street Indianapolis, IN 46290 ©2007 TTE Technology, Inc. RCA and associated marks are trademarks of THOMSON S.A. used under license to TTE Corporation.