Quick Set-up Guide for Optional/Additional DECT 6.0 Cordless Handset for use with Systems 2111 and 2112 Series Please read this manual before operating product for the first time. Visit the RCA web site at www.rca4phones.
Equipment Approval Information Your telephone equipment is approved for connection to the Public Switched Telephone Network and is in compliance with parts 15 and 68, FCC Rules and Regulations and the Technical Requirements for Telephone Terminal Equipment published by ACTA. 1 Notification to the Local Telephone Company On the bottom of this equipment is a label indicating, among other information, the US number and Ringer Equivalence Number (REN) for the equipment .
2 Rights of the Telephone Company Should your equipment cause trouble on your line which may harm the telephone network, the telephone company shall, where practicable, notify you that temporary discontinuance of service may be required. Where prior notice is not practicable and the circumstances warrant such action, the telephone company may temporarily discontinue service immediately.
• Reorient or relocate the receiving antenna (that is, the antenna for radio or television that is “receiving” the interference). • R e o r i en t o r re lo c a t e a n d in c re a s e t h e se p a ra t i o n b e t we e n t h e telecommunications equipment and receiving antenna. • Connect the telecommunications equipment into an outlet on a circuit different from that to which the receiving antenna is connected.
Table of Contents Making an Auto Intercom Call.....14 NOTE......................................................14 Receiving an Intercom Call...........14 Advanced Intercom Features.......15 Using Intercom with External Telephone Calls……….....15 Two-Way Calling..............................15 Three-Way Calling.............................15 Transferring External Calls to Other Handsets.............16 Battery Safety Precautions.......16 Causes of Poor Reception...........16 General Product Care..............
Industry Canada (I.C.) Notice This product meets the applicable Industry Canada technical specifications. Le présent materiel est conforme aux specifications techniques applicables d'Industrie Canada.” The Ringer Equivalence Number is an indication of the maximum number of terminals allowed to be connected to a telephone interface.
Introduction CAUTION: When using telephone equipment, there are basic safety instructions that should always be followed. Refer to the IMPORTANT SAFETY INSTRUCTIONS provided w i t h this product and save them for future reference. IMPORTANT: Because cordless phones operate on electricity, you should have at least one phone in your home that isn’t cordless, in case the power in your home goes out . Before You Begin Parts Checklist Make sure your package includes the items listed here.
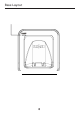
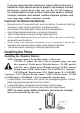
Base Layout 8
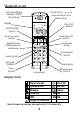
HandsetLayout CALLER ID-VOL or (caller id/volume up or down button) Voice Mail Waiting Indicator (VMWI)/ Visual Ringer display END /EXIT (button) TALK/SPEAKER (button) mute/menu OK (button) flash /answerer (button) phone book (button) delete/int/conf (delete/intercom/ conference) format/redial (button) review (button) play/stop (button) *tone/ (button) skip (button) microphone #pause/ringer (button) Display icons Signal strength Speakerphone Message Voicemail SMS Ringer OFF/DND ON Alarm ON
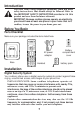
If you are concerned with interference, please refer to the owner’s manual for these devices on how to properly set channels to avoid interference. Typical devices that may use the 1.9 GHz frequency for communication include wireless audio/video senders, wireless computer networks, multi-handset cordless telephone systems, and some long-range cordless telephone systems.
4. Insert the battery pack. 5. Close the battery compartment by pushing the door up until it snaps into place. Handset Charging Cradle 1. Plug the AC power converter of the charging cradle into the electrical outlet. CAUTION: To reduce risk of personal injury, fire, or damage use only the power adaptor (Manufacturer: ESL, Type: IA5060, 120Vac/ 6Vdc/500mA; Manufacturer: NanTong DaMing, Type: DM-SC060058, 120Vac/6Vdc/0-0.58A) listed in the user’s guide.
for the letter M; press the 4 key 3 times for the letter I; press the 8 key for the letter T; press the 4 key twice for the letter H. NOTE: If you make a mistake, use the delete/int/conf button to backspace and delete one character at a time. 4. Press the mute/menu OK button t o save your name. You will hear a confirmation tone and the handset name shows in the display. Registration 1. Your packaged handset(s) are pre-registered and ready to use.
WARNING: It is not recommended that a handset be deregistered unless absolutely necessary because once a handset is de-registered, that handset’s telephone features cannot be used until the handset is re-registered. 4. Select NO, if you do not want to de-register. 5. If you select YES, press the mute/menu OK button and MOVE NEAR BASE displays for seconds, then YES NO appears in the display. 6. Use the caller ID-volume ( or ) button to scroll to YES or NO. 7.
Intercom Operation (applicable only with additional handsets) The intercom feature allows you to have a conversation with another registered handset without tying up the telephone line, allowing you to still receive incoming calls. Making an Auto Intercom Call 1. Make sure the handset is OFF (not in TALK mode). 2. Press the delete/int/conf button on the handset . 3. Use the touch-tone pad to select the handset you want to page.
Advanced Intercom Features Receiving an Incoming Call During an Intercom Call If you receive a telephone call during an intercom call, an incoming call alert tone will be heard (through the earpiece or speaker). If the user wants to answer an incoming call, they must press END to terminate the intercom and receive an incoming ring.
Transferring External Calls to Other Handsets During an external call, you may transfer the external call to another handset . 1. Press the delete/int/conf button on the originating handset to put an external call on hold, and enter the paged handset number. 2. A long beep is heard and then the two handsets are immediately connected.
General Product Care To keep your telephone working and looking good, follow these guidelines: • Avoid putting the phone near heating appliances and devices that generate electrical noise (for example, motors or fluorescent lamps ). • DO NOT expose to direct sunlight or moisture. • Avoid dropping the unit and other rough treatment . • Clean with a soft cloth. • Never use a strong cleaning agent or abrasive powder because this will damage the finish.
If the equipment is causing harm to the telephone network, the telephone company may require that you disconnect the equipment until the problem is resolved. Limited Warranty What your limited warranty covers: • Defects in materials or workmanship. For how long after your purchase: • One year, from date of purchase. Please retain your sales receipt , as that will act as your proof of purchase in order to validate warranty status.
What your limited warranty does not cover: • Customer Instruction. (Your Owner’s Manual provides information regarding operating and install instructions. Additional information may be obtained by contacting the retailer) • Installation and set-up service adjustments. • Batteries. • Damage from misuse, neglect , unauthorized repair. • Products which have been modified or incorporated into other products • Products that have been serviced by an unauthorized servicer.
How state law relates to this warranty: Some states do not allow the exclusion nor limitation of incidental or consequential damages, or limitations on how long an implied warranty lasts so the above limitations or exclusions may not apply to you. This warranty gives you specific legal rights, and you also may have other rights that vary from state to state. If you purchased your product outside the USA or Canada: This warranty does not apply. Contact your dealer for warranty information.