DECT 6.0 Multi-Handset Cordless Speakerphone User's Guide Please read this manual before operating product for the first time. Visit the RCA web site at www.rca4phones.
Equipment Approval Information Your telephone equipment is approved for connection to the Public Switched Telephone Network and is in compliance with parts 15 and 68, FCC Rules and Regulations and the Technical Requirements for Telephone Terminal Equipment published by ACTA. 1 Notification to the Local Telephone Company On the bottom of this equipment is a label indicating, among other information, the US number and Ringer Equivalence Number (REN) for the equipment .
2 Rights of the Telephone Company Should your equipment cause trouble on your line which may harm the telephone network, the telephone company shall, where practicable, notify you that temporary discontinuance of service may be required. Where prior notice is not practicable and the circumstances warrant such action, the telephone company may temporarily discontinue service immediately.
• Reorient or relocate and increase the separation between the telecommunications equipment and receiving antenna. • Connect the telecommunications equipment into an outlet on a circuit different from that to which the receiving antenna is connected. If these measures do not eliminate the interference, please consult your dealer or an experienced radio/television technician for additional suggestions.
Table of Contents Equipment Approval Information........2 Interference Information.......................3 Hearing Aid Compatibility (HAC)..........4 FCC RF Radiation Exposure Statement ............................................................................4 Information for DECT Product ..............4 Table of Contents........................................5 Introduction..................................................7 Before You Begin.......................................
Language...........................................23 Base tone............................................23 Base Ring Volume............................24 Base Ring melody............................24 Advanced Set ....................................24 Recall time...........................................24 Registration.........................................24 De-register the handset ................25 Modify master PIN...............................25 Reset ..........................................
Industry Canada (I.C.) Notice This product meets the applicable Industry Canada technical specifications. Le présent materiel est conforme aux specifications techniques applicables d'Industrie Canada.” The Ringer Equivalence Number is an indication of the maximum number of terminals allowed to be connected to a telephone interface.
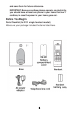
and save them for future reference. IMPORTANT: Because cordless phones operate on electricity, you should have at least one phone in your home that isn’t cordless, in case the power in your home goes out . Before You Begin Parts Checklist (for 2131 single handset model) Make sure your package includes the items listed here.
For Model 2131-2 there will be ONE additional handset,charge cradle, battery cover and two additional pieces of battery cells and power adaptor. For Model 2131-3 there will be TWO additional handsets, charge cradles, battery covers and four additional pieces of battery cells and power adaptors.. For Model 2131-4 there will be THREE additional handsets, charge cradles, battery covers and six additional pieces of battery cells and power adaptors.
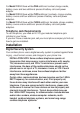
Important Installation Guidelines • • • • • • • Avoid sources of noise and heat,such as motors, fluorescent lighting, microwave ovens, heating appliances and direct sunlight . Avoid areas of excessive dust, moisture and low temperature. Avoid other cordless telephones or personal computers. Never install telephone wiring during a lightning storm. Never install telephone jacks in wet locations unless the jack is specifically designed for wet locations.
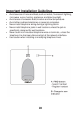
Base layout
Handset layout Installation and Set-up Fit the rechargeable batteries in each handset 1) 2) Install the AAA batteries (Brand name: CORUN, Capacity: Ni-MH 1.2V/ 550mAh, or Brand name: SANIK , Capacity: Ni-MH 1.2V/550mAh) into handset in accordance with the polarity marked in the battery compartment . Close the battery compartment cover, sliding it into place and pressing firmly to make sure it is secure.
back on. It may take some time for the handset to re-establish a radio link with the base unit . Keypad lock To lock the cordless handset‟s keypad: Press and hold [*] button for 2 seconds until you hear a beep tone, when the keypad lock is activated, shows on the display. To unlock the keypad: Press and hold [*] button for 2 seconds until you hear a beep tone. Or simply replace the handset on the charger cradle.
Press the TALK/SPEAKER button again to switch from speakerphone to earpiece mode. Press the HANG UP button to end conversation. Making a Call 1. Press the TALK/SPEAKER button. Dial the desired number. - OR Dial the number first,press the TALK/SPEAKER button. - OR Press the Navigation (or ) button to select the desired record, press the TALK/SPEAKER button. 2. When finished, press the HANG UP button to end conversation. NOTE: You may enter up to 24 pre-dial digits.
2. Press the redial button. -OR3. Press the redial button first , then use the Navigation button to select the desired redial number. - Press the Navigation () to review the oldest call and scroll toward the most recent calls (higher numbers). - Press the Navigation () to review the newest call and scroll to older calls (lower numbers). NOTE: You may choose from the last ten numbers that were dialed. 4. Press the TALK/SPEAKER button. The number dials automatically.
record can contain a maximum of 20-digit numbers and 10-character names. Reviewing phonebook records 1. 2. 3. 4. Make sure the phone is OFF (not in TALK/SPEAKER mode). Press the Phonebook button to access the phone book, all records are shown in alphabetical order. Press the Navigation (or) button or key in alphabet to the desired records. Press the MENU/OK button to view detail information. Adding phonebook entries 1. 2. 3. 4. 5. 6. 7. 8. Press MENU/OK key to enter main menu.
the MENU/OK button to confirm, the records are stored alphabetically in the phone book. Inserting a Pause Press the #pause/ringer button on the handset‟s touch-tone pad to insert a delay in dialing sequence when a pause is needed to wait for a dial tone (for example, after you dial 9 for an outside line, or to wait for a computer access tone) Each pause counts as one digit in the dialing sequence. Editing a phonebook record From Phonebook Sub-Menu: 1.
4. records. Press the TALK/SPEAKER button, the number dials automatically. Using the redial list The redial list stores the last 10 numbers dialed. A maximum of 20 digits can be displayed for each entry. Last number redial 1. 2. Press REDIAL key in idle mode and press Navigation key to browse the redial list . The last number dialed will appear first in the redial list . Press the TALK/SPEAKER button to dial the number. Save a redial number into the phonebook 1. 2. 3. 4.
line. The Call Waiting Caller ID information will be displayed and stored in the history of all handsets in the system. Caller list 1. 2. 3. CLIP of incoming Calls are stored in the CALLER LIST menu. When you enter the CALLER LIST menu, the display shows icon. Store the last 20 incoming calls and the call time. Access the Caller list 1. 2. Press the CID button to enter the Caller List menu. The display shows the recent caller phone number. Press the Navigation (or) button through the Caller List .
3. 4. Select Delete All, press MENU/OK button, the screen displays Delete All? Press MENU/OK button again to confirm your deletion. Using multi-handset capabilities Note: To use intercom feature, you need to have at least 2 handsets link to this product . This product is capable of linking up to 4 handsets. Making an intercom call 1. 2. 3. Make sure the phone is OFF (not in talk mode).
rings. You can press the TALK/ SPEAKER button to take the external call again. Making conference call (three-way conversation) You can connect one external call to two handsets registered at the base station. All users can TALK/SPEAKER and listen simultaneously. 1. During an external call, press the INT button on handset , the external call is put on hold and the registered handset shows on the display, enter the handset number you want to page. 2. Wait until the internal user answers. 3.
4. volume level (High, Medium, Low, Silence) Press the MENU/OK button to save your selection. You will hear a confirmation tone. NOTE: If you select Silence, Ringer off icon shows on the display. Ring melody You may choose from ten different melody ring tones. From Handset Tones setting sub-menu: 1. Press the Navigation (or) button to select Ring Melody. 2. Press the MENU/OK button to enter the menu. 3. Press the Navigation (or) button to select the desired melody ring tone. 4.
4. to backspace and delete one character at a time. 2) Use the #/Pause/ringer button to toggle between upper case and lower case text entry. Press the MENU/OK button to save your name. You will hear a confirmation tone and the handset name shows in the display. Auto answer From the Personal Set sub-menu: 1. Press the Navigation (or) button to scroll to the Auto Answer submenu. 2. Press the MENU/OK button to enter the menu. 3. Press the Navigation (or) button to select On or Off. 4.
Base tone From Personal setting sub-menu: 1. Press the Navigation (or) button to select Base Tone. 2. Press the MENU/OK button to access base tone setting, you may program the follow items: BS Ring Volume, BS Ring Melody. Base Ring Volume From Base Tone setting sub-menu: 1. Press the Navigation (or) button to select BS Ring Vol. 2. Press the MENU/OK button to enter the menu. 3.
4. Press the MENU/OK button to confirm. Registration From the Advanced Set sub-menu: 1. Press the Navigation (or) button to scroll to the Registration. 2. Press the MENU/OK button to access registration setting, the display will show Enter PIN----. 3. Use the touch tone pad to enter the 4 digits of PIN code (default PIN code is 0000). 4. Press the MENU/OK button to confirm, the screen displays Registering... 5. Press and hold the FIND button on the base for a few seconds. 6.
tone. Reset As you become familiar with this system, you may prefer to use the system‟ s original settings. Follow the steps below to return to the factory default settings. From the Advanced set sub-menu: 1. Press the Navigation (or) button to scroll to Reset . 2. Press the MENU/OK button, the screen displays Enter PIN ----. 3. Use the touch tone pad to enter your four digits of PIN code. 4. Press the MENU/OK button, the screen displays Confirm Reset? 5.
2. 3. 4. 5. 6. Remove the battery compartment door. Disconnect the cord attached to the battery pack and remove the battery pack from the handset. Insert the new battery pack and connect the cord to the jack inside the battery compartment. Put the battery compartment door back on. Place handset in the base to charge. Allow the handset battery to properly charge (for 16 hours) prior to first use or when you install a new battery pack.
“I cannot make or answer calls” If the handset‟s display is blank, it may have been switched off. Press and hold the HANG-UP key to switch it back on. Check that the base unit‟s main power adapter is plugged in and power is switched on. The base unit needs main power for normal operation of the phone – not just for charging the batteries. Make sure you are using the telephone line cable supplied with your phone. Other telephone line cables might not work. Move the handset closer to the base unit.
“The phone does not Check that the base unit‟s main power adapter ring” is plugged in and power is switched on. The base unit needs main power for normal operation of the phone – not just for charging the batteries. Make sure you are using the telephone line cable that was supplied with your package. “My call was cut off Move the handset closer to the base unit before when I went out of you try again to make a call. range. Now I can‟t use my handset.
“The Caller Display In order to utilize the Caller ID features of this feature isn‟t working” phone, you will need to subscribe to Caller ID with your telephone service provider. Please contact your telephone service provider for details. The caller may have BLOCKED their number or the caller may be calling from a network that does not transmit the Caller ID data. Allow at least 2 rings for the Caller ID data to display.
“I try to recharge the battery but I still get a warning that they are low” You need to replace the battery. Dispose of used batteries safely – never burn them, or put them where they could get punctured. Do not use non-rechargeable battery in your handset – they may explode, causing damage. If the fault persists... Disconnect all other instruments connected to the same line and try to make a call. Disconnect the base unit from the telephone line and plug a different phone into the master telephone socket.
For instructions on how to obtain warranty service, you may call Customer Care at 1-877-722-4908 or you may visit our website at www.rca4phones. com. If you prefer, you may write to us at: Supreme Power USA LLC PO Box 501045 Indianapolis IN 46250-1045 Please do not send products to this address as it only adds delays in service and may result in lost or damaged product . This PO BOX is for written communication only.
• We will ask that you properly pack your product to avoid shipping damage. We recommend that you use the original carton and packing materials. • We will ask you to include with your product the following: Your name, return shipping address and daytime phone number handwritten or typed on a sheet of paper A legible copy of your sales receipt ( please do not send the original sales receipt ) • Ship your product prepaid, to the address we provide.
INCREASE THE SCOPE OF THIS WARRANTY. • REPAIR OR REPLACEMENT AS PROVIDED U N D E R T H I S WARRANTY IS THE EXCLUSIVE REMEDY OF THE CONSUMER. SUPREME POWER USA LLC SHALL NOT BE LIABLE FOR INCIDENTAL OR CONSEQUENTIAL DAMAGES RESULTING FROM THE USE OF THIS PRODUCT OR ARISING OUT OF ANY BREACH OF ANY EXPRESS OR IMPLIED W A R R A N T Y ON THIS PRODUCT.
Visit the RCA web site at www.rca4phones.com Please do not send any products to the Indianapolis address listed in this manual or on the carton. This will only add delays in service for your product.