Two-Line Speakerphone with Call Waiting Caller ID User’s Guide Please read this manual before operating this product for the first time.
Important Information Equipment Approval Information Your telephone equipment is approved for connection to the Public Switched Telephone Network and is in compliance with parts 15 and 68, FCC Rules and Regulations and the Technical Requirements for Telephone Terminal Equipment published by ACTA. 1 Notification to the Local Telephone Company On the bottom of this equipment is a label indicating, among other information, the US number and Ringer Equivalence Number (REN) for the equipment.
Important Information The telephone company may make changes in its communications facilities, equipment, operations or procedures where such action is required in the operation of its business and not inconsistent with FCC Rules and Regulations. If these changes are expected to affect the use or performance of your telephone equipment, the telephone company must give you adequate notice, in writing, to allow you to maintain uninterrupted service.
Table of Contents Important Information...................... 2 Equipment Approval Information.................2 Interference Information.............................3 Licensing....................................................3 Hearing Aid Compatibility...........................3 Introduction..................................... 6 Base Layout...............................................7 Connections and Setup..................... 7 Parts Checklist. .........................................
Table of Contents Deleting a CID Record...................................26 Deleting All CID Records..............................26 Dialing Back....................................................26 If You Programmed Your Local Area Code in the Setup Menu........................................................ 26 If You Did Not Program Your Local Area Code in the Setup Menu. ............................................ 27 Call Waiting Caller ID..................................27 Memory................
Introduction CAUTION: When using telephone equipment, there are basic safety instructions that should always be followed. Refer to the IMPORTANT SAFETY INSTRUCTIONS provided with this product and save them for future reference. Your Caller ID phone stores and displays specific information, provided by your local telephone company, to subscribers of Caller ID or similar caller identification services. Your Caller ID phone enables you to: • Identify callers before you answer the phone.
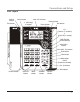
Connections and Setup Base Layout Sel/Save button Menu button Exit button New Call indicator 3 (directory/ 3button) Format button Delete button Dial button 5/6 (volume +/- buttons) 4 (Caller ID/4 button) DND (Do Not Disturb button) Auto Redial button Voice Mail 1/2 buttons Flash button Store button Hold button Confer (conference button) Line 1/2 buttons Microphone Headset button Preset EQ button Mute button # PAUSE button Speaker button
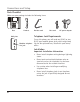
Connections and Setup Parts Checklist Make sure your package includes the following items: Base Handset Handset cord Line cords AC power adaptor Telephone Jack Requirements Wall plate Modular telephone line jack To use this phone, you will need one RJ14C or two RJ11C type modular phone jacks, which might look like the one pictured here, installed in your home/ office. Installation Important Installation Information • Never install telephone wiring during a lightning storm.
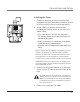
Connections and Setup Installing the Phone 1. Choose an area near an electrical outlet and telephone wall jack. Your phone should be placed on a level surface, such as a table top or desk. 2. Install 4 AAA-size alkaline batteries (not included) for back up power in the event of a power failure. • Use a tool to press the lock and then open the battery compartment door located on the bottom of the phone. • Insert the batteries as shown on the diagram inside the battery compartment.
Connections and Setup Attaching the Desktop Pedestal 1. Turn the phone over so that the bottom of the base is facing up and the end with data port and line jacks is pointing away from you. 2. Turn the desktop pedestal so that the side with four rectangle rubber feet is facing you. 3. Insert the tabs on the pedestal into the two lower slots on the bottom of the base, then push the pedestal downward until the tab on the top of the pedestal snaps (lock) into place.
Connections and Setup Use the DATA PORT jack to hook up your fax machine, for example, and then set the DATA PORT switch to 2 in order to receive faxes on the phone number for line 2.
Connections and Setup Programming the Telephone Display Language You may set the display language to English, French, or Spanish. The default is English. 1. Press the MENU button. 2. Use the 5 or 6 button to scroll to DISPLAY SETTING. 3. Press Sel/Save. 4. Use the 5 or 6 button to scroll to LANGUAGE. 5. Press Sel/Save. 6. Use the 5 or 6 button to select the language. 7. When finished, press Sel/Save to save. To start over, press EXIT to return to the main menu and repeat step 2.
Connections and Setup 10. Use the 5 or 6 button to select the Hour. 11. Press Sel/Save to save. The cursor moves to the Minute field. 12. Use the 5 or 6 button to select the Minute. 13. Press Sel/Save to save. To start over, press EXIT to return to the main menu and repeat step 2. Hour Format You can set the clock for either 12-hour or 24-hour (military) format. The default is 12 hour. 1. Press the MENU button. 2. Use the 5 or 6 button to scroll to DISPLAY SETTING. 3. Press Sel/Save. 4.
Connections and Setup LCD Backlight 1. Press the MENU button. 2. Use the 5 or 6 button to scroll to DISPLAY SETTING. 3. Press Sel/Save. 4. Use the 5 or 6 button to scroll to LCD BACKLIGHT. 5. Press Sel/Save button. 6. Use the 5 or 6 button to select AUTOMATIC or ALWAYS ON. NOTE: If you select the option AUTOMATIC, the LCD will be turned on during incoming call or when a button is pressed. If you select the option ALWAYS ON, the LCD backlight will become always turned on. 7. Press Sel/Save to save.
Connections and Setup Key Tone Volume 1. Press the MENU button. 2. Use the 5 or 6 button to scroll to SOUND SETTING. 3. Press Sel/Save button. 4. Use the 5 or 6 button to scroll to KEY TONE VOL. 5. Press Sel/Save button. 6. Use the 5 or 6 button to scroll to OFF, Low or High. 7. Press Sel/Save button to save. To start over, press EXIT to return to the KEY TONE VOL menu.
Connections and Setup Local Area Code 1. Press the MENU button. 2. Use the 5 or 6 button to scroll to PHONE SETTING. 3. Press Sel/Save button. 4. Use the 5 or 6 button to scroll to AREA CODE. 5. Press Sel/Save. ENTER DIGIT is displayed. 6. Use the touch-tone pad to enter your area code. NOTE: If you make a mistake, press DELETE to clear all three digits and re-enter the area code. 7. When finished, press Sel/Save to save. To start over, press EXIT to return to the AREA CODE menu and repeat step 4.
Connections and Setup 6. Use the 5 or 6 to scroll to desired code #. 7. Press Sel/Save. 8. Use the touch-tone pad to enter the code. Press DELETE to clear and re-enter all three digits. 9. When finished, press Sel/Save to save and return to CODE # x. Flash Time Depending on the services you have with the phone company, you may need to adjust the flash timing. It can be set to 100ms or 600ms. The default is 600ms. 1. Press the MENU button. 2. Use the 5 or 6 to scroll to PHONE SETTING. 3. Press Sel/Save. 4.
Telephone Operation Restoring the Defaults This feature allows you to reset all the menu settings to the original default settings. 1. Press the MENU button. 2. Use the 5 or 6 to scroll to RESTORE SETTING. 3. Press Sel/Save. 4. Use the 5 or 6 to scroll to YES. 5. Press Sel/Save to save. To start over, press EXIT to return to the RESTORE SETTING menu. Telephone Operation Making Calls with the Handset 1. Pick up the handset and the phone automatically selects an open line. 2. Wait for a dial tone. 3.
Telephone Operation 6. Dial a phone number. 7. Press HEADSET when finished. NOTE: To converse using the headset, the handset must be placed in the cradle. Receiving Calls with the Handset When the phone rings, the corresponding line’s indicator flashes rapidly. 1. Pick up the handset (your phone automatically selects the ringing line). 2. When you are finished, hang up the handset. Receiving Calls with the Speakerphone When the phone rings, the corresponding line’s indicator flashes rapidly. 1.
Telephone Operation To switch to the handset, pick up the handset. The speakerphone or headset turns off. To switch to the headset, press HEADSET. The headset indicator turns on. Place the handset in the cradle. Pre-Dialing Telephone Numbers Pre-dialing lets you enter , check , and edit a telephone number before engaging the line.
Telephone Operation Hold Placing a Call on Hold 1. Press HOLD. The indicator for the line on hold flashes blue. 2. Hang up or press another line button. Releasing a Call from Hold Press the line button for the call on hold. The phone automatically goes into speakerphone mode. NOTE: If you want to change modes, lift the handset to switch to the handset, or press the HEADSET button to use the headset.
Telephone Operation 2. Use the Vol + or Vol - button to adjust the ring volume. The phone generates a 2second long sample ring at the select setting for loudness verification. Speakerphone, Handset, and Headset Volume While using the phone press the Vol + or Vol - buttons to set the volume to a comfortable level The phone stores the setting when you release the button. Conference This feature lets you connect two calls to make a conference call. To connect with two calls: 1.
Telephone Operation 1. While the handset is on the cradle, press DND button. The DND indicator flashes. 2. Use the 5 or 6 button to select the duration. You may choose from 15 minutes, 30 minutes, 45 minutes, 1 hour, or 2 hours and increase the duration by 1 hour intervals up to 24 hours. 3. Press the Sel/Save button to save your selection. 4. When the Do Not Disturb function is on, the DND indicator flashes. To turn off Do Not Disturb, press the DND button.
Caller ID Caller ID (CID) Summary Screen The summary screen shows the current time, current date and number of new calls to be reviewed. It is displayed until any button is pressed. Within 10 seconds of receiving a new call, the new caller information is displayed and the blue NEW CALL indicator flashes. Date Number of New calls Time 12/31 12:43 A L1: 01 NEW CALLS L2: 02 NEW CALLS L2 RINGER OFF NOTE: The number of new calls is displayed until all new calls have been reviewed.
Caller ID Saving CID Records to Memory/Phone Directory Memory 1. While a name and telephone number shows in the display, press Sel/Save if you want to edit the information. Then follow the steps in the Storing a Name and Number in Memory section to edit and store the record. 2. If you do not need to edit the name or number, press the STORE button followed by the MEMORY button, or press the DIR button to save the information in the Phone Directory memory.
Caller ID 3. To adjust the phone number format, press the FORMAT button. For instance, a 7-digit local number sometimes cannot be dialed because it requires a 10-digit or 11-digit format. Use the FORMAT button to scroll through 7, 10, and 11-digit numbers. 7-digits: 7-digit telephone number (i.e. 555-5555) 10-digits: 3-digit area code + 7-digit telephone number (i.e. 425-555-5555) 11-digits: long distance code 1 + 3-digit area code + 7-digit telephone number (i.e. 1-425-555-5555) 4.
Memory Direct Access Memory & Directory Memory Storing a Name and Number in Memory 1. Press the STORE button. ENTER DIGITS shows in the display. 2. Use the touch-tone pad to enter the number you want to store (up to 25 digits). NOTE: If you make a mistake, press DELETE button to delete the last digit and back one space. 3. Press the Sel/Save or STORE button. 4. Use the touch-tone pad to enter a name (up to 16 characters). More than one letter is stored in each of the number keys.
Memory Reviewing Stored Names & Numbers 1. Press the DIR button. 2. Use the 5 and 6 button to review the records stored in Directory Memory. OR 1. Press a MEMORY button to review the record stored in Direct Access Memory. Changing a Stored Name or Number 1. Press DIR. 2 . Use the 5 and 6 button to scroll to the desired memory. 3. Press Sel/Save and edit the content according to the steps in the Storing a Name & Number in Memory section. OR 1. Press a MEMORY location button. 2.
Memory Dialing a Stored Number If the number is stored in the Directory Memory, 1. Pick up the handset, or press SPEAKER or HEADSET. 2. Wait for the dial tone. 3. Press the DIR button, and use the 5 and 6 button to find the number. 4. Press the DIAL button and the number automatically dials. If the number is stored in the Direct Access Memory, 1. Pick up the handset, or press SPEAKER or HEADSET. 2. Wait for the dial tone. 3. Press the MEMORY location button, and the number automatically dials.
Memory Deleting All Directory Memory This feature allows you to clear all memory saved in the directory at once. 1. Press the MENU button. 2. Use the 5 or 6 buttons to scroll to PHONE SETTING. 3. Press Sel/Save. MEMORY CLEAR shows in the display. 4. Press Sel/Save. 5. Press the 5 or 6 button to scroll to YES. 6. Press Sel/Save to confirm all directory memory deletion. If you want to start over, press EXIT once to return to the previous menu level.
Other Information Audio Tone Adjustment There are four preset profiles to allow for adjustment of the audio tone (graphics equalizer) of the speakerphone. When speakerphone is active, press the Preset EQ button to move through the settings. Display Messages The following special messages indicate the status of a message or the unit: NO CALLS The CID memory log is empty. UNKNOWN CALLER The incoming call does not have CID service or their service area is not linked to yours.
Other Information You cannot be heard by the other party. • Make sure the handset or headset cord is connected properly and securely. • Make sure MUTE is not turned on. Phone does not ring. • Make sure the ringer is turned on. • You may have too many extension phones on your line. Try unplugging some phones. • See solutions for “No dial tone.” • Make sure Do Not Disturb is not turned on. Incoming voice too low or none at all. • Check and adjust volume control setting.
Other Information Service If trouble is experienced with this equipment, for repair or warranty information, please contact customer service at 1-800-511-3180. If the equipment is causing harm to the telephone network, the telephone company may request that you disconnect the equipment until the problem is resolved. This product may be serviced only by the manufacturer or its authorized service agents. Changes or modifications not expressly approved by Thomson Inc.
Other Information Limited Warranty What your warranty covers: • Defects in materials or workmanship. For how long after your purchase: • One year, from date of purchase. (The warranty period for rental units begins with the first rental or 45 days from date of shipment to the rental firm, whichever comes first.) What we will do: • Provide you with a new or, at our option, a refurbished unit. The exchange unit is under warranty for the remainder of the original product’s warranty period.
Other Information Product Registration: • Please complete and mail the Product Registration Card packed with your unit. It will make it easier to contact you should it ever be necessary. The return of the card is not required for warranty coverage. Limitation of Warranty: • The warranty stated above is the only warranty applicable to this product. All other warranties, express or implied (including all implied warranties of merchantability or fitness for a particular purpose) are hereby disclaimed.
Index A Accessory Information 39 Attaching the Desktop Pedestal 11 Audio Tone Adjustment 32 Auto Redial Function 31 B Base Layout 7 C Call Alert Tone 16 Caller ID (CID) 25 Call Timer 21 Call Waiting Caller ID 27 Chain Dialing 30 Changing a Stored Name or Number 29 Conference 23 Connections and Setup 7 D Data Port 11 Deleting a CID Record 26 Deleting All CID Records 26 Deleting All Directory Memory 31 Dialing a Stored Number 30 Dialing Back 26 Direct Access Memory & Directory Memory 28 Display Language
Index R S T Receiving and Storing CID Records 25 Receiving Calls with the Handset 20 Receiving Calls with the Optional Headset 20 Receiving Calls with the Speakerphone 20 Redial 22 Regional Area Codes 17 Removing a Call from Hold 22 Restoring the Defaults 19 Reviewing CID Records 25 Reviewing Stored Names & Numbers 29 Ringer Volume 22 Ring Tone 15 Saving CID Records to Memory/Phone Directory Memor 26 Service 34 Speakerphone, Handset, and Headset Volume 23 Storing a Name and Number in Memory 28 Storing
Accessory Information AC power adaptor Headset 5-2719 5-2425 To place order, have your Visa, MasterCard, or Discover Card ready and call toll-free 1-800-338-0376. A shipping and handling fee will be charged upon ordering. We are required by law to collect appropriate sales tax for each individual state, country, and locality to which the merchandise is being sent. Items are subject to availability.
Visit the RCA web site at www.rca.com Please do not send any products to the Indianapolis address listed in this manual or on the carton. This will only add delays in service for your product. Thomson Inc. 10330 North Meridian Street Indianapolis, IN 46290 © 2006 Thomson Inc. Trademark(s) ® Registered Marca(s) Registrada(s) Model 25204 00007055 (Rev.
Teléfono con Altavoz de Dos Líneas con Identificador de Llamada en Espera Guía del Usuario Por favor lea este manual antes de operar este producto por primera vez.
Información Importante Información sobre la Aprobación de Equipo El equipo de su teléfono esta aprobado para la conexión con la red Telefónica Pública (Public Switched Telephone Network) y cumple con los requisitos establecidos en las secciones 15 y 68 de las Reglas y Regulaciones de la FCC y con los Requerimientos Técnicos para Equipos de Terminales Telefónicas (Technical Requirements for Telephone Terminal Equipment), publicado por ACTA.
Información Importante La compañía telefónica puede hacer los cambios en sus instalaciones de comunicación, en equipos, en sus funcionamientos o procedimientos que digne necesarios para el manejo de sus negocios y que no sean incompatibles con las Reglas y Regulaciones de l a FCC. Si estos cambios pudieran alterar el uso o el funcionamiento de su equipo telefónico, la compañía telefónica deberá darle aviso adecuado en escrito para que Ud. goce de un servico ininterrumpido.
Tabla de Contenido Información Importante.................... 2 Información sobre la Aprobación de Equipo 2 Información de Interferencias. ....................3 Licensing ...................................................3 Compatibilidad con Audífonos (CCA)...........3 Introducción.................................... 6 Formato de la Base....................................7 Conexión y Programación................. 7 Lista de Partes...........................................
Tabla de Contenido Para Revisar Archivos del Identificador de Llamadas........................................................25 Para Salvar Archivos del Identificador de Llamadas a la Memoria /Directorio de Memoria.........................................................26 Para Borrar un Archivo del Identificador de Llamadas........................................................26 Para Borrar todos los Archivos del Identificador de Llamadas ............................26 Para Volver a Marcar.............
Introducción CUIDADO: Cuando utilice equipo telefónico, hay instrucciones básicas de seguridad que siempre deben seguirse. Refiérase a la guía de INSTRUCCIONES DE SEGURIDAD IMPORTANTES provista con este producto y guárdela para referencia futura. Su teléfono con Identificador de Llamada almacena y muestra información específica, provista por su compañía telefónica local, a suscriptores al servicio de Identificador de Llamadas o servicios de identificación similares.
Conexión y Programación Formato de la Base Sel/Save (Botón para seleccionar/guardar) New Call (Indicador de llamada nueva) Menu (Botón Format (Botón para formato) para menú) Exit (Botón Delete (Botón para salir) 3 (Botón para Dial (Botón para para borrar) directorio/ 3) marcar) 5/6(Botónes para volumen/5/6) 4 (Botón de identificador de llamada/ 4) DND (Botón de No Molestar) Auto Redial (Botón Remarcado Automático) Voice Mail 1/2 (Botónes de Mensaje de Voz 1/2) STORE (Botón para almacenar) FLASH (Botón par
Conexión y Programación Lista de Partes Asegúrese de que su empaque contenga los siguientes artículos: Auricular Base Placa de pared Enchufe telefónico modular Cable del auricular Cables de línea Adaptador de corriente AC Requerimientos Para Enchufe Telefónico Para utilizar este teléfono, usted necesitará un enchufe telefónico modular tipo RJ14C o dos enchufes tipo RJ11C, que pueden ser como el que está ilustrado aquí, en su casa/ oficina.
Conexión y Programación Para Instalar el Teléfono 1. Escoja un área cerca de un enchufe eléctrico y un enchufe telefónico de pared. Su teléfono debe ser colocado sobre una superficie plana, como una mesa o un escritorio. 2. Instale 4 baterías alcalinas tamaño AAA (no incluidas) como repuesto en caso de un corte de corriente. • Use una herramienta para presionar el seguro y luego abra la puerta del compartimiento de la batería ubicada en la parte inferior del teléfono.
Conexión y Programación 6 4 3 5 Si usted tiene dos líneas telefónicas instaladas en un solo enchufe, conecte un extremo del cable de línea liso dentro del enchufe marcado “LINE 1+2” en la parte trasera de la base. Conecte el otro extremo en el enchufe de pared de 2 líneas. Si usted tiene dos enchufes telefónicos separados, conecte uno de los cables telefónicos dentro del enchufe marcado “LINE 1+2” y el otro cable dentro del enchufe marcado “LINE 2.
Conexión y Programación Para Instalar el Pedestal sobre la Superficie Plana 1. Voltee el teléfono de forma que la parte inferior de la base quede hacia arriba y el extremo con el puerto de datos y receptáculos de línea esté apuntando lejos de usted. 2. Voltee el pedestal de escritorio de forma que el lado con cuatro patas de hule rectangulares esté frente a usted. 3.
Conexión y Programación Utilice el enchufe de la terminal de datos para conectar su máquina de fax, por ejemplo, y después coloque el selector de la terminal de datos (”DATA PORT”) en la línea 2 para poder recibir faxes en el número telefónico de la línea 2. Si usted está hablando con alguien en la línea 2 y quiere que le manden un fax, cambie el selector de la terminal de datos (“DATA PORT”) a la línea 1 y dé a esa persona el número telefónico de la línea 1.
Conexión y Programación Para Programar el Teléfono Idioma de la Pantalla Usted puede programar el idioma de la pantalla a inglés, francés o español. El idioma de fábrica es el inglés. 1. Oprima el botón MENU. 2. Utilice los botones 5 o 6 para ir a la indicación DISPLAY SETTING (CONFIG PANTALLA). 3. Oprima el botón Sel/Save. 4. Utilice los botones 5 o 6 para ir a la indicación LANGUAGE (IDIOMA). 5. Oprima el botón Sel/Save. 6. Utilice los botones 5 o 6 para seleccionar el idioma. 7.
Conexión y Programación 8. Utilice los botones 5 o 6 para programar la fecha. 9. Oprima el botón Sel/Save para salvar. El cursor se mueve al campo de Hora. 10. Utilice los botones 5 o 6 para programar la hora deseada. 11. Oprima el botón Sel/Save para salvar. El cursor se mueve al campo de Minuto. 12. Utilice los botones 5 o 6 para programar programar el minuto. 13. Oprima el botón Sel/Save para salvar. Para volver a empezar, oprima el botón EXIT para volver al menú principal y repita el paso 2.
Conexión y Programación La Luz de Fondo del LCD 1. Oprima el botón MENU. 2. Utilice los botones 5 o 6 para ir a la indicación CONFIG PANTALLA. 3. Oprima el botón Sel/Save. 4. Utilice los botones 5 o 6 para ir a la indicación LUZ DE FONDO LCD. 5. Oprima el botón Sel/Save. 6. Utilice los botones 5 o 6 para activar AUTOMATICO o SIEMPRE ENCNDIDO. NOTA: si usted selecciona la opción AUTOMATICO, el LCD se activará durante la llamada entrante o cuando se presione un botón.
Conexión y Programación Volumen del Tono de Tecla 1. Oprima el botón MENU. 2. Utilice los botones 5 o 6 para ir a la indicación CONFIG SONIDO. 3. Oprima el botón Sel/Save. 4. Utilice los botones 5 o 6 para llegar a la indicación VOL TONO TECLA. 5. Oprima el botón Sel/Save. 6. Utilice los botones 5 o 6 para activar OFF, BAJO o ALTO. 7. Oprima el botón Sel/Save para salvar. Para volver a empezar, oprima el botón EXIT para volver al menú de VOL TONO TECLA.
Conexión y Programación Clave de Área Local 1. Oprima el botón MENU. 2. Utilice los botones 5 o 6 para ir a la indicación CONFIG TELFONO. 3. Oprima el botón Sel/Save. 4. Utilice los botones 5 o 6 para ir a la indicación CLAVE DE AREA. 5. Oprima el botón Sel/Save. La indicación INGRESE DIGITO aparece en la pantalla. 6. Utilice el teclado numérico para inscribir su clave de área. NOTA: Si usted comete un error, oprima el botón DELETE y elimine los tres dígitos para volver a inscribir su clave de área. 7.
Conexión y Programación 6. Utilice los botones 5 o 6 para ir al # de la clave de área deseada. 7. Oprima el botón Sel/Save. 8. Utilice el teclado numérico para inscribir su clave de área. Oprima el botón DELETE para eliminar y volver a inscribir elimine los tres dígitos. 9. Cuando haya terminado, oprima el botón Sel/Save y vuelva al menú de CLAVE # x.
Operación del Teléfono Para Restablecer las Programaciones de Fábrica Esta función le permite volver todas las programaciones del menú a las programaciones originales. 1. Oprima el botón MENU. 2. Utilice los botones 5 o 6 para ir a la indicación RESTAUR CONFIG. 3. Oprima el botón Sel/Save. 4. Utilice los botones 5 o 6 para ir a la indicación SI. 5. Oprima el botón Sel/Save para salvar. Para volver a empezar, oprima el botón EXIT para volver al menú de RESTAUR CONFIG.
Operación del Teléfono 6. Marque el número telefónico. 7. Oprima el botón HEADSET cuando usted haya terminado. NOTA: Para conversar utilizando los audífonos, el auricular debe estar sobre la base. Para Recibir Llamadas con el Auricular Cuando el teléfono timbra, el indicador de la línea correspondiente parpadea rápidamente. 1. Levante el auricular (su teléfono automáticamente selecciona la línea que timbra). 2. Cuando haya terminado, cuelgue el auricular.
Operación del Teléfono Para cambiar a auricular, levántelo. El altavoz o los audífonos se desactivan. Para cambiar a los audífonos, oprima el botón HEADSET. El indicador de audífonos se ilumina. Coloque el auricular sobre la base. Pre-Marcado de Números Telefónicos La función de pre-marcado le permite inscribir, verificar y cambiar un número telefónico antes de ocupar la línea.
Operación del Teléfono En Espera Para Poner una Llamada en Espera 1. Oprima el botón HOLD. El indicador de la línea en espera parpadea en azul. 2. Cuelgue u oprima el botón de otra línea. Para Liberar una Llamada en Espera Oprima el botón de la línea en donde está la llamada en espera. El teléfono automáticamente se pone en modalidad de altavoz. NOTA: Si usted quiere cambiar modalidades, levante el auricular para cambiar a modalidad de auricular, u oprima el botón de audífonos para utilizar los audífonos.
Operación del Teléfono 2. Use el botón Vol + ó Vol - para ajustar el volumen del timbre. El teléfono genera un timbre de muestra de 2 segundos de longitud en el ajuste de selección para verificación de la intensidad. Volumen del Altavoz, Auricular, o Audífonos Mientras que usted utiliza el teléfono, toque los botones Vol + o Vol - para programar el volumen a un nivel cómodo. El teléfono almacena esta programación cuando usted suelta el botón.
Operación del Teléfono 1. Mientras que el auricular está en la base, oprima el botón DND. El indicador DND parpadea. 2. Utilice los botones 5 o 6 para seleccionar la duración. Usted puede escoger entre 15 minutos, 30 minutos, 45 minutos, 1 hora, 2 horas e incrementar la duración a intervalos de 1 hora hasta 24 horas. 3. Oprima el botón Sel/Save para salvar su selección. 4. Cuando la función de No Molestar está activada, el indicador DND parpadea.
Funciones del Identificador de Llamadas (Caller ID) Funciones del Identificador de Llamadas (Caller ID) Pantalla Sumario La pantalla sumario muestra la hora actual, la fecha actual y el número de llamadas esperando a ser revisadas. Esto aparece hasta que se oprime cualquier botón. Dentro de 10 segundos después de que se recibe una llamada nueva la información de la persona que acaba de llamar aparece en la pantalla y el indicador azul NUEVA parpadea..
Funciones del Identificador de Llamadas (Caller ID) Para Salvar Archivos del Identificador de Llamadas a la Memoria /Directorio de Memoria 1. Mientras aparece en nombre y número telefónico en la pantalla, oprima el botón Sel/Save si usted quiere cambiar la información. Después, siga los pasos en la sección “Para Almacenar el Nombre y Número en la Memoria” para cambiar y almacenar el archivo. 2.
Funciones del Identificador de Llamadas (Caller ID) 3. Para ajustar el formato del número, appuyez sur FORMAT. Por ejemplo, un número local de 7 dígitos algunas veces no se puede marcar porque requiere un formato de 10 o de 11 dígitos. Utilice los botones FORMAT para recorrer los formatos de 7, 10 y 11 dígitos.
Memoria Memoria de Acceso Directo y Directorio de Memoria Para Almacenar un Nombre y Número en la Memoria 1. Oprima el botón STORE. La indicación INSCRIBA DIGITO aparece en la pantalla. 2. Utilice el teclado numérico para inscribir el número que usted quiera almacenar (hasta 25 dígitos). NOTA: Si usted comete un error, presione el botón DELETE para eliminar el último dígito y retroceder un espacio. 3. Oprima el botón Sel/Save o STORE. 4.
Memoria Para Revisar Nombre y Números Almacenados 1. Oprima el botón DIR. 2. Utilice los botones 5 o 6 para recorrer los archivos almacenados en el Directorio de Memoria . U 1. Oprima uno de los botones de memoria (“MEMORY”) para revisar el archivo localizado en Memoria de Acceso Directo. Para Cambiar un Nombre o Número Almacenado 1. Oprima el botón DIR. 2 . Utilice los botones 5 o 6 para llegar a la localización de memoria deseada. 3.
Memoria Para Marcar un Número Almacenado Si el número está almacenado en la Memoria del Directorio, 1. Levante el auricular, u oprima el botón SPEAKER o HEADSET. 2. Espere al tono de marcar. 3. Oprima el botón DIR o utilice los botones 5 o 6 para encontrar el número. 4. Oprima el botón DIAL y el número se marca automáticamente. Si el número está almacenado en la Memoria de Acceso Directo, 1. Levante el auricular, u oprima el botón SPEAKER o HEADSET. 2. Espere al tono de marcar. 3.
Memoria Para Borrar Todas las Memorias del Directorio Esta función le permite eliminar todas las memorias almacenadas en el directorio a la vez. 1. Oprima el botón MENU. 2. Utilice los botones 5 o 6 para ir a la indicación CONFIG TELFONO. 3. Oprima el botón Sel/Save. La indicación BORRAR MEMORIA aparece en la pantalla. 4. Oprima el botón Sel/Save. 5. Utilice los botones 5 o 6 para llegar a la indicación SI. 6. Presione Sel/Save para confirmar la eliminación de toda la memoria en el directorio.
Otra Información Ajuste del Tono de Audio Hay cuatro perfiles preestablecidos para permitir el ajuste del tono de audio (ecualizador gráfico) del altavoz. Cuando el altavoz esté activo, presione el botón Preset EQ para moverse a través de las selecciones. Mensajes de la Pantalla Los siguientes mensajes especiales indican el estado actual de un mensaje o del aparato: NO HAY LLAMADAS El registro de memoria está vacío.
Otra Información La otra persona no le escucha • Asegúrese que el auricular y el cable de los audífonos estén conectados adecuadamente. • Asegúrese que la función del enmudecedor (“MUTE”) no haya sido activada. El teléfono no timbra • Asegúrese que el selector del timbre (“RINGER”) esté en la posición de activado (ON). • Usted puede tener demasiadas extensiones de teléfono en su línea. Intente desconectar algunos teléfonos. • Vea las soluciones para “No hay tono de marcar.
Otra Información Cómo Obtener Servicios de Mantenimiento Si usted experimenta problemas con este equipo, para reparaciones o para información de garantía, comuníquese con el departamento de servicio al cliente al 1-800-511-3180. Si el equipo está causando daños a la red telefónica, la compañía telefónica puede pedirle que desconecte su equipo hasta que el problema haya sido resuelto. Este producto puede únicamente ser reparado por el fabricante o sus agentes de reparación autorizados.
Otra Información Garantía Limitada Lo que cubre su garantía: • Defectos de materiales o de trabajo. Por cuánto tiempo después de la compra: • Un año, a partir de la fecha de compra. (El periodo de garantía para unidades arrendadas se inicia con la primera renta o 45 días de la fecha del embarque a la firma de arrendamiento, lo que ocurra primero). Lo que haremos: • Proporcionarle una unidad nueva o, a nuestra opción, una reacondicionada.
Otra Información • Desastres naturales, por ejemplo y sin limitarse a ellos, daños por relámpagos. Registro del Producto: • Por favor llene y envíe por correo la Tarjeta de Registro del Producto que se embarcó con su producto. Hará más fácil que hagamos contacto con usted si fuera necesario. No se requiere la devolución de la tarjeta para tener la cobertura de la garantía. Limitaciones sobre la Garantía: • LA GARANTÍA ESPECIFICADA ANTERIORMENTE ES LA ÚNICA GARANTÍA APLICABLE A ESTE PRODUCTO.
Índice A G Ajuste del Tono de Audio 32 Auricular 23 Auricular y Audífonos 21 Garantía Limitada 35 Guía para Solución de Problemas 32 B Botón de Servicios Especiales (“Flash”) 22 C Caller ID (Identificador de Llamadas) con Call Waiting (Llamada en Espera) 27 Clave de Área Local 17 Claves de Área Regionales 17 Cómo Obtener Servicios de Mantenimiento 34 Compatibilidad con Audífonos (CCA) 3 Conexión y Programación 7,8,9 Conferencia 23 Contraste del LCD 14 Cuidado General del Producto 33 E En Espera 22 Enm
Índice P Pantalla Sumario 25 Para Almacenar el Último Número Marcado 29 Para Almacenar una Pausa 29 Para Almacenar un Nombre y Número en la Memoria 28 Para Apagar el Indicador de Mensajes de Voz: 24 Para Borrar Todas las Memorias del Directorio 31 Para Borrar todos los Archivos del Identificador de Llamadas 26 Para Borrar un Archivo del Identificador de Llamadas 26 Para Cambiar entre Altavoz 21 Para Cambiar un Nombre o Número Almacenado 29 Para Hacer Llamadas con el Altavoz 19 Para Hacer Llamadas con el Aur
Información de Accesorios Convertidor de corriente AC Audífonos 5-2719 5-2425 Para ordenar, tenga lista su tarjeta Visa, Mastercard o Discover y llame al 1-800-338-0376. Se aplicará un cargo por envío al ordenar. La ley nos requiere que cobremos el impuesto sobre la venta apropiado para cada estado, condado y área individuales a las cuales se envíe la mercancía. Los artículos están sujetos a disponibilidad.
Visite el sitio de RCA en www.rca.com Por favor no envíe ningún producto a la dirección de Indianápolis enlistada en este manual o en la caja. Esto únicamente resultará en un retraso para dar servicio a su producto. Thomson Inc. 10330 North Meridian Street Indianapolis, IN 46290 © 2006 Thomson Inc. Trademark(s) ® Registered Marca(s) Registrada(s) Modelo 25204 00007055 (Rev.