User’s Guide 25216 ®
Equipment Approval Information Your telephone equipment is approved for connection to the Public Switched Telephone Network and is in compliance with parts 15 and 68, FCC Rules and Regulations and the Technical Requirements for Telephone Terminal Equipment published by ACTA. 1 Notification to the Local Telephone Company On the bottom of this equipment is a label indicating, among other information, the US number and Ringer Equivalence Number (REN) for the equipment.
The telephone company may make changes in its communications facilities, equipment, operations or procedures where such action is required in the operation of its business and not inconsistent with FCC Rules and telephone company must give you adequate notice, in writing, to allow you to maintain uninterrupted service. Notice: techniques applicables d’Industrie Canada.The Ringer Equivalence Number is an indication of the maximum number of devices allowed to be connected to a telephone interface.
Table of Contents Equipment Approval Information Interference Information Licensing Hearing Aid Compatibility Introduction Parts Checklist Telephone Jack Requirements Important Installation Guidelines Phone Layout Installing the Phone Programming the Phone - Standby Screen - Programming Functions 2 3 3 3 5 5 6 6 7 8 11 11 11 - Phone Settings 11 - Date/Time 11 - Set Date/Time 11 - Set Format 12 - Time Format 12 - Date Format 12 - Dial Mode 12 - Area Code 12 - 2nd Call Alert 13 - Display Setting 13 - Langua
Introduction CAUTION: When using telephone equipment, there are basic safety instructions that should always be followed. Refer to the IMPORTANT SAFETY INSTRUCTIONS provided with this product and save them for future reference.
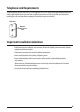
Telephone Jack Requirements To use this phone, you will need a RJ11C (for a single line) or a RJ14C (for two lines) type modular phone jack, which might look like the one pictured here, installed in your home or office. If you find don’t have either modular jack, call your local phone company to find out how to get one installed.
Phone Layout Display 3 Soft Keys Volume +/Prev Key Message Waiting Next Key One-Touch Memory Log Directory, Caller ID Delete, Bluetooth® DND, Exit Redial, Flash Cell Tone 7 Headset, Hold, Mute Pause Line1, Line 2 Speakerphone
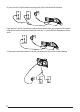
Installing the Phone The phone has the ability to connect to two landlines and a Bluetooth® cellular telephone. The landlines may be connected by a single two-line cable or two single-line cables. Please see page 15 for instructions on how to connect your RCA 25216 to your Bluetooth® cellular phone. 1. Choose an area near an electrical outlet and a telephone wall jack (RJ11C), and place your corded telephone on a level surface, such as a desktop or tabletop, or you may mount it on the wall. 2.
Or, you can use the 2 single telephone lines plug into the 2 jacks on the back of the telephone. Line 2 Line 1 If you have Line 1 and Line 2 wired into one wall jack in your home or office, you can use one of the supplied telephone line cords to connect from the wall jack to the Line 1 + 2 jack on the back of the phone as shown below. Line 1 + 2 5.
-OR- Line 2 Line 1 -OR- Line 1 & 2 6. Connect the handset cord: Connect one end of the coiled handset cord to the jack on the side of the base and the other end into the jack in the handset, and place the handset in the cradle. IMPORTANT INFORMATION Refer to your cell phone user's manual for more information about its Bluetooth® function.
Programming the Phone Standby Screen The phone displays the current date, time and the Soft keys. NOTE: The Soft keys will change according to the status of the unit. menu “Phone Setting- Date /Time” to set the clock. If you subscribe to Caller ID services from your telephone service provider, your clock will be set automatically each time you receive a phone call. However, you will need to set the year by going to the Date/Time option in the Phone Settings Menu.
SELECT Set Format SELECT SELECT Set Format SELECT SELECT Dial Mode From the Phone Settings Menu: 1. Use the VOL (- or +) button to scroll to Dial Mode. 2. Press the SELECT Soft key. 3. Use the VOL (- or +) button to scroll to select either Line 1 or Line 2. 4. Press the SELECT Soft key to select. 5. Use the VOL (- or +) button to scroll to select either Tone or Pulse. Note: the default setting is Tone. Area Code From the Phone Settings Menu: 1. Use the VOL (- or +) button to scroll to Area Code. 2.
2nd Call Alert From the Phone Settings Menu: 1. Use the VOL (- or +) button to scroll to 2nd Call Alert. 2. Press the SELECT Soft key. 3. Use the VOL (- or +) button to scroll to select either On or 4. Press the SELECT Soft key to select. Note: the default setting is On. SELECT SELECT SELECT Note: The default setting is English. SELECT SELECT Note: The default setting is Level 3. SELECT (- or +) button to scroll to either Always On or Automatics. SELECT Note: The default setting is Automatics.
1. Make sure your phone is OFF (not in Talk mode). 2. Press the MENU Soft key to go to the main menu. 3. Use the VOL (- or +) button to scroll to Sound Settings 4. Press the SELECT Ring Volume SELECT SELECT SELECT Note: The line 1 default ring tone is melody 1 and the line 2 default is melody 2. Ring Volume From the Sound Settings Menu: 1.Press the VOL(- or +)button to scroll to the Ring Volume. 2.Press SELECT Soft key. 3.Use the VOL (- or +) button to scroll to select either Line 1 or Line 2. 4.
1. Make sure your phone is in idle mode. (not in Talk mode) 2. Press the MENU Soft key (left) to go to the main menu. 3. Press VOL (- or +) button to scroll to Voice Mail. 4. Press SELECT Call VM Settings Call VM From the Voice Mail Menu: 1. Press VOL (- or +) button to scroll to Call VM. 2. Press SELECT Soft key 3. Use the VOL (- or +) button to toggle between Line 1 and Line 2 and press SELECT soft key to select. 4. The phone will dial your voicemail access number.
all Bluetooth® devices within range. Select your Bluetooth® cell phone and press Select soft key. 3. Your cell phone will ask you for a PIN or password. Use the number keys on your cell phone to enter the default PIN 0000. When the device is paired successfully, device information will be saved to the base and can be displayed by pressing the Bluetooth® button. NoteOnce you have paired a device with the telephone base, the pairing information is stored in the telephone base.
Telephone Operation Making Calls with the Corded Handset 1. Pick up the handset. The unit will automatically select an available land line. If both land lines are available, Line 1 Bluetooth® ell button. -ORPress the Line 1, Line 2 or Cell button and then pick up the corded handset to select the desired line. 2. Wait for a dial tone, and then dial a phone number using the dial-pad, the directory or a one-touch speed dial. Making Calls in Speakerphone Mode 1. Press the speaker button.
Answering a Call 1. Pick up the corded handset to answer the call in Handset mode, -OR2. Press the speaker button to answer the call in speakerphone mode, -OR3. Press the corresponding line button to answer the call in speakerphone mode, -OR4. Press the headset button to answer the call in headset mode. Speaker button (in speakerphone mode) or Headset button (in headset mode) to end the call. NOTE: Adjust the volume by pressing the vol (- or +) button during a call.
Flash If you subscribe to Call Waiting service from your telephone service provider and you receive an incoming call on while a call is currently active on the same line, you will hear an audible tone to indicate another call is waiting. Also, Caller ID information (if available) for the waiting call will be displayed. 1. To connect to the waiting call, press the Flash button on your phone. This will place the origian call on hold and connect you to the new incoming call. 2.
SAVE 6. You can edit the telephone number by using the Delete button and number keys. 7.Press SAVE Soft key to enter the VIP Tone Melody selection. 8.User VOL(- or +)button to scroll to the desired ring tone melody and press SELECT Soft key to complete. NOTE:If an incoming call number matches this record,the VIP Tone Melody will ring 3.
Bluetooth® Operation When the unit is in idle mode(not on an active call), press the Bluetooth® button. The menu will display a list of Bluetooth® devices (up to eight ) that are paired to the RCA 25216. Transfer cellular call to cell MY DEVICE BACK DIAL DISC This feature allows you temporarily cancel Bluetooth®capabilites and transfer the active cell call from the base back to your cell phone. The base will then return to standby mode.
Deleting a CID Record Press the Delete button to delete the record shown in the display. The screen displays DELETE?. Press the OK will display Empty. Deleting All Call Records This feature allows you to clear all CID records at once. 1. While viewing a CID record, press and hold the Delete button. The screen displays Delete All? 2.
SAVE 6. Press the SAVE Soft key to enter VIP tone melody selection. NOTE: If an incoming call number matches this record the VIP Tone Melody will ring. 7. Use VOL (- or +) button to scroll to the selection and press SELECT Soft key to complete. NOTE: Press the Delete button will delete the last number or character during editing.
SAVE 24
3. Press SAVE Soft key to proceed to number change. You may now change the number, if desired. 4. Press SAVE Soft key to proceed to VIP Tone Melody selection. You may use VOL (- or +) key to scroll to the selection you desired. NOTE: If an incoming call number matches this record the VIP Tone Melody will ring. 5. Press SELECT Soft key to complete.
4. Press the Speaker, Line 1, Line 2 or Cell button or While in idle mode: 1. Make sure your phone is in idle mode. (Not in Talk mode) 2. Press the One-Touch/Memory Log button to select the desired record. 3. Press the speaker, line 1/2 button or Line1/Line2 Soft key or pick up the handset on the base. The number dials automatically.
Backup Battery Operation If the power cord is not plugged into the unit, and the battery is available, the unit enters Battery Operation Mode. In this mode, the base is fully functional. Troubleshooting Guide Telephone Solutions No dial tone • Check or repeat installation steps. • Make sure the base power cord is connected to a working electrical outlet. Make sure the telephone line cord is connected to the base and the wall jack. • Connect another phone to the same jack.
Warranty Assistance If trouble is experienced with this equipment, for warranty information, please contact customer service at 1-800-511-3180. If the equipment is causing harm to the telephone network, the telephone company may require that you disconnect the equipment until the problem is resolved. user’s authority to operate this product. For instructions on how to obtain a replacement unit, refer to the warranty included in this guide or call customer service at 1-800-511-3180.
• A new unit will be shipped to you freight prepaid. What your warranty does not cover: • Customer instruction. (Your Instruction Book provides information regarding operating instructions and user controls. Any additional information should be obtained from your dealer.) • Installation and setup service adjustments. • Batteries. • Damage from misuse or neglect. • Products purchase or serviced outside the USA. • Acts of nature, such as, but not limited to lightning damage.
How state law relates to this warranty: • Some states do not allow the exclusion nor limitation of incidental or consequential damages, or limitations on how long an implied warranty lasts so the above limitations or exclusions may not apply to you. If you purchased your product outside the USA: • This warranty does not apply. Contact your dealer for warranty information. The Bluetooth® word mark and logos are owned by the Bluetooth® SIG, In c. and any use of such their respective owners.