25-Channel Caller ID with Call Waiting Cordless Telephone User’s Guide 26730 We bring good things to life.
FCC REGISTRATION INFORMATION Your telephone equipment is registered with the Federal Communications Commission and is in compliance with parts 15 and 68, FCC Rules and Regulations. 1 Notification to the Local Telephone Company On the bottom of this equipment is a label indicating, among other information, the FCC Registration number and Ringer Equivalence Number (REN) for the equipment. You must, upon request, provide this information to your telephone company.
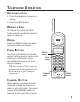
TABLE OF CONTENTS FCC REGISTRATION INFORMATION ........... 2 INTERFERENCE INFORMATION ................... 2 HEARING AID COMPATIBILITY .................. 2 INTRODUCTION ..................................... 4 INSTALLATION AND SETUP ...................... 5 MODULAR JACK REQUIREMENTS ......... 5 DIGITAL SECURITY SYSTEM ................. 5 DESKTOP INSTALLATION ...................... 6 WALL MOUNT INSTALLATION .............. 7 TELEPHONE OPERATION ......................... 9 RECEIVING A CALL ......................
INTRODUCTION Your Caller ID phone stores and displays specific information, provided by your local telephone company, to subscribers of Caller ID or similar caller identification services. You must subscribe to one of these services in order to use this unit. Your Caller ID phone enables you to: • Identify callers before you answer the phone. • View the time and date of each incoming call. • Record up to 40 Caller ID messages sequentially. • Know who called while you were away.
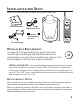
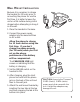
INSTALLATION AND SETUP Make sure your package includes the items shown here.
DESKTOP INSTALLATION NOTE: For desktop charging only, the handset is able to charge facing up or down. 1 3 2 4 5 1. Place the handset in the base. 2. Set the RINGER switch on the handset to ON. 3. Raise the base antenna. 4. Plug the power supply cord into the base and then into an AC outlet. The CHARGE/IN USE light comes on indicating that the battery is charging. Allow the phone to charge for 12 hours before using the first time.
WALL MOUNT INSTALLATION Because it is necessary to charge the handset for 12 hours prior to connecting the phone for use the first time, it is better to leave the unit on a flat surface during initial charge before attempting to hang it on the wall. 1 3 2 1. Place the handset in the base. 2. Connect the power supply adapter into the base and then an AC outlet. Allow the phone to charge for 12 hours before using the first time.
6. Slip the mounting holes over the wall plate posts and slide the unit down firmly into place. (Wall plate not included.) NOTE : The phone automatically defaults to touch-tone dialing. To change to pulse (rotary) dialing, see “Tone/Pulse Dialing. If you don’t know which type of service you have, check with the phone company.
TELEPHONE OPERATION RECEIVING A CALL 1. Check the display to see who is calling. 2. Press the TALK button. MAKING A CALL To make a call, press the TALK button before you dial and press it again to hang up. REDIAL Press the REDIAL button to redial the last number you dialed. FLASH BUTTON Use the FLASH button to activate custom calling services such as call waiting or call transfer, which are available through your local phone company.
TEMPORARY TONE This feature enables Pulse (rotary) service phone users to access touch-tone services offered by banks, credit card companies, etc., by pressing the TONE button to temporarily make the phone touchtone compatible. To get information about your bank account, for example, you would: REDIAL 1. Call the bank’s information line. 2. Press the TONE button (*) after your call is answered. 3. Follow the voice instructions to complete your transaction.
RINGER SWITCH The RINGER switch must be ON for the handset to ring during incoming calls. TONE/PULSE DIALING This adjustment allows you to select tone (touch-tone) or pulse (rotary) mode dialing. The phone is automatically set for touch-tone use. TONE 1. Turn the phone off. 2. Press and hold the CHANNEL button for 2 seconds until the phone beeps. 3. Press TONE* REDIAL VOLUME TALK PHONE CALL BACK PULSE 1. Turn the phone off. 2. Press and hold the CHANNEL button for 2 seconds until the phone beeps.
VOICE MESSAGING Provided your phone company offers voice messaging service and you subscribe to it, the CHARGE/IN USE light on the base will flash when the phone is not in use to indicate there is a message waiting. It will stop flashing after the message has been reviewed.
CALLER ID FEATURES This unit receives and displays information transmitted by your local phone company. This information can include the phone number, date, and time; or the name, phone number, date, and time. The unit can store up to 40 calls for later review. CALLER ID WITH CALL WAITING Provided you subscribe to Caller ID with Call Waiting service from your phone company, you are able to see who is calling when you hear the call waiting beep.
When the memory is full, a new call automatically replaces the oldest call in memory. NEW appears in the display for calls received that have not been reviewed. Time NOTE: Check with your local phone company regarding name service availability. Number of calls Date 10:51 A.M. 8/11 NEW CALL REPT MEMO # 25 3175554231 SMITH JOHN Caller ID phone number Caller ID name REVIEWING MESSAGES As calls are received and stored, the display is updated to let you know how many calls have been received.
DELETING RECORDS Use the DELETE button to erase the record currently shown in the display or all records. DELETING THE CURRENT RECORD 1. Press DELETE. The display shows ERASE CALL ID? 2. Press DELETE again to erase the record. DELETING ALL RECORDS 1. Press and hold DELETE. The display shows ERASE ALL? 2. Press DELETE again to erase all records. DIALING A CALLER ID NUMBER CALL BACK button REDIAL VOLUME TALK PHONE CALL BACK GHI 1. Make sure the phone is OFF.
CHANGING THE NUMBER FORMAT The FORMAT button lets you change the format of the displayed number. The available formats are as follows. 7-digit 7-digit telephone number. 10-digit 3-digit area code + 7-digit telephone number. 11-digit long distance code “1” + 3-digit area code + 7-digit telephone number. CALL BACK button 1. Use the arrow buttons (* and #) to scroll to the number you want to call back. 2. If the number will not dial as shown, press the FORMAT button.
THE MEMORY FEATURE Store up to 10 24-digit numbers in memory for quick dialing. This memory feature is in addition to the 40 Caller ID records that can be stored in memory. STORING A NUMBER IN MEMORY The phone must be OFF when you store numbers. 1. Press the MEMORY button. 2. Press the memory location number (0-9). 3. Press MEMORY again. The display shows ENTER NAME. 4. Use the keypad to store a name (up to 15 characters). More than one letter is stored in each of the number keys.
and 2 two times for B. You need to press FORMAT between the B and the A since they are stored within the same number key. 5. Press MEMORY. The display shows ENTER TEL NUMBER. 6. Use the keypad to enter the number you want to store (up to 24 digits). 7. Press MEMORY again to store the number. 8. Record whose number is stored in the location on the memory label provided. You will also be able to view the name and number in the phone's display.
DIALING A STORED NUMBER 1. Make sure the phone is ON by pressing the TALK button. 2. Press MEMORY. 3. Press the number (0-9) for the desired memory location OR use the arrow (* and #) buttons to scroll through the numbers stored in memory and press CALL BACK when you reach the desired number. USING CALL BACK This feature allows you to call back Caller ID records that were previously stored. 1. Make sure the phone is OFF. 2.
CHAIN DIALING FROM MEMORY Use this feature to make calls which require a sequence of numbers such as using a calling card for a frequently called long distance number. Basically, you dial each part of the sequence from memory. The following example shows how you can use chain dialing to make a call through a long distance service: The Number For Memory Location Long distance access number Authorization code Frequently called long distance number 7 8 9 1. Make sure the phone is ON. 2.
INSERTING A PAUSE IN THE DIALING SEQUENCE Press the REDIAL button to insert a delay in the dialing sequence of a stored telephone number when a pause is needed to wait for a dial tone (for example after you dial 9 for an outside line, or to wait for a computer access tone). Each pause counts as 1 digit in the dialing sequence. REVIEWING AND DELETING STORED NUMBERS 1. Press MEMORY, then press the arrow (* and #) keys to view the entry. 2. While the entry is displayed, press DELETE to delete the entry.
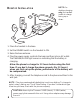
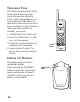
CHANGING THE BATTERY The handset runs on a consumer-replaceable nickel cadmium battery pack. If you experience any of the following problems, you may need to replace the battery pack: • Short talk time • Poor sound quality • Limited range • CHARGE/IN USE light fails to light Make sure phone is OFF before you replace battery. Battery Holding Strap 1. Slide open the battery compartment door. Plug 2. Unhook the strap holding the battery in place. 3. Pull out the 4. Remove the battery plug. battery pack.
BATTERY SAFETY PRECAUTIONS • Do not burn, disassemble, mutilate, or puncture. Like other batteries of this type, toxic materials could be released which can cause injury. • To reduce the risk of fire or personal injury, use only the battery listed in the User’s Guide. • Keep batteries out of the reach of children.
MESSAGE INDICATORS The following indicators show the status of a message or of the unit. CALLER ID ERROR Caller information has been interrupted during transmission or the phone is excessively noisy. ENTER NAME Prompt telling you to enter name one of the 10 memory locations. ERASE ALL? Prompt asking you if you want to erase all Caller ID records. ERASE CALL ID? Prompt asking you if you want to erase the current Caller ID record that is shown on the display.
TROUBLESHOOTING TIPS CALLER ID Problem Solution No Display • Is battery fully charged? Try replacing the battery. • If you are using AC power, make sure that the unit is connected to a non-switched electrical outlet. Disconnect the unit from the plug and plug it in again. • Did you order Caller ID service from your local telephone company? The display won't work unless you order Caller ID service from your phone company.
Problem Solution Dial tone is OK, but can't dial out • Make sure the TONE/PULSE setting is programmed correctly. Handset does not ring • Make sure the RINGER switch on the handset is turned to ON. • You may have too many extension phones on your line. Try unplugging some phones. • See solutions for “No dial tone.” You experience static, noise, or fading in and out • • • • • Unit beeps • Place handset in base for 20 seconds to reset the security code.
CAUSES OF POOR RECEPTION • Aluminum siding • Foil backing on insulation • Heating ducts and other metal construction can shield radio signals • You’re too close to appliances such as microwaves, stoves, computers, etc. • Atmospheric conditions, such as strong storms • Base is installed in the basement or lower floor of the house • Base is plugged into an AC outlet with other electronic devices • Baby monitor is using the same frequency • Handset battery is low. • You’re out of range of the base.
SERVICE The FCC requires this product to be serviced only by the manufacturer or its authorized service agents. In accordance with FCC requirements, changes or modifications not expressly approved by Thomson Consumer Electronics could void the user’s authority to operate this product. For instructions on how to obtain service, refer to the warranty included in this user's guide or contact Consumer Information at 1-800-448-0329.
Sales Tax........................................................$_______________ Daytime Phone Number ( )_______________________________ City ________________________State________ ZIP_________________ Address_____________________________________ Apt.____________ Name_______________________________________________________ Ronks, PA 17573-8419 P.O. Box 8419 Mail Order Department TCE Mail order form and money order or check (in U.S. currency) made payable to Thomson Consumer Electronics, Inc.
INDEX A M Accessory order form 29 Making a call 9 Memory 17 Message indicators 24 Modular jack requirements 5 B Battery Changing 22 C Call Back 11 Caller ID operation 13 Caller ID with Call Waiting 13 Causes of poor reception 27 Chain dialing from memory 20 Changing the battery 22 D Deleting all records 15 Deleting records 15 Desktop installation 6 Dialing a Caller ID number 15 Dialing a stored number 19 F FCC registration information 2 Flash button 9 G General product care 23 H Handset sound signa
LIMITED WARRANTY What your warranty covers: • Any defect in materials or workmanship. For how long after your purchase: • One year. (The warranty period for rental units begins with the first rental or 45 days from date of shipment to the rental firm, whichever comes first.) What we will do: • Provide you with a new or, at our option, a refurbished unit. • The exchange unit is under warranty for the remainder of the original product’s warranty period. How to make a warranty claim: • Properly pack your unit.
Serie 26730 Teléfono Inalámbrico de 25 Canales con Identificador de Llamadas y Llamada en Espera Manual del Usuario Creamos cosas buenas para la vida.
INFORMACIÓN DE LA REGISTRACIÓN DE LA FCC Su equipo telefónico de la GE ha sido registrado con la Comisión Federal de Comunicaciones (FCC) y está en acuerdo con las Partes 15 y 68 de las Regulaciones y Reglas de la FCC. 1 Notificación a la Compañía Telefónica Local Al fondo de este equipo Ud. hallará un rótulo indicando, entre otra información, el número de la Registración con la FCC y el Número del Equivalente Timbre (REN) para este equipo. Ud.
TABLE DE CONTENIDO INFORMACIÓN DE LA REGISTRACIÓN DE LA FCC ............................... 2 INFORMACIÓN DE INTERFERENCIAS .... 2 COMPATIBILIDAD CON AUDÍFONOS .... 2 INTRODUCCIÓN ..................................... 4 INSTALACIÓN Y PROGRAMACIÓN .............. 5 SISTEMA DE SEGURIDAD DIGITAL: .... 5 REQUISITOS DE ENCHUFE MODULAR ...... 5 INSTALACIÓN SOBRE ESCRITORIO O SUPERFICIE PLANA ......................... 6 INSTALACIÓN SOBRE PARED ................. 7 OPERACIÓN DEL TELÉFONO .....................
INTRODUCCIÓN Su teléfono con Identificador de Llamadas almacena y muestra información específica, que proviene de su compañía telefónica local, para suscriptores del Identificador de Llamadas o servicios similares para la identificación de la persona que llama. Usted debe suscribirse a alguno de estos servicios para poder utilizar este aparato. Su teléfono Identificador de Llamadas le permite: • Identificar quién es la persona que llama antes de que usted conteste el teléfono.
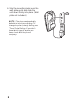
INSTALACIÓN Y PROGRAMACIÓN Asegúrese de que su paquete incluye los siguientes artículos: CHARGE/ IN USE PA G E / FIND Placa para montaje de pared Cable de línea telefónica REDIAL VOLUME TALK PHONE CALL BACK GHI DELETE 1 ABC 2 DEF 4 JKL 5 MNO 7 TUV 8 WXYZ OPER 0 # PQRS TONE Cable corto de línea telefónica Cable de corriente AC 3 6 9 CHANNEL FORMAT MEMORY FLASH ON OFF RINGER Base Auricular REQUISITOS DE ENCHUFE MODULAR Se requiere un jack modular RJ11C, que es el tipo de jack m
INSTALACIÓN SOBRE ESCRITORIO O SUPERFICIE PLANA 1 3 2 4 5 NOTA: Para cargar en posición sobre superficie plana unicamente, el auricular se puede cargar volteado hacia arriba o hacia abajo. 1. Coloque el auricular sobre la base. 2. Programe el selector del timbre (“RINGER”) del auricular en posición de encendido (“ON”). 3. Levante la antena de la base. 4. Conecte el cable de corriente a la base y después a un contacto de pared.
INSTALACIÓN SOBRE PARED Como es necesario cargar el auricular durante 12 horas antes de conectar el teléfono para usarlo por primera vez, es mejor dejar el aparato sobre una superficie plana durante la etapa de cargado inicial antes de intentar colgarlo sobre la pared. 1. Coloque el auricular sobre la base. 2. Conecte el adaptador del cable de corriente a la base y a un contacto AC. Deje que el teléfono se cargue durante 12 horas antes de usarlo por primera vez.
4. Después de cargar, conecte el cable corto de línea telefónica en el contacto localizado en la parte trasera del aparato y después al contacto de pared. 5. Sujete la placa para montaje introduciendo las dos lengüetas en la parte superior y después metiendo la lengüeta en la parte de abajo en su sitio. 4 5 6. Deslice los agujeros de montaje sobre los postecitos de la placa y resbale el aparato hacia abajo hasta que entre firmemente en su sitio.
OPERACIÓN DEL TELÉFONO PARA RECIBIR UNA LLAMADA 1. Cheque el visor para ver quién llama. 2. Oprima el botón para hablar (“TALK”). PARA HACER UNA LLAMADA Para hacer una llamada, oprima el botón para hablar (“TALK”) antes de marcar y oprímalo nuevamente para colgar. REDISCADO Oprima el botón para rediscar (“REDIAL”) para volver a marcar el último número que usted marcó.
TONO TEMPORARIO Esta función le permite a los usuarios de servicio de pulso (rotatorio) tener acceso a los servicios de tono (touch-tone) que ofrecen los bancos, compañías de crédito, etc., simplemente oprimiendo el botón “TONE” para hacer el teléfono compatible a servicio de tono temporalmente. Para obtener información de su cuenta bancaria, por ejemplo, usted tiene que: REDIAL VOLUME TALK PHONE CALL BACK GHI DELETE 1 ABC 2 DEF 4 JKL 5 MNO TUV 8 WXYZ OPER 0 # 7 PQRS 1.
SELECTOR DEL TIMBRE (“RINGER”) Botón para control de volumen (“VOLUME”) El selector del timbre (“RINGER”) debe estar en posición de encendido (”ON”) para que el auricular timbre cuando entran llamadas. DISCADO DE TONO/ PULSO Este ajuste le permite seleccionar la modalidad de discado, ya sea tono (touch-tone) o pulso (rotatorio). El teléfono está programado para uso de tono (touch-tone). REDIAL TONO 1. Apague el aparato. 2.
MENSAJE DE VOZ Suponiendo que su compañía telefónica ofrece servicio de mensaje de voz y que usted se suscribe a este servicio, elindicador “CHARGE/ IN USE” en la base se iluminará parpadeando cuando el teléfono no esté en uso para indicar que hay un mensaje esperando. El parpadeo cesa después de que el mensaje ha sido revisado.
FUNCIONES DEL IDENTIFICADOR DE LLAMADAS Este aparato recibe y muestra información transmitida por su compañía telefónica local. La información puede incluir el número telefónico, fecha y hora; o el nombre, número telefónico, fecha y hora. El aparato puede almacenar hasta 40 llamadas para ser revisadas después.
PARA RECIBIR Y ALMACENAR LLAMADAS Cuando usted recibe una llamada, la información es transmitida por la compañía telefónica a su Teléfono con Identificador de Llamadas entre el primero y el segundo timbre. Cuando la memoria está llena, una llamada nueva automaticamente reemplaza a la llamada más antigua en la memoria. La indicación de llamada nueva (“NEW”) aparece en el visor para llamadas recibidas que no han sido revisadas.
PARA BORRAR DATOS Use el botón “DELETE” para borrar el dato que se muestra actualmente en el visor o todos los datos. PARA BORRAR EL DATO ACTUAL 1. Oprima el botón “DELETE”. El visor le preguntará si borra el dato (“ERASE CALL ID?”). 2. Oprima “DELETE” nuevamente para borrarlo. PARA BORRAR TODOS LOS DATOS 1. Oprima y sostenga el botón “DELETE.” El visor le preguntará si borra todos los datos (“ERASE ALL?”). 2. Oprima “DELETE” nuevamente para borrar todos los datos.
PARA CAMBIAR EL FORMATO DEL NÚMERO El botón “FORMAT” le permite cambiar el formato del número mostrado en el visor. Los formatos disponibles son como sigue: 7-dígitos número telefónico de 7 dígitos 10-dígitos código de área de 3 dígitos + número telefónico de 7 dígitos 11-dígitos código de larga distancia 1 + código de área de 3 dígitos + número telefónico de 7 dígitos 1. Use los botones de las flechas (* y #) para recorrer números hasta llegar al número que usted quiere marcar.
LA FUNCIÓN DE MEMORIA Almacene hasta 10 números de 24 dígitos en la memoria para discado rápido. Esta función de memoria es además de los 40 datos del identificador de Llamadas que pueden ser almacenados en la memoria. PARA ALMACENAR UN NÚMERO EN LA MEMORIA El teléfono debe estar apagado (OFF) cuando usted almacena números. 1. Oprima el botón de memoria (“MEMORY”). 2. Oprima el número de la localización de memoria (0-9). 3. Oprima el botón “MEMORY” nuevamente.
cuatro veces para la S; oprima el 6 para la M; oprima el 4 tres veces para la I; oprima el 8 para la T; y el 4 dos veces para la H. Si usted está usando dos letras consecutivas que están almacenadas en la misma tecla numérica, usted debe oprimir el botón “FORMAT” entre las dos letras. Por ejemplo, si usted inscribe “Barb”, oprima el 2 dos veces para la B; oprima el botón “FORMAT”; oprima el 2 para la A; el 7 tres veces para la R; (Page 18) y el 2 dos veces para la B.
PARA MARCAR UN NÚMERO ALMACENADO 1. Asegúrese de que el teléfono está encendido (ON), simplemente oprimiendo el botón para hablar (“TALK”). 2. Oprima el botón de memoria (“MEMORY”). 3. Oprima el número de la localización de memoria deseada (0-9) O use los botones de flechas (* y #) para recorrer los números almacenados en la memoria y oprima “CALL BACK” cuando llegue al número deseado.
DISCADO EN CADENA DESDE LA MEMORIA Use esta función para hacer llamadas que requieren una secuencia de números como el usar una tarjeta para llamar por teléfono o un número de larga distancia llamado frecuentemente. Basicamente, usted marca cada parte de la secuencia desde la memoria.
PARA INTRODUCIR UNA PAUSA EN LA SECUENCIA DE DISCADO Oprima el botón “REDIAL” para introducir un retraso en la secuencia de discado de un número telefónico almacenado cuando una pausa es necesaria para esperar al tono de marcar (por ejemplo después de que usted marca 9 para obtener línea externa, o para esperar e tono de acceso en una computadora). PARA REVISAR Y BORRAR NÚMEROS ALMACENADOS 1. Oprima “MEMORY”, después oprima las teclas de las flechas (* y #) para ver la inscripción.
PARA CAMBIAR LA BATERÍA El auricular funciona con un paquete de batería cambiable por el cliente, de níquel-cadmio. Si usted experimenta cualquiera de los siguientes problemas, es posible que necesite cambiar el paquete de baterías: • Tiempo para hablar muy corto • Rango limitado • Mala calidad de sonido • La luz de “CHARGE/ IN USE” no se ilumina. Asegúrese de que el teléfono esté apagado (OFF) antes de cambiar la batería. Cinta que sostiene la batería 1. Deslice la 2.
PRECAUCIONES DE SEGURIDAD PARA LA BATERÍA • No queme, desarme, mutile, o agujere. Igual que otras baterías de este tipo, materiales tóxicos pueden escaparse y causarle daño. • Para reducir el riesgo de fuego o daño personal, use unicamente la batería indicada en la Guía del Usuario. • Mantenga las baterías fuera del alcance de los niños.
INDICADORES DE MENSAJES Los siguientes mensajes especiales indican el estado actual de un mensaje o del aparato: CALLER ID ERROR La información de la persona que llama ha sido interrumpida durante la transmisión o el teléfono es excesivamente ruidoso. ENTER NAME ERASE ALL? Indicación para pedirle que inscriba el primer nombre 10 en una de las 10 localizaciones de memoria. Indicación preguntándole si quiere borrar todos los datos del Identificador de Llamadas.
DETECCIÓN DE AVERÍAS IDENTIFICADOR DE LLAMADAS Problema Solución El visor no muestra nada • ¿Está la batería completamente cargada? • Si usted está usando corriente AC, asegúrese de que el aparato esté conectado a un contacto eléctrico que no tenga selector para apagarse. Desconecte el aparato del contacto y conéctelo nuevamente.
Problema Problema El tono de marcar está bien, pero no da línea • Asegúrese de que el selector de tono/pulso está programado correctamente. El auricular no timbra • Asegúrese de que el selector de timbre (“RINGER”) está encendido (ON). • Usted puede tener demasiadas extensiones de teléfono en su línea. Intente desconectar algunos teléfonos. • Vea las soluciones para “No hay tono de marcar”. Usted experimenta • estática, ruido, o • debilitamiento del • sonido entrante o saliente • • Cambie canales.
CAUSAS DE UNA MALA RECEPCIÓN • Recubrimiento externo de la casa con aluminio. • Aislación con revestimiento de papel de aluminio. • Conductos de calefacción y otras construcciones de metal que paran las señales de radio. • Está demasiado cerca de los aparatos eléctricos como microondas, cocina, computadoras, etc. • Condiciones atmosféricas, como una tormenta eléctrica. • La base está instalada en el sótano o en un piso más bajo de la casa.
CÓMO OBTENER SERVICIOS DE MANTENIMIENTO La FCC requiere que este producto sea sometido a servicios de mantenimiento solamente por el fabricante o por sus agentes de servicio autorizados. De acuerdo con los requerimientos de la FCC, los cambios o las modificaciones que no hayan sido expresamente aprobadas por Thomson Consumer Electronics podrían anular la autoridad que tiene el usuario de operar este producto.
29 $14.95 5-2454 Adaptador del cable de corriente AC (negro) Adaptador del cable de corriente AC (blanco) TOTAL Número Telefónico durante el Día ( )_______________________ Ciudad________________Estado________ Código Postal_________ Dirección_____________________________________Depto.____________ Nombre_______________________________________________________ Ronks, PA 17573-8419 P.O.
30
INDICE B O Botón de Centelleo/ Servicios Especiales 9 Botón para Cambiar Canales 9 Operación del Teléfono 9 C Causas de una mala recepción 27 Cómo obtener servicios de mantenimiento 28 Compatibilidad con Audífonos 2 Cuidado General del Producto 23 D Detección de Averías 25 Discado de Tono/ Pulso 11 Discado en Cadena desde la Memoria 20 F Formulario para hacer pedidos de accesorios 29 Funciones del Identificador de Llamadas 13 G Garantía limitada 32 I Identificador de Llamadas con Llamada en Espera 1
GARANTÍA LIMITADA Lo que cubre su garantía: • Cualquier defecto en material o mano de obra. Por cuánto tiempo después de la compra: • Un año. (El periodo de garantía para unidades arrendadas se inicia con la primera renta o 45 días de la fecha del embarque a la firma de arrendamiento, lo que ocurra primero). Lo que haremos: • Proporcionarle una unidad nueva o, a nuestra opción, una reacondicionada. • La unidad de intercambio quedará bajo garantía por el resto del periodo de garantía del producto original.