VideoCassette Recorder Owner's Manual
Warranty Registration No other RCA Video Cassette Recorder has the same serial number as yours. It is important that you record the number and other vital information here, in case your VCR is stolen or in case you need a complete description for any other reason. You will find the model and serial numbers on the back of the VCR. You will also find both numbers recorded on your registration form.
Contents Using This Manual Congratulations on your choice of an RCA VCR. You have selected a high-quality, precision-engineered instrument designed to give you years of trouble-free video and audio enjoyment. To get best performance from your new VCR, it is important that you carefully read and follow the operating instructions in this manual in the sequence in which they are presented. Should you experience a problem, please follow the "Things to Check" near the end of this manual.
Installation Unpacking Location When you unpack your new VCR, be sure you have removed all the accessories and information sheets. We recommend that you save the packing materials and box in case you ever need to ship or store your VCR The accessories supplied for connecting your antenna, VCR, and TV set are shown here. The remote control unit and its batteries are also packed in with the VCR. • Choose a location that is convenient, but away from sources of heat such as direct sunlight and heating units.
Antenna Connections • Disconnect (Your antenna A. Antenna resemble If your existing antenna to your TV like this: l F OR UHF OR _V Existing will probably INOOOR HF DR UHF from TV and Connect it to VCR. on this page.) one of the diagrams Disconnect the antenna from your TV and connect it to your VCR like this: is connected YOUR TV _N I_---_ _ I FROM ANTEN., ANTENNA v. D'SCO"N%CT FROM £.
Antenna Connections (continued) • Connect (The back VCR to back of TV. of your TV will probably resemble one of the diagrams below,) If the antenna connection on the back of your TV looks like this: A, Connect the VCR to your TV like this: I v_ I BACK OF TV BACKOFVCR OF @ UHF • VHF TV SCREWS OR v_F _F BACK OF TV B.
Cable-TV Connections Your VCR is designed to receive unscrambled cable channels 2 through 48 plus 98 and 99 without a "converter box." (These channels are sometimes designated 2 through 13, A through W, W+I through W+12, and A-2 and A-1.) There are several ways to hook up your VCR and TV, depending on the type of TV you have, the cable channels you receive, and whether or not some of the cable channels must be "unscrambled.
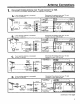
Cable-TV Connections (Continued) .C. When you use to select either these connections the A-B switch the converter output or the VCR O Disconnect Cable-TV from O Disconnect TV converter O Connect from Cable-TV converter. to input CO_VERTE_ cable. of splitter. is used output, This arrangement will let you use your VCR as a "remotecontrolled converter box" when you are not recording. O Connect splitter to converter O Connect VCR O Connect splitter to VCR.
What Your VCR Will Do Recording The built-in Sources VHF/UHF/Cable-compatible tuner can tune in any of the standard broadcast channels and up to 49 Cable-TV channels. Since your VCR has its own tuner, you can use it to record one program while you watch another one selected with your TV tuner. Also you can view and record the same program if you prefer. Your VCR also has special video and audio input connectors for recording from a camera or another VCR.
TV Monitor/Receiver Connections -Direct Video and Audio Connections Connecting the video output and audio output jacks of _our VCR to the corresponding video and audio input jacks of your TV monitor/receiver may produce a slightly better picture during playback. These "direct" signal connections bypass the TV tuner during playback, thus reducing the probability of "noise" and other "extra" signals that may degrade picture quality.
Video Cassettes RCA recommends that RCA cassettes be used with this unit. The tape in RCA cassettes is of high-quality formulation, intended for use with multi-speed VHS video cassette recorders. It has been manufactured to RCA's critical specifications for excellent performance with RCA VCR's, Use of tape not meeting these specifications could considerably reduce the performance of your VCR. Use of poor quality tapes or tapes that have been damaged or mishandled can contaminate the VCR heads.
Basic Operation ......... =OO ,/ II II° _1 _> \ -\ Basic Operating Controls and Displays PLAY: Starts playback. Now that you have connected your VCR to your TV and antenna or cable-TV system, you are ready to turn it on. You don't need to know all the details about the controls and display before you begin using your new VCR, so only those you will be using immediately are discussed here. (Additional information about the controls is on pages 16-17.) 0 POWER: Turns the VCR on and off.
Basic Operation (continued) -Turning on Your VCR for the First Time --Deleting When you have finished connecting the cables to your antenna and TV, plug in the VCR's power cord and press POWER. The light in the STOP button should come on. If it , flashes, too much moisture has collected inside the unit ! for it to operate. Leave the VCR turned on until the internal heat dries it and the light stops flashing. Proceed below when the light in the STOP button is on and not flashing.
Basic Operation (continued) -Setting Your TV to the VCR Channel The "VCR Channel"is the TV channel you use for viewing what the VCR is recording or playing, and for viewing the signal from the VCR tuner when it is stopped. Your TV must be set to this channel, and the light above the VCR/ TVswitch on your VCR must be on. Selecting the VCR channel is normally a one-time procedure, since there is little reason ever to change it. Proceed as follows: 1.
Remote Control Belore you use the remote control unit supplied with your VCR, install the batteries (instructions below). Most of the remote's buttons do the same things as the buttons with the same names on the front of your VCR, and you can use whichever one is more convenient at the moment. The remote control is also used for setting the clock and programming the timer. Since the remote control operates the VCR by infrared light, it is immune to electrical and sound interference.
Setting the Clock Here are some things you should know before you set the clock: • When you first plug in your VCR, the clock will read --.-- . • The buttons hand unit, for setting the clock are on the remote • While you are setting the clock, the display on the TV screen will prompt you through the procedure. • [1] If you press a wrong digit, press CLEAR repeatedly until the incorrect digit flashes, and then enter the correct digit. Turn on your "IV and tune it to the VCR Channel (channel 3 or 4).
First Recording and Playback First Recording and Playback This page gives the basic steps for recording and playback, You should practice them until you can do them without referring to the manual, To save time, we suggest you record for only two or three minutes.
Operating Controls (Detailed The uses of the controls for basic operation are on page 10. Now that you are familiar with the basic procedure for recording a TV program and playing it back, you are ready to learn the rest of the control functions, The controls of your VCR are designed • Accidentally pressing or the cassette.
Special Effects and Features Pause During Recording Press the PAUSE button when you are recording to prevent recording short passages of unwanted material. Press the PAUSE button again when you are ready to resume recording Avoid pausing for more than three or four minutes, because the spinning heads that do the recording are still in contact with tape and will eventually wear oft the active material. This cause streaks or spots in the picture of the tape (called dropouts).
Quick Reference Recording With Guides TV Off Itisnotnecessaryto have yourTV on when yourecord. PRESS BOTH PLAY AND RECORD. O_RN ON VCR ,SELECT INSERT STOP WHEN FINISHED CHANNEL. CASSETTE SELECT SPEED TO TUNER, Normal TV Viewing Follow the two steps in the drawing for normal TV viewing.
Quick Reference Guides (continued) Recording and Viewing Different Programs SELECT CHANNEL. t TURN ON VCR. ,PRESS BOTH PLAY AND RECORD. INSERT CASSETTE. STOP WHEN FINISHED. ©O - FE + SET SPEED. O VCR LIGHT OFF. 'SET TO TUNER. O OPERATE TV AS USUAL. Note: If you want to view what is being recorded, press the VCR/TVswitch to turn on the light and then tune your TV to the VCR channel (3 or 4). Basic Playback O TURN ON TV. O TUNE TV TO VCR CHANNEL (3 OR 4). _ITURNONVCR.
Recording from Another VCR To copy (dub) tapes, connect the two VCR's as shown below. Use shielded audio/video cables (such as RCA #AH002 or #AH005). The connections from the recording VCR to your TV are the ones you normally use. It is preferable to play the original tape on the same machine that was used to record it. I CAUTION: The unauthorized grams and other materials recording of television pro-I may infringe the rights of I others.
Camera Recording In addition to the camera itself, you will need a Camera AC Power Supply (RCA Model CPS03 for use withRCA cameras). Plug the camera cable into the power supply and then connect the cables from the power supply to the VCR as the drawing shows. The connections from the VCR to your TV are the same ones you normally use. To start recording press PLAY and RECORD on the VCR. Use the PAUSE button on the VCR to start and stop recording.
Express Recording Express Recording (XPFO lets you record up to four hours without programming the timer. It also allows you to start (or continue) recording immediately or to delay recording up to 24 hours. When the recording is finished, the VCR will turn off automatically. Note: Although you do not have to program the timer, the clock must be set before you can Express Record.
Programming the Timer The programmable clock/timer permits unattended recording of up to four different TV programs. The timer is actually a small computer which will turn on the VCR at the time you select, record for a selected length of time, and then turn off the VCR... all automatically without you being there -You Simpllfed Programming Instructions t. Turn on VCR and Tune your TV to the VCR channel (channel 3 or 4), 2. Press PROGRAM on remote hand uniL can program the timer to do the following:-- 3.
Programming the Timer (continued) I [s] The display AM or PM. will prompt you to select NORMAL pRC_3AAM PROGRAM CH O4 either Press "1" for AM or "2" for PM tO END PUSH PROGRAM [6] ,If NORMALPROGRAM -_ / The display will prompt you to select the stopping time. PROGRAM C_ 04 I TIME ON 06 00 PM TIME OFF I, _mo .--+ NORMAL will prompt you to select l I J digits, two for the hour and two the minute. For example, press 8:05. (Always press "0" before a hour or minute.
Timer Recording The information on this page tells you how to set up your VCR for Timer Recording after you have programmed the timer. (The programming instructions are on pages 2324.) When you have finished programming the timer, follow the steps in the drawing to prepare for timer recording. We suggest that you make one or more short timer O PROGRAM TURN recordings on.
Alternate Remote Control Units Selected models of RCA color TV receivers and monitor/ receivers feature infrared hand units that will also remotely control your VCR. Only the buttons that are used for controlling your VCR are described here. These buttons have generally the same functions as the ones with the same names on the front panel of the VCR, but there are some differences. • Any VCR tuner channel may be selected by pressing two of the Digit buttons on the hand unit.
Optional Accessories Several accessories are available that will enable you to expand your home video system. You may also find some of these items helpful when installing your VCR. A few accessories are pictured here to briefly familiarize you with the different types that are available. AJthough RCA Pad Numbers are listed for your convenience, other accessory brands are compatible with your RCA video system. Accessories are availa ble through most electronic supply stores and RCA video dealers.
Specifications Format VHS Record/Playback System: 3-Head: Cable-TV Channels: Midband A-1 and A-2 Midband A through I (14 - 22) Superband J through W (23 - 36) Hyperband W+ I through W+12 (37 - 48) 2 video record/ playback heads. 1 special effects head Video Signal: EIA standard: NTSC color Power Requirements 120V AC, 60Hz Antenna 75-ohm external VHF antenna terminal 300-ohm external UHF antenna Power Consumption 32 watts Weight 15.9 Ibs.