26993/26994 40-Channel 900 MHz Caller ID Cordless Telephone/Answerer User’s Guide 1 We bring good things to life.
FCC REGISTRATION INFORMATION Your telephone equipment is registered with the Federal Communications Commission and is in compliance with parts 15 and 68, FCC Rules and Regulations. 1 Notification to the Local Telephone Company On the bottom of this equipment is a label indicating, among other information, the FCC Registration number and Ringer Equivalence Number (REN) for the equipment. You must, upon request, provide this information to your telephone company.
INTRODUCTION Your cordless telephone/answerer with Caller ID is designed to give you flexibility in use and high quality performance. To get the most from your new cordless telephone/answerer, we suggest that you take a few minutes right now to read through this instruction manual. TABLE OF CONTENTS FCC R I .......... 2 EGISTRATION NFORMATION INTERFERENCE INFORMATION .................. 2 HEARING AID COMPATIBILITY .................. 2 GETTING STARTED .........................................
REMOTE ACCESS ......................................... USING THE HANDSET ............................... ANSWERER INDICATOR ........................ SCREENING CALLS FROM THE HANDSET ..................... ACCESSING THE ANSWERER FROM ANOTHER LOCATION .................................. CHANGING THE SECURITY CODE ................. HEADSET AND BELT CLIP OPERATION .............. CONNECTING A HEADSET TO THE HANDSET ... CONNECTING THE BELT CLIP ...................... CHANGING THE BATTERY ..........................
GETTING STARTED Make sure your package includes the items shown here. Short telephone line cord CORDLESS TELEPHONE 900 MHz DIGITAL ANSWERER DAY/ CHECK PAGE HOUR MIN MESSAGES AC power supply Wall mount bracket CHARGE/ IN USE PROG 8.8.
DESKTOP INSTALLATION 3 7 4 5 6 1 2 T/P switch 1. Make sure wall mount bracket is securely fastened. 2. Set the T/P switch to T for touch-tone service, or P for pulse (rotary) service. If you don’t know which type of service you have, check with the phone company. 3. Set RINGER switch (on the handset) to ON. 4. Plug the power supply cord into the POWER 9V DC jack on the base and into an AC outlet. 5. Place handset in the base to charge for 12 hours.
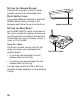
WALL MOUNT INSTALLATION Because it is necessary to charge the handset for 12 hours prior to connecting the phone for use the first time, it is better to leave the unit on a flat surface during initial charge before attempting to hang it on the wall. 1. Make sure the wall mount bracket is securely fastened. 1 2. Set the T/P switch to T for touch-tone service, or P for pulse (rotary) service. If you don’t know which type of service you have, check with the phone company. 5 3. Set RINGER switch to ON.
6. Remove the wall mount bracket. Rotate it so that the bottom of the phone is flat. 10 Reattach the wall mount bracket by inserting the tabs into the slots on the top of the unit first, and then snapping the bottom tabs into place. 7. Plug the short telephone line cord into the jack marked TEL LINE on the back of the unit and plug the other end into a modular wall jack. 8. Slip the mounting holes over the wall plate posts and slide the unit down firmly into place. (Wall plate not included.) 9.
ANSWERING MACHINE SETUP This section shows you how to set up your answering machine to receive incoming calls. Before you begin the setup, you must turn on the answerer. SETTING THE VOICE TIME/DAY STAMP 1. Make sure the answerer is ON. 2. Press and hold the DAY/CHECK button to set the day of the week. 3. Press the HOUR button to set the hour (a.m. or p.m.). 4. Press the MIN button to set the minute. When you press and hold the MIN button, the time advances in 5-minute intervals. 5.
SETTING THE SPEAKER VOLUME Use the VOL (volume) control to adjust speaker volume to a comfortable level. VOL VOICE INSTRUCTIONS If you need additional assistance, press the REVIEW button when you plug in the answerer and follow the voice instructions. Speaker volume control SETTING THE RING SELECT Set the RING SELECT switch on the back of the unit to choose the number of times you want the phone to ring before the machine answers the call. You can choose 2 rings, 5 rings, or TOLL SAVER.
RECORDING THE OUTGOING ANNOUNCEMENT R NEXT E VIE W 1. Make sure the answerer is ON. 2. Press and hold the ANNOUNCE button. You need to hold the button until you finish the announcement. MEMO ANNOUNCE ERASE AY / S T O PL P For best results when recording, you should be about 9 inches from the microphone, and eliminate as much background noise as possible. S KIP ANSWER ON/OFF 3. Begin talking after you hear the beep. 4. Release the button when you finish your announcement.
TELEPHONE SETUP SETTING THE DISPLAY LANGUAGE 1. Press and release PROG until SET LANGUAGE shows on the display. 2. Use the CID REVIEW buttons to change the display to the desired language. 3. When finished, press and release PROG again to store the setting and enter the Local Area Code menu. SETTING THE LOCAL AREA CODE 1. Press and release PROG until LOCAL AREA CODE shows on the display. 2. Use the keypad to enter the area code. 3.
CORDLESS PHONE BASICS MAKING A CALL The only two things you need to know to make a call are: • Press the TALK button before you dial. • Press TALK button or place the handset in the base to hang up. Otherwise, it works just like any other phone. IMPORTANT: Because cordless phones operate on electricity, you should have at least one phone in your home that isn’t cordless, in case the power in your home goes out.
RECEIVING A CALL To answer a call you must press the TALK button on the handset before you can talk. FLASH Use the FLASH button to activate custom calling services such as call waiting or call transfer, which are available through your local phone company. TIP: Don't use the TALK button to activate custom calling services such as call waiting, or you’ll hang up the phone. MUTE button TALK button VOLUME When the phone is ON, press the VOL buttons to adjust the volume of the handset's earpiece.
RINGER SWITCH The RINGER switch must be ON for the handset to ring during incoming calls. FINDING THE HANDSET This feature helps to locate a misplaced handset. Press the PAGE button on the base. The display shows PAGING YOU. The handset beeps continuously for about 2 minutes or until you press TALK or ANSW on the handset. NOTE: You can still page the handset with the ringer off.
CALLER ID FEATURES This unit receives and displays information transmitted by your local phone company. This information can include the phone number, date, and time; or the name, phone number, date, and time. The unit can store up to 40 calls for later review. CALLER ID WITH CALL WAITING Provided you subscribe to Caller ID with Call Waiting service from your phone company, you are able to see who is calling when you hear the call waiting beep.
When the memory is full, a new call automatically replaces the oldest call in memory. NEW appears in the display for calls received that have not been reviewed. NOTE: Check with your local phone company regarding name service availability. Time Number of calls Date 10:51 A.M. 8/11 NEW CALL REPT MEMO # 25 317-555-4231 SMITH JOHN Caller ID phone number Caller ID name REVIEWING MESSAGES As calls are received and stored, the display is updated to let you know how many calls have been received.
DELETING RECORDS Use the DELETE button to erase the record currently shown in the display or all records. DELETING THE CURRENT RECORD Press DELETE. The display shows DELETED. DELETING ALL RECORDS 1. Press and hold DELETE. The display shows DELETE ALL? CID REVIEW buttons PROG FORMAT 2. Press DELETE again to erase all records. MUTE TALK DIAL REDIAL DIALING A CALLER ID NUMBER 1. Make sure the phone is OFF.
CHANGING THE NUMBER FORMAT The FORMAT button lets you change the format of the displayed number. The available formats are as follows. 7-digit 7-digit telephone number. 10-digit 3-digit area code + 7-digit telephone number. 11-digit long distance code “1” + 3-digit area code + 7-digit telephone number. FORMAT button CID REVIEW buttons PROG FORMAT MUTE TALK DIAL DELETE PAUSE REDIAL DIAL button 1. Use the CID REVIEW buttons to scroll to the number you want to call back.
THE MEMORY FEATURE Store up to ten 24-digit numbers in memory for quick dialing. This memory feature is in addition to the 40 Caller ID records that can be stored in memory. STORING A NUMBER IN MEMORY The phone must be OFF when you store numbers. 1. Press the MEM button. 2. Press the memory location number (0-9). 3. Press MEM again. The display shows ENTER NAME. PROG FORMAT NOTE: If you don't want to enter the name, skip step 4. 20 DELETE PAUSE REDIAL REVIEW 4.
and 4 two times for H. If you're using two letters consecutively that are stored in the same number key, you must press FORMAT between the letters. For example, if you enter Barb, press 2 two times for B; press FORMAT; press 2 for A; 7 three times for R; and 2 two times for B. You need to press FORMAT between the B and the A since they are stored within the same number key. 5. Press MEM. The display shows ENTER TEL NUMBER. 6. Use the keypad to enter the number you want to store (up to 24 digits).
DIALING A STORED NUMBER 1. Make sure the phone is ON by pressing the TALK button. 2. Press MEM. 3. Press the number (0-9) for the desired memory location. The number dials automatically. USING DIAL This feature allows you to call back Caller ID records that were previously stored. 1. Make sure the phone is OFF. TALK button CID REVIEW buttons PROG FORMAT 2. Press MEM. 3. Use the CID REVIEW buttons to scroll through the numbers stored in memory until the desired number is shown.
CHAIN DIALING FROM MEMORY Use this feature to make calls which require a sequence of numbers such as using a calling card for a frequently called long distance number. Basically, you dial each part of the sequence from memory. The following example shows how you can use chain dialing to make a call through a long distance service: The Number For Memory Location Long distance access number Authorization code Frequently called long distance number 7 8 9 1. Make sure the phone is ON. 2.
INSERTING A PAUSE IN THE DIALING SEQUENCE Press the REDIAL button to insert a delay in the dialing sequence of a stored telephone number when a pause is needed to wait for a dial tone (for example after you dial 9 for an outside line, or to wait for a computer access tone). Each pause counts as 1 digit in the dialing sequence. REVIEWING AND DELETING STORED NUMBERS 1. Press MEM. 2. Use the CID REVIEW buttons to scroll through the numbers stored in memory until the desired number is shown. 3.
ADVANCED FEATURES CHANNEL BUTTON While talking, you might need to manually change the channel in order to reduce static caused by baby monitors, garage door openers, or other cordless phones. Press and release the CHANNEL button to advance to the next clear channel. TEMPORARY TONE This feature enables pulse (rotary) service phone users to access touch-tone services offered by banks, credit card companies, etc. Press the TONE button to temporarily make the phone touch-tone compatible.
ANSWERING MACHINE OPERATION This section discusses the buttons and features on the answering machine. MESSAGES indicator MESSAGES INDICATOR The MESSAGES indicator shows you how many new messages you have. The ANSWER ON/OFF button must be on in order for the MESSAGES indicator to work. MESSAGES CHARGE/ IN USE 8.8.
MESSAGE PLAYBACK The messages indicator lets you know when you have messages. To play messages, press PLAY/STOP. While a message is playing, you can do the following: • Press PLAY/ STOP to stop the message playback. • Press and release REVIEW to restart the current message; continue to press and release REVIEW to go to previous messages. • Press and release SKIP to go to the next message. • Press PLAY/ STOP to stop message playback. MEMORY FULL When the memory is full, the system answers after 10 rings.
• To erase a message from the handset: 1. Press ANSWER button on the handset. 2. Press PLAY/STOP on the handset (the 2 button). 3. Press ERASE on the handset (the 0 button) to erase the message that is playing. NOTE: Erased messages cannot be restored. Also, be careful you don't press ERASE button as the next unheard message is playing because that message will also be erased. LEAVING A MEMO Use the Memo feature to leave a message. 1. Press and hold the MEMO button.
REMOTE ACCESS This section explains two types of remote access: using the handset to access the answering machine and accessing the answering machine from another phone. The handset contains integrated buttons that enable you access the answering machine with the handset. You can also access your answering machine from any phone that is tone-dial compatible by entering a 3-digit security code after you hear the outgoing announcement. A voice menu system guides you through all of the procedures.
USING THE HANDSET Press the ANSWER button to access the answering machine from the cordless handset. After you access the answerer, use the marked handset keys just as if you were pressing the corresponding buttons on the base (see "Answering Machine Operation" for details on functions). To make it easy for you, the functions are listed on the handset above each number. For example, to play messages: 1. Press the ANSWER button. 2. Press 2 (PLAY/STOP). 3.
SCREENING CALLS FROM THE HANDSET Use the handset to screen calls even when you can't hear the answering machine. When the phone rings: 1. Press the ANSWER button to gain access to the answering machine. 2. Listen to the caller leaving a message. 3. Press the TALK button to talk to the person or press ANSWER to stop screening the call.
ACCESSING THE ANSWERER FROM ANOTHER LOCATION You can access your answering machine from a touch-tone phone by entering your 3-digit security code after you hear the outgoing announcement. 1. Dial the phone number for the answering machine. 2. Enter the security code after you hear the tone. 3. Follow the voice menu to use the answerer's remote functions.
CHANGING THE SECURITY CODE The default security code for accessing the answerer from another location is 1 2 3. You must use the handset to change the security code. With the phone off, follow these steps: 1. Press ANSWER (the ANSWER indicator comes on). 2. Press TONE (*). PROG 3. Enter 3 numbers to be used as the new security code. FORMAT MUTE TALK DIAL DELETE PAUSE REDIAL REVIEW 4. Press TONE (*) again.
HEADSET AND BELT CLIP OPERATION CONNECTING A HEADSET TO THE HANDSET For hands free conversation, connect the headset (provided with 26994 only) to the HEADSET jack as shown. The handset receiver and microphone are disabled when the headset is connected. Handset jack HEADSET Adjust the headset to rest comfortably on top of your head and over your ear. Move the microphone to approximately 2 to 3 inches from your mouth.
CHANGING THE BATTERY Make sure the telephone is OFF before you replace battery. 1. Remove the battery compartment door. 2. Disconnect the battery plug and remove the battery pack from the handset. 3. Insert the new battery pack and reconnect the battery plug. 4. Put the battery compartment door back on. 5. Place handset in the base to charge.
GENERAL PRODUCT CARE To keep your telephone working and looking good, follow these guidelines: • Avoid putting the phone near heating appliances and devices that generate electrical noise (for example, motors or fluorescent lamps). • DO NOT expose to direct sunlight or moisture. • Avoid dropping the handset, as well as other rough treatment to the phone. • Clean the phone with a soft cloth. • Never use a strong cleaning agent or abrasive powder because this will damage the finish.
HANDSET INDICATORS The following indicators show the status of a message or of the unit. ERROR Caller information has been interrupted during transmission or the phone is excessively noisy. ENTER NAME Prompt telling you to enter name one of the 10 memory locations. DELETE ALL? Prompt asking you if you want to erase all Caller ID records. DELETE CALL ID? Prompt asking you if you want to erase the current Caller ID record that is shown on the display.
ANSWER STATUS INDICATORS The following indicators show the status of the answerer. 0-59 Total number of messages. CL (blinking) The voice time/day stamp needs set. -- Answerer off. An (blinking) Currently answering a call. F (blinking) Memory is full. Six bars (blinking) Recording a memo or announcement.
TROUBLESHOOTING GUIDE CORDLESS PHONE SOLUTIONS Problem Solution No dial tone • • • • • • • Check installation: — Is the base power cord connected to a working outlet? — Is the telephone line cord connected to the base unit and the wall jack? Connect another phone to the same jack; the problem might be your wiring or local service. Is the handset out of range of the base? Make sure the battery is properly charged (12 hours).
CORDLESS PHONE SOLUTIONS (CONTINUED) Problem Solution Unit beeps • • • • Memory Dialing doesn't work • • Place handset in base for 20 seconds; if it still beeps, charge battery for 12 hours. Clean charging contacts on handset and base with a soft cloth, or an eraser. See solutions for “No dial tone.” Replace battery.
ANSWERING MACHINE SOLUTIONS Problem Solution Can’t hear messages, beep, etc. • Adjust speaker volume. Time/Day setting stuck at 12 a.m Mon. • Set the time clock. Answers on 10th ring • • Make sure answerer is turned on. Memory may be full. Incoming messages are incomplete • • • Was an extension phone picked up? Memory is full. Accidentally pressed PLAY button during playback and stopped message. Won’t respond to remote commands • • • Must use tone-dial phone.
CAUSES OF POOR RECEPTION • • • • • • • • • • Aluminum siding. Foil backing on insulation. Heating ducts and other metal construction that can shield radio signals. You’re too close to appliances such as microwaves, stoves, computers, etc. Atmospheric conditions, such as strong storms. Base is installed in the basement or lower floor of the house. Base is plugged into AC outlet with other electronic devices. Baby monitor is using the same frequency. Handset battery is low. You’re out of range of the base.
INDEX A E Accessing the Answerer from another phone 32 Accessory Order Form 45 Answerer-in-Use Light 30 Answering Machine Operation 26 Answering Machine Setup 9 Answering Machine Solutions 41 Erasing Messages 27 B General Product Care 36 Getting Started 5 Battery Safety Precautions 35 Before You Begin 5 Belt Clip 34 C Call Back 22 Caller ID operation 16 Caller ID with Call Waiting 16 Causes of Poor Reception 42 Changing the Battery 35 Changing the Security Code 33 Channel Button 25 CHARGE/IN USE ligh
O T Order form 45 Telephone Setup 12 Temporary Tone 25 Troubleshooting Guide 39 R Receiving a Call 14 Recording the Outgoing Announcement 11 Redial 13 Remote Access 29 Reviewing and deleting stored numbers 24 Reviewing Announcement 11 Ringer Switch 15 S Screening Calls from the base 26 Screening Calls from the Handset 31 Service 42 Setting the Display Language 12 Setting the Local Area Code 12 Setting the Ring Select 10 Setting the Speaker Volume 10 Setting the Voice Time/Day Stamp 9 Stored numbers 21
5-2472 5-2451 5-2425 5-2471 5-2452 5-2444 TOTAL Sales Tax........................................................$_______________ Daytime Phone Number ( )_______________________________ City ________________________State________ ZIP_________________ Address_____________________________________ Apt.____________ Name_______________________________________________________ Ronks, PA 17573-8419 P.O. Box 8419 Mail Order Department TCE Mail order form and money order or check (in U.S.
LIMITED WARRANTY What your warranty covers: • Any defect in materials or workmanship. For how long after your purchase: • One year. (The warranty period for rental units begins with the first rental or 45 days from date of shipment to the rental firm, whichever comes first.) What we will do: • Provide you with a new or, at our option, a refurbished unit. • The exchange unit is under warranty for the remainder of the original product’s warranty period.
Model 26993/26994 15433020 (Rev. 1 E/S) 99-39 Printed in China P.O. BOX 1976, Indianapolis, IN 46206 © 1999 Thomson Consumer Electronics, Inc.
26993/26994 Teléfono / Contestador Inalámbrico de 900 MHz con 40 Canales e Identificador de Llamadas (Caller ID) Guía del Usuario 1 Creamos cosas buenas para la vida.
INFORMACIÓN DE LA RREGISTRACIÓN DE LA FCC Su equipo telefónico de la ha sido registrado con la Comisión Federal de Comunicaciones (FCC) y está en acuerdo con las Partes 15 y 68 de las Regulaciones y Reglas de la FCC. 1 Notificación a la Compañía Telefónica Local Al fondo de este equipo Ud. hallará un rótulo indicando, entre otra información, el número de la Registración con la FCC y el Número del Equivalente Timbre (REN) para este equipo. Ud.
INTRODUCCIÓN Su teléfono/contestador inalámbrico está diseñado para darle flexibilidad de uso y rendimiento de la más alta calidad. Para aprovechar al máximo su nuevo teléfono/contestador inalámbrico, le sugerimos que se tome unos minutos ahora mismo para leer este manual de instrucciones. CONTENIDO INFORMACIÓN DE LA RREGISTRACIÓN DE LA FCC ........................................... 2 INFORMACIÓN DE INTERFERENCIAS ........... 2 COMPATIBILIDAD CON AUDÍFONOS ........... 2 ANTES DE EMPEZAR ..................
ALMACENADOS ........................... FUNCIONES AVANZADAS ............................... BOTÓN PARA CANALES (“CHANNELS”) .. TONO TEMPORARIO ................................. INDICADOR DE MENSAJES ......................... PARA FILTRAR LLAMADAS DESDE LA BASE ... OPERACIÓN DE LA MÁQUINA CONTESTADORA ... REPRODUCCIÓN DE MENSAJES ................... MEMORIA LLENA ..................................... PARA BORRAR MENSAJES ........................ PARA DEJAR UN RECADO ......................... ACCESO REMOTO ..
PREPARACIÓN Asegúrese de que la caja contiene lo siguiente: Cable corto de línea telefónica CORDLESS TELEPHONE 900 MHz DIGITAL ANSWERER DAY/ CHECK PAGE HOUR Adaptador de CA Placa para montaje sobre pared MIN MESSAGES CHARGE/ IN USE PROG 8.8.
INSTALACIÓN SOBRE SUPERFICIE PLANA 4 1. Asegúrese de que la placa de montaje sobre pared está sujeta adecuadamente. 3 7 5 2. Programe el selector de T/P (tono/pulso) en la “T” para 6 1 servicio de tono 2 selector de T/P (touch-tone), o en la “P” para servicio de pulso (rotatorio). Si usted no sabe qué tipo de servicio tiene, cheque con su compañía telefónica. 3. Ponga el selector del timbre -”RINGER”- (en el auricular) en la posición de encendido (ON). 4.
INSTALACIÓN SOBRE PARED Como es necesario cargar el auricular durante 12 horas antes de conectar el teléfono para usarlo por primera vez, es mejor dejar el aparato sobre una superficie plana durante la carga inicial antes de intentar colgarlo sobre la pared. 1. Asegúrese de que la placa para montaje esté sujeta adecuadamente. 1 2. Programe el selector de T/P (tono/ pulso) en la “T” para servicio de tono (touch-tone), o en la “P” para servicio de pulso (rotatorio).
6. Quite la placa para montaje sobre pared. Gírela de manera que la parte de abajo del teléfono esté plana. Vuelva a colocar la placa para montaje simplementeintroduciendo las lengüetas dentro de las ranuras en la parte superior primero, y después ajustando en su sitio las lengüetas en la parte inferior. 7. Conecte el cable corto de la línea telefónica dentro del contacto marcado “TEL LINE” en la parte de atrás del aparato y conecte el otro extremo en un contacto modular de pared. 8.
PROGRAMACIÓN DE LA MÁQUINA CONTESTADORA NOTA: El contestador muestra “- -” cuando está desactivado . MEMO ANNOUNCE R NEXT E VIE PL AY / S T O P • Oprima el botón para encender o apagar el contestador (“ANSWER ON/ OFF”). El indicador de mensajes (“MESSAGES”) se iluminará cuando el contestador está encendido. El indicador parpadea cuando usted tiene mensajes. CHARGE/ IN USE W Esta sección le muestra cómo programar su contestador para recibir llamadas entrantes.
PARA PROGRAMAR EL VOLUMEN DE LA BOCINA VOL Use el control “VOL” (volumen) para ajustar el volumen de la bocina a un nivel cómodo. INSTRUCCIONES DE VOZ Si usted necesita asistencia adicional, oprima el botón “REVIEW” cuando usted conecta el contestador y siga las instrucciones orales.
PARA GRABAR EL ANUNCIO SALIENTE 3. Comience a hablar después de que escuche el tono. NEXT E VIE W R 1. Asegúrese de que el contestador está activado (ON). 2. Oprima y sostenga el botón de saludo (“ANNOUNCE”). Usted tiene que sostener el botón oprimido hasta que termine el anuncio. MEMO ANNOUNCE ERASE Micrófono AY / S T O PL P Para mejores resultados mientras graba, usted debe estar a alrededor de 9 pulgadas del micrófono, y elimine tanto ruido de fondo como le sea posible.
PROGRAMACIÓN DEL TELÉFONO PARA PROGRAMAR EL IDIOMA DE LA PANTALLA Botón para programar (“PROG”) 1. Oprima y suelte el botón “PROG” hasta que la indicación “SET LANGUAGE” aparezca en la pantalla. 2. Utilice los botones “CID REVIEW” para cambiar la pantalla al idioma deseado. 3. Cuando haya terminado, oprima y suelte nuevamente el botón “PROG” para almacenar este programa y pasar al menú para inscribir la Clave de Área Local.
INFORMACIÓN BÁSICA DEL TELÉFONO INALÁMBRICO PARA HACER UNA LLAMADA Las únicas dos cosas que usted necesita saber para hacer una llamada son: • Oprima el botón para hablar (“TALK”) antes de marcar. • Oprima el botón para hablar (“TALK”) o ponga el auricular sobre la base para colgar. Por lo demás, funciona igual que cualquier otro teléfono.
PARA RECIBIR UNA LLAMADA Para contestar una llamada usted debe oprimir el botón para hablar (“TALK”) en el auricular antes de que usted pueda hablar. Botón para hablar (“TALK”) Indicador enmudecedora (“MUTE”) BOTÓN DE SERVICIOS ESPECIALES O CENTELLO (“FLASH”) Use el botón de centello (“FLASH”) para activar servicios especiales como llamada en espera o transferencia de llamada, que son disponibles a través de su compañía telefónica local.
SELECTOR DEL TIMBRE (“RINGER”) Botón para hablar (“TALK”) El selector del timbre (“RINGER”) debe estar activado (ON) para que el auricular timbre cuando hay llamadas entrantes. PARA ENCONTRAR EL AURICULAR PROG Esta función le ayuda a localizar el auricular extraviado. FORMAT DELETE PAUSE REDIAL REVIEW Oprima el botón localizador (“PAGE”) en la base. La pantalla muestra la indicación “PAGING YOU”.
FUNCIONES DEL IDENTIFICADOR DE LLAMADAS Este aparato recibe y muestra información transmitida por su compañía telefónica local. La información puede incluir el número telefónico, fecha y hora; o el nombre, número telefónico, fecha y hora. El aparato puede almacenar hasta 40 llamadas para ser revisadas después.
Cuando la memoria está llena, una llamada nueva automaticamente reemplaza a la llamada más antigua en la memoria. La indicación de llamada nueva (“NEW”) aparece en el visor para llamadas recibidas que no han sido revisadas. NOTA: Cheque con su compañía telefónica local con respecto a la disponibilidad de servicio de nombre. Hora Número de Llamadas Fecha 10:51 A.M.
PARA BORRAR DATOS Use el botón “DELETE” para borrar el dato que se muestra actualmente en el visor o todos los datos. PARA BORRAR EL DATO ACTUAL Oprima el botón para borrar (“DELETE”). La pantalla muestra la indicación “DELETED.” PARA BORRAR TODOS LOS DATOS Botones para revisar (“CID REVIEW”) 1. Oprima y sostenga el botón “DELETE”. La pantalla le pregunta si borra todos los archivos (“DELETE ALL?”). 2. Oprima “DELETE” nuevamente para borrar todos los datos.
PARA CAMBIAR EL FORMATO DEL NÚMERO El botón “FORMAT” le permite cambiar el formato del número mostrado en el visor. Los formatos disponibles son como sigue: 7-dígitos 10-dígitos número telefónico de 7 dígitos. código de área de 3 dígitos + número telefónico de 7 dígitos.
LA FUNCIÓN DE MEMORIA Almacene hasta diez números de 24 dígitos en la memoria para marcado rápido. Esta función de la memoria es además de los 40 archivos para información del Identificador de Llamadas (Caller ID) que pueden ser almacenados en la memoria. PARA ALMACENAR UN NÚMERO EN LA MEMORIA El teléfono debe estar apagado (OFF) cuando usted almacena números. 1. Oprima el botón de memoria (“MEM”). PROG FORMAT 2. Oprima el número de la localización de memoria (0-9). 3.
el 4 tres veces para la I; oprima el 8 para la T; y el 4 dos veces para la H. Si usted está usando dos letras consecutivas que están almacenadas en la misma tecla numérica, usted debe oprimir el botón “FORMAT” entre las dos letras. Por ejemplo, si usted inscribe “Barb”, oprima el 2 dos veces para la B; oprima el botón “FORMAT”; oprima el 2 para la A; el 7 tres veces para la R; (Page 18) y el 2 dos veces para la B.
PARA MARCAR UN NÚMERO ALMACENADO 1. Asegúrese de que el teléfono está encendido (ON), simplemente oprimiendo el botón para hablar (“TALK”). 2. Oprima el botón de memoria (“MEM”). 3. Oprima el número (0-9) para la localización de memoria deseada. El número se marca automaticamente.
DISCADO EN CADENA DESDE LA MEMORIA Use esta función para hacer llamadas que requieren una secuencia de números como el usar una tarjeta para llamar por teléfono o un número de larga distancia llamado frecuentemente. Basicamente, usted marca cada parte de la secuencia desde la memoria.
PARA INTRODUCIR UNA PAUSA EN LA SECUENCIA DE DISCADO Oprima el botón “REDIAL” para introducir un retraso en la secuencia de discado de un número telefónico almacenado cuando una pausa es necesaria para esperar al tono de marcar (por ejemplo después de que usted marca 9 para obtener línea externa, o para esperar e tono de acceso en una computadora). Botón para borrar (“DELETE”) Botones de flechas (“CID REVIEW”) PROG FORMAT PARA REVISAR Y BORRAR NÚMEROS ALMACENADOS 1. Oprima el botón de memoria (“MEM”).
FUNCIONES AVANZADAS BOTÓN PARA CANALES (“CHANNELS”) Mientras usted está hablando, usted puede necesitar cambiar manualmente el canal para reducir la estática causada por monitores de bebé, control para abrir la puerta del garage, u otros teléfonos inalámbricos. Oprima y suelte el botón “CHANNEL” para avanzar al siguiente canal.
OPERACIÓN DE LA MÁQUINA CONTESTADORA Esta sección se refiere a los botones y funciones de la máquina contestadora. Indicador de mensajes (“MESSAGES”) INDICADOR DE MENSAJES El indicador de mensajes (“MESSAGES”) le muestra cuántos mensajes tiene usted. El botón “ANSWER ON/OFF” debe estar activado para que el indicador funcione. SUGERENCIA: Asegúrese de que el volumen en la base está programado lo suficientemente alto para escuchar sus llamadas entrantes. 26 8.8.
REPRODUCCIÓN DE MENSAJES El indicador de mensajes le hace saber cuando usted tiene mensajes. Para reproducir los mensajes, oprima “PLAY/STOP.” Mientras un mensaje se está reproduciendo, usted puede hacer lo siguiente: • Oprima el botón “PLAY/STOP” para suspender la reproducción del mensaje. • Oprima y suelte el botón “REVIEW” para volver a comenzar la reproducción del mensaje actual; continúe oprimiendo y soltando el botón “REVIEW” para volver a mensajes previos.
• Para borrar un mensaje desde el auricular: 1. Oprima el botón para contestar (“ANSWER”) en el auricular. 2. Oprima el botón “PLAY/STOP” en el auricular (la tecla con el número 2). 3. Oprima el botón para borrar (“ERASE”) en el auricular (la tecla con el número 0) para borrar el mensaje que se está reproduciendo. NOTA: Los mensajes borrados no pueden ser recuperados.
ACCESO REMOTO Esta sección explica los dos tipos de acceso remoto: el usar el auricular para tener acceso a la máquina contestadora y el tener acceso a la máquina contestadora desde otro teléfono. El auricular contiene botones integrados que le permiten tener acceso a la máquina contestadora con el auricular.
PARA USAR EL AURICULAR Oprima el botón “ANSWER” para tener acceso a la máquina contestadora desde al auricular inalámbrico. Después de que usted ha tenido acceso al contestador, use las teclas marcadas del auricular como si usted oprimiera las teclas correspondientes en la base (vea “Operación de la Máquina Contestadora” para detalles de las funciones). Para facilitarle a usted, las funciones están enlistadas en el auricular arriba de cada número. Por ejemplo, para reproducir mensajes: PROG 1.
PARA FILTRAR LLAMADAS DESDE EL AURICULAR Use el auricular para filtrar llamadas, incluso cuando usted no puede escuchar la máquina contestadora. Cuando el teléfono timbra: 1. Oprima el botón “ANSWER” para tener acceso a la máquina contestadora. 2. Escuche a la persona que llama dejar un mensaje. 3. Oprima el botón “TALK” para hablar con la persona u oprima “ANSWER” para dejar de filtrar la llamada.
PARA TENER ACCESO AL CONTESTADOR DESDE OTRA LOCALIZACIÓN Usted puede tener acceso a su máquina contestadora desde un teléfono con modalidad de discado de tono (touch-tone), inscribiendo su código de seguridad de 3 dígitos después de que usted escucha el anuncio saliente. 1. Marque el número de teléfono para la máquina contestadora. 2. Inscriba el código de seguridad después de que usted escuche el tono. 3. Siga las instrucciones orales del menú para usar las funciones remotas del contestador.
PARA CAMBIAR EL CÓDIGO DE SEGURIDAD El código de seguridad pre-programado de fábrica para tener acceso al contestador desde otra localización es 123. Usted debe utilizar el auricular para cambiar el código de seguridad. Con el teléfono apagado, siga los siguientes pasos: 1. Oprima el botón “ANSWER” (el indicador del contestador en uso se iluminará). PROG FORMAT 2. Oprima el botón de tono (*). MUTE TALK DIAL DELETE PAUSE REDIAL REVIEW 3.
OPERACIÓN DEL AUDÍFONO Y BROCHE DEL CINTURÓN CONEXIÓN DEL AUDÍFONO AL AURICULAR Clavija del Audífono Ajuste el audífono para que descanse cómodamente sobre su cabeza y sobre su oído. Mueva el micrófono a entre 2 y 3 pulgadas de su boca. HEADSET Para conversar sin sostener el auricular en la mano, conecte el audífono (provisto unicamente con el modelo 26994) al enchufe del audífono como se muestra. El receptor del auricular y el micrófono quedan deshabilitados cuando se conecta el audífono.
PARA CAMBIAR LA BATERÍA Asegúrese de que el teléfono esté desactivado (OFF) antes de reemplazar la batería. 1. Quite la puerta del compartimento de la batería. 2. Desconecte el enchufe de la batería y saque el paquete de batería del auricular. 3. Introduzca el paquete de batería nuevo y vuelva a conectar el enchufe de la batería. 4. Vuelva a colocar la puerta del compartimento de la batería. 5. Coloque el auricular sobre la base para cargarlo.
CUIDADO GENERAL DEL PRODUCTO Para mantener su teléfono funcionando bien y con buena apariencia, observe las siguientes pautas: • Evite poner el teléfono cerca de calentadores (calefactores) de ambiente y dispositivos que generen interferencia eléctrica ejemplo, motores o lámparas fluorescentes). • No lo exponga a la luz solar directa o a la humedad. • No deje caer la extensión móvil y no maltrate el teléfono. • Limpie el teléfono con un trapo suave.
INDICADORES DEL AURICULAR Los siguientes mensajes especiales indican el estado actual de un mensaje o del aparato: ERROR La información de la persona que llama ha sido interrumpida durante la transmisión o el teléfono es excesivamente ruidoso. ENTER NAME Indicación para pedirle que inscriba el primer nombre 10 en una de las 10 localizaciones de memoria. DELETE ALL? Indicación preguntándole si quiere borrar todos los datos del Identificador de Llamadas.
INDICADORES DEL ESTADO DEL CONTESTADOR Los siguientes indicadores muestran el estado del contestador. 0-59 Número total de mensajes. CL (parpadeando) La marca de voz para indicar hora/fecha necesita ser programada. -- Contestador desactivado. An (parpadeando) Actualmente contestando una llamada. F (parpadeando) La memoria está llena. Six bars (parpadeando) Grabando un recado o mensaje.
DETECCIÓN DE AVERÍAS SOLUCIONES PARA EL TELÉFONO INALÁMBRICO Problema Solución No hay tono de marcar • • • • • • • Cheque la instalación: — Está el cable de la base conectado a un contacto que sirve? — Está el cable telefónico conectado a la base del aparato y a un contacto de pared? Conecte otro teléfono al mismo contacto; el problema puede estar en el cableado o en el servicio local. ¿Está el auricular fuera del rango de la base? Asegúrese de que la batería ha sido cargada adecuadamente (12 horas).
SOLUCIONES PARA EL TELÉFONO INALÁMBRICO (CONTINUACIÓN) Problema Solución El aparato pita • Coloque el auricular en la base durante 20 segundos; si sigue pitando, cargue la batería durante 12 horas. • Limpie los contactos del cargador en el auricular y la base con un trapo suave o una goma de borrar. El Discado de Memoria no funciona • Vea las soluciones para “No hay tono de marcar”. • Cambie la batería.
SOLUCIONES PARA LA MÁQUINA CONTESTADORA Problema Solución No se oyen los mensajes, tono, etc. • Ajuste el volumen de la bocina. La programación de la Hora/ • Está atorada en Lunes 12 a.m. Programe el reloj. Contesta en el 10o. timbre • • Asegúrese de que el contestador está activado. La memoria puede estar llena. Los mensajes entrantes están Incompletos. • • • ¿Alguna extensión del teléfono fué levantada? La memoria está llena.
CAUSAS DE UNA MALA RECEPCIÓN • Recubrimiento externo de la casa con aluminio. • Aislación con revestimiento de papel de aluminio. • Conductos de calefacción y otras construcciones de metal que paran las señales de radio. • Está demasiado cerca de los aparatos eléctricos como microondas, cocina, computadoras, etc. • Condiciones atmosféricas, como una tormenta eléctrica. • La base está instalada en el sótano o en un piso más bajo de la casa.
INDICE A I Acceso Remoto 29 Antes de empezar 5 Identificador de Llamadas 40 Identificador de Llamadas con Llamada en Espera 16 Indicador de Mensajes 26 Indicador del Contestador 30 Indicadores Del Auricular 37 Indicadores Del Estado Del Contestador 38 Información Básica del Teléfono Inalámbrico 13 Información de Interferencias 2 Información de la Rregistración de la FCC 2 Instalación sobre Pared 7 Instalación sobre Superficie Plana 6 Instrucciones de Voz 10 Introducción 3 B Botón de Servicios Especiales
P Para Almacenar un Número en la Memoria 20 Para Borrar Datos 18 Para Borrar el Dato Actual 18 Para Borrar Mensajes 27 Para Borrar Todos los Datos 18 Para Cambiar el Código de Seguridad 33 Para Cambiar el Formato del Número 19 Para Cambiar la Batería 35 Para Cambiar un Número Almacenado 21 Para Dejar un Recado 28 Para Discar un Número del Identificador de Llamada 18 Para Encontrar el Auricular 15 Para Filtrar Llamadas desde el Auricular 31 Para Filtrar Llamadas desde la Base 26 Para Grabar el Anuncio Salien
45 5-2471 5-2452 5-2444 CANTIDAD Total de la mercancía....................................$_______________ TOTAL Número Telefónico durante el Día ( )_______________________ Ciudad________________Estado________ Código Postal_________ Dirección_____________________________________Depto.____________ Nombre_______________________________________________________ Ronks, PA 17573-8419 P.O.
46
GARANTÍA LIMITADA Lo que cubre su garantía: • Cualquier defecto en material o mano de obra. Por cuánto tiempo después de la compra: • Un año. (El periodo de garantía para unidades arrendadas se inicia con la primera renta o 45 días de la fecha del embarque a la firma de arrendamiento, lo que ocurra primero). Lo que haremos: • Proporcionarle una unidad nueva o, a nuestra opción, una reacondicionada. • La unidad de intercambio quedará bajo garantía por el resto del periodo de garantía del producto original.
Model 26993/26994 15433020 (Rev. 1 E/S) 99-39 Printed in China P.O. BOX 1976, Indianapolis, IN 46206 © 1999 Thomson Consumer Electronics, Inc.