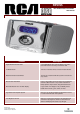
RP3765 AM / FM Dual Wake Clock Radio with Remote Feature Description Digital AM/FM CD Clock Radio A great AM/FM CD clock radio with digital tuning which tunes with maximum accuracy and minimum drift. TV/Weatherband Tune into TV band as well as one-touch Instant Weather. Motorized Vertical Load CD Door The unit has a motorized CD door system for smooth and easy access. Multi-Function Dual Wake Using a unique ASIC chip, three features are combined to make life a little bit easier.
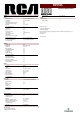
RP3765 Technical Specifications : BRAND Brand Limited Warranty Yes - One Year RCA CLOCK REMOTE Number of Alarms 2 - Multi-Function Dual Wake Model Number - Alarm Mode CD / Alarm / Radio Number of Buttons 12 Graduwake™ Yes Programmable Snooze Function Yes Programmable Sleep Function Yes Nap (Min) Yes - 10-120 Time / Wake Set Lock Yes Time Zone Selection Switch Yes Sleep Timer Yes Trademark(s) ® Registered Clock / Timer Yes / - Marca(s) Registrada(s) Automatic Time-Set Yes P
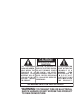
EN CAUTION RISK OF ELECTRIC SHOCK DO NOT OPEN THE LIGHTNING FLASH AND ARROWHEAD WITHIN THE TRIANGLE IS A WA R N I N G S I G N ALERTING YOU OF "DANGEROUS VOLTAGE" INSIDE THE PRODUCT. CAUTION: TO REDUCE THE RISK OF ELECTRIC SHOCK, D O N OT R E M OV E C OV E R ( O R BAC K ) . N O U S E R S E RV I C E A B L E PA RT S I N S I D E . R E F E R S E RV I C I N G T O Q UA L I F I E D S E RV I C E PERSONNEL.
FCC Information This equipment has been tested and found to comply with the limits for a Class B digital device, pursuant to Part 15 of the FCC Rules. These limits are designed to provide reasonable protection against harmful interference in a residential installation. This equipment generates, uses and can radiate radio frequency energy and, if not installed and used in accordance with the instructions, may cause harmful interference to radio communications.
Table of Contents EN Operating the Radio ................... 12 FCC information Battery Back-Up Operation .......... 2 Power Failure Indicator ..................... 2 General Controls ........................... 3 Front view ........................................... Bottom view ....................................... Top view .............................................. Back view ............................................ 3 3 4 4 Using the Weather Band ................. TV Band ...................
Battery Back-Up Operation This clock radio is equipped with a memory holding system that can be powered with 2 “AA” batteries (included). The power failure protection circuit will not operate unless battery is installed. When normal household power is interrupted, or the AC line cord is unplugged, the batteries will power the clock radio to keep track of time and alarm settings programmed into memory.
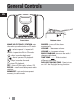
General Controls EN EASY SET CLOCK / DIGITAL RADIO CD TR A CK/STATIO N DAYLIGHT SAVING TIME OFF RECALL MEMO/SET VOLUME + RADIO ON / BAND Front view WAKE UP CD TRACK / STATION- sets the wake up radio station or CD track. - selects repeat 1 / repeat all / shuffle / repeat shuffle in CD mode. - skips / searches backward. - starts / pauses CD playback. - skips / searches forward. - stops CD playback. OFF - turns off the radio / alarm / CD RECALL - recalls available preset radio stations.
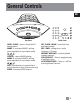
General Controls EN CLOCK/WA KE COLOR SELECT NAP SLEEP REV. SET FWD T A R S EN O S ER WAKE 2 NT TH CANCEL INS WAKE 1 WEA OPEN/CLOSE ON OFF AUTO BRIGHTNESS Top view v v OPEN / CLOSE - opens / closes the CD compartment. WAKE 1 - activates WAKE 1 setting, press repeatedly to cycle wake mode: v v v CANCEL - cancels WAKE setting. WAKE 2 - activates WAKE 2 setting, press repeatedly to cycle wake mode: v NAP - sets the alarm to sound after a specific period of time.
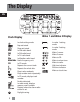
The Display EN CH TV Wx AM FM AM PM Clock Display Wake 1 and Wake 2 Display WAKE 1 In clock setting mode. Nap activated. WAKE 2 Sleep activated. In AM radio band. AM / / In FM radio band. FM / / In TV radio band. TV / In Weather radio band. Wx / MHz/kHz Radio frequency unit. / In CD mode. CD AM Repeats the current track. PM Repeats the whole disc. Plays tracks randomly. Plays random track repeatedly. In CD mode, displays track number. No disc detected. In radio mode, displays memory recall number.
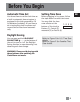
Before You Begin Automatic Time Set Setting Time Zone You do not have to set the clock time as a built-in automatic time set system is equipped in this clock powered by 2 X AA batteries (included). All you have to do is to plug this clock for power and current time will be shown automatically. Before plugging in for power, follow the steps below to select time zone. EN You may slide the time zone selector at the 1. 2. 3. 4. bottom of the clock to Eastern (1), Central (2), mountain (3) or Pacific (4).
Before You Begin EN U.S.
Setting the Clock This unit has a built-in automatic time set system that automatically generates the correct clock time once the unit is plugged in. You are not required to set the clock manually, however, in case the memory holding batteries are accidentally removed, you may set the clock manually with following procedures: EN Note: The clock is in 12 hour format. The AM and PM indicators will light to show am and pm time respectively. Setting Clock 1.
Operating the Wake Timer Setting the Wake Time Waking to CD 1. Press SET CLOCK/WAKE repeatedly until WAKE 1 or WAKE 2 icon shows on the display. 2. Press REV or FWD to set the wake time. The time decrements or increments will follow by a faster rate when you press and hold either REV or FWD. 3. Press SET CLOCK/WAKE repeatedly to exit setting wake time mode. Or else the unit will exit setting wake time mode when no button is pressed within 5 seconds. When the waking to CD is selected, icon will light.
Operating the Wake Timer Waking to RADIO When the waking to radio is selected, / icon will light. 1. Press RADIO ON/BAND to turn on the radio. 2. Set the wake time . 3. Press WAKE 1 or WAKE 2 to select waking up by RADIO / will light accordingly.. 4. Press VOLUME + / - to adjust to your desired wake up volume. 5. Press OFF to turn off the radio. You can select your wake up radio station by the following procedures. You can cancel your wake up radio station by the following procedures. EN 1.
Operating the Wake Timer EN Waking to Alarm Tone Turning off Alarm When waking to alarm tone is selected, / icon will light. You cannot adjust the alarm tone with volume. 1. Silence the alarm momentarily Tip: If you set the SLEEP function with low volume level before going to bed, we advise using Waking to Alarm Tone mode to wake you up since the volume will automatically increase.
Operating the Radio Using the Weather Band TV Band Weather information is given continuously from U.S. Government Weather Stations on frequencies from 162.4MHz to 162.55MHz. The Weather transmission, broadcast 24 hours a day, are taped messages that are repeated every 4 to 6 minutes and revised and updated as needed to match the changing weather conditions. For additional information, check your location office of the National Weather Service (Department of Commerce). CH 2-13 are available for TV Band.
Operating the Radio EN Antennas Tuning the Stations FM antenna - The power cord acts as your FM antenna. It picks up moderate to strong radio stations and eliminates the need for an external antenna in most strong signal areas. Be sure the power cord is stretched to its full length. Do not coil or bunch the cord together. Changing position of the power cord may improve reception. 1. Press RADIO ON/BAND (located on the front of the radio) to turn on the radio. 2.
Operating the Radio Setting the Preset Radio Stations Automatic Radio Station Search 1. Press RADIO ON/BAND to turn on the radio. 2. Press RADIO ON/BAND to change the broadcast band. 3. Press REV or FWD to tune to your desired radio station. 4. If you want to memorize this radio station, press MEMO/SET once, and then press RECALL repeatedly to choose the radio station number you want to record in. 5. Press MEMO/SET again to confirm. 6.
Operating the CD Player EN EASY SET CLOCK / DIGITAL RADIO CD TR A CK/STATIO N OFF RECALL MEMO/SET VOLUME + RADIO ON / BAND Listening to Compact Disc Selecting Play Mode 1. Press OPEN/CLOSE to open the CD compartment. 2. Insert a disc, press OPEN/CLOSE to close the CD compartment door. 3. Press . 4. Press VOLUME + / - to adjust to your desired listening level. 5. Press or to skip backward or forward the CD track. or to search back6. Press and hold ward or forward within the CD track. 7.
Alarm Settings Setting Sleep Time Sleep to CD In sleep mode, the radio and CD will turn off automatically. To set the sleep time, simply: 1. Press SLEEP, then the time display will exhibit 0:59 and the radio will turn on (default). While holding SLEEP, press REV or FWD to set the sleep time. The time range is from 1 minute to 2 hours (default is 0:59). 2. Release SLEEP and the current time will will show on the be shown again, display, and the sleep time is set. 1.
Alarm Settings EN Nap Mode For catnaps up to 2 hours without disturbing the regular alarm settings, the NAP function wakes you up after a short period of time. Simply: 1. Press NAP, the NAP indicator will flash. While the NAP indicator is flashing, press REV or FWD to adjust nap time. The time range is from 10 minutes to 2 hours at 10 minutes interval (default is 20 minutes). 2. Wait 3 seconds or press NAP again to confirm, the NAP indicator will show on the display. 3.
Care and Maintenance Handling Compact Discs EN • Do not touch the signal surfaces. Hold by the edges, or by one edge and the hole. • Do not affix labels or adhesive tape to the label surfaces. Also, do not scratch or damage the label. • Discs rotate at high speeds inside the player. Do not use damaged (cracked or warped) discs. Cleaning Compact Discs • Dirty discs can cause poor sound quality. Always keep discs clean by wiping them gently with a soft cloth from the inner edge toward the outer perimeter.
U.S. Limited Warranty EN What your warranty covers: • Defects in materials or workmanship. For how long after your purchase: • One year from date of purchase. The warranty period for rental units begins with the first rental or 45 days from date of shipment to the rental firm, whichever comes first. What we will do: • Provide you with a new, or at our option, a refurbished unit. The exchange unit is under warranty for the remainder of the original product’s warranty period.
U.S. Limited Warranty Limitation of Warranty: • THE WARRANTY STATED ABOVE IS THE ONLY WARRANTY APPLICABLE TO THIS PRODUCT. ALL OTHER WARRANTIES, EXPRESS OR IMPLIED (INCLUDING ALL IMPLIED WARRANTIES OF MERCHANTABILITY OR FITNESS FOR A PARTICULAR PURPOSE) ARE HEREBY DISCLAIMED. NO VERBAL OR WRITTEN INFORMATION GIVEN BY THOMSON INC., ITS AGENTS OR EMPLOYEES SHALL CREATE A GUARANTY OR IN ANY WAY INCREASE THE SCOPE OF THIS WARRANTY.
Canadian Limited Warranty EN Thomson multimedia Ltd. warrants to the purchaser or gift recipient that if any manufacturing defect becomes apparent in this product within 1 year from the original date of purchase, it will be replaced free of charge, including return transportation. This warranty does not include damage to the product resulting from accidents, misuse or leaking batteries. Should your product not perform properly during the warranty period, either: 1.