TV/VCR/DVD User’s Guide Changing Entertainment. Again.
Important Information WARNING TO REDUCE THE RISK OF FIRE OR ELECTRIC SHOCK, DO NOT EXPOSE THIS PRODUCT TO RAIN OR MOISTURE. CAUTION THIS PRODUCT UTILIZES A LASER. USE OF CONTROLS OR ADJUSTMENTS OR PERFORMANCE OF PROCEDURES OTHER THAN THOSE SPECIFIED HEREIN MAY RESULT IN HAZARDOUS RADIATION EXPOSURE. DO NOT OPEN COVERS AND DO NOT REPAIR YOURSELF. REFER SERVICING TO QUALIFIED PERSONNEL. CAUTION RISK OF ELECTRIC SHOCK DO NOT OPEN CAUTION: TO REDUCE THE RISK OF ELECTRIC SHOCK, DO NOT REMOVE COVER (OR BACK).
Introduction Key Features Overview Your TV/VCR/DVD is equipped with features that will add to your TV/VCR/DVD viewing experience. The following information summarizes these features. See Chapter 3 for more information about the features and how to use them.
Introduction Index Search Description: Provides a quicker way to find segments of a program on a videotape (instructions on page 41). Requirements: INDX 2 0:30:00 • Insert the pre-recorded tape into the VCR. • Use the INDEX + and - buttons to locate the index mark. 10:00AM OCT.15 Virtual Dolby (QSURROUND) DVD Description: This feature adds a surround effect to your audio. Requirements: ON • You must use the LINE OUT AUDIO L and R output jacks. • Turn Compression off (Chapter 4 has details).
Table of Contents Introduction Key Features Overview .................................................................................................... 1 Parental Controls ........................................................................................................ 1 Record One Channel While Watching Another ....................................................... 1 Index Search ...............................................................................................................
Table of Contents Chapter 2: Using the Remote Control The Buttons on the Remote Control ............................................................................. 24 Programming the Remote to Operate Other Components ......................................... 27 Find Out If You Need to Program the Remote ....................................................... 27 How to Program the Remote ..................................................................................
Table of Contents Selecting a Chapter ....................................................................................... 48 Selecting a Time Location ............................................................................. 49 Selecting Subtitles ......................................................................................... 49 Changing the Camera Angle ........................................................................ 49 Changing the Audio ..........................................
Table of Contents Chapter 6: Other Information Troubleshooting.............................................................................................................. 66 The Front of Your TV/VCR/DVD..................................................................................... 70 Back Panel Jacks.............................................................................................................. 71 Care and Cleaning .......................................................................
Chapter 1 Connections & Setup Chapter Overview: • Things to Consider Before You Connect • Choose Your Connection • Connections • Plug in the TV/VCR/DVD • Put Batteries in the Remote • How to Use the Remote Control to Complete the Initial Setup • Turn on the TV/VCR/DVD • Initial Setup • VCR Basics • DVD Basics Changing Entertainment. Again. Graphics used within this publication are for representation only.
Connections & Setup Things to Consider Before You Connect Protect Against Power Surges • Connect all components before you plug any of their power cords into the wall outlet. • Turn off the TV/VCR/DVD and/or component before you connect or disconnect any cables. • Make sure all antennas and cables are properly grounded. Refer to the Important Safeguards sheet packed with your TV/VCR/DVD. Protect Components from Overheating • Don’t block ventilation holes on any of the components.
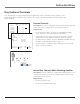
Connections & Setup Choose Your Connection There are several ways to connect your TV/VCR/DVD. Please use the following chart to determine which connection is best for you. Proceed to the appropriate page and connect your TV/VCR/DVD. Components Connection Title Cables Needed Go to...
Connections & Setup TV/VCR/DVD Back Panel VD D / CR V / TV LINE IN IN 1 ANT/CABLE 75 LINE OUT VIDEO AUDIO 1 From Antenna/Cable Feed TV/VCR/DVD Only 1. Connect the antenna/cable feed to the TV/VCR/DVD. Connect the coaxial cable from your cable or antenna to the ANT/CABLE jack on the TV/VCR/DVD.
Connections & Setup TV/VCR/DVD Back Panel LINE IN VD D / CR V / TV IN 1 ANT/CABLE 75 LINE OUT VIDEO AUDIO 1A 1B Satellite Receiver Back Panel IN FROM ANT CH3 CH4 OUT OUT TO TV VIDEO e llit er e t Sa ceiv Re L R SATELLITE IN S-VIDEO 3 2 From Antenna/Cable Feed From Satellite Note: The back of your satellite receiver might not look exactly like the one shown here. TV/VCR/DVD + Satellite Receiver 1. Connect the satellite receiver to the TV/VCR/DVD. A.
Connections & Setup TV/VCR/DVD Back Panel LINE IN IN 1 VD D / CR V / TV ANT/CABLE 75 LINE OUT VIDEO AUDIO 1A From Antenna/Cable Feed 1B A/V RECEIVER DOLBY DIGITAL or DTS RECEIVER DIGITAL IN -OR- CD IN TAPE IN OUT TV IN IN VCR OUT R L R e ec iv er Note: The back of your Dolby Digital* or DTS** receiver might not look exactly like the one shown here. Dolby Digital® and DTS® Both Dolby Digital and DTS are audio formats used to record 5.
Connections & Setup TV/VCR/DVD + Receiver 1A. Connect the Dolby Digital or DTS receiver to the TV/VCR/DVD If you have a Dolby Digital or DTS receiver with a Digital Input jack, connect an optical digital cable (not provided) into the OPTICAL DIGITAL OUT jack on the TV/VCR/DVD player and to the Digital Input jack on the back of the receiver. You must also set the digital output setting in the DVD setup menu (Chapter 5 has details).
Connections & Setup Plug in the TV/VCR/DVD Plug the end of the power cord into the wall outlet. Match the wide blade of the plug with the wide slot in the outlet. Insert the plug completely into the outlet. Put Batteries in the Remote TV button ON•OFF VCR VCR button DVD REPEAT TV VCR2 MUTE SAT•CABLE SOUND CH TR A CK - OM SP EE VOL VOL T R A CK + CH + RETURN D-ZO TIMER DV NS INFO D O P TI O Arrow buttons (up, down, left, right), and the OK button OK 1.
Connections & Setup Initial Setup The first time you turn on your TV/VCR/DVD, you’ll be asked to set a few screens so that your TV/VCR/DVD will be set up correctly. Complete the following steps to set up your TV/VCR/DVD. Select a Language LANGUAGE The first time you turn on the TV, the SELECT LANGUAGE menu appears on the screen. If you want the TV on-screen menus to appear in English, press the OK button on the remote control.
Connections & Setup Add or Erase Channels MENU TIME VIDEO ADJUST AUDIO ADJUST CLOSED CAPTION TIMER RECORDINGS LANGUAGE SETTING V-CHIP BLOCK SETTING SELECT / PREVIOUS FUNCTION You might want to add or erase some channels if they’re inactive, have weak signals, or you don’t want them in your channel list. The channel list is the list of channels the TV tunes to when you press the channel up and/or channel down buttons.
Connections & Setup VCR Basics Now that you’ve finished the initial setup, you can watch TV or start using the VCR part of your product. Playing a Tape 1. Insert a tape in the VCR (the VCR turns on automatically and the VCR indicator lights on the front panel). If the safety tab on the videotape is removed, the tape automatically begins playback. 2. VCR indicator Press the VCR button on the remote to put the remote in VCR mode.
Connections & Setup TV button Recording One Channel While Watching Another 1. VCR button ON•OFF VCR DVD REPEAT TV VCR2 MUTE SOUND VOL VOL CH TR A CK - OM SP EE Note: You can’t record on a tape with the safety tab removed. If the safety tab is removed and you want to record on the tape, simply cover the hole with adhesive tape. SAT•CABLE T R A CK + CH + CH +/– buttons Insert a videotape, with its safety tab in place, into the VCR.
Connections & Setup DVD Basics The first time you turn on the DVD player, press the DVD SETUP button while the player is stopped. The OSD LANGUAGE SETUP screen appears on the TV screen. OSD LANGUAGE SETUP LANGUAGE: ENGLISH Set the Menu Language By default, the DVD’s on-screen displays are shown in English. If you want the on-screen menus to appear in English, press OK on the remote. To change the language: 1. Press the down arrow button on the remote until the appropriate language is highlighted. 2.
Connections & Setup Loading and Playing Discs Your DVD player plays DVD discs (3” and 5” discs), audio CD discs (3” and 5” discs), and CDR/CD-RW discs recorded in MP3 format or audio format (3” and 5” discs). On CD-G and CDEXTRA discs, only the sound can be played (no images). Before you load a disc, make sure that it is compatible with the player.
Connections & Setup Using a Disc Menu Tip Some discs have an on-screen menu that is separate from the DVD player’s menus. The disc menu might only contain a list of the titles and chapters or it may allow you to change features such as language and playback settings. Although the content and operation of disc menus vary from disc-to-disc, the following example gives you an idea of what to expect. Many discs skip the disc menu and start playing automatically.
Connections & Setup Using the On-Screen Options Menu The on-screen Options Menu contains many playback features. Press the DVD OPTIONS button on the remote while a disc is playing. Each feature is illustrated with an icon. Use the up or down arrow button on the remote to highlight the icon. Note: Either up or down arrow button allows you to highlight an icon. Depending where the icon is located on-screen, one button might be quicker to access the icon than the other.
Chapter 2 Using the Remote Control Chapter Overview: • The Buttons on the Remote Control • Programming the Remote to Operate Other Components • How to Use the Remote After You’ve Programmed It • How to Order a New Remote Control • Code List Changing Entertainment. Again. Graphics used within this publication are for representation only.
Using the Remote Control The Buttons on the Remote Control Your backlit remote has a light button that glows in the dark. Press this button to light the channel up and channel down (CH +/–), volume up and down (VOL ), MUTE, SOUND, SPEED-ZOOM, RETURN and the backlight buttons. If you don’t press any buttons for several seconds, the light turns off to conserve battery power. L.E.D.
Using the Remote Control INPUT Repeatedly press to select tuner or line inputs (LINE1 for the rear LINE IN/IN1 jacks, LINE2 for the front VIDEO, L/MONO, R jacks, or DVD). If you are watching TV, press INPUT to tune to the VCR and play a tape. L.E.D. (light-emitting diode) The little light on the remote that lights when you are programming the remote. It also lights when you press a valid button on the remote. MUTE Lowers the volume to its minimum level and automatically turns on closed-captioning.
Using the Remote Control DVD Player Function Buttons L.E.D. Press DVD to place the remote in the DVD mode when playing DVDs, CDs or MP3s. The function of the button varies with the type and content of the disc played. ON•OFF VCR DVD REPEAT TV VCR2 MUTE SAT•CABLE SOUND CH TR A CK - OM SP EE VOL VOL T R A CK + CH + RETURN D-ZO TIMER DV NS INFO D O P TI O OK 0-9 (Number buttons) Use to directly input information such as chapter numbers, track numbers, and time.
Using the Remote Control SOUND Use this button to display available audio for the type of disc that is playing. SPEED-ZOOM STOP Use to zoom in on the picture when playing DVD discs. Stops disc play. SKIP-TITLE Allows you to see the title and other options available on the current disc (if the disc contains the options). VIEW Allows you to switch to a TV program or a recording channel, if you are recording.
Using the Remote Control 3. Press PLAY (the light on the remote starts flashing). The remote is searching the first set of component codes (there are 20 sets of codes). If the component you want to operate doesn’t turn off automatically after 5 seconds, press PLAY again (the light starts flashing again as the remote searches through the next set of codes). Continue pressing PLAY until the component turns off.
Using the Remote Control Code List VCR Admiral ........................................................................ 2131 Adventura .................................................................... 2026 Aiko ............................................................................. 2027 Aiwa ................................................................... 2002, 2026 Akai .......... 2003, 2004, 2005, 2007, 2008, 2111,2112, 2113 American High .......................................................
(This page intentionally left blank)
Chapter 3 Using the TV/VCR/DVD’s Features Chapter Overview: • Parental Controls and V-Chip • Recording Features • Picture Search Options • Audio Features • Disc Playback Features Using the Remote Changing Entertainment. Again. Graphics used within this publication are for representation only.
Using the TV/VCR/DVD’s Features Parental Controls and V-Chip MENU TIME VIDEO ADJUST AUDIO ADJUST CLOSED CAPTION TIMER RECORDINGS LANGUAGE SETTING V-CHIP BLOCK The V-CHIP BLOCK feature allows you to program your TV so that children can’t see certain programs or channels. By default, this feature is turned off.
Using the TV/VCR/DVD’s Features Age-Based Rating Description and Content Themes for Age-Based Ratings Mature Audience Only. Specifically designed to be viewed by adults and may be unsuitable for children under 17. It contains one or more of the following content themes: crude indecent language (L), explicit sexual activity (S), or graphic violence (V). TV-MA Parents Strongly Cautioned. Contains some material that many parents would find unsuitable for children under 14.
Using the TV/VCR/DVD’s Features V-CHIP BLOCK MPAA TV GUIDELINES 5. Press the up or down arrow buttons to select the age-based rating or its contents that you want to block, and press the OK button. 6. When the desired rating screen appears, press the up or down arrow buttons and OK button to BLOCK or unblock (– –) the age rating and any content rating you are allowed to set. 7. Press the left arrow button to return to the TV GUIDELINES menu or press MENU to exit.
Using the TV/VCR/DVD’s Features MPAA Rating Limit The MPAA menu lets you decide which movies can and can’t be viewed according to the agebased rating of the MPAA. The TV/VCR/DVD locks and unlocks the parental control settings using a password you select. If you only want your child to watch movies that have a PG rating and lower (in other words, movies rated PG and G), then you could automatically block out all other movies with higher ratings. 1. Press TV MENU on the remote to display the main MENU.
Using the TV/VCR/DVD’s Features Download New Rating System MENU TIME VIDEO ADJUST AUDIO ADJUST CLOSED CAPTION TIMER RECORDINGS LANGUAGE SETTING V-CHIP BLOCK You can choose to download additional new rating systems. The new rating system is automatically set according to the ratings you have previously chosen. 1. Press TV MENU on the remote (the main MENU appears). 2. Press the up or down arrow button to select V-CHIP BLOCK and press OK (INPUT SECRET NO. menu appears). 3.
Using the TV/VCR/DVD’s Features Recording Features The VCR provides several different ways to record programs. The following pages explain how to use the types of recording features. If you’re using the remote control, you must press the VCR button to put the remote control in VCR mode. STOP SP 6 Recording Speeds Press SPEED on the remote to select a recording speed. • SP (Standard Play) gives the best quality recording; consequently, fewer programs can be recorded on the tape.
Using the TV/VCR/DVD’s Features One-Touch Recording Use OTR to quickly record the remaining portion of a program being watched. OTR is a great way to capture the end of a sporting event that has run into overtime or a live broadcast that runs long. OTR works in 15 minute increments. STOP 9:50AM 1. Make sure the clock is set and insert a tape with the safety tab in place. 2. Press the VCR button and select the channel you want to record. 3.
Using the TV/VCR/DVD’s Features REC TIMER PROGRAM MODE CH START STOP 1 DAILY 10 4:30PM 6:30PM SP 2 MON-FRI 58 10:00AM 11:30AM EP 3 20(SAT) 56 11:30AM 1:20PM SP 4 5 COMPLETE NEXT CHANGE DELETE SELECT PROGRAM TO DELETE SELECT PREVIOUS / 10:20AM OCT.15(MON) : SET OK : QUIT MENU 10. Insert a tape with safety tab intact before the recording is to begin. Press the TIMER button on the remote. The PROGRAM EVENT indicator on the front panel lights when a timer recording is set.
Using the TV/VCR/DVD’s Features Copying and Editing Tapes Use another VCR or camcorder as the playback VCR and the TV/VCR/DVD as the recording VCR. Note: The unauthorized recording of television programs and other materials may infringe upon the rights of others. 1. Turn on the VCR or camcorder and the TV/VCR/DVD. 2. Press INPUT on the TV/VCR/DVD’s remote to select the correct line input for the device you have connected (LINE 1--back LINE IN 1 jacks, LINE 2--front jacks). 3.
Using the TV/VCR/DVD’s Features Picture Search Options The most basic way to search during playback is using the FORWARD or REVERSE buttons. This section contains several other options available for searching a tape. Frame Advance Frame advance allows you to view one-stop action frame after another during playback. 1. Press PAUSE during playback to freeze the action. 2. Press PAUSE again each time you want to view the next frame of the scene. 3. Press PLAY to return to normal playback.
Using the TV/VCR/DVD’s Features Tracking Your TV/VCR has automatic tracking which removes streaks and “noise” from the picture. Tracking has no effect when recording – only during playback. Automatic tracking is activated when you insert a tape or turn on the TV/VCR. TRACKING flashes on the TV screen during automatic tracking. Occasionally you may need to manually adjust tracking, especially if the tape was recorded on a different VCR.
Using the TV/VCR/DVD’s Features Reception Some TV programs are broadcast with stereo audio or a Second Audio Program (SAP) which offers a second language. The SOUND button on the remote lets you select the type of audio you want to listen to or record. Press the SOUND button on the remote repeatedly to switch between STEREO or SAP. • STEREO Used to hear/record normal or stereo broadcast TV. ST appears on the TV screen when stereo is being broadcast. • SAP Used to hear/record a Second Audio Program.
Using the TV/VCR/DVD’s Features Disc Playback Features Using the Remote You can use the remote control to activate disc playback features. Playback features aren’t usually available during the opening credits of a movie. If a playback feature isn’t available, the invalid symbol appears on the screen when you press that button. Fast Motion Playback (Picture Scan) ON•OFF VCR DVD REPEAT VCR2 MUTE TV To scan through the disc when you’re playing it, use the Picture Scan feature. SAT•CABLE 1.
Using the TV/VCR/DVD’s Features Zoom You can zoom in on the picture. 1. Press SPEED-ZOOM to zoom in on the picture. The ZOOM indicator appears on the TV screen. 2. Press SPEED-ZOOM again to increase the zoom. You can use the arrow buttons to move the zoomed area up, down, left, or right. Notes: The zoom indicator turns red when you cannot perform the selected zoom operation. When playing a pan and scan disc, only two zoom levels are available. The zoom image may become distorted. 3.
(This page intentionally left blank)
Chapter 4 Playing Discs Chapter Overview: • Playing DVDs • Playing Audio CDs • Playing MP3 CDs Changing Entertainment. Again. Graphics used within this publication are for representation only.
Playing Discs Playing DVDs For basic information about loading and playing discs, go to page 20 in Chapter 1. This chapter gives you the details about the on-screen DVD Options, how to play audio CDs and MP3 discs. Selecting a Title Some discs contain more than one title. For example, there might be four movies on one disc (each movie might be considered a title). Each title is divided into chapters. To select a title: 1. While the disc is playing, press DVD OPTIONS. 2. If 3.
Playing Discs Selecting a Time Location DVD You can skip to a specific time on the DVD by using the Time Location Feature. -0:00:00 DVD 01:00:00 1. While the disc is playing, press DVD OPTIONS on the remote to bring up the options menu. 2. isn’t highlighted, press the up or down arrow button to If highlight it, and press OK. 3. Use the number (0-9) buttons to enter the time location on the DVD you want to go to. 4.
Playing Discs Changing the Audio DVD Audio is recorded in several ways on DVDs, including multi-channels (used for voice-overs in other languages), Dolby Digital (5.1ch), DTS, and Linear PCM. If you change the disc audio, make sure you also change to the same audio option within the DVD Setup Menu (details on page 62). 5.1ch 1 DVD 2LPCM • Choose Dolby Digital if you connected a Dolby Digital receiver. • Choose DTS if you connected a DTS receiver or decoder.
Playing Discs Changing the Digital Gamma Setting DVD You can use this feature to enhance viewing by brightening darker areas of the image. 1. While the disc is playing, press the DVD OPTIONS button on the remote. 2. Press the up or down arrow button to highlight and press OK. If digital gamma is not available ( XX) is displayed. ON DVD • Press the up or down arrow button to toggle Digital Gamma ON or OFF.
Playing Discs Playing Audio CDs Your DVD player has many of the same features as an audio CD player. This section explains how to play audio CDs in your DVD player and how to use the player’s features. Disc Playback Features Using the Remote ON•OFF VCR DVD REPEAT TV VCR2 MUTE SAT•CABLE SOUND T R A CK + CH + VOL Scan Playback VOL CH TR A CK - OM SP EE You can use the remote control to activate disc playback features.
Playing Discs 1. While a disc is playing, press REPEAT on the remote. The screen. (repeat icon) appears on the TV • Press the REPEAT button once and press the PLAY button to repeat the track that is playing. • Press the REPEAT button twice and press the PLAY button to repeat the disc that is playing. • Press the REPEAT button three times and press the PLAY button when you reach the start of the section you want to repeat.
Playing Discs Playback Features Using the Remote You can use the remote control to activate disc playback features. If a playback feature isn’t available, the invalid symbol appears on the screen when you press that button. Pause ON•OFF VCR DVD REPEAT VCR2 MUTE TV 1. Press the PAUSE button when a disc is playing to pause the disc. SAT•CABLE 2. Press the PLAY button to resume normal playback.
Chapter 5 Using the Menu System Chapter Overview: • How to Use Your Menu System • Time Menu • Video Adjust Menu • Audio Adjust Menu • Language Menu • Setting Closed Caption Modes • Additional Setup Features • DVD Menu System Changing Entertainment. Again. Graphics contained within this publication are for representational purposes.
Using the Menu System How to Use Your Menu System The V-CHIP BLOCK menu and the TIMER RECORDINGS menu were explained in Chapter 3. This Chapter explains the rest of the menu system. Use the buttons on the remote to access the menu system and make changes to the settings. To highlight or point to an item on the screen, press the arrow buttons on the remote (the triangular icon moves). To select an item or activate a choice, press the OK button.
Using the Menu System To Set the Clock: TIME TIMER CLOCK SET CLOCK SET AUTO CLOCK EDS CH SELECT PREVIOUS MONTH 1. Display the TIME menu, use the up or down arrow to select CLOCK SET, and press OK (the CLOCK SET screen appears). • Automatic Clock Set Press the up or down arrow to select AUTO CLOCK ON and press OK. ON AUTO / : SET : QUIT --- DAY YEAR TIME The triangular icon moves to EDS CH.
Using the Menu System MENU TIME VIDEO ADJUST AUDIO ADJUST CLOSED AUDIOCAPTION ADJUST TIMER RECORDINGS EQUISOUND OFF LANGUAGE BASS SETTING TREBLE V-CHIP BLOCK BALANCE RESET SELECT / : SET PREVIOUS : QUIT Audio Adjust Menu EQUISOUND Displays a choice list that allows you to turn on or off the change of sound during a commercial break. ON allows you to have the volume of the audio remain constant during program changes and commercial breaks.
Using the Menu System : SET : QUIT / : SET : QUIT 4. Press TV MENU to exit. Use the FUNCTION menu to set up your TV/VCR/DVD for your personal preferences. You can turn energy saving on or off, select a blue screen when there is no signal from a channel or a blank portion of tape is playing, or choose to play a tape repeatedly. OK MENU AUTO CH PRESET AIR/CABLE CH SEARCH CH MEMORY CABLE SELECT PREVIOUS If you select DATA, press the up or down arrow to select CH1 or CH2.
Using the Menu System TV MODE TV MODE SETUP TV MODE: 4:3 LB TV MODE SETUP TV MODE: 4:3 LB 4:3 PS 4:3 LB 16:9 The TV MODE feature adjusts the way a movie appears on your TV. Standard TVs are 4 x 3 format. You can adjust the TV MODE for the way you want to watch movies. 1. Press the DVD SETUP button to display the setup menu. 2. Press the up or down arrow button to highlight the and press OK to display the available modes.
Using the Menu System Set Parental Limits The PARENTAL SETUP menu lets you set viewing limits according to a movie’s rating or contents. Some discs are equipped with a rating feature that rates the disc according to the content. Some discs let you edit out scenes and replace them with scenes suitable for children. You can also set the locking feature so any discs beyond the rating you select cannot be played. PARENTAL SETUP 1 2 3 4 5 CODE: 6 7 8 1.
Using the Menu System Select Audio Settings The compression feature allows you to raise (or normalize) the audio level of a DVD. You can also select the type of digital output while playing a DVD recorded in Dolby Digital (5.1ch). AUDIO SETUP COMPRESSION: OFF DIGITAL: ON OFF Turn Compression On or Off 1. Press the DVD SETUP button to display the setup menu. 2. Press the up or down arrow button to highlight the icon), and press OK. 3.
Using the Menu System DISC LANGUAGE Select the Disc Language SUB TITLE:ENGLISH AUDIO: ENGLISH MENU: ENGLISH You can change some disc’s subtitle, audio, and menu languages. The DVD must be recorded with the language for it to be available. DISC LANGUAGE SUB TITLE:ENGLISH ENGLISH CHINESE SPANISH SWEDISH FRENCH DUTCH ITALIAN OTHER DISC LANGUAGE GERMAN [--] SUB TITLE:ENGLISH ENGLISH CHINESE SPANISH SWEDISH FRENCH DUTCH ITALIAN OTHER GERMAN 1.
Using the Menu System Disc Language Codes Code Code Language Name Code Language Name Code Language Name AA Afar FY Frisian MG Malagasy SL Slovenian AB Abkhazian GA Irish MI Maori SM Samoan AF Afrikaans GD Scots Gaelic MK Macedonian SN Shona AM Ameharic GL Galician ML Malayalam SO Somali AR Arabic GN Guarani MN Mongolian SQ Albanian AS Assamese GU Gujarati MO Moldavian SR Serbian AY Aymara HA Hausa MR Marathi SS Siswat AZ Azerbaijani HI Hindi
Chapter 6 Other Information Chapter Overview: • Troubleshooting • The Front of Your TV/VCR/DVD • Back Panel Jacks • Care and Cleaning • Limited Warranty • Finding the TV/VCR/DVD’s Video Line Input Channel • Accessories • Index Changing Entertainment. Again. Graphics used within this publication are for representation only.
Other Information Troubleshooting Most problems you encounter with your TV/VCR/DVD can be corrected by consulting the Troubleshooting list that follows. General TV/VCR/DVD Problems TV/VCR/DVD won’t turn on • Make sure you try the following buttons on the remote: TV, VCR, DVD, and ON•OFF. • Something might be wrong with your remote control. Press the POWER button on the front of the TV/VCR/DVD. If the TV/VCR/DVD turns on, check the remote control solutions on page 67.
Other Information Sound okay, picture poor • Try adjusting sharpness function to improve weak signals. Go to page 57 for instructions. • The energy-save feature might be on. Go to page 59 for more information. • Check antenna connections. Make sure all of the cables are firmly connected to the jacks. Can’t select certain channel • Channel may be blocked or not approved in the V-CHIP BLOCK menu. Clock is wrong • Power interruption. Need to reset the clock. Go to page 57 for more information.
Other Information Tape won’t play or record • If you’re using the remote control, press VCR to put the remote in VCR mode before you press PLAY or RECORD. • Make sure a videotape has been inserted. • Eject and reinsert tape. • The tape might be broken — try another tape. • Check to see if the safety tab has been removed. If it has, the TV/VCR/DVD will not record. • The TV/VCR/DVD might be in pause mode. Press PLAY on the remote to return the tape to play mode.
Other Information VCR Recording Problems PROGRAM EVENT indicator on front of TV/VCR is flashing • There might have been a power interruption. Check the clock for time and date setting. Go to page 36 for more information. • A timer program has been set and you turned off the TV/VCR but you haven’t inserted a tape or the tape you inserted has had its safety tab removed. Go to page 38 for instructions.
Other Information The Front of Your TV/VCR/DVD TV/VCR Controls VIDEO L/MONO R PHONES DVD Player Controls Remote control sensor POWER Button Turns the TV/VCR/DVD on or off. Power Indicator Lights when the power is on. PHONES (Headphone Jack) Connect headphones (not supplied) to this jack. Remote Sensor Receives signals from the remote. Aim remote at this sensor with no objects between them.
Other Information PAUSE PLAY Press once to pause playback. Press again to advance one frame. Press PLAY to return to playback. Press once to begin playback. PROGRAM EVENT Indicator Lights when a timer program has been set and a cassette with the safety tab is in the TV/VCR. Also flashes when a timer recording has been set and the TV/VCR is turned off with no cassette inserted, a cassette without the safety tab has been inserted, or there has been a power interruption.
Other Information Care and Cleaning Maintenance of TV/VCR/DVD Cabinet CAUTION: Turn OFF your TV/VCR/DVD before cleaning. You can clean the TV/VCR/DVD as required, using a soft lint-free cloth. Be sure to occasionally dust the ventilation slots in the cabinet to help assure adequate ventilation. The TV/VCR/DVD screen may be cleaned with a soft, lint-free cloth as well. Take care not to scratch or mar the screen. If necessary, you may use a cloth dampened with warm water.
Other Information Handling Discs • Don’t touch the disc’s signal surfaces. Hold by the edges or by one edge and the hole in the center. • Don’t affix labels or adhesive tape to label surfaces. Don’t scratch or damage the label. • Do not use damaged (cracked or warped) discs. Cleaning Discs • Dirty discs can cause reduced video and audio performance. Always keep discs clean by wiping them gently with a soft cloth from the inner edge toward the outer perimeter.
Other Information Limited Warranty What your warranty covers: • Defects in material or workmanship. For how long after your purchase: • One year from date of purchase for labor charges. • One year from date of purchase for parts. • Two years from date of purchase for picture tube. The warranty period for rental units begins with the first rental or 45 days from date of shipment to the rental firm, whichever comes first.
Other Information Product registration: • Please complete and mail the Product Registration Card packed with your TV/VCR/DVD. It will make it easier to contact you should it ever be necessary. The return of the card is not required for warranty coverage. Limitation of Warranty: • THE WARRANTY STATED ABOVE IS THE ONLY WARRANTY APPLICABLE TO THIS PRODUCT. ALL OTHER WARRANTIES, EXPRESS OR IMPLIED (INCLUDING ALL IMPLIED WARRANTIES OF MERCHANTABILITY OR FITNESS FOR A PARTICULAR PURPOSE) ARE HEREBY DISCLAIMED.
Other Information Finding the TV/VCR/DVD’s Video Line Input Channel You need to tune your TV/VCR/DVD to the video line input channel if you’re using the AUDIO/ VIDEO (A/V) IN jacks to connect other components (such as a cable box, another VCR, or satellite receiver). You must select the TV/VCR/DVD’s video line input channel before you can see the video and hear the audio from another component you have connected to these jacks.
Other Information Accessories Accessory Order Form Description VH81 (3-ft) VH82 (6-ft) VH89 (6-ft) Gold-Tipped cable VH83 (6-ft) Screw-on Cable attaches to the round antenna connectors (called 75-ohm F-type) on the back of your TV/VCR/DVD. The ends screw onto the connectors for a secure connection. Push-on Cable attaches to the round antenna connectors (called 75ohm F-type) on the back of your TV/VCR/DVD. Ends push on for a quick connection.
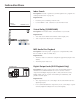
Other Information Charge your order on your VISA, MasterCard, or Discover Card by filling in below Remote Control TV VCR2 MUTE SAT•CABLE This is the remote control that came packed with your TV/VCR/DVD. Replacements or spares can be ordered as needed.
Index Index Symbols 16 x 9 Widescreen 60 4 x 3 Letterbox 60 4x3 Pan and Scan 60 A A•B Repeat 45 Accessories 77 Add/erase channels 16 Age-Based Rating 33 Age-Based Ratings 35 Angle, camera 49 ANT/CABLE jack 10, 11, 71 Arrow buttons 24, 26, 58 Aspect ratio 60 Audio 50 A•B repeat 52 disc repeat 52 Dolby Digital 12 track repeat 52 Audio Adjust menu 58 Audio equipment Dolby Digital 12 Audio features 42 Audio/video jacks 11, 13, 71 Auto channel search 15 B Back Panel jacks 71 Back-lit remote 24 Balance 58 Bass
Index Maintenance 72 Menu Audio Adjust 58 Language 58 Time 56 Video Adjust 57 MENU button 16 MP3 disc repeat 54 playback features 54 track repeat 54 MP3 discs 53 MPAA 32 age-based rating 35 rating limit 35 MUTE button 25 N Number buttons 24, 26 O OK button 15, 25, 26 ON•OFF button 25, 26 One-touch recording 38 OPEN/CLOSE button 70 OPTICAL DIGITAL OUT jack 12, 13, 71 P Pan and Scan 60 Parental controls 32 Password 33 PAUSE button 17, 25, 26, 37, 71 Picture adjust 57 Picture scan 44 Picture search options
Index Video Adjust menu 57 Video input channel 76 VIEW button 27 Virtual Dolby 50 VOL buttons 70 VOL+ button 25 VOL- button 25 W Warranty 74 Widescreen 60 Z Zoom 45 Chapter 6 81
Visit the RCA web site at www.rca.com Please do not send any products to the Indianapolis address listed in this manual or on the carton. This will only add delays in service for your product. Thomson multimedia Inc. 10330 North Meridian Street Indianapolis, IN 46290 ©2002 Thomson multimedia Inc.