User manual Manuel d'utilisation Manual de usuario BRC11072E EN FR ES IMPROVE YOUR PRODUCT! Blu-ray technology is constantly changing and improving. To ensure you're getting the best performance from your product, please visit our website to download the latest operating software for it. Simply go to www.RCAav.com, click on your product's link and you'll get the latest operating software.
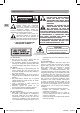
Important Information caution RISK OF ELECTRIC SHOCK DO NOT OPEN DO not expose this unit to rain or moisture EN The lightning flash with an arrowhead symbol, within the equilateral triangle, is intended to alert the user to the presence of uninsulated "dangerous voltage" within the product's enclosure that may be of sufficient magnitude to cause an electric shock.
Important Information Rating Plate Location • The rating plate is located at the bottom of apparatus. Warning: Changes or modifications to this unit not expressly approved by the party responsible for compliance could void the user’s authority to operate the equipment. Notes on Copyright It is forbidden by law to copy, broadcast, show, broadcast on cable, play in public, or rent copyrighted material without permission. This item incorporates copy protection technology that is protected by U.S.
Table of Contents EN Important Information ...................... 2 - 3 Maintenance ............................................... 4 Disc Formats .............................................. 5 Accessories ..................................................... 6 Remote Control ......................................... 6 Control Reference Guide .................... 7 - 8 Remote Control ......................................... 7 Unit ...........................................................
Disc Formats This player can playback discs bearing any of the following marks: DVDs [8cm(3")/12cm(5") disc] Audio CDs [8cm(3")12cm(5") disc] Blu-ray Discs [8cm(3")/12cm(5") disc] CD-R CD-RW EN Compatible Region Management Information This unit has been designed to playback BD-video with region and DVD-video with region . You cannot playback BD-video or DVD-video that are labeled for other regions. Look for the symbols on the right on your BD-video or DVD-video.
Accessories Please check and identify the supplied accessories. Remote Control (with batteries) ............................................................................................. x 1 EN Remote Control Using the Remote Control • Point the remote control at the REMOTE SENSOR located on the unit. • When using this unit in very bright light, the infrared REMOTE CONTROL SENSOR may not work properly. • The recommended effective distance for remote operation is about 16 feet (5 meters).
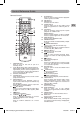
Control Reference Guide Remote Control 9. 10. 11. 12. 13. 14. 15. 16. 17. 18. 19. 1. ON/OFF Button Press to turn on the unit or put it in standby mode. 2. Color (Red, Green, Blue, Yellow) buttons When playing a Blu-ray Disc that has a Java application, press to control playback. For more information, see the documentation that comes with the Blu-ray Disc. 3. Number (0-9) Buttons 4. CLEAR Button Clear input selections and cancel certain playback functions. 5.
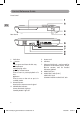
Control Reference Guide Front Panel EN Rear Panel 1. 2. DVD door Button Use to open and close the disc tray. Stop Button Stops playing a disc. Play / Pause Button Press to start or pause playback of a disc. Button Press to turn on the unit or put it in standby mode. 3. Remote Sensor Receives the remote control signal. 4. POWER ON indicator Power On Mode: Light on Standby Mode: Light off 5. Power cord 6. USB Port 7.
Connections A. Connecting to a TV 1. Using a HDMI cable (not included) For TVs that support it, HDMI can provide the best quality audio and video output (depending on media source), and so is the preferred connection type. The HDMI cable incorporates both audio and video signals, so you will have just one cable running from the unit to your TV. Using a HDMI cable (not included), connect the HDMI OUT jack on your unit to the HDMI IN jack on your TV or HDMIcompatible display.
Connections C. Using USB port EN You can connect a USB flash drive (not included) to the USB port on the unit to play picture files. For operation of file playback on the USB flash drive, please refer to the section “Playing Picture Files”. Note: • It is recommended that the product is turned OFF when you plug in a USB flash drive. • It does not support USB hard disk mass storage devices, multi-card readers and other USB computer peripherals. • It only supports USB flash drives (FAT32/16, max.
Connections F. Using Picasa For users that already have a Picasa account, Signing in with your account To display photos from your web album on the screen, you need to sign in with your Picasa account. a. Press the MEDIA button to select media mode. b. Press or button to highlight Picasa. c. Press OK button to confirm. d. Sign in with your Picasa account. My Photos Friends Search Favorites Tag New User+ EN User New User+ My Photos Creating a new Picasa account on your PC a.
Unit Operation Turning on the Unit 1. Press button to turn on the unit. 2. The start-up picture will appear on the screens. 3. After use, Press button to turn off. EN Note: • If the unit turns ON, the GREEN indicator on the front of the unit will illuminate. If the unit turns OFF, the GREEN indicator will be off. • When the unit turns ON, you can use the remote control to put the unit in STANDBY mode. The GREEN light on the front of the unit will light off when the unit is in POWER ON mode.
Playing a Blu-ray Disc or DVD This owner’s manual explains the basic instructions for operating this unit. Some discs are produced in a manner that allows specific or limited operation during playback. Therefore, this unit may not respond to all operating commands. THIS IS NOT A DEFECT. Please refer to the instructions accompanying the specific disc in question for more information about the options available on that disc. “ ” may appear on the screen during operation.
Playing a Blu-ray Disc or DVD Subtitle Selection EN 1. While a disc is playing, press the SUBTITLE button to display the current language setting. 2. Press the SUBTITLE button repeatedly to select the desired subtitle language. 14/32 English Note: • Some discs are set to display subtitles automatically, and you cannot turn them off even if you set the subtitle function to off. • During some scenes, the subtitles may not appear immediately after you select your desired scene.
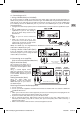
Locating a Desired Section Locating a specific title If a Blu-ray Disc or DVD contains title numbers, you can locate a specific title by directly selecting its title number. 1. Press the GOTO button. 2 / 4 2 / 18 TT 00 :01 : 25 DVD MPEG 2. Press the or button 2 / 2 French 1/2 Dolby Digital Stereo to highlight title number, then press OK button to start the modification. 3. Press the corresponding number buttons (0-9) for the title you want, then press the OK button to confirm.
Repeat Playback You can play a specific title or chapter repeatedly. (Chapter repeat, title repeat, A-B repeat) Repeating a chapter (DVD) You can play the same chapter repeatedly. EN 1. While the disc is playing, press the REPEAT button until the The current chapter is played repeatedly. CH indicator displays on the screen. Repeating a title (DVD) You can play the same title repeatedly. 2. While the disc is playing, press the REPEAT button until the The current title is played repeatedly.
Customizing the Function Settings General Setting System Setup Home Menu 1. In STOP mode, press the SETUP button. Press the button to select System. 2. Use the button to move the highlight bar --- General Setting --to the right, use the or button to select System On Screen Saver Screen Saver, Disc Auto Playback, Restore Off Disc Auto Playb... Language Default Settings, Upgrade, Easy Setup and Restore Default Settings More... Network Netflix Info, press the OK button to select. More... Upgrade 3.
Customizing the Function Settings Network Setup EN Home Menu 1. In STOP mode, press the SETUP button. Press the button to select Network. 2. Use the button to move the highlight --- General Setting --bar to the right, press the or button System Interface Wired to select Interface, Information, Connection Information Language More... Test, IP Setting and Wireless Setting, press Connection Test More... Network the OK button to select. IP Setting Auto 3.
Customizing the Function Settings HDMI Resolution Auto: If your TV is a high-definition TV (HDTV), is connected to the HDMI port on your player and you want your player to set the output resolution based on information exchanged between the TV and your player over the HDMI cable. 480i: If your TV is a standard-definition NTSC (analog) TV. 480p: If your TV is an enhanced-definition TV (EDTV). 720p: If your TV is a high-definition TV (HDTV) capable of 720p only.
Internet Content and Services Disclaimer All internet content and services accessible through this device belong to third parties and are protected by copyright, patent, trademark and/or other intellectual property laws. Such internet content and services are provided solely for your personal noncommercial use, and you may not use such content or services in a manner that has not been authorized by the internet content owner or service provider.
Troubleshooting Guide SYMPTOM CAUSE (AND REMEDY) No power. • Ensure the AC power cord is connected. • Make sure that the unit is turned on. The remote control does not function. • • • • • Very little or no sound is coming from a DVD. • Make sure that you select POWER ON mode. • Make sure the unit is not paused. Press the PLAY button. • Make sure the unit is not in fast-forward or fast-reverse mode. Press the PLAY button.
Limited Warranty EN AVC MULTIMEDIA (“AVC”) makes the following limited warranty. This limited warranty extends to the original consumer purchaser and is limited to non-commercial use of the product. One Year Parts & Labor Warranty AVC products purchased in the United States are warranted to be free from defects in materials or workmanship for a period of one year from the date of their original retail purchase.
Mises en garde de sécurité caution RISK OF ELECTRIC SHOCK DO NOT OPEN DO not expose this unit to rain or moisture Le symbole de l’éclair et d’une flèche à l’intérieur d’un triangle équilatéral signale qu’il y a une « tension dangereuse » non isolée à l’intérieur de l’appareil, assez puissante pour provoquer un choc électrique.
Mises en garde de sécurité AVERTISSEMENT: Des changements ou modifications apportés à cet appareil, non approuvés expressément par les responsables de la conformité, peuvent ôter à l'utilisateur le droit d'utiliser cet appareil. Remarques sur les droits de Copyright FR Il est illégal de copier, de transmettre, de montrer, de transmettre sur la télédistribution, de jouer en public et de louer tout ce qui est protégé par un droit d’auteur, sans permission.
Table des Matières Mises en garde de sécurité ................ 23 - 24 Entretien ..................................................... 25 Formats de disques ................................ 26 Accessoires ................................................. 27 Télécommande ......................................... 27 Guide de référence des commandes .. 28 - 29 Télécommande ...................................... 28 Appareil .................................................. 29 Connexions .......................
Formats de Disques L'appareil peut effectuer la lecture des disques de marques suivantes: DVD [disques 8cm (3po)/ 12cm (5po)] Disques compacts audio [disques 8cm (3po)/12cm (5po)] FR Disques Blu-ray [8cm(3 po/12 cm(5 po)] CD-R CD-RW Compatible Renseignements sur les régions Cet appareil est conçu pour la lecture de disques BD-vidéo à code de région et DVD-vidéo à code de région . La lecture de différents codes de région n'est pas possible.
Accessories Veuillez vérifier et identifier les accessoires compris. Télécommande (avec piles) .......................................................................................................... x 1 Télécommande FR Utilisation de la télécommande • Pointez la télécommande vers le CAPTEUR DE TÉLÉCOMMANDE "IR" situé sur l’appareil. • Si l’éclairage ambiant est élevé, le rendement du CAPTEUR DE TÉLÉCOMMANDE "IR" à infrarouge peut baisser et entraîner un mauvais fonctionnement.
Guide de Référence des Commandes Télécommande FR 1. Touche ON/OFF Abaissez pour mise en circuit de l'appareil ou pour le mettre en mode de veille. 2. Touches de couleur Lors de la lecture d'un disque Blu-ray à application Java, abaissez pour régler la lecture. Pour détails supplémentaires, lisez la documentation qui accompagne le disque Blu-ray. 3. Touches numériques (0-9) 4. Touche CLEAR Pour effacer des sélections et annuler certaines fonctions de lecture. 5.
Guide de Référence des Commandes Panneau devant FR Panneau arrière 1. 2. Porte du tiroir pour DVD Touche Pour ouvrir/fermer le tiroir du disque. Touche Stop Pour cesser la lecture. Touche Play / Pause Pour commencer ou reprendre la lecture d'un disque Touche Abaissez pour mise en circuit de l'appareil ou pour le mettre en mode de veille. 3. Capteur de télécommande Capte le signal de la télécommande. 4. Voyant D'ALIMENTATION Mode d'alimentation : Allumé Mode de veille : Éteint 5.
Connexions A. Raccordement d'un téléviseur 1. Utilisation d'un câble HDMI (non compris) FR Les téléviseurs à compatibilité HDMI offrent une reproduction audio et vidéo optimale (selon la source du contenu), et c'est le type de connexion favori. Un câble HDMI incorpore les signaux audio et vidéo en même temps, par conséquent un seul câble entre l'appareil et votre téléviseur suffit.
Connexions C. Utilisation du port USB Vous pouvez raccorder une clé USB à mémoire flash (non comprise) dans le port USB sur l'appareil pour la lecture de fichiers photos. Pour effectuer la lecture des fichiers sur la clé USB à mémoire flash, veuillez vous reporter à la section Lecture de fichiers photos. Remarque: • Il est conseillé de mettre l'appareil HORS CIRCUIT, lors du branchement d'une clé USB à mémoire flash.
Connexions F. Utilisation de Picasa Pour utilisateurs déjà abonnés à Picasa, FR Ouvrir une session Pour afficher des photos dans votre album Web, vous devez ouvrir une session en utilisant votre compte d'accès Picasa. a. Abaissez la touche MEDIA pour choisir le mode multimédia. b. Abaissez ou pour mettre en évidence Picasa. c. Abaissez la touche OK pour confirmer. d. Ouvrez la session d'accès à votre compte Picasa. Creation d'un nouveau compte Picasa sur votre ordinateur a. Allez au site http://www.
Fonctionnement de l'appareil Mise en circuit de l'appareil 1. Abaissez la touche pour mettre l'appareil en circuit. 2. L'image de lancement apparaît sur l'écran. 3. Une fois l'utilisation terminée, abaissez la touche pour mettre l'appareil hors circuit. Remarque: • Si l'appareil est en circuit, le voyant VERT sur le devant de I'appareil s'allume. Si l'appareil est hors circuit, le voyant VERT est éteint.
Lecture d'un disque Blu-ray ou d'un DVD Ce manuel indique les instructions normales pour l’appareil. La production de certains vidéodisques en limite les fonctions ou ne permet qu’une fonction spécifique durant la lecture; c’est pourquoi, l’appareil peut ne pas répondre à toutes les commandes de fonctionnement et ceci n’indique pas que l’appareil est défectueux. Reportez-vous aux renseignements indiqués sur chaque disque.
Lecture d'un disque Blu-ray ou d'un DVD Sélection de sous-titres 1. Pendant la lecture d'un DVD, pressez la touche SUBTITLE (sous-titres) pour 14/32 English afficher le réglage de la langue en cours, comme montré sur l'exemple. 2. Pressez la touche SUBTITLE de façon répétée pour choisir la langue de sous-titres désirée. Remarques: • Sur certains DVD l'affichage des sous-titres est automatique et vous ne pouvez pas les mettre hors service même en annulant la fonction de sous-titres.
Accès à une section spécifique Accès à un titre spécifique Si un disque Blu-ray ou un DVD comporte des titres numérotés, il suffit d'entrer le numéro du titre pour y accéder directement. 1. Abaissez la touche GOTO. MPEG 2 / 4 2 / 18 TT 00 :01 : 25 2. Abaissez la touche ou pour 2 / 2 French 1/2 Dolby Digital Stereo mettre en évidence le numéro du titre, et abaissez la touche OK pour commencer l'action voulue. 3.
Lecture Répétition Vous pouvez effectuer la lecture répétée d’un titre ou d’un chapitre. (Répétition d’un titre, répétition d’un chapitre, répétition de A-B) Répétition d’un chapitre (DVD) Vous pouvez répéter la lecture d'un chapitre indéfiniment. 1. Durant la lecture d’un disque, pressez la touche REPEAT DISC sur la télécommande jusqu’à ce que l’indicateur façon répétée. (répétition du chapitre) soit affiché.
Personnalisation des réglages de fonction Réglage de base Configuration du système FR Home Menu 1. En mode ARRÊT, abaissez la touche SETUP. Abaissez la touche pour choisir System (système). --- General Setting --2. Utilisez pour déplacer la barre de mise System On Screen Saver en évidence à droite, utilisez ou pour Off Disc Auto Playb... Language choisir Screen Saver, Disc Auto Playback Restore Default Settings More... Network (lecture auto), Restore Default Settings, More...
Personnalisation des réglages de fonction Configuration de réseau Home Menu 1. En mode ARRÊT, abaissez la touche SETUP. Abaissez la touche pour choisir Réseau. 2. Utilisez pour déplacer la barre de mise en --- General Setting --évidence à droite, abaissez ou pour System Interface Wired choisir Interface, Information, Connection Information Language More... Test, IP Setting et Wireless Setting (interface, Connection Test More...
Customizing the Function Settings FR Résolution HDMI Auto : Pour téléviseur haute définition (HDTV) raccordé à la prise HDMI du lecteur. Ceci permet au lecteur de régler la résolution de sortie en fonction des renseignements transmis entre votre téléviseur et le lecteur par l'entremise du câble HDMI. 480i : Pour téléviseur NTSC à définition standard (analogique). 480p : Pour téléviseur à définition améliorée (EDTV). 720p : Pour téléviseur haute définition (HDTV) à limite de 720p.
Avis de non-responsabilité au sujet du contenu et des services concernant l'Internet Tout contenu et service Internet accessible par le biais de cet appareil appartiennent à des tiers, et sont protégés par les lois sur le droit d'auteur, les brevets, les marques de commerce et/ou autres droits de propriété intellectuelle.
Guide de dépannage SYMPTÔME CAUSE (ET SOLUTION) Pas d’alimentation. La télécommande fonctionne pas. • Vérifier si le cordon d'alimentation CA est raccordé. • Vérifier si l'appareil est mis en circuit. ne • Déplacez les éventuels obstacles se trouvant entre la télécommande et l’unité. • Utilisez la télécommande plus près de l’unité. • Orientez la télécommande vers le capteur situé sur l’unité. • Remplacez les piles de la télécommande par des piles neuves.
Garantie Limitée AVC MULTIMEDIA (“AVC”) offre la garantie limitée suivante. Cette garantie limitée s’applique à l’acheteur initial et se limite à un usage non commercial du produit. Garantie de Un An sur pièces et main-d’œuvre Les produits AVC achetés aux États-Unis ou au Canada sont garantis être exempts de vices de matériaux ou de fabrication pendant une période de un an à partir de la date de l’achat au détail initial.
Información Importante ATTENTION RISQUE DE CHOC ELECTRIQUE NE PAS ENLEVER AVIS RISQUE DE CHOC ÉLECTRIQUE-NE PAS OUVRIR ES El símbolo de un rayo dentro de un triángulo equilátero está pensado para alertar al usuario de la presencia de “voltaje peligroso” no aislado dentro de la carcasa del producto, el cual puede ser de una magnitud suficiente para provocar una descarga eléctrica.
Información Importante Localización de la placa de características nominales • La localización de la placa de características nominales es en la parte trasera de la unidad. Advertencia: los cambios o modificaciones a esta unidad, que no estén expresamente aprobados por la entidad responsable del cumplimiento, podrían invalidar la autoridad del usuario para operar el equipo.
Tabla de contenidos ES Información Importante .................. 44 - 45 Mantenimiento ............................... 46 Formatos de los Discos ............................... 47 Accesorios ......................................... 48 Mando a Distancia .................................. 48 Guía de Referencia ............................ 49 - 50 Control remoto .................................. 49 Undid ..................................................... 50 Conexiones ...................................
Formatos de los Discos Esta unidad puede reproducir: discos de DVD [discos de 8cm / 12cm] Discos compactos para audio [discos de 8cm / 12cm] Los discos de Blu-ray [discos de 8cm / 12cm] CD-R CD-RW Compatible Información de la administración de regiones Esta unidad ha sido diseñada para reproducir videos de BD con región y videos de DVD con región . Usted no puede reproducir videos de BD o videos de DVD etiquetados para otras regiones.
Accesorios Por favor BUSQUE de accesorios que se INCLUYEN con este equipo. Control remoto con pila .......................................................................................................... x 1 Mando a Distancia Utlilizar el mando a distancia ES • Dirija el control remoto hacia el SENSOR REMOTO ubicado en la unidad. • Al estar ante la presencia de una luz muy brillante, es posible que el SENSOR DEL CONTROL REMOTO infrarrojo no funcione correctamente. alrededor de 16 pies (5 metros).
Guía de Referencia Control remoto 1. Botones ON/OFF Oprima para encender la unidad o para ponerla bajo la modalidad de suspensión. 2. Botones de color (R, G, B, Y) Cuando reproduzca un disco Blu-ray que tenga una aplicación Java, oprima para controlar la reproducción. Para mayor información, lea la documentación que viene junto con el disco de Blu-ray. 3. Botones numéricos (0-9) 4. Botón CLEAR Borra las selecciones ingresadas y cancela ciertas funciones de reproducción. 5.
Guía de Referencia Panel frontal ES Panel posterior 1. Tapa del compartimiento de discos de DVD 5. Cable de alimentación de CA 2. Botón Use este botón para abrir y cerrar la bandeja para discos. 7. Enchufe para Ethernet (LAN) – puede usarse para hacer funcionar el servicio Netflix, Picasa, contenido BD-Live, y para actualizaciones de software del producto. Botón Stop Detiene la reproducción de un disco. Botón Play / Pause Comienza o reanuda la reproducción de un disco.
Conexiones A. Conexión a un televisor 1. Usando un cable HDMI (no viene incluido) En el caso de los televisores que cuentan con respaldo para ello, HDMI puede darle la salida de audio y video de mejor calidad (dependiendo de la fuente de soporte de datos), y por esto es el tipo de conexión preferida. El cable HDMI incorpora señales de audio y video, de manera que usted tendrá sólo un cable yendo desde la unidad a su televisor.
Conexiones C. Usando un puerto USB ES Usted puede conectar una memoria flash USB (no viene incluida) al puerto USB de la unidad para reproducir archivos de imágenes. Para la operación de la reproducción de archivos de la memoria flash USB, por favor lea la sección “Reproducción de archivos de imágenes”. Nota: • Se recomienda que el producto esté apagado cuando usted enchufe una memoria flash USB.
Conexiones c. Oprima el botón OK para confirmar. d. Regístrese con su cuenta Picasa. Para crear una nueva cuenta Picasa en su PC a. Vaya a la página http://www.picasa.google.com para crear una nueva cuenta. b. Siga las instrucciones para crear una nueva cuenta.
Reproducción de un disco de Blu-ray o de un disco de DVD Este manual para el usuario explica las instrucciones básicas para hacer funcionar esta unidad. Algunos discos de DVD se producen de manera tal que sólo permiten un funcionamiento específico o limitado durante la reproducción. A causa de esto, es posible que la unidad no responda a todos los comandos de funcionamiento, LO CUAL NO ES UN DEFECTO DE LA UNIDAD.
Reproducción de un disco de Blu-ray o de un disco de DVD Selección de subtítulo 1. Mientras el DVD está en reproducción, presione el botón SUBTITLE para 14/32 English desplegar la programación actual de idioma, tal como se muestra en el ejemplo. 2. Presione reiteradamente el botón SUBTITLE para seleccionar el idioma de subtítulo deseado. Nota: • Algunos discos de DVD están programados para desplegar automáticamente los subtítulos, y usted no podrá desactivar esta función aún cuando lo intente.
Ubicación de una sección determinada Para ubicar un título específico Si un disco de Blu-ray o de DVD contiene números de títulos, usted puede ubicar un título específico seleccionando directamente el número del título. 1. Oprima el botón GOTO. MPEG 2 / 4 2 / 18 TT 00 :01 : 25 2. Oprima el botón o para 2 / 2 French 1/2 Dolby Digital Stereo destacar el número del título, luego oprima el botón OK para iniciar la modificación. 3.
Reproducción repetida Usted puede reproducir un título o capítulo de manera repetida. (Title repeat, chapter repeat, A-B repeat). Cómo Repetir un Capítulo (El disco de Blu-ray o de DVD) 1. Mientras el DVD se reproduzca, oprima el botón REPEAT hasta que el indicador visualice en la pantalla. El capítulo actual se reproducirá de manera repetida. se Cómo Repetir un Título (El disco de Blu-ray o de DVD) 2.
Adaptando la programación de las funciones Configuración general Configuración del equipo ES Home Menu 1. Al estar bajo la modalidad STOP, oprima el botón SETUP. Oprima el botón para --- General Setting --seleccionar “System”. System On Screen Saver 2. Use el botón para mover la barra Off Disc Auto Playb... Language destacadora a la derecha, use el botón o Restore Default Settings More... Network para seleccionar salvapantallas, reproducción More...
Adaptando la programación de las funciones Configuración de la Red Home Menu 1. Al estar bajo la modalidad de detención STOP, oprima el botón SETUP. Oprima el botón para seleccionar Network [Red]. --- General Setting --2. Use el botón para mover la barra System Interface Wired destacadora a la derecha, use el botón Information Language More... o para seleccionar Interfaz, Información, Connection Test More...
Adaptando la programación de las funciones HDMI Resolución Auto: cuando su televisor es un televisor de alta definición (HDTV), y está conectado al enchufe HDMI de su reproductor, y usted desea que su reproductor configure la resolución de salida con base en la información intercambiada entre en televisor y su reproductor por medio del cable HDMI. 480i: cuando su televisor es un televisor de definición estándar (análogo). 480p: cuando su televisor es un televisor de definición realzada (EDTV).
Cláusula de exención de responsabilidad por el contenido y servicios de la red de Internet Todo contenido y servicio de la red de Internet que sea accesible por medio de este aparato pertenece a terceros y está protegido por derechos de copyright , patentes, marcas comerciales y/o otras leyes de propiedad intelectual.
Guía para resolver problemas PROBLEMAS CAUSA Y REMEDIO No hay corriente. • Revise que haya conectado el adaptador de corriente para el automóbil. • Asegúrese de haber encendido la unidad. El control remoto no funciona. • Retire cualquier obstáculo que esté bloqueando el sensor remoto infrarrojo. • Asegúrese de haber retirado la lámina de plástico del control remoto. • Apunte con el control remoto directamente al sensor remoto de la unidad.
Garantía Limitada AVC MULTIMEDIA (“AVC”) ofrece la siguiente garantía limitada, la cual se extiende al comprador-consumidor original y está limitada al uso no comercial del producto. Garantía de repuestos y reparaciones por Uno Año Los productos AVC que se hayan comprado en los Estados Unidos tienen una garantía de uno año a partir de la fecha original de compra en caso de presentar defectos en los materiales o en su fabricación.
ES Ninguna persona, agente, distribuidor, comerciante ni empresa está autorizada para cambiar, modificar o extender los términos de estas garantías en ninguna manera, cualquiera que ésta fuese. El tiempo dentro del cual se debe iniciar una acción para hacer cumplir cualquier obligación de AVC que surja en virtud de la garantía o de cualquier estatuto o ley de Estados Unidos o de cualesquier de sus estados, queda aquí limitado a uno año a contar de la fecha de adquisición del producto.