CC437 USER‘S GUIDE C A M C O R D E R
Important Safety Information Be sure to read all the safety information before you begin to use this product. WARNING: To reduce the risk of fire or shock hazard, do not expose product or AC adapter/charger to rain or moisture. CAUTION RISK OF ELECTRIC SHOCK DO NOT OPEN ATTENTION RISQUE DE CHOC ELECTRIQUE NE PAS OUVRIR This symbol indicates “dangerous voltage” inside the product that presents a risk of electric shock or personal injury.
Assistance We want to make sure you enjoy your new camcorder. If you have any questions, call: Customer Service..................................... 800-336-1900 (Page 67) Accessories......................................... 800-338-0376 (Pages 54-61) Table of Contents Safety Information ................................i Product Registration.............................i Contents.............................................1-2 First-Time Operation • Assistance............................................
Table of Contents Recording Features • Quick Review....................................19 • Tape Positioning ...............................19 • Microphone.......................................19 • AI (Artificial Intelligence)................19 • Program AE (Auto Exposure)...........20 • Auto Focus........................................20 • Macro Focus......................................20 • Electronic Indexing...........................21 • Time Remaining Display..................21 • Viewfinder.......
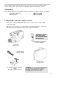
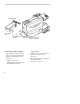
First-Time Operation This section describes only the basic steps necessary to set up your camcorder to record. Refer to the other sections for detailed operation and feature options. Assistance The toll-free numbers are available to help you with any problem you may encounter. Customer Service . . . . . . . . . . . . . . . .800-336-1900 Accessories . . . . . . . . . . . . . . . . . . . .800-338-0376 1. Unpack the camcorder and accessories.
First-Time Operation Adapter/Charger DC OUTPUT Jack Adapter/Charger’s DC Cable 2. Attach the adapter/charger. Since the battery must be charged before it can be used the first time, attach the adapter/charger to the camcorder. • Attach one end of the adapter/charger’s DC cable to the DC OUTPUT jack on the 4 DC IN 9.6V Jack on Back of Camcorder adapter/charger. • Attach the other end of the cable to the DC IN 9.6V jack on the camcorder. • Plug the adapter/charger’s plug into an operating outlet.
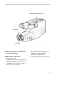
First-Time Operation CAMERA/OFF/VCR Switch Handstrap Lens Cap 3. Remove the lens cap and attach it to the handstrap. 4. Turn on the camcorder. • Press and hold the small button on CAMERA / O F F / V C R while sliding it in CAMERA. The electronic viewfinder will come on. The position of the CAMERA / O F F / V C R switch tells the camcorder whether you want to record (CAMERA), play back tapes (VCR), or turn off the power (OFF).
First-Time Operation Safety Tab Tape Window REC (Record) /PAUSE Button Lens Cap on Handstrap Cassette Door Press Here to Close 5. Insert a cassette. • Press STOP/EJECT to open the cassette compartment. • Insert the cassette with the safety tab facing up and the tape windows facing out. • Press the cassette down gently until it locks into place, and close the cassette compartment door. • Details are on page 17. 6 6. Position viewfinder and adjust eyepiece focus control.
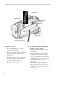
First-Time Operation CAMERA/OFF/VCR Switch STOP/EJECT PLAY REW(Rewind)/ REVIEW REC (Record) /PAUSE Eyepiece Focus Control Eyepiece Electronic Viewfinder (Grasp Here to Move) 7. Start and stop recording. Start and stop recording by pressing and releasing REC/PAUSE. REC appears in the viewfinder. You do not have to hold the button to record. Notes: If you do not record within five minutes, the camcorder will automatically shut off to prevent excessive tape wear. Press REC/PAUSE to turn on the camcorder.
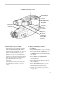
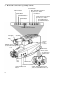
First-Time Operation 9. Review the camcorder’s operating controls. AV DUB Button REW (Rewind/Review) Button Also Title Select – Button DISPLAY Button RESET Button PLAY Button DATE/TIME Button F.
First-Time Operation 9. Review the camcorder’s operating controls. Shoulder Strap Attachment Ring BATTERY EJECT Lever REC (Record) /PAUSE Button Hand Strap with Lens Cap Holder DC IN 9.
Powering the Camcorder Caution: Do not attempt to use a “power converter” to use your AC adapter/charger on a power source other than 120 volts, 50/60 Hz, or the adapter/charger and camcorder may be damaged. If you wish to operate the AC adapter/charger on a power source other than 120 volts, 50/60 Hz, use only a transformer-type power converter. Do not use “solid-state” or “switching-type” power converters. They will damage your AC adapter/charger.
Powering the Camcorder Using the Battery to Power Your Camcorder Charging the Battery The battery must be charged before it can be used the first time. Charging will take approximately two hours depending on the condition of the battery. When fully charged, the battery should supply approximately 60 minutes of operating time (depending on how much you use zoom and pause). To extend the battery’s operation time, turn off the camcorder’s power when not in use.
Powering the Camcorder Using the Battery to Power Your Camcorder CAMERA/OFF/VCR Switch BATTERY EJECT Lever Rechargeable Battery Hold Battery Flush and Slide Down Align Arrows Attach Charged Battery Remove the Battery 1. Align reference arrow on battery with arrow on camcorder. Hold battery flush against camcorder while sliding it down in the direction of the arrow as shown. 2. Press and hold small button on CAMERA/OFF/VCR while placing it in CAMERA. 1. Slide CAMERA/OFF/VCR to OFF. 2.
Powering the Camcorder Using the Battery to Power Your Camcorder Battery Care • Your battery will provide better service and longer performance if you charge it before and after use, and store it at normal room temperature. • The battery should be charged at a temperature of 32ºF-95ºF (0ºC-35ºC) to prevent damage. • Do not operate the battery at temperatures below 14ºF (-10ºC) or above 95ºF (35ºC). The battery may be Battery Storage • Store the battery at normal room temperature.
Powering the Camcorder Check Battery Power (Battery Level Indicator) Battery Level Indicator Display in Viewfinder When DISPLAY is pressed, the battery level indicator ( ) appears in the camcorder’s viewfinder to show how much battery power is left in the rechargeable battery. • When the battery reaches the empty level, will start flashing. Recharge the battery or attach the adapter/charger before continuing to use the camcorder. This indicator is not recorded on the tape.
Powering the Camcorder Using the Optional Thomson Car Cord Adapter To power your camcorder from the cigarette lighter socket of a car, truck, or RV, you need the optional car cord adapter DCC096 shown on page 55. The DCC096 car cord is especially designed to convert power from a 12-volt battery to the 9.6-volt input jack on the camcorder. Caution: The DCC096 car cord is designed to be used only with vehicles having 12-volt negative ground electrical systems.
Video Cassettes We recommend that our cassettes be used with your camcorder. Use of poor quality tapes or tapes that have been damaged or mishandled can contaminate the video heads, resulting in a snowy picture or no picture at all during playback. Because there is no control over the type of tape purchased or rented by consumers, head cleaning is not covered under warranty. It is considered normal maintenance.
Video Cassettes Inserting and Removing Cassettes Safety Tab STOP/EJECT Caution: Insert cassette with safety tab facing up and tape windows facing out. Cassette should slide easily into the compartment. Gently push the cassette down until it locks into place. Press Here to Close 1. Attach a power source to the camcorder (either a charged battery or adapter/charger). 2. Press STOP/EJECT on the top of the camcorder to open cassette door. Tape Windows 3.
Camcorder Traveling and Cassette Tips Traveling Tips Write down your camcorder’s serial number and keep it separate from the camcorder when traveling. If your camcorder is lost or stolen, you will be able to identify it. Make sure you have any plug adapters you need before taking your camcorder to other countries. Consult your dealer. Carry your camcorder in a carrying case when traveling. See page 54 for a specially designed soft case.
Camcorder Features STOP/EJECT F.FWD (Fast Forward) REW (Rewind)/REVIEW CAMERA/OFF/VCR Switch Microphone Quick Review Press REW/REVIEW when CAMERA/ OFF/VCR is in CAMERA and the camcorder is in record pause to review the last few seconds of a recording. The camcorder will play back the last few seconds of the recording, return the tape to its previous position, and return to record pause.
Camcorder Features Program AE (Auto Exposure) Program auto exposure automatically selects the shutter speed and adjusts the iris according to the shutter speed. AE:60 Viewfinder Display When DISPLAY is pressed, the AE indicator for the shutter speed selected (1/60, 1/100, 1/120, 1/180, 1/250, 1/350, 1/500, 1/750, 1/1000, 1/1500, 1/2000, or 1/4000 second) appears in the viewfinder. Auto Focus The camcorder will focus on the subject in the center of the viewfinder.
Camcorder Features Electronic Indexing Each time you begin recording (after the camcorder has been turned off for at least four hours), the camcorder will automatically record an index mark at the beginning of the new recording. When you play back the indexed tape in a VCR that has a compatible indexing feature called “VHS Index Search System,” the invisible marks can be located automatically. See your VCR owner’s manual for index playback instructions.
Viewfinder The camcorder’s viewfinder is a miniature monitor that displays the picture seen by the camcorder when recording. The viewfinder also can be used for viewing the tape during playback. When carrying or storing the camcorder, return the viewfinder to the original position to prevent possible damage. Viewfinder in operating position Eyepiece Viewfinder in carrying or storing position Pull here Caution: Pulling on the eyepiece may cause damage to the camcorder. 1.
Viewfinder Eyepiece BRIGHT Control BRIGHT BRIGHT Control Viewfinder brightness can be adjusted by turning the BRIGHT control. This does not affect the picture actually recorded by the camcorder. Tilt Adjustment For convenient viewing, you can rotate the eyepiece about 225º degrees. Caution: Do not force the eyepiece to rotate completely around. This will damage the eyepiece and/or the camcorder.
Displays in Viewfinder AE Shutter Speed AE:60 0000M Tape Counter Time Remaining FADE ZOOM and 16 x 9 Status ZM:2 I.ZOOM INDEX NO TAPE T Battery Level INDEX Display W A/V DUB REC 10:30AM 11/18/1996 TAPE, NO TAPE, and TAPE END Time and Date Viewfinder Displays AE (Auto Exposure) Shutter Speed The shutter speed selected by the camcorder appears here. It is not recorded on the tape. • Press DISPLAY to display the shutter speed. Fade Press FADE to select white, wipe, or zoom fade.
Displays in Viewfinder AV (Audio/Video) DUB DATE/TIME DISPLAY CAMERA/OFF/VCR Power Zoom Buttons FADE DIGITAL ZOOM INST. (INSTANT) ZOOM Time Remaining ( ) This display shows the amount of recording or playback time remaining on the tape. It is not recorded on the tape. • Press DISPLAY to display the time remaining. • Details are on page 21. Battery Level ( ) This indicator shows the amount of time left for the rechargeable battery. It is not recorded on the tape.
Date and Time Display Set the Time and Date REW (Rewind)/REVIEW CAMERA/OFF/VCR F.FWD (Fast Forward) DATE/TIME 1. Attach a power supply (battery or adapter/charger) to the camcorder. 2. Press and hold the small button on CAMERA/OFF/VCR and place in CAMERA. 3. Press DATE / T IME to display the date and time in the viewfinder. A flashing cursor lets you know which part of the display you are setting. Note: If flashing cursor does not appear, press and hold DATE/TIME and then press STOP/EJECT.
Date and Time Display Recording Date and Time, Date, or Date and Title on Your Tape The time and date, date only, or date and title can be recorded on your tape. Whenever one of the displays appears in the viewfinder, it will be recorded. The camcorder also has auto date and auto title features. Repeatedly Press DATE/ TIME 10:30AM AUTO 11/18/1996 Date and Time 11/18/1996 Auto Date No Display TITLE 11/18/1996 Auto Title Date Only To Select Display to Record 1.
Zooming Using Power Zoom Buttons Power Zoom Buttons T = Telephoto W = Wide Angle DIGITAL ZOOM INST.(Instant) ZOOM ZOOM and Zoom Level Indicator ZOOM T W When DISPLAY is pressed so the display appears in the viewfinder and the power zoom button is pressed, the zoom level is displayed in 10 steps for several seconds. • Press “T” to move the lens in the “telephoto” (close-up) direction. ZOOM appears in the viewfinder when you zoom in more than 12 times.
Zooming (continued) Using INST. (Instant) ZOOM Instant Zoom Indicator I.ZOOM • Press INST.ZOOM to magnify the subject 1.5 times regardless of the position of the power zoom buttons. When DISPLAY is pressed, I.ZOOM appears in the viewfinder during instant zoom. • Press INST.ZOOM again to turn off instant zoom. Digital Zooming ZM:2 ZOOM The digital zoom feature allows you to zoom in on a subject with magnification of up to 100 times. 1.
Zooming (continued) 16X9 Mode The new 16 X 9 TV format provides a 30% wider picture than conventional TVs of the same height. The 16 X 9 recording mode lets you make recordings compatible with this new format. When the 16 X 9 mode is activated, the camcorder records black bars at the top and bottom of the picture to produce the wide-screen effect. This is known as “letter box” recording. When played back on a standard size TV, black bars appear in the picture.
Fading In and Out of Scenes You can add a professional touch to your recordings when you fade in and out of scenes. Both the picture and sound will gradually appear or disappear. The speed of the fade is controlled by the camcorder. FADE Select the Type of Fade Repeatedly Press FADE You can select white, wipe, or zoom fade. Press DISPLAY to display the fade mode icon. • Select white fade to fade in and out from a white screen. appears in the viewfinder.
Tape Counter with Memory Stop The tape counter acts as a handy reference to help you locate tape segments. CAMERA/OFF/VCR RESET DISPLAY REW/REVIEW F.FWD REC/PAUSE Memory Stop The tape counter’s memory stop helps you locate a certain point on the tape. When memory stop is turned on, the tape will stop automatically during fast forward or rewind when the tape counter reaches “0000M.” Using Memory Stop: 1. Press DISPLAY to display the tape counter with “M.” 2.
ProEdit Features ProEdit® System • Flying Erase Head • Edit Search • Audio Dub • A/V (Audio and Video) Dub • Titler The camcorder incorporates a complete package of advanced editing features to make it easy and fun to edit your home videos like a professional. The major ProEdit® System features are described here and on the following pages. Flying Erase Head A separate erase head is mounted on the spinning headwheel (hence the term “flying”).
ProEdit Features Audio Dubbing Note: You will need an optional audio/video cable, such as VH83 shown on page 56. If the audio source has separate left and right outputs, attach the audio plug to the one labeled MONO. If one is not labeled MONO, you may need a Y-adapter, as shown on page 56, to record audio from both the left and right channels.
ProEdit Features Audio Dubbing The audio dub feature lets you record new audio (sound) on a previously recorded tape without erasing the original video (picture). The previous audio is erased and replaced with the new audio. The audio dub feature increases your editing flexibility. Video segments can first be assembled and then a single narration or music background can be added. The new audio can be added two different ways. • You can speak into the camcorder’s built-in microphone.
ProEdit Features Audio and Video Dubbing 36
ProEdit Features Audio and Video Dubbing The audio and video dubbing feature lets you record new audio (sound) and video (picture) on a previously recorded tape in the camcorder. The source for the dubbing is the camcorder’s microphone and camera or a source connected to the AUDIO/VIDEO jacks on the side of the camcorder. • To record from the camcorder’s microphone and camera, no special connections are required. • To record from an external video source (VCR, laserdisc player, etc.
ProEdit Features Titler The camcorder’s built-in titler can store a title in memory. The created title can be displayed and recorded at any time. The built-in character register contains over 45 different characters for creating your titles. The title can contain up to 32 characters on two lines. CAMERA/OFF/VCR TITLER Title Select - (Also REW/REVIEW) Title Select + (Also F.
ProEdit Features To Create a Title 1. Attach a power source to the camcorder, press and hold the small button on CAMERA/OFF/VCR while sliding it to CAMERA. 2. Press TITLER to display titler graphics in the viewfinder. A flashing cursor will appear. 3. Press EDIT•ADV to move the flashing cursor to the place you want to begin your title. 4. Select the first character for your title by pressing the Title Select + button or the – button until the character you want appears in the viewfinder.
ProEdit Features Recording a Title on a Tape in the Camcorder To record a title on a tape in the camcorder, follow the steps below. 1. Attach a power source to the 4. Press REC/PAUSE to start recording camcorder, slide CAMERA/OFF/VCR the title. to CAMERA. 5. After you have recorded the title for 2. Locate the place on the tape where the desired length of time, press you want to record the title. TITLER to remove titler graphics from the viewfinder.
Recording Tips Make a recording of your home and contents to store in a safe place in case of fire or theft. Practice recording under a variety of lighting conditions. This will help you respond quickly whenever you see a scene you want to record. Fading in and out of scenes may make your videos appear more professional. Do not move the camcorder rapidly from side-to-side while recording. A steady, gradual “pan” avoids blurring and “jitter”.
Recording on the Camcorder from a VCR or TV Monitor To record on a tape in your camcorder from a VCR or TV monitor with AUDIO OUT and VIDEO OUT jacks, you will need an optional audio/video cable, such as VH83 shown on page 56.
Recording on the Camcorder from a VCR or TV Installation Attach the white plug on one end of the audio/video cable to the AUDIO OUT jack on the VCR (or TV monitor). Note: If your VCR or TV monitor has stereo left and right AUDIO OUT jacks, attach the plug to the one labeled MONO. If one of the audio jacks is not labeled MONO, you may need a Y-adapter, such as AH25 shown on page 56, to hear both channels. Attach the yellow plug on the same end to the VIDEO OUT jack on the VCR (or TV monitor).
Viewfinder Playback and Playback Features REW (Rewind)/REVIEW CAMERA/OFF/VCR Switch in VCR position F.FWD (Fast Forward) STOP/EJECT TRACKING Viewfinder Playback 1. Attach a power supply to the camcorder. 2. Press and hold the small button on CAMERA/OFF/VCR while sliding it to VCR. 3. Press STOP/EJECT and insert the cassette you want to play back. Note: The camcorder can only play back tapes recorded at SP speed. 44 4. Press PLAY to begin playback. Adjust TRACKING if necessary. 5.
Viewfinder Playback and Playback Features Playback Features Stop-Action Pause Picture Search During playback, you can view one frame of the tape. • Press REC/PAUSE to stop the action. During playback you can visually search the tape at a higher speed in forward or reverse. • Press REC/PAUSE again to return to normal playback. • Press and hold F.FWD to search the tape forward. Caution: Pause is designed for momentary interruptions and should not be used for an extended period of time.
Playback on a TV or VCR with AUDIO and VIDEO IN Jacks To connect your camcorder to a TV monitor (or VCR) with AUDIO IN and VIDEO IN jacks, you will need an optional audio/video cable, such as VH83 shown on page 56. If your TV is already connected to a VCR, you can attach the camcorder to the VCR and watch what the camcorder is recording or playing on the TV. Caution: The unauthorized recording of television programs and other materials may infringe the rights of others.
Playback on a TV or VCR with AUDIO and VIDEO IN Jacks Attach the white plug on one end of the audio/video cable to the AUDIO IN jack on the TV or VCR. Attach the yellow plug on the same end of the audio/video cable to the VIDEO IN jack on the TV or VCR. Note: If your TV (or VCR) has stereo left and right AUDIO IN jacks, attach the plug to the one labeled MONO. If one of the jacks is not labeled MONO, you may need a Y-adapter, such as AH25 shown on page 56, to hear both channels.
Playback on a TV Without Audio and Video Inputs To connect your camcorder to a TV without audio and video input jacks. You will need an optional RF output adapter (such as CRF95) and an optional coaxial RF cable (such as VH82 or VH85) shown on page 56. Disconnect the VHF antenna from your TV. If you are going to leave the RF adapter connected to the TV, connect the antenna to the RF output adapter. A.If antenna is round 75-ohm cable, connect it to IN FROM ANT connector on RF output adapter. B.
Playback on a TV Without Audio and Video Inputs Playback Operation 1. Set the channel selector switch on the RF output adapter to CH3 or CH4. 2. Turn on the TV and tune it to the same channel (3 or 4) you selected with the channel selector switch on the RF output adapter. 3. Press and hold the small button on the camcorder’s CAMERA/OFF/VCR switch while sliding it to VCR. 4. Insert the cassette you want to play back into the camcorder. 5. Press PLAY on the camcorder.
Color Enhancement Light The color enhancement light helps create brighter, sharper pictures. Light LIGHT AUTO/OFF/ON To Use the Color Enhancement Light 1.Attach the rechargeable battery or AC adapter/charger to power the camcorder. 2.Press and hold the small button on CAMERA/OFF/VCR and place it in CAMERA. 3.Select a position for the LIGHT AUTO/OFF/ON switch. • Place in AUTO to have the light automatically turn on when the camcorder is aimed at a dark object and turn off when aimed at a bright object.
Color Enhancement Light Removing and Replacing the Front Case of the Light Light Bulb Front Case Reflection Plate Lower Hook To Remove and Replace Light Case 1. To remove front case, press and hold the lower hook while removing it. 2. To replace the front case, pass the bulb through the hole of the reflection plate, and attach the lower hook to the light. 3. Press front of case to light. Notes: Do not touch the bulb with your fingers. It may shorten its service life.
Attaching the Shoulder Strap The shoulder strap is designed to let you carry the camcorder from your shoulder and — when you are ready to shoot — bring the camcorder to shooting position in one quick movement. Cautions: When carrying the camcorder with the shoulder strap, place the viewfinder in its original position. This helps prevent possible damage to the viewfinder from bumping against your body as you move. Make sure the shoulder strap is firmly attached before using it to carry your camcorder.
Packing Carrying Case The carrying case that came with your camcorder is specially designed to provide protection for your camcorder and its accessories. See below for details on packing your case. Two Hour Battery Type Camcorder Audio/Video Cable One Hour Battery Type Adapter/Charger Information to User This equipment has been tested and found to comply with the limits for a Class B digital device and RF lighting device, pursuant to Part 15 and part 18 of the FCC Rules.
Specifications General Camera Section Power requirement: 9.6VDC Power consumption: 8 watts (normal) Weight: 4.4 lbs. (2 kg) Dimensions: 4-1/4"(W) x 8-3/8"(H) x 13-1/8"(D) (108 x 213 x 334mm) Scanning: 525 Lines/60 Fields/30 Frames Image Sensor: 1/4” high/resolution, solid state CCD imager Tripod Mount: One 1/4" x 20 threaded hole Lens: f1.
Optional Accessories DCC096 DC (Battery) Car Cord This DC car cord enables you to operate your camcorder from your car, truck, or RV by plugging the car cord directly into the vehicle’s cigarette lighter. Caution: Do not use any other car cord with this camcorder. CPS014 AC Adapter/Charger This adapter/charger operates on 100240 volts, 50/60 Hz, so it can be used almost anywhere in the world to power your camcorder and recharge the EP096FS battery supplied with your camcorder.
Optional Accessories VH83 Audio/Video Cable This six foot audio/video dubbing cable is used to connect your camcorder to a VCR or TV monitor to copy tapes. CRF95 RF Output Adapter This adapter is used with coaxial RF cable (VH82 or VH85) to connect your camcorder to a standard TV (one without audio/video input jacks) for playback. If your antenna cable is the flat twin-lead type attached by two screws, you will also need a 300-75 ohm transformer such as 193983.
Optional Accessories Removing the Lens Hood The lens hood can be removed so you can attach optional accessories, such as wideangle lens, lens extender, or lens filter kit. Do not grasp the end of the lens hood. Attach the lens cap over the lens hood, then turn them counterclockwise to remove them. Attaching Accessory Lens Remove the lens hood as shown above. Turn the accessory lens clockwise into the camcorder’s lens. Make sure the lens is tightened firmly, but do not over tighten.
Optional Accessories Using an Optional Tripod Mounting the camcorder on a tripod, such as AC093, will keep the camcorder steady and produce excellent video results. AC093 Deluxe Tripod This tripod’s fluid effect head provides smooth camera pan and tilt. Its quickrelease mount makes it easy to attach or remove the camcorder. The grooved, tubular 3-section leg design folds down to 24" when not in use and weighs only 4-1/4 lbs.
Accessory Order Form Order Form for Camcorder Models CC437 Description Soft Camcorder Case Deluxe Tripod Audio/Video Cable Cable Transformer RF Coaxial Cable (6-ft.) RF Coaxial Cable (12-ft.) Y-Adapter Rechargeable Battery Rechargeable Battery AC Adapter/Charger RF Output Adapter Car Cord 300-75 Cable Transformer DC Cable Shoulder Strap Replacement Bulb (4 watt) for Built-in Light AC Adapter/Charger (Supplied) Part No.
Accessory Order Form 60
Accessory Order Form To order accessories, contact your local Dealer. If a dealer is not nearby, you can also follow the directions below to order by telephone or direct-by-mail. United States and Canada Orders To place your order by phone, have your Visa, MasterCard, or Discover Card ready and call the toll-free number listed below between 8AM and 8PM (EST) Mon. - Fri., or 9AM - 5PM (EST) Sat. Use this number only to place an order for accessory items listed on this order form.
Care and Maintenance Keep dust and grit from entering the camcorder’s cassette door. Dust and grit are abrasive and cause excessive wear to both the camcorder’s recording and playback heads and cassettes. Do not use strong or abrasive detergents when cleaning your camcorder. They may damage the camcorder. Before handling your camcorder, make sure your hands and face are free from any chemical products such as suntan lotion, as it may damage the finish.
Care and Maintenance Cleaning the Camcorder To clean the camcorder’s exterior, remove any power source connected to the camcorder and gently wipe it with a clean soft cloth. Caution: Use of strong cleaning products, such as those containing alcohol or benzine, may damage the camcorder. Cleaning the Camcorder’s Lens To clean the camcorder’s lens, blow it with a blower brush, and then gently wipe the lens with cleaning tissue and commercially prepared cleaning solution designed for use on camera lens.
Trouble Checks Troubles sometimes are caused by simple “faults” that you can easily correct without the help of a service technician by first checking a few basic remedies. Before you call or take your camcorder to an Authorized RCA Camcorder Servicenter, look below for the type of trouble you are experiencing. Then perform the simple checks and adjustments listed for that trouble. Trouble Checks and Adjustments No Power • If using the rechargeable battery, it may need recharging.
Trouble Checks Trouble Checks and Adjustments Tape Stops During Rewind or Fast Forward • The tape counter’s memory-stop feature may be turned on. When an “M” appears behind the tapecounter display, the camcorder will stop rewinding or fast-forwarding when the counter reads “0000M”. Press the REW/REVIEW or F.FWD button again to continue, or press DISPLAY to turn off memory stop. Camcorder Remains in Play Pause • Press REC/PAUSE to return to normal playback.
Trouble Checks Trouble Checks and Adjustments AE Shutter-Speed or INDEX Indicator Does Not Appear in Viewfinder • CAMERA/OFF/VCR switch must be in CAMERA, and press DISPLAY to display the indications. Date and Time (or Date) were Recorded on the Tape • Date and time (or date) will be recorded on the tape whenever they appear in the viewfinder. Press DATE/TIME to remove them from the viewfinder when recording. Date and Time Appear Incorrect • Make sure the date and time have been set.
Limited Warranty What your warranty covers: • Any defect in material or workmanship. For how long after your purchase: • Ninety days for labor charges. name and address, and (3) a brief description of the problem. • Ship the camcorder to an Authorized RCA Camcorder Servicenter. • One year for parts. The warranty period for rental units begins with the first rental. What we will do: • Pay any Authorized RCA Camcorder Servicenter the labor charges to repair your camcorder.
Index A.(Audio) DUB Indicator . . . . .24,35,37 A/V DUB Indicator . . . . . . . . . . . . .24,37 Accessories, Included . . . . . . . . . . . . . .3 Accessories, Optional . . . . . . . . . .54-61 Accessory Lens, Attaching . . . . . . . . .57 Accessory Order Form . . . . . . . . . .59-61 Adapter/Charger, Using . . . . . . . . . .4,10 Adjustments and Checks . . . . . . . .64-66 AE Displays . . . . . . . . . . . . . . . . . .20,24 AI (Artificial Intelligence) . . . . . . . . .19 Assistance . . . . . . . . . . .
Index Operation, First-Time . . . . . . . . . . . .3-9 Optional Accessories . . . . . . . . . . .54-61 Optional Car Cord . . . . . . . . . . . . .15,55 Order Form, Accessories . . . . . . . .59-61 PAUSE Indicator . . . . . . . . . . . . . .35,37 Picture Search . . . . . . . . . . . . . . . . . . .45 PLAY Button . . . .7,8,33,35,37,44,47,49 Playback on a TV with AUDIO/VIDEO IN Jacks . . . . .46-47 Playback on a TV without Audio/Video Inputs . .48-49 Playback, First . . . . . . . . . . . . . . . . . . . .
Need Assistance? We want to help! U.S. Consumers: Customer Service . . . . . . . . . . . . . . . . .800-336-1900 Accessories . . . . . . . . . . . . . . . . . . . . .800-338-0376 Canadian Consumers: English . . . . . . . . . . . . . . . . . . . . . . . . .800-522-0338 French . . . . . . . . . . . . . . . . . . . . . . . . .800-522-0445 Please do not send any products to the Indianapolis address listed in this manual or on the carton. This will only add delays in service for your product.