camcorder user's guide CC6151/CC6251/CC6271
Important Safety Information Be sure to read all the safety information before you begin to use this product. WARNING: To reduce the risk of fire or shock hazard, do not expose camcorder or AC adapter/charger to rain or moisture. This symbol indicates “dangerous voltage” inside the product that presents a risk of electric shock or personal injury.
Assistance We want to make sure you enjoy your new camcorder. If you have any questions, call: Camcorder Exchange Warranty...........800-283-6503 (pages 84-85) Customer Service...................................800-336-1900 (page 83) Accessories............................................. 800-338-0376 (pages 70-75) Table of Contents Safety Information .............................. i First Time Operation • Assistance ....................................... 3 • Unpack the Camcorder and Accessories .......
Table of Contents • • • • • • • • • • • • • • • • • • • • • • • 2 Quick Record Feature ................... 33 Quick Review Feature ................... 33 Tally Light ..................................... 33 Camera Edit Feature ..................... 33 Flying Erase Head ......................... 33 Auto Head Cleaner ........................ 33 Zooming • Use the Zoom Buttons ......... 34-35 • Tele Macro Zooming ................ 35 Focusing • Auto Focus................................ 36 • Manual Focus .
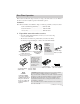
First-Time Operation This section describes the steps necessary to set up your camcorder to record. Refer to the other sections for detailed operation and feature options. Assistance The toll-free numbers are available to help you with any problem you may encounter. Camcorder Exchange Warranty...............800-283-6503 Customer Service................................... 800-336-1900 Accessories............................................. 800-338-0376 1. Unpack the camcorder and accessories.
First-Time Operation 2. Attach the adapter/charger. To AC 100-240, 50/60 Hz Adapter/ Charger DC Cable VCR R POWE OFF ERA CAM DC OUT Jack DC In Jack Since the battery must be charged before it can be used the first time, attach the adapter/charger to the camcorder. • Connect one end of the DC cable to the DC OUT jack on the adapter/charger. • Connect the other end of the DC cable to the DC in jack on the camcorder as shown above. • Plug the adapter/charger’s plug into an operating outlet. 3.
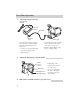
First-Time Operation 5. Insert a tape. EJECT Button Tape Wheel Tape Window PUSH Here to Close Cassette Compartment • Slide the EJECT button up. The cassette holder opens automatically. • Turn the tape wheel on the cassette to remove any slack from the tape. • Insert the cassette with the tape wheel facing up and the tape window facing out. • Press on the area labeled PUSH until the cassette holder locks into place. 6. Set POWER (CAMERA/OFF/VCR) switch to CAMERA.
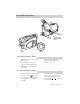
First-Time Operation SP/SLP Button Eyepiece Focus Control REC P SE VC P LA Y/ AU R QUI CK SP/S LP DA COU TE/TIM NTE E R R/ M Electronic Viewfinder A M AN U TO FRO N T L I G A EJECT H T SE PI FA DE I GHT 0 KL 00 HAZE C E 1 /1 B A PUSH TI TL W SHD LIG HT OFF AUTO ON 7. Adjust the viewfinder and eyepiece focus control. You can see what you record in the viewfinder. • Adjust the viewfinder for a comfortable viewing position.
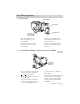
REC SE VC R AU P LA Y/ P QUI CK LP SP/S DA COU TE/TIM NTE E R R/ M First-Time Operation A M AN U TO FRO N T L I G A EJECT H T SE PI FA DE 0 I GHT 00 KL HAZE C E 1 /1 B A PUSH TI TL W SHD LIG HT OFF AUTO ON MENU Dial 9. Select a tape length. Set the length of the tape you are using so the camcorder can correctly calculate the recording time remaining on the tape. • Place the AE dial in MAN, and press the MENU dial to display the MENU in the viewfinder.
First-Time Operation VCR R POWE OFF RA CAME AU SE Power Indicator PA LY /P QU IC K RE CO DA TE UN /TI ME TE R SP /SL P Thumb Trigger N PUSH MA F AUTO RO NT POWER (VCR/ OFF/CAMERA) Switch LIG H T TIT LE Tally Light N T L I GH AC TITLE KLIG HA ZE DW T FADE B SH RO T SEPIA H 000 TO F AU 1 /1 1/1000 ZE H HA DW C K LIG M AN SH BA T FA DE SEPIA AE Dial 10. Set the AE dial to AUTO. • This places the camcorder in the AUTO mode.
First-Time Operation PL VCR 55 Button AY / PAUSE PLAY/PAUSE Button VCR STOP Button AU SE STOP PA LY /P QU IC K RE CO DA TE UN /T IM TE R E SP /SL P N PUSH MA F AUTO RO NT L I G HT TIT LE C K LIG 1/1000 ZE DW HA SH BA HT FA DE SEPIA 12. Play back what you have recorded. • Set the POWER switch to VCR. • Press VCR 55 to rewind the tape. • Press PLAY/PAUSE to play back the tape. • Press STOP when you are finished playing back the tape.
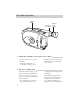
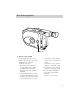
First-Time Operation 15. Review camcorder’s operating controls.
First-Time Operation 15. Review camcorder’s operating controls. (continued) REC AU SE VC R P LA Y/ P QUI CK SP/S LP DA COU TE/TIM NTE E R R/ M Shoulder Strap Attachment Ring A M AN U TO FRO N T L I G A EJECT H T SE PI FA DE PUSH Here to Close Cassette Compartment KL I GHT LIG HT OFF AUTO ON MENU Dial BATT.
Power Your Camcorder Use the Adapter/Charger to Power Your Camcorder The adapter/charger attaches to the camcorder and lets you power your camcorder directly from standard household power. The adapter/charger operates on 100-240 volts, 50/60 Hz, so it can be used virtually anywhere in the world to power the camcorder or recharge the battery. To AC 100-240, 50/60 Hz Adapter/ Charger DC Cable VCR R POWE OFF ERA CAM DC OUT Jack DC In Jack Attach Adapter/Charger Remove Adapter/Charger 1.
Power Your Camcorder Use the Battery to Power Your Camcorder The battery must be charged as described on the next page before it can be used the first time. Initial charging takes approximately 70 minutes for the FB1260 (100 minutes for the BB700). When fully charged, the FB1260 supplies approximately 50-55 minutes (BB700 approximately 75-85 minutes) of operating time – depending on how much you use the light, zoom, and pause. Conserve battery power by turning the camcorder off during recording breaks.
Power Your Camcorder Use the Battery to Power Your Camcorder (continued) Hold Battery Flush and Slide Reference Marks To AC Wall Outlet 100240 Volts, 50/60 Hz. CHG (Charge) Indictor REFRESH Indicator Adapter/Charger REFRESH Button Caution: When a battery is attached to the adapter/charger, do not turn them upside down. The battery may fall off and be damaged or cause injury. Charge the Battery Use the REFRESH Button If the DC cable is attached to the DC OUT jack on the adapter/charger, remove it. 1.
Power Your Camcorder Use the Battery to Power Your Camcorder (continued) Battery Level Indicator The battery level indicator appears in the viewfinder and shows you the amount of power in the rechargeable battery. • When the battery power is almost flashes in the viewfinder. gone, The camcorder turns off automatically after a few seconds. Set the POWER switch to OFF to turn off the camcorder before replacing the battery. The battery level indicator is not recorded on the tape.
Power Your Camcorder Optional Car Cord Adapter The optional DCC08 car cord shown on page 70 allows you to power your camcorder from the cigarette lighter socket of a car, truck, or RV. It converts 12-volts to a 6-volt output. Note: Consult the installation and operating instructions enclosed with the DCC08 for complete operating instructions. Cautions: The DCC08 is designed to be used only with vehicles having negative ground electrical systems. Use only car cord adapter DCC08 with this camcorder.
Date and Time Display Install the Clock Lithium Cell The clock cell indicator flashes for a few seconds in the viewfinder when you turn on the camcorder if the cell is not installed or needs replacing. Insert Object Here to Remove Cell Clock Cell (+ Side Facing Out) Clock Cell Compartment 1. Make sure camcorder is turned off, and remove any power supply attached to the camcorder. 2. Press release tab of clock cell compartment cover and open the compartment. 3.
Date and Time Display Set the Date and Time AU SE You must set the correct date and time before you can display and record it on your tapes. The clock cell must be installed as shown on the previous page before you can set the date. PA LY /P Q UI CK RE CO DA TE UN /T IM TE R E SP /S LP N PUSH MA F AU T O RO NT L I GH T TI TL HT C K L IG 1/1000 BA ZE W HD HA S E FA DE SEPIA MENU Dial (Rotate or Press In) 1.
Date and Time Display Set the Date and Time (continued) When YEAR starts flashing, rotate the MENU dial to select the year. When the correct year appears, press the MENU dial in to set the year. 6. Repeat step 5 to set the MONTH and DAY. 7. Rotate the MENU dial to highlight TIME. DATE/TIME YEAR MONTH DAY TIME 1998 NOV 18 PM 12:00 EXIT 8. Press the MENU dial in. When the hour starts flashing, rotate the MENU dial to set the hour including AM or PM. 9. Press the MENU dial in.
Date and Time Display Record the Date, Time, and Title Displays You must install the clock cell and set the date and time (as shown on the previous pages) before the you can select and record the correct date and time. You must create your title (as described on pages 46-47) before you can select and record it.
Date and Time Display Record the Date, Time, and Title Displays (continued) Viewfinder Displays Repeatedly Press DATE/TIME NOV 18.98 Date Display AM 10:25:00 Time Display NOV 18.98 AM 10:25:00 No Display Date and Time Display TAYLOR IS FOUR Title You Created AUTO DATE AUTO DATE Display To Record the Date, Time, Date and Time, AUTO DATE, or Title You Created 1. Make sure the camcorder is in record-pause. 2. Make sure the AE dial is not set to AUTO unless you want to record AUTO DATE. 3.
Videocassettes Make sure you select good quality tapes for your camcorder. Use of poor quality tapes or tapes that have been damaged or mishandled can contaminate the video heads, resulting in a snowy picture or no picture at all during playback. Because there is no control over the type of tape purchased or rented by consumers, head cleaning is not covered under warranty. It is considered normal maintenance.
Videocassettes Insert and Remove Cassettes SP/SLP Button EJECT Button Tape Wheel Push Here to Close Cassette Compartment Caution: Insert the cassette only one way with the tape wheel facing up and the tape window facing out. The cassette should slide easily into the holder. Do not force the cassette. Tape Window Before inserting a cassette, turn the tape wheel on the side of the cassette in the direction shown to remove any slack in the tape. Tape Wheel 1. Press EJECT.
Recording Time-Remaining Display The approximate time remaining on the tape in the camcorder for the tape speed you select is displayed. You must set the correct tape length in the TAPE LENGTH feature of the main MENU before the camcorder can correctly calculate time remaining.
Recording Time-Remaining Display (continued) 30MIN 29MIN 30MIN SP T30 Tape Length Indicator Tape Speed Indicator 3MIN TAPE END 2MIN (Flashing) 1MIN (Flashing) Time-Remaining Display in Viewfinder 0MIN (Flashing) 5. Press the MENU dial to display the TAPE LENGTH menu. TAPE LENGTH T20 T30 T40 EXIT 6. Rotate the MENU dial to highlight the type of tape you are using. • Select T20 for a tape with 20 minutes or less recording time in SP. • Select T30 for a tape with 30 minutes recording time in SP.
Recording Recording Tips • Try to make sure indoor scenes are well-lit. This improves picture quality and color reproduction. • Do not move the camcorder rapidly from side-to-side while recording. A steady, gradual “pan” avoids blurring and “jitter”. • Use the viewfinder to make sure the camcorder is level while recording so that your scene isn’t “tilted”. • Do not bump or tap the camcorder’s microphone while recording because this sound is recorded.
Recording Use the Viewfinder to See What You Record The camcorder’s viewfinder is a miniature monitor that displays the picture seen by the camcorder when recording. Eyepiece Focus Control Cautions Viewfinder Do not force the viewfinder to rotate completely around. This will damage the viewfinder and/or the camcorder. When carrying the camcorder with the shoulder strap, put the viewfinder down and in to help prevent possible damage to the viewfinder from bumping against your body as you move.
Recording Viewfinder Displays REC AT SEPIA MWB PAUSE HAPPY BIRTHDAY NOV 18.98 PM 8:30:03 AE Dial Special Effect Indicators AUTO (Full Auto Mode) AUTO LOCK appears briefly when you select AUTO. • MAN (Manual Mode) AUTO RELEASE appears briefly when you select MAN. • SPORTS This indicator appears when you select to record fast-moving action, such as sporting events. • SEPIA This indicator appears when you select to give your recordings a brown-tone like old photographs.
Recording Viewfinder Displays (continued) Battery Level Indicator ( • • ) This indicator shows the amount of power left in the rechargeable battery. This indicator flashes when the battery is almost empty. Cassette Warning • The indicator flashes when the POWER switch is set to CAMERA and there is no cassette in the camcorder. indicator flashes when the • The POWER switch is set to CAMERA and the safety tab is set to REC OFF or removed from the cassette.
Recording Viewfinder Displays (continued) T 30 5MIN EFFECT M 0:00:00 SP BK FADER +03 BK 15 S 1S LENS COVER TAPE END Dew Warning ( ) The dew indicator appears when excessive moisture (condensation) has entered the camcorder. The camcorder will not operate when this indicator appears. Place the camcorder in a warm, dry area until this indicator disappears. Fade Indicators (6EFFECT and BK FADER) The 6EFFECT and BK FADER indicators briefly appear when you press the FADE button to turn on fading.
Recording Viewfinder Displays (continued) • appear when you have selected MAN in the FOCUS menu. • and flash while you adjust manual focus and and flash when you cannot adjust the focus any farther. • Details are on pages 36-37. Lithium Cell ( ) Time Counter (M0:00:00) • The time counter appears during playback. It is not recorded. • An “M” appears in front of the time counter when memory-stop is on. • Details are on page 63.
Recording PL AY / PAUSE PLAY/PAUSE Button VCR 55 Button VCR 66 Button VCR STOP Button STOP AU SE QUICK REC Button PA LY /P Q UI CK RE CO F PUSH NT LIGH T E T H 1/1000 ZE AU TO SEPIA B DW AC TITLE KLIG HAZE Microphone N T L I GH FA D E Tally Light SH RO T F HA C K LIG MAN BA W T LP TI TL D SH H 000 SP /S N RO FA DE 1/1 DA TE UN /T IM TE R E MA AU T O SEPIA AE Dial Full Auto Mode The AE dial lets you select automatic or manual control of several feature
Recording Quick Record Feature Camera Edit Feature The quick record feature allows you to record for five seconds providing short scene transitions. 1. Set POWER switch to CAMERA. The camera edit feature allows you to position the tape when the camcorder is in record-pause. Set POWER switch to CAMERA. • Press and hold VCR 55 to visually search the recorded tape in reverse. • Press and hold VCR 66 to visually search forward on the recorded tape.
Recording Zooming You can zoom in and out for close ups or wide-angle shots just by pressing the zoom buttons on the camcorder. The camcorder automatically focuses when you zoom at most distances. To record a close-up of a small subject closer than three feet. Turn on the TELE MACRO feature in the main MENU. You can record a small subject at a distance of approximately 23 inches.
Recording Zooming (continued) 3. Rotate the MENU dial to highlight ZOOM SPEED. 4. Press the MENU dial in to display the ZOOM SPEED menu. ZOOM SPEED FAST SLOW 5. Rotate the MENU dial to highlight FAST or SLOW, and press the dial in. • Select FAST to zoom faster. • Select SLOW to zoom slower. 6. Rotate the MENU dial to EXIT and press the MENU dial in twice to remove the MENUS. Notes: For fastest zooming, select FAST in the ZOOM SPEED menu and press the zoom button firmly.
Recording Focusing The camcorder adjusts focus automatically under normal conditions. You might need to focus manually under certain conditions. AU SE Zoom Buttons (T and W) PA LY /P Q UI CK RE CO DA TE UN /T IM TE R E SP /S LP N PUSH MA F AU T O RO NT L I GH T TI TL ZE HT BA C K L IG MENU Dial (Rotate or Press In) HA W HD 1/1000 SEPIA S E FA DE Auto Focus Manual Focus During auto focus the camcorder focuses on the object located in the center area of the viewfinder.
Recording Focusing (continued) 4. Press the MENU dial in to display the FOCUS menu. FOCUS AUTO MANU EXIT 5. Rotate the MENU dial to highlight MANU (manual) and press the dial in. appears in the viewfinder. The focus is locked at this point. 6. Adjust the focus for a subject nearer or farther away. • Rotate the MENU dial up to focus on a subject farther away. flashes while you are adjusting the focus and flashes when you cannot adjust the focus any more.
Recording White Balance Making colors look natural is what white balance is all about. This is achieved by adjusting the way the camcorder “sees” and records the light source in the scene you record. Your camcorder is equipped with automatic white balance. You might want to adjust white balance manually under certain conditions, such as recording an object with various shades of the same color or when recording a predominantly red or brown object outdoors.
Recording White Balance (continued) 3. Rotate the MENU dial to highlight M.W.B. and press the dial in to display the M.W.B. menu. M.W.B. AUTO :FINE :CLOUD :HALOGEN MWB EXIT 4. Rotate the MENU dial to highlight the white balance you want to use. • No indicator appears when you select AUTO white balance. • Select :FINE when recording outdoors on a sunny day. • Select :CLOUD when recording outdoors on a cloudy day. • Select :HALOGEN when recording using halogen or tungsten lighting.
Recording Exposure Control AU SE The camcorder controls the iris for you when the AE dial is set to AUTO. The camcorder adjusts brightness automatically under normal conditions. You might need to adjust brightness manually when the background is too bright or too dark in comparison with the subject.
Recording Exposure Control (continued) 2. Press the MENU dial in to display the main MENU in the viewfinder. MENU MENU END FOCUS EXPOSURE DATE/TIME TELE MACRO TAPE LENGTH M.W.B. ZOOM SPEED NEXT AUTO AUTO NOV 18.98 OFF T30 AUTO FAST 3. Rotate the MENU dial to highlight EXPOSURE and press the dial in to display the EXPOSURE menu. The exposure indicator (00) appears in the viewfinder. 5. Adjust the exposure for a dark or bright subject. • To brighten the image, rotate the MENU dial up.
Recording Fade In or Out AU SE You can add a professional touch to your recordings when you fade in and out of scenes. The picture gradually appears or disappears. The speed of the fade is controlled by the camcorder. PA LY /P QU IC K RE CO DA TE UN /T IM TE R E SP /S LP N PUSH MA F AUTO RO NT L I GH T TI TL HT C K L IG 1/1000 ZE DW BA HA SH E FA DE SEPIA FADE Button To Fade In or Out 1. Set POWER switch to CAMERA. You can activate fading during recordpause or recording.
Recording AE Dial AU SE The AE dial lets you select one of several different effects. Turn the dial to select the effect you want. The name and indicator for the effect appears briefly and then the indicator remains. There are no indicators for AUTO or MAN. Set the AE dial to MAN for normal recording.
Recording Front Light and Back Light AU SE The camcorder adjusts the light automatically under normal conditions. You might need to adjust for a strong front light or back light (such as spotlights or subjects standing in front of a window with the sun at their backs). You can adjust for a strong front or back light using the AE dial, FRONTLIGHT button, or BACKLIGHT button.
Recording Travel Tips • Write down your camcorder’s serial number and keep it separate from the camcorder when traveling. If your camcorder is lost or stolen, you will be able to identify it. • Make sure you have any plug adapters that you might need before taking your camcorder to other countries. Consult your dealer for advice. • Use extra care to avoid damage to your camcorder and accessories when operating them at a beach or pool. Spray, sand, and dust should be avoided.
Recording Titles — Recording The title feature lets you choose one of eight preset titles or create your own title — up to 18 characters. You must install the clock cell battery as shown on page 17 before you can create or store your own title.
Recording Create Your Own Title 1. Make sure the camcorder is in recordpause and the AE dial is not set to AUTO. 2. Press the MENU dial in to display the main MENU in the viewfinder. MENU MENU END FOCUS EXPOSURE DATE/TIME TELE MACRO TAPE LENGTH M.W.B. ZOOM SPEED NEXT AUTO AUTO NOV 18.98 OFF T30 AUTO FAST 3. Rotate the MENU dial to highlight NEXT. The second MENU will appear. Keep rotating the MENU dial to highlight CHARACTER. where you want the character to appear. 6.
Recording Self-Timer Recording AU SE You can set the self-timer to delay recording so you can be in the scene when recording begins. PA LY /P QU IC K RE D C O ATE /T UN TE R IM E SP /S LP N PUSH MA F AU T O RO NT L I GH T TI TL ZE BA E C K L IG HA S W HD HT SEPIA E 1/1000 FA D MENU Dial (Rotate or Press In) Tally Light To Set the Self Timer 1. Make sure the camcorder is in recordpause and the AE dial is not set to AUTO. 2.
Recording Self-Timer Recording (continued) 3. Rotate the MENU dial to highlight NEXT. The second MENU appears. Keep rotating the MENU dial to highlight INT. TIME. BACK REC TIME INT. TIME TALLY LAMP CHARACTER JLIP ID NO. DEMO MODE 6. Press the MENU dial twice to exit the menu. 7. and the amount of delayed recording time appear in the viewfinder. OFF OFF ON 07 OFF MENU END 4. Press the MENU dial in to display the INT. TIME menu. INT. TIME OFF 15 S 30 S 1 MIN 5 MIN EXIT 5.
Recording Animation Recording You can produce an illusion of movement for an otherwise stationary scene or object by shooting a series of pictures of slightly different poses (such as cartooning). AU SE SP/SLP Button PA LY /P QU IC K RE D C O AT E /T UN TE R IM E SP /S LP N PUSH MA F AU T O RO NT L I GH T TI TL ZE HT C K L IG HA DW BA 1/1000 SEPIA SH E FA DE MENU Dial (Rotate or Press In) Tally Light To Record Using Animation 1.
Recording Animation Recording (continued) 4. Rotate the MENU dial to highlight NEXT. The second MENU appears. Keep rotating the MENU dial to highlight REC TIME. BACK REC TIME INT. TIME TALLY LAMP CHARACTER JLIP ID NO. DEMO MODE OFF OFF ON • Select OFF if you do not want to record for a selected amount of time. 7. Press the MENU dial twice to exit the menu. 8. and the amount of recording time appear in the viewfinder. 07 OFF MENU END 5. Press the MENU dial in to display the REC TIME menu.
Recording Time-Lapse Recording You can make automatic recordings at preset time intervals. The recording shows subtle changes (such as shifts in cloud formations or plant growth) when it remains focused on an object. AU SE SP/SLP Button PA LY /P QU IC K RE CO DA TE UN /T IM TE R E SP /S LP N PUSH MA F AU T O RO NT L I GH T TI TL ZE HT MENU Dial (Rotate or Press In) C K L IG 1/1000 BA W HA D SH E FA DE SEPIA Tally Light To Record Using Time Lapse 1.
Recording Time-Lapse Recording (continued) 6. Rotate the MENU dial to highlight the desired time between recordings (15S, 30S, 1 MIN, or 5 MIN). • Select 15S to delay the recording for 15 seconds. • Select 30S to delay the recording for 30 seconds. • Select 1MIN to delay the recording for one minute. • Select 5MIN to delay the recording for five minutes. • Select OFF if you do not want the camcorder to delay recording. 7. Press the MENU dial in to display the second MENU.
Recording Tally Light (Turn On or Off) AU SE You can turn the tally light on or off using the second MENU. PA LY /P QU ICK RE CO DA TE UN /TI ME TE R SP /SL P N PUSH MA F AUTO Tally Light RO NT L I GH T TIT LE C K L IG 1/1000 ZE BA HA S W HD HT FA DE SEPIA MENU Dial (Rotate or Press In) To Turn the Tally Light On or Off 1. Make sure the camcorder is in recordpause and the AE dial is not set to AUTO. 2. Press the MENU dial in to display the main MENU in the viewfinder. 4.
Recording Demo Mode AU SE You can turn on the DEMO mode in the second MENU to have a demonstration of some of the camcorder’s features. PA LY /P QU ICK RE CO DA TE UN /TI ME TE R SP /SL P N PUSH MA F AUTO RO NT L I GHT TIT LE BA ZE DW C K L IG MENU Dial (Rotate or Press In) HA SH 1/1000 SEPIA HT FA DE To Turn the Demo Mode On 1. Make sure the camcorder is in recordpause and the AE dial is not set to AUTO. 2. If a cassette is inserted, remove the safety tab or set it to REC OFF.
Recording JLIP (Joint Level Interface Protocol) Identification Number You can connect a device, such as a home computer, to the JLIP connector on the camcorder. MENU Dial (Rotate or Press In) VCR R POWE OFF RA CAME JLIP Connector (Under Cover) To Select a JLIP ID NO. 1. Make sure the camcorder is in recordpause and the AE dial is not set to AUTO. 2. Press the MENU dial in to display the main MENU in the viewfinder. 4. Press the MENU dial in to display the JLIP ID NO. menu. JLIP ID NO. ID NO.
Recording Attach the Shoulder Strap The camcorder’s shoulder strap is designed to let you carry the camcorder from your shoulder and – when you are ready to shoot – bring the camcorder to shooting position in one quick movement. To Attach the Shoulder Strap 1. If the strap keeper is over a double section of the strap, slide the strap keeper off the end of the strap. Replace the keeper on the strap between the buckle and the end of the strap as shown. 4.
Recording Model CC6271 Only: Built-In Color Enhancement Light P P LA Y/ SE VC AU R LP SP/S DA COUN TE/TIM TER E R/M QUI CK RE C Model CC6271’s built-in color enhancement light automatically adds more light when needed. The POWER switch must be set to CAMERA to operate the video light.
Recording Model CC6271 Only: Built-In Color Enhancement Light (continued) Replace the Bulb Assembly Carefully follow the instructions below. Cautions The video light and bulb need to cool for approximately 30 minutes after the camcorder has been used before the bulb assembly is replaced. Do not touch the light bulb with your fingers. If the bulb is accidentally touched, wipe it with a soft cloth. A dirty bulb may cause smoke and have a reduced service life.
Playback Use the Viewfinder for Playback You can see tapes using the viewfinder. There is no sound during viewfinder playback. PL VCR 55 Button AY / PAUSE VCR PLAY/PAUSE Button VCR 66 Button STOP Button STOP AU SE Eyepiece Focus Control PA LY /P QU IC K RE CO DA TE UN /T IM TE R E SP /S LP Viewfinder N PUSH MA F AU T O RO NT L I G HT TI TL HT C K LIG 1/1000 ZE W HD BA HA S E FA DE SEPIA EJECT Switch PUSH Button To Play Back a Tape 1. Attach a power supply.
Playback Use the Viewfinder for Playback (continued) • Turn the eyepiece focus control to adjust the focus of the viewfinder for your vision. • During playback, use the playback features on the following pages. 6. Press the STOP button when you are finished. 5. Press the PLAY/PAUSE button to begin playback. • If necessary, adjust tracking.
Playback Playback Features PL PLAY/PAUSE Button VCR 55 Button AY / PAUSE VCR VCR 66 Button STOP Button AU SE STOP PA LY /P QU IC K RE CO DA TE UN /T IM TE R E SP /S LP N PUSH MA F AU T O RO NT L I G HT TI TL ZE HT C K LIG 1/1000 BA W HA D SH E FA DE SEPIA Position the Tape Set POWER switch to VCR and press STOP. • Press and quickly release the VCR 55 button or VCR 66 button to rewind or fast-forward the tape. • Press STOP to stop the tape.
Playback Playback Features (continued) PL VCR 55 Button AY / PAUSE VCR PLAY/PAUSE Button VCR 66 Button STOP Button COUNTER R/M Button AU SE STOP PA LY /P QU IC K RE CO DA TE UN /T IM TE R E SP /S LP N PUSH MA F AU T O RO NT L I G HT TI TL HT C K LIG 1/1000 BA ZE DW HA SH E FA DE SEPIA Time Counter The time-counter display shows the actual time elapsed when playing back a segment of tape. The memory-stop feature helps locate a certain point on the tape.
Playback Use the Cassette Adapter The camcorder uses a smaller size cassette, but records in standard VHS format. The cassette adapter allows you to play your VHS-C cassettes in a VCR just like other standard VHS cassettes. Insert the VHS-C cassette into the cassette adapter. Insert the cassette adapter into the VHS VCR like a normal VHS cassette. Install Cassette Adapter’s Battery Battery Compartment Cover 1. Remove battery compartment cover. 2.
Playback Use the Cassette Adapter (continued) Load Detector 4. Gently close the cassette compartment lid until it locks into place. Make sure the cassette reel area under the adapter is free to turn while the cassette is loading. Note: You should hear a whirring sound while the tape loads. The adapter’s load detector will automatically retract into the adapter.
Playback Playback on TV (or VCR) with Audio/Video Inputs To connect your camcorder to a TV monitor (or VCR) with audio/video inputs, you need an optional audio/video cable, such as VH83 shown on page 72. If your TV is already connected to a VCR, attach the camcorder to the VCR and watch what the camcorder is recording or playing on the TV.
Playback Playback on TV (or VCR) with Audio/Video Inputs (continued) Playback Operation and How to Copy Tapes on the VCR 1. A. Camcorder connected directly to TV: Turn on the TV and tune it to the video input channel. B. Camcorder connected to VCR that is already connected to TV: Turn on VCR and place it in the “line” or “camera mode”. (If your VCR does not have a “line” or “camera mode”, consult the VCR owner’s manual.) Operate the TV as you normally do to see the signal coming from the VCR. 2.
Playback Playback on a TV Without Audio/Video Inputs To connect your camcorder to a TV without audio/video inputs, you need an optional 1CVA147C RF output adapter and an optional coaxial RF cable, such as VH82 or VH90 shown on page 72. If your TV has audio and video inputs (or is connected to a VCR), refer to pages 66-67.
Playback Playback on a TV Without Audio/Video Inputs (continued) Playback Operation 1. Set the CH3/CH4 switch on the RF output adapter to channel 3 or 4. 2. Turn on the TV, and tune it to the same channel you selected with the RF output adapter’s CH3/CH4 switch. 3. Place adapter’s VCR/TV switch in VCR. 4. Set POWER switch to VCR. Power indicator lights. 5. Press PLAY/PAUSE on the camcorder. • During playback, use the playback features described on pages 62-63. 6.
Optional Accessories We invite you to take a look at some great ideas for sparking creativity and adding to the fun of using your compact VHS camcorder. The following pages have a selection of accessories to help make your memorable moments look and sound even better. These accessories are designed to make the process of recording and watching your videos more enjoyable. To order accessories, contact your local Dealer.
Optional Accessories SE Mounting the camcorder on a tripod, such as AC088, keeps the camcorder steady and produces excellent video results. This tripod’s fluid-effect head provides smooth camera pan and tilt. The quickrelease mount makes it easy to attach or remove the camcorder. The grooved, tubular 3-section leg design folds down to 26" when not in use. Rubber feet allow for sure footing.
Optional Accessories 1CVA147C RF Output Adapter This RF output adapter is used with a coaxial RF cable, such as VH82 or VH90, to connect your camcorder to a standard TV (one without audio/video inputs) for playback. If your antenna cable is the flat twin-lead type attached by two screws, you need a 300-to-75 ohm transformer. If your TV has 300 ohm antenna screw terminals, you need an optional 75-to-300 ohm transformer such as VH54.
Accessory Order Form Order Form for Camcorder Model CC6151/CC6251/CC6271 Description Part No. Price Qty.
Accessory Order Form Charge your order on your VISA,MasterCard, or Discover Card by filling in below USE YOUR CREDIT CARD IMPORTANT: Copy complete account number from your VISA card ® Expiration date: IMPORTANT: Copy complete account number from your MasterCard s r r TM Expiration date: Copy Number above your name on MasterCard IMPORTANT: Copy complete account number from your Discover Card Expiration date: AUTHORIZED SIGNATURE Prices are subject to change without notice.
Accessory Order Form To order accessories, contact your local Dealer. If a dealer is not nearby, you can also follow the directions below to order by telephone or direct-by-mail. United States and Canada Orders To place your order by phone, have your Visa, MasterCard, or Discover card ready and call the toll-free number listed below between 8 AM and 10 PM (EST) Monday through Friday or between 9AM and 5PM (EST) Saturday. Use this number only to place an order for accessory items listed on this order form.
Trouble Checks Troubles sometimes are caused by simple “faults” that you can easily correct without the help of a service technician by first checking a few basic remedies. Before you call or take your camcorder to an Authorized RCA Camcorder Service Center, look below for the type of trouble you are experiencing. Then perform the simple checks and adjustments listed for that trouble. If service should be necessary, the warranty information lists what your warranty covers and explains how to get service.
Trouble Checks Trouble Checks and Adjustments Tape stops during rewind or fast forward • Time-counter memory might be on. Whenever an “M” appears with the time-counter display, the camcorder stops rewinding (or fast forwarding) when counter reads M 0:00:00. Press VCR 55 or VCR 66 again to continue rewinding or fast forwarding, or press COUNTER R/M to turn off the memory-stop feature. Camcorder remains in pause mode • Press PLAY/PAUSE to return to normal playback.
Trouble Checks Trouble Checks and Adjustments Sound is too low or distorted • Picture recorded with special effect • AE dial might be turned to special effect mode. Rotate the AE dial to AUTO. See page 43. Colors do not look natural on recording • Try adjusting white balance. See pages 38-39. Title recorded on tape • Title is recorded when it appears in viewfinder. Remove the title. See pages 20-21 and 46.
Trouble Checks Trouble Checks and Adjustments Model CC6271: light turns on and off • Lighting condition changes frequently. Set LIGHT AUTO•OFF•ON light switch to ON or OFF. Streaks in picture during playback or play-pause • Adjust tracking with MENU dial. See page 61. Bright, crystalshaped spots in viewfinder • Sunlight is directly entering the lens. Colored bright spots appear in viewfinder • Models CC6251 and CC6271: Black spots or bright spots of light (red, green, or blue) may appear.
Care and Maintenance Clean the Camcorder To clean the camcorder’s exterior, remove any power source connected to the camcorder and gently wipe it with a clean soft cloth. Caution: Use of strong cleaning products, such as those containing alcohol or benzine, might damage the camcorder. Clean the Camcorder’s Lens AU SE To clean the camcorder’s lens, blow it with a blower brush and gently wipe the lens with cleaning tissue and commercially prepared cleaning solution designed for use on camera lens.
Care and Maintenance Proper Care and Storage • Keep dust and grit from entering the camcorder’s cassette door. Dust and grit are abrasive and cause excessive wear to both the camcorder’s recording/playback heads and cassettes. • Always close the lens cover when the camcorder is not in use. • Before handling your camcorder, make sure your hands and face are free from any chemical products such as suntan lotion, as it might damage the finish. • The camcorder might be damaged by improper storage or handling.
Specifications General Power requirement: 6VDC Power consumption: CC6151: 5.0 watts CC6251: 5.1 watts CC6271 (normal): 5.1 CC6271 (light on): 8.0 watts Weight: CC6151: 1.8 lbs. (800g) CC6251: 1.8 lbs. (780g) CC6271: 1.8 lbs.
Customer Assistance and Service You can reach Thomson at the following number: 800-283-6503 (Toll free inside U.S.A.) Our toll-free Camcorder number operates from 8 a.m. to 5 p.m., CST Monday – Friday for U.S. customers only Thomson provides a toll-free telephone number to help you with any problems you may encounter with your camcorder. Many can be diagnosed over the phone, and if necessary, repair or replacement will be arranged.
Limited Warranty What your warranty covers: • Any defect in materials or workmanship. For how long after your purchase: • 90 days for labor charges. • One year for parts. The warranty period for rental units begins with the first rental or 45 days from date of shipment to the rental firm, whichever comes first. What we will do: During the initial 90 days • Exchange your camcorder with a new or refurbished unit, or repair your camcorder. The option will be ours. There will be no cost to you.
Limited Warranty • Evidence of purchase date, such as a bill of sale, to verify your unit’s warranty eligibility. • A brief note describing your camcorder’s problem. • Your name, address and phone number. Return transportation, storage, handling, and insurance costs are your sole responsibility. We accept no liability in case of damage or loss. To receive a replacement unit after we have received your unit: 1. Write the RA number on the outside of the carton used to return the unit.
Index 1 S 1/1000 indicator 28, 43 A Accessories included 3 optional 70 order form 73 Accessory order form 73 Adapter/charger charging battery 14 using 4, 12 AE dial 7, 8, 10, 18, 20, 21, 24, 32, 34, 35, 36, 38, 40, 43, 44, 46, 47, 48, 50, 52, 54, 55, 56 indicators 28, 43 features 43 Animation indicator 31, 51 Animation recording 50 Assistance 1, 3, 83 Attach shoulder strap, 57 Audio/video jacks 11, 66, 68 Auto date display 20, 32 Auto date feature 20, 32 Auto exposure 40 Auto focus 36 Auto head cleaner 33
Index D Date and time displays setting 18 Date, time, and title displays recording 20 DATE/TIME button 10, 20, 21, 29, 47 DATE/TIME menu 18 DC cable 12, 13, 14, 16 DC in jack 4, 12 Demo mode 55 DEMO MODE menu 55 Design specifications 82 Dew warning 30, 77 Displays, status 29 E EJECT button 5, 11, 23, 60 Erase protection 22 Exposure control 40, 41 Exposure indicator 41, 44 EXPOSURE menu 41 Eyepiece focus control 6, 11, 27, 60 F Fade/wipe feature 42 First time operation 3 Flying erase head 33 Focus indicato
Index L Lens 10 Lens cover 4 LENS COVER control 4, 11 LENS COVER indicator 31 Light, color enhancement (model CC6271) 58, 59 LIGHT OFF•AUTO•ON switch (model CC6271) 11, 58 Limited warranty 84 Lithium cell inserting and removing 17 Lithium cell indicator 17, 31 Low-contrast indicator 36 M M.W.B.
Index RF output adapter, optional 68 S Safety information i Safety precautions, battery 13 Safety tab 22 SD:SHADOW indicator 28, 43 Second MENU 47, 49, 51, 52, 53, 54, 55, 56 Self timer 48, 49 Self timer indicator 31, 49 SEPIA indicator 28, 43 Setting tape length 7 Shoulder strap, attach 57 Shoulder strap attachment rings 11, 57 Shutter speed indicator 43 SLP recording speed 6 SLP tape speed 6, 22 Solving problems 76 SP recording speed 6, 22 SP tape speed 6, 22 SP/SLP button 22, 24, 50, 52 Specifications 8
10330 N Meridian Street Indianapolis, IN 46290 ©1998 Thomson Consumer Electronics, Inc.