cameradigitalstiilcameradig italstillcameradigitalstillcam eradigitaistil Icameradigitals tillcameradigitalstillcamera digitalstillcamerad igitalstill cameradigitalstil Icameradig italstill cameradigitalstilicam eradigitalstillcameradigitals tillcamerad!gitalstillcamera cameradigitalstillcameradig italstillcameradigitalstillcam e radigitalstillcam eradigitals tiilcameradigitalstillcamera digitalstillcameradigitalstill cameradigitalstil loam italstill cameradigitalstillcam eradigitalstillcameradigitals e ra
Important Safety Information * Be sure to read all the safety information on this page and inside the manual before you begin to use this product. To reduce risk of injury, charge only rechargeable batteries recommended by the manufacturer for this camera. Other types of batteries may burst causing damage and personal injury. FCC Regulations state that unauthorized changes or modifications to this equipment may void the user's authority to operate it.
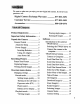
We want to make sure you enjoy your new digital still camera. If you have any questions, call: Digital Camera Exchange Warranty Customer Accessories Service .............................................. ................................ Product Registration Important .................... Safety Information Attach the Strap .................... 5 Power Supply ................. .. . .... 5 Batteries ............. 5 Using AC Adapter ............. 6 Auto Power Off ................
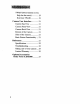
TWAIN Driver buttons (Cont.) Help for the user(s) ............. 19 Exit from TWAIN ............... 19 Camera User Interface .............. 21 Camera Top View .................. 21 Camera Front View ................ 21 Camera Back View ................ 21 Bottom of the Camera ........... 21 Sides of the Camera ............... 21 Basic Button Functionality References ................................... Specifications 21 ........................ 22 .....................
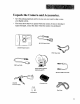
Unpack the Camera and Accessories. • Save the packing materials and box in case you ever need to ship or store • you r di gital camera, ...... ,_acked with you_ camera If any are missing The items shown bexow _" r where the camera was purchased. or appear damaged, contact the dealer CDSIO00 Digital Camera NTSC V_deo Cable USBSerial Cable Image FAlling $of-v,vare (Macintoshand PC) Cart3,ing Case CDSIO00 AC Power S.
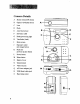
Camera Details A Shutter release/OK button B Optical viewfmder (front) C Lens D Flash E Auto flash sensor F Self-timer LED G Ready/processing H Viewfinder (back) I Menu screen J Exposure value/ next image button K Flash set/ previous picture button L Power button M Menu button N Battery Cover O Tripod mount P Video out jack Q AC Power adapter jack R USB/Serial S Hand strap eyelet D E light F k GH"__ j oo 0 0 _..
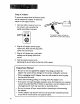
Attach the Strap Dropping a camera can cause serious damage both internally and externally. So, to secure your investment, attach the hand strap first thing, and use it every time. 1. Insert the small loop at the end of the strap under the strap eyelet. 2. Insert the other end of the strap through the loop to tie the strap onto the strap eyelet. Inserting the Hand Strap Power Supply This digital camera features two ways to supply power to it; either use two batteries (size AA) or the included AC adapter.
Using AC Adapter To power the camera from an electrical outlet, use the supplied AC adapter. To attach the adapter to your digital camera: 1. Open the rubber connector cover on the camera's side, using the flap handle and pulling it upwards. AC ADAPTER DC IN 5V _- O0 The supplied AC adapter will allow the digital camera to operate without batteries 2. Plug the AC adapter into the proper camera jack. Make sure the plug slides all the way into the jack. 3.
Auto Power Off To conserve energy, the camera goes into "sleep" mode automatically if no buttons or switches are pressed for a certain amount of time. Press the POWER button on the back of the camera to restore power to full. Power source inactivity period: Battery- 2 min.; AC adapter- N/A (will not time out). Recording Pictures Since there needs to be pictures taken before the camera will display stored f'des, let's walk through the steps to capture images.
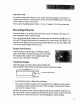
Viewing Stored Images The images stored in the camera's memory may be viewed on a TV screen or downloaded to your computer. For more information about viewing images on the computer, see the section, Working with Images, in this manual. O O ACADAPTER "_DC IN SV Picture Viewing Put the camera into playback mode (as indicated i. by the _ icon on the rear LCD display) by quickly pressing and releasing the menu button (I'M]) on the back of the camera.
On-screen menu choices To get the most benefit from your digital camera, you must know and be able to navigate through the LCD menu choices. In the main menu of either the record (I'_) or playback ([E]_) mode of the camera, you can change settings for different aspects of the camera's performance. f That's right, there are two different menus, one for playback mode and another for record, whichever you are using the camera for. Playback mode allows browsing through stored pictures.
Changing settings To switch between recording mode (_) and playback mode (_--q), quickly press and release the Menu button ([M]) at the lower right of the LCD screen until the on-screen icon changes. Pressing and holding the Menu button enters the camera into a submenu level in either playback or record modes. Once at the submenu level, quickly pressing the Menu button toggles through available choices.
3. Pressthe shutterreleasebutton on top of the camera to select "OK" and activate fme picture quality. Note: The camera will remain in fine quality mode until manually changed. If the batteries are removed, it will change back to the factory default (Normal mode). viewfinder and press the shutter release button to activate the countdown. TIP: For vibration-free photos, use a ] tripod or other stable surface to mount the camera during self timer mode.
Exposure value (Cont.) . Use the EV/+ button at the upper left of the LCD monitor to increase the exposure value setting or the _t/button to decrease it. Note: The exposure values can be determined by noting the mark next to "E" on the LCD screen. While the arrow highlights 0, • (.5), or 1, positive EV values are reflected with the plus symbol (+) next to EV and negative values are reflected with the minus symbol (--).
4. when the correct image number is displayed on the LCD, press the shutter release button on top of the camera to OK erasing the picture. Note: Another image can be selected with the EV/+ or _/- buttons and erased . following the above steps. Tune the TV to its video input line (for more information about video input, see the User's Manual that came with the teIevision). Erasing An alternative to erasing images one at a time is to erase all stored images at once. To do this, use the Erase All command.
Introduction to the camera's TWAIN Driver Using the provided TWAIN application* allows the transfer of photos from the digital camera to a computer. The following is a discussion of key software points to make the process of getting your pictures on a computer easier. TWAIN is defined by a standard software protocol and API for communication between software applications and image acquisition devices (digital cameras and scanners).
Selecting the TWAIN driver From within your image-editing software, you will need to tell the computer what driver to use to get images from your digital camera. Select FILE->SELECT SOURCE and choose the TWAIN driver for the camera that was installed from the supplied software. Connect the camera to the computer Now that there are images stored in the camera, you can connect it to the computer and "download" the data to the TWAIN driver software.
TWAIN Driver buttons ,! ,i! There are several options within the TWAIN software to simplify working with digital pictures. The following is a list of the buttons in the TWAIN driver software and an explanation of their functions. Connect Camera to Computer Choose DIGITAL CAMERA to access stored images. The TWAIN driver interface will be launched by the editing software and begin the transfer process by displaying thumbnail versions of the camera's stored images.
Scroll One Row Down Get Image(s) Use this button to scroll down one row Use this button to select an image from the TWAIN interface to the graphic- of pictures (four photos). editing application. Note: If the last thumbnail is already viewable, nothing will happen. Scroll One Screen Down Note: You must select one or more image files from the TWAIN interface. The photos will then display on the graphic-editing application. Use this button to scroll one full screen down (twelve photos).
Selecting Images Exit from TWAIN To select images one by one: press the Control key (Command key on the Macintosh) and click thumbnails individually to activate the selection. Use this button to exit the TWAIN driver. Camera Status Use this button to display camera status information. Record mode: Previews the picture to be taken and displays it on the camera's LCD monitor. Play mode: Views the photos taken and displays them on the camera's LCD.
Camera Camera User Interface Top View Basic Button Functionality Button Playback mode Record mode EV/+ Advances to next Adjusts the exposure value in .5 increments stored picture Camera Front View ranging from -1 to +1 _/- Displays preceding picture number Toggles between auto flash (flash on) and flash off o o o o • u • o • Power (O) Power on/off Power on/off Menu ([_3) Pressed quickly: switches to record menu. Pressed Pressed quickly: switches to playback menu.
Specifications Product Type: Digital Still Camera Imaging Device: 1/3-inch CMOS Image Quality: Fine/Normal Image Resolution: 640 x 480 pixels Recording System: Digital (JPEG based) Recording Medium: 2 Mb internal flash memory Erase Functions: Single image or all images Video System: NTSC output Computer Interface: USB, RS-232C, or Macintosh ADB Focal Length: 7 mm Aperture: f=2.0 Focus Range: .
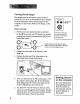
Troubleshooting Q: Th e camera doesn't turn on when I press the power button. A: The batteries are missing, dead, or are not loaded correctly. Correctly load new batteries in the battery chamber. If you are using an AC adapter, make sure you are only using the recommended AC adapter for this digital camera. Q: The power suddenly turned off. A: Most likely, the batteries you have are getting too weak to sustain operation of the camera. Check the LCD display to see if the weak battery icon is displayed.
Taking care of your camera Your camera is a precision instrument designed and manufactured to give you reliable service. Handled and cared for properly, the camera should give years of trouble-free imaging. In order to avoid damaging the unit: Do Not: • Drop or bang the camera. Always transport the unit in a carrying case; • Drop into water or expose the camera to rain or splashing. Your camera is not waterproof and is particularly susceptible to damage from salt water.
Limited Warranty What your warranty covers: • Any defect in materials or workmanship. For how long after your purchase: • One year - Unit exchange, which includesparts and labor. • The warranty for rental units begins with the first rental or45 days from date of shipmentto the rental firm, whichever comes first. What we will do: • Exchange a defective Digital Still Camera with a new or, at our option, refurbished unit.
To receive a replacement camera after we have received your unit: • Write the RA number on the outside of the cartonusedto returnthe unit. Makesure you insure your shipmentin case of damageor loss. Carefullypack the unit using the originalbox and packing materialif possible. Please retain all accessoriesthat were includedwith your unit. • Includewith the shipment: 1. Evidence of purchase datesuch as a bill of sale. 2. A brief note describing yourcamera's problem. 3. Yourname, address and phone number.
Optional Accessories Order Form (CDS1000 Description Part No. Price NiMH Battery Charger (includes 4 rechargeable AA batteries) PC224 $29.95 2-pack Alkaline batteries PC102AK $3.95 4-pack Alkaline batteries PC104AK $4.95 2-pack Nickel Metal Hydride batteries PC202MH $9.95 4-pack Nickel Metal Hydride batteries PC204MH $19.95 Gear Bag._ Blue PC556 $29.95 Black PC555 $29.95 Rechargeable Total Qty. Batteries (AA) Prices are subject to change without notice. Total Merchandise ........
USE YOUR CREDIT CARD Charge your order on your VISA, MasterCard, or Discover Card by filling in the provided form: IMPORTANT: Copy complete account number from your VISA card 1--_-_ CCI3 Fr_ CI_ IMPORTANT: VISA" Copy complete account number from your MasterCard FT-T-I-]f-I-I_ r-l--r--Nr-r--r-_ Copy Number above your name on MasterCard IMPORTANT: _xp_ondato:CE] CC] _ Expiration date: _--] Copy complete account number from your Discover Card r-T--_ _-T--I--1 _-r--r-] _-FTq Exp_ooda_: CE]Vl-]
To order accessories, contact your local Dealer. If a dealer is not nearby, you can also follow the directions below to order by telephone or direct-by-mail. To order by phone: To place your order by phone, have your Visa, MasterCard, or Discover card ready and call the toll-free number listed below. Use this number only to place an order for accessory this order form.
A AA Batteries 3 AC Adaptor 6 AC Power Supply 3 Accessories 1, 3 included 3 order form 27 ordering 29 Accessories, optional 29 Assistance 1 Auto flash sensor 4 Auto Power Off 7 Capturing Images 7 Carrying Case 3 Case 3 CDS1000 3 CDS 1000AC power supply 3 Changing settings 10 computer connecting camera 16 Customer Service 1 Image Editing Software 3 Image quality settings 9 images erasing all 13 erasing single 13 viewingonaTV 8, 12 inactivity period 7 L D lens 4 Download Image(s) 18 S M Basic Button F
powersupply 3, 5 AC adaptor6 autopoweroff 7 batteries5 ProductRegistrationi Productregistrationi R REC mode 10 Rechargeable batteries 27 Recording mode 9 recording pictures 7 Registration i Rotate Image(s) button 18 RS-232C Digital Cable 3 $ Safety information i Scroll One Row Down button 18 Scroll One Row Up button 17 Scroll One Screen Down button 18 Scroll One Screen Up button 17 Select All of the Images button 18 Select None of the Images button 18 selecting images 19 Self Timer/+ button 4 self-timer a
_ THOMSON CONSUMER ELECTRONICS 10330 N Meridian Street Indianapolis, IN 46290 ©1999 Thomson Consumer Electronics, Inc. Trademark(s) ® Registered Printed in the U.S.A.