HDTV Monitor User’s Guide Changing Entertainment. Again.
Important Information WARNING To reduce the risk of fire or electric shock, do not expose this product to rain or moisture. CAUTION RISK OF ELECTRIC SHOCK DO NOT OPEN Caution: To reduce the risk of electric shock, do not remove cover (or back). No user serviceable parts inside. Refer servicing to qualified service personnel. This symbol indicates "dangerous voltage" inside the product that presents a risk of electric shock or personal injury.
Introduction Key Features Overview Your TV is equipped with features that will add to your TV viewing experience. The following information summarizes a few of these features. Chapter 3 provides more information about the rest of the TV’s features and how to use them. On-screen Program Guide Description: The GUIDE Plus+ system is an on-screen interactive list of programs and information that is built into your TV.
16:9 Mode Description: Lets you select a widescreen format for a wider viewing area using a 16:9 aspect-ratio source, such as a DVD player, for display on this 4:3 aspect-ratio TV. Requirements: HIGH RESOLUTION INPUT • A 16:9 aspect-ratio source, such as a DVD player or HD receiver. • A 16:9 aspect-ratio disc or signal. • The 16:9 source needs to be set to output a 16:9 format signal. • The 16:9 mode on the TV needs to be on.
Table of Contents Introduction Key Features Overview .................................................................................................... 1 On-screen Program Guide ......................................................................................... 1 V-Chip: Parental Controls ........................................................................................... 1 16:9 Mode ..............................................................................................................
Table of Contents Chapter 3: Using the TV’s Features About the GUIDE Plus+ System..................................................................................... 34 Downloading Data ................................................................................................... 34 Getting In & Out of the GUIDE Plus+ System ......................................................... 35 The GUIDE Plus+ System Menus ..............................................................................
Chapter 1 Connections & Setup Chapter Overview: • Things to Consider Before You Connect • Choose Your Connection • Connections • Explanation of Input Jacks and Cables • Why You Should Connect the G-LINK Cable • The Front of Your TV • Plug in the TV • Put Batteries in the Remote • How to Use the Remote Control to Complete the Interactive Setup • Turn on the TV • Complete the Interactive Setup Changing Entertainment. Again.
Connections & Setup Things to Consider Before You Connect Protect Against Power Surges • Connect all components before you plug any of their power cords into the wall outlet. • Turn off the TV and/or component before you connect or disconnect any cables. • Make sure all antennas and cables are properly grounded. Refer to the Important Safeguards sheet packed with your TV. Protect Components from Overheating • Don’t block ventilation holes on any of the components.
Connections & Setup Choose Your Connection There are several ways to connect your TV. Please use the following chart to determine which connection is best for you. Proceed to the appropriate page and connect your TV. Components Cables Needed Connection Title Coaxial TV + HD Receiver + DVD + VCR page 8 TV + Satellite Receiver + VCR page 10 TV + DVD + VCR pages 11 Audio/video TV HD iver e Rec DVD VCR Go to...
Connections & Setup VCR CABLE ANTENNA IN VIDEO L AUDIO R L AUDIO R IN VIDEO O R OUT ANTENNA OUT OFF-AIR ANTENNA TV 3 2B AUDIO 2A VIDEO L R HDTV MONITOR S-VIDEO COMPONENT VIDEO INPUT INPUT1 AUDIO R PB Y PR HD iver e Rec AUDIO OUTPUTS HIGH RESOLUTION INPUT ANTENNA/ CABLE INPUT L FIXED R VARIABLE R L INPUT2 AUDIO INPUTS L R G-LINK EXT SPEAKERS EXT INPUT3 + POWER + R 1 DVD L DVD PLAYER HD RECEIVER 4C 4B AUDIO VIDEO L AUDIO R S-VIDEO INT L R L R L VIDE
Connections & Setup 4. Connect your HD Receiver to your TV. A. Connect the supplied high resolution cable to your HD receiver and to the HIGH RESOLUTION INPUT on the TV. Note: Due to copyright restrictions, you may not be able to view some high definition programs in high definition format using this product. To view material in standard definition instead, you also must connect the Audio/Video jacks to the TV. B.
Connections & Setup VCR CABLE ANTENNA IN VIDEO L AUDIO R VIDEO L AUDIO R IN O R OUT ANTENNA OUT OFF-AIR ANTENNA 2 TV 1B 1A AUDIO VIDEO L R HDTV MONITOR S-VIDEO COMPONENT VIDEO INPUT AUDIO R INPUT1 Y PB PR AUDIO OUTPUTS HIGH RESOLUTION INPUT ANTENNA/ CABLE INPUT L FIXED R L VARIABLE R L INPUT2 AUDIO INPUTS L R G-LINK EXT SPEAKERS EXT INPUT3 + POWER Sa tel lite + R INT L 3 SATELLITE RECEIVER VIDEO L AUDIO R S-VIDEO VCR How to Connect: TV + Satellite Receiver
Connections & Setup VCR CABLE ANTENNA IN VIDEO L VIDEO L AUDIO R IN O R AUDIO R OUT ANTENNA OUT OFF-AIR ANTENNA TV 3 2B 2A AUDIO VIDEO L HDTV MONITOR S-VIDEO R COMPONENT VIDEO INPUT AUDIO R INPUT1 Y PB PR AUDIO OUTPUTS HIGH RESOLUTION INPUT ANTENNA/ CABLE INPUT L FIXED VARIABLE L R R L INPUT2 AUDIO INPUTS L R DVD G-LINK EXT SPEAKERS EXT INPUT3 + POWER + R INT L 1 DVD PLAYER VIDEO L AUDIO R S-VIDEO VCR How to Connect: TV + DVD + VCR 1.
Connections & Setup How to Connect: A/V Receiver + Speakers 1. Connect either the FIXED or VARIABLE AUDIO OUTPUT from the TV to an A/V receiver using audio cables. • FIXED provides fixed-level audio output from the TV. This audio output is ideal for connecting to an A/V receiver that has its own volume control. Note: If you use the fixed audio output jacks, you may want to turn off the volume display in the Audio menu. • VARIABLE provides variable-level audio output.
Connections & Setup Explanation of Input Jacks and Cables This section describes the jacks and cables you can use to make connections. There are several ways to connect components to your TV. Component Video (Y•Pb•Pr) Jacks and Cables The Y•Pb•Pr jacks allow you to connect an optional component video source, such as a DVD player. This connection provides optimum picture quality because the video is separated into three signals.
Connections & Setup RF Jack and Coaxial Cables (F-type) The RF jack is necessary for reception of off-air broadcasts, cable, and satellite signals. This jack is required for antenna or cable connections. The RF jack on the TV is labeled ANTENNA/CABLE INPUT. An RG-6 coaxial cable is required for all satellite signal distribution.
Connections & Setup Why You Should Connect the G-LINK Cable The G-LINK cable enables the GUIDE Plus+ system (the on-screen interactive program guide) to work with your VCR and/or cable box. Cable Box – If your TV is connected to a cable box, you must connect the G-LINK cable to receive TV program listings for your area and to tune directly to a channel when the program guide is on your TV screen.
Connections & Setup The Front of Your TV Front Inputs The TV has front inputs for convenience: one set of audio/video inputs, and a headphone jack. Look for a hinged door and open the cover. Please note the illustration below shows a typical front input layout. Notes: • When you plug in headphones, the TV’s internal and external speakers are automatically turned off.
Connections & Setup Plug in the TV Plug the flat end of the cable into the POWER jack on the back of the TV. Then plug the end of the power cord into an appropriate wall outlet. Be sure to insert the plug completely. Put batteries in the remote • Remove the battery compartment cover from the back of the remote by pushing down on and sliding off the cover. • Insert 2 “AA” fresh batteries. Make sure the polarities (+ and -) are aligned correctly. • Replace the cover.
Connections & Setup Complete the Interactive Setup Tip To access the setup menus manually, press MENU and choose SETUP. SETUP Select the language to be used in these menus. 1 English 2 Español 3 Français SETUP Would you like the monitor to search for all available channels? 1 Yes 2 No, skip this step The menu system in your TV allows the TV’s features to work properly.
Connections & Setup The GUIDE Plus+ System Setup Important: If you have a VCR or cable box connected to the TV, you need to connect the G-LINK cable to use the GUIDE Plus+ system. Go to page 15. Tip If you move to a new zip or postal code, or if any of your information changes and you need to access the setup screens from the TV’s main menu— press MENU, choose GUIDE Plus+ Menu, and choose GUIDE Plus+ Setup, then choose Setup.
Connections & Setup Step 3: Configuring for Cable The next series of screens asks you about your cable setup. To supply your TV with the correct TV program listings, the GUIDE Plus+ system needs to know if your TV is connected to cable. 1. If your TV is connected to cable, highlight Yes and press OK. If your TV isn’t connected to cable, highlight No and press OK. 2. If you have a cable box connected to this TV, highlight Yes and press OK on your remote control.
Connections & Setup 6. Look at your cable box. If it is still on and changed to channel 09, the test was successful. Highlight Yes, and press OK. If the cable box did not change to channel 9, highlight No. If you select No, the system will try another code. If the GUIDE Plus+ system cannot recognize your cable box after several tries, a screen stating “Cable Box (VCR) test failed...Please consult your manual and try again” appears. You have a choice to either Try Again or Skip Cable Box Setup.
Connections & Setup Step 4: Configuring for a VCR 1. If your TV is connected to a VCR, press OK. If it is not, highlight No and press OK. (Answering No automatically skips to the end of GUIDE Plus+ setup.) 2. Use the up and down arrow buttons to highlight the brand of your VCR that is connected to the TV and press OK. If your brand isn’t listed, highlight Not Listed and press OK. 3. Tune your VCR to channel 02. Next, turn OFF your VCR. When you complete these steps, press OK to begin testing.
Connections & Setup What to Expect The next time you turn on your TV, the GUIDE Plus+ system will appear on the screen. The following examples explain what you might see: • If all of the program information has been sent to your TV, the GUIDE Plus+ system appears with all of your TV program listings. • If the program information hasn’t been sent to your TV yet, an outline of the GUIDE (without TV program listings) will appear on the screen. Program information is usually sent to your TV at night.
This page left intentionally blank.
Chapter 2 Using the Remote Control Chapter Overview: • The Buttons on the Remote Control • Programming the Remote to Operate Other Components • How To Use the Remote After You’ve Programmed It • Code List Changing Entertainment. Again. Graphics contained within this publication are for representation only.
Using the Remote Control The Buttons on the Remote Control ON OFF VCR1 DVD TV SAT•CABLE AUX VCR2 Indicator MUTE SKIP VOL VOL CH + (0-9) Number Buttons Enter channel numbers and time settings directly through the remote control. They are also used in the GUIDE Plus+ system and in the TV menu to make selections. To enter a one-digit channel, enter a zero first. To enter a two-digit channel, press the two digits.
Using the Remote Control Tip To turn off all the RCA, GE, and PROSCAN components that are connected to the TV, press ON•OFF twice within two seconds. This feature only works with most RCA, GE, and PROSCAN products. MUTE Reduces the TV’s volume to its minimum level. Press again to restore the volume. OK When in the menu system, selects highlighted items. ON•OFF When in TV mode, turns the TV on and off. If in another device mode (VCR, DVD, SAT•CABLE, etc.) and programmed, will turn the device on and off.
Using the Remote Control ON • OFF VCR1 DVD VCR2 TV AUX SAT•CABLE Indicator Programming the Remote to Operate Other Components The universal remote can be programmed to operate most brands of remote controllable components. The remote is already programmed to operate most RCA, GE, and PROSCAN components. Also, the AUX button can be programmed to operate most brands of an additional remote-controllable component. Note: The TV button can’t be programmed on this remote.
Using the Remote Control At this point the remote is searching for the correct code to program. If, after 5 seconds, the component you want to operate does not turn off, press PLAY again to tell the remote to search the next set of codes. Continue pressing PLAY until the component turns off or you have searched through all of the codes. There are 20 total sets of codes. If the component does not turn off after pressing PLAY 20 times, then the remote can’t be programmed to operate that component.
Using the Remote Control How to Use the Remote After You’ve Programmed It Because this universal remote can control several different components (TV, DVD, VCR, satellite receiver, etc.) it uses operational modes triggered by the component buttons. For example, if you want the remote to control the TV, you would press the TV button to put the remote into TV mode before you could control the TV. 1.
Using the Remote Control VCR Codes Programmable for VCR1, VCR2, and AUX buttons. Admiral ........................................................ 2132 Adventura .................................................... 2026 Aiko ............................................................. 2027 Aiwa ............................................................. 2026 Akai ..................... 2003, 2004, 2005, 2007, 2008, ................................................. 2111, 2112, 2113 American High ...........
Using the Remote Control Satellite Receiver Codes Programmable for SAT•CABLE and AUX buttons. Alphastar ................................................................ Chapparal ..................................................... 5056, Dishnet ................................................................... Drake ............................................................ 5058, Echostar .................................................................. GE .............................................
Chapter 3 Using the TV’s Features Chapter Overview: • All About the GUIDE Plus+ System • The Channel Banner • Autotuning • Parental Controls and V-Chip • PIP (Picture-In-Picture) Operation Changing Entertainment. Again. Graphics contained within this publication are for representation only.
Using the TV’s Features Video Action Program Menu window buttons information options About the GUIDE Plus+ System The GUIDE Plus+ system is an interactive on-screen program guide that lists TV schedules for your area and allows your TV direct control of a cable box and/or VCR. You must first set up the GUIDE Plus+ menu system in order to view this on-screen program guide (see Chapter 1 for details). Press GUIDE to bring up the GUIDE Plus+ system.
Using the TV’s Features Channel Lineup If more than one cable company services your area, you may be prompted with a Channel Mapping screen after the first GUIDE Plus+ system download. You will need to identify your cable company by selecting the correct channel numbers for the stations in question. • Use the up and down arrow buttons to change the channel group and press OK when the correct channel group is highlighted.
Using the TV’s Features Grid guide menu selection Grid guide action buttons Grid Guide Action Buttons Action buttons will change according to where you are in the GUIDE Plus+ system. Be sure to look at the action bar before pressing the command numbers. When highlighting the program, the following Action buttons appear: • Watch Press 1 on the remote to place a timer in the Schedule for the TV to turn on and tune to the program highlighted in the channel listing.
Using the TV’s Features Sort menu selection Sort The Sort menu lets you browse programs by category. The channel to which you are currently tuned is displayed in the video window. To Sort: 1. If the GUIDE Plus+ system isn’t on your screen, press GUIDE on your remote control. 2. Press MENU on the remote to select the Menu bar. 3. Use the arrow buttons to highlight Sort. When Sort is highlighted for the first time, the Movies category is displayed. Thereafter, the last category used becomes the default.
Using the TV’s Features News menu action buttons News menu selection News The News menu lets you browse current news stories by headline. Schedule menu action buttons Schedule menu selection 1. If the GUIDE Plus+ system isn’t on your screen, press GUIDE on your remote control. 2. Press MENU on the remote control to select the menu bar. 3. Use the arrow buttons to highlight News (if MSNBC is available on your TV, it will appear in the video window). 4.
Using the TV’s Features To remove or change the frequency (daily, once, or weekly) of a scheduled event, access the Schedule menu from the Menu bar. 1. 2. 3. 4. Press GUIDE to bring up the GUIDE Plus+ system. Press MENU on the remote to select the Menu bar. Use the arrow buttons to highlight the Schedule menu selection. Use the up and down arrow buttons to highlight the program you want to edit. Then use the Schedule Menu Action buttons as described next.
Using the TV’s Features Editor menu action buttons Editor menu selection Editor You can customize the channel listing by enabling or disabling the display of certain channels. For instance, you may disable channels that you never watch. You can restore disabled channels at a later point in time. 1. If the GUIDE Plus+ system isn’t on your screen, press GUIDE on your remote control. 2. Press MENU to select the Menu bar. 3. Use the right and left arrow buttons to highlight the Editor menu selection. 4.
Using the TV’s Features How to Get More Information About an Advertisement or a Program To find out more information about a program, advertisement or special, use the left arrow button to highlight the channel listing or promotional information box and press the INFO button. Requesting more information about a particular show displays the PlusCode programming number and the Shows on Next for that channel. Press the INFO button again to exit the expanded information screen.
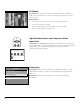
Using the TV’s Features 12:01 Mute Locked CC ESPN 60 SAP PIP SVID2 16:9 Mode On 00:00 SLEEP Sample displays on a Channel Banner. Channel Banner There are several indicators that might appear when you press the TV or INFO buttons on the remote. This display is called the Channel Banner. The following list describes the items on the Channel Banner screen (left to right and top to bottom). 12:01 Displays the current time. Locked Displayed when the Parental Controls are locked.
Using the TV’s Features VCR1 DVD TV VCR2 AUX SAT CABLE With the autotuning feature, you can set up the TV to tune to the channel you need to watch by pressing that component’s button. Why You Should Use the Autotuning Feature The autotuning feature automatically tunes the TV to the correct channel for different components you have connected to your TV (like a VCR, DVD Player, etc.
Using the TV’s Features Notes: • • To use SAT2 autotuning for a second RCA satellite receiver, program the AUX button using the direct entry method and program the 5001 code. Then set up the SAT2 channel in the Autotuning menu. To use RCA WEB autotuning for an RCA WebTV remote, set up the WEB channel in the Autotuning menu. Channel 3 or 4 Component is connected to the CABLE/ANTENNA jack on the back of the TV, and you want the TV to tune to channel 3 when you press the corresponding button on the remote.
Using the TV’s Features 1 2 3 4 5 6 7 8 0 MAIN MENU Audio... Picture Quality... Screen... Channel... Time... Parental Controls GUIDEPARENTAL Plus+ Menu.. CONTROLS Setup... 1 V-Chip TV Rating Limit... Go Back 2 V-Chip Movie Rating Limit... 3 V-Chip Unrated Program Block 4 Channel Block... 5 Front Panel Block... 6 Lock Parental Controls...
Using the TV’s Features Age-Based Rating TV-MA TV-14 TV-PG 1 2 3 4 5 6 7 8 0 Mature Audience Only. Specifically designed to be viewed by adults and may be unsuitable for children under 17. It contains one or more of the following content themes: crude indecent language (L), explicit sexual activity (S), or graphic violence (V). Parents Strongly Cautioned. Contains some material that many parents would find unsuitable for children under 14.
Using the TV’s Features The V-Chip Rating Limit Screen The following is an example of where items are located within the Rating Limit screen. Rating Status Field Lets you select whether the status of the age-based rating limit to the left is View or Block. Content Themes V-CHIP TV RATING LIMIT - - Content - - Rating TV-MA Rating Field Lets you select from a list of age-based ratings you can block or view. Status VIEW D L S V FV V V V ^ Press ^/v to select rating. Press MENU to exit.
Using the TV’s Features Hierarchy of Age-Based Ratings TV-MA Mature Audience Only TV-14 Parents Strongly Cautioned TV-PG Parental Guidance Suggested TV-G General Audience TV-Y7 Directed to Children 7 years and older TV-Y All Children 4. Press the right arrow button to move the yellow highlight to the Status field. 5. Press the up or down arrow button to toggle between View and Block. The status for the rating listed to the left and all higher ratings automatically changes to Block (and B).
Using the TV’s Features Rating field Rating status field Content themes V-CHIP TV RATING LIMIT - - Content - - Rating TV-PG Status View D L S V FV V B V V ^ Press ^/v to view programs with this content for this rating. D L S V FV RATING STATUS B V V TV-MA View V B V V TV-14 View V B V V TV-PG View TV-G View V TV-Y7 View TV-Y View Content status fields To block program content: 1. Determine the lowest level of content you don’t want the child to watch. 2.
Using the TV’s Features V-Chip Movie Rating Limit PARENTAL CONTROLS 1 V-Chip TV Rating Limit... 2 V-Chip Movie Rating Limit... 3 V-Chip UnratedMOVIE ProgramRATING Block V-CHIP LIMIT 4 Channel Block... Rating Status 5 Front Panel Block... Block PG-13 ^ 6 Lock Parental Press ^/vControls... to view programs with 0 Go Back this rating. Press MENU to exit.
Using the TV’s Features PARENTAL CONTROLS 1 V-Chip TV Rating Limit... 2 V-Chip Movie Rating Limit... 3 V-Chip Unrated Program Block 4 Channel Block... V-CHIP UNRATED PROGRAM BLOCK 5 Front Panel Block... 6 Lock Parental Controls... 1 View 0 Go Back 2 Block V-Chip Unrated Program Block Selecting this option lets you decide if programs that the V-Chip recognizes as “unrated” can be viewed.
Using the TV’s Features PIP (Picture-in-Picture) Operation ON OFF VCR1 DVD TV The PIP (picture-in-picture) feature lets you display a second, smaller picture on top of the main picture. Note that PIP is not available for high resolution or component video sources.
Chapter 4 Using the TV’s Menu System Chapter Overview: • How to Use Your TV’s Menu System • Audio Menu • Picture Quality Menu • Screen Menu • Channel Menu • Time Menu Changing Entertainment. Again. Graphics contained within this publication are for representation only.
Using the TV’s Menu System How to Use Your TV’s Menu System You use the buttons on the remote or the front of your TV to access the menu system and make changes to the settings. The following pages explain how to use the different types of menus to adjust the features of your TV. MAIN MENU 1 2 3 4 5 6 7 8 0 Audio... Picture Quality... Screen... Channel... Time... Parental Controls... GUIDE Plus+ Menu... Setup... Go Back Menus The first menu is called the Main menu.
Using the TV’s Menu System SRS Stero (•) SRS technology is an audio pr ocessing technology that adds gr eater depth and ster eo separation to ster eo audio signals. SRS Stereo (•) — Focus This technology enhances audio signals by adding tr eble and making dialog mor e understandable. Second Audio Program (SAP) Plays the pr ogram’ s audio in a second language, if one is available. The TV displays the word SAP in the channel marker when you tune to a pr ogram that is br oadcast with SAP infor mation.
Using the TV’s Menu System MAIN MENU 1 2 3 4 5 6 7 8 0 Audio... Picture Quality... Screen... Channel... SCREEN Time... Parental1 Control... Closed-Caption Display GUIDE Plus+ Menu... 2 Closed-Caption Mode... Setup...3 PIP Closed-Caption Display... Go Back 4 PIP Closed-Caption Mode... 5 Menu Language... 6 Menu Background Color... 7 Picture Tilt... 8 16:9 Mode...
Using the TV’s Menu System Tip You can turn 16:9 mode on/off from the menu or the FETCH button on the remote. If you are using a DTC100 remote, you can use the FETCH button with the remote in the TV mode. 16 : 9 Mode Also known as anamorphic mode. Lets you select a widescreen format for a wider viewing area using a 16:9 aspect-ratio source, such as a DVD player, for display on this 4:3 aspect-ratio TV.
Using the TV’s Menu System MAIN MENU 1 2 3 4 5 6 7 8 0 Audio... Picture Quality... Screen... Channel... Time... CHANNEL Parental Controls... GUIDE Plus+ Menu... 1 Signal Type... Setup... 2 Auto Channel Search... Go Back 3 List and Labels... 4 Autotuning... 0 Go Back Channel Menu Signal Type Displays a choice list that lets you select the current antenna type. This option does not appear when the GUIDE Plus+ system is set up.
Chapter 5 Other Information Chapter Overview: • Troubleshooting • Specifications • Care and Cleaning • Limited Warranty • Accessory Order Form • Index Changing Entertainment. Again. Graphics contained within this publication are for representation only.
Other Information Troubleshooting Most problems you encounter with your TV can be corrected by consulting the following troubleshooting list. TV Problems TV won’t turn on • Press the TV button. • Make sure the TV is plugged in. • Check the wall receptacle (or extension cord) to make sure it is “live” by plugging in something else. • Something might be wrong with your remote control. Press the POWER button on the front of the TV. If the TV turns on, check the remote control solutions on page 62.
Other Information No sound, picture okay • Maybe the sound is muted. Try pressing the volume up button to restore sound. • Maybe the speakers are turned off. Check the Audio Output and Speakers control panel in the Audio menu. • If using an S-VHS component, remember to also connect the component’s L and R AUDIO OUT jacks to the TV’s L and R INPUT jacks. • Check the INT/EXT switch on the back of the TV.
Other Information Program information doesn’t download • Review your setup information and make sure it’s correct. Press MENU on the remote and select GUIDE Plus+ Setup. Go to page 19 for detailed instructions about the GUIDE Plus+ Setup menus. • The TV must be off to download information. Leave your TV off overnight, for at least 10 hours, to receive the initial download for your area. • If you’re using a cable box, leave it on so you can receive program information.
Other Information RCA HDTV Monitor Specifications* PICTURE Optimum Contrast Screen ...................................... Yes Picture Power (Watts) ............................................. 65 Dot Pitch .................................................................. .78mm Dynamic Focus ......................................................... Yes Scan Velocity Modulation ...................................... Yes Aperture Sharpness ................................................ Yes Comb Filter ...
Other Information Care and Cleaning CAUTION: Turn OFF your TV before cleaning. You can clean the TV as required, using a soft lint-free cloth. Be sure to occasionally dust the ventilation slots in the cabinet to help assure adequate ventilation. The TV’s screen may be cleaned with a soft, lint-free cloth as well. Take care not to scratch or mar the screen. If necessary, you may use a cloth dampened with warm water. Never use strong cleaning agents, such as ammonia-based cleaners, or abrasive powder.
Other Information Limited Warranty What your warranty covers: • Defects in materials or workmanship. For how long after your purchase: • One year from date of purchase for labor. • One year from date of purchase for parts. • Two years from date of purchase for the picture tube. The warranty period for rental units begins with the first rental or 45 days from date of shipment to the rental firm, whichever comes first.
Other Information Product registration: • Please complete and mail the Product Registration Card packed with your unit. It will make it easier to contact you should it ever be necessary. The return of the card is not required for warranty coverage. Limitation of Warranty: • THE WARRANTY STATED ABOVE IS THE ONLY WARRANTY APPLICABLE TO THIS PRODUCT. ALL OTHER WARRANTIES, EXPRESS OR IMPLIED (INCLUDING ALL IMPLIED WARRANTIES OF MERCHANTABILITY OR FITNESS FOR A PARTICULAR PURPOSE) ARE HEREBY DISCLAIMED.
Other Information ON OF F TV VC R2 AU X SA T•C AB LE + SK IP VO L CH VO L FE TC H CH GU IDE - GO BA CK INF O OK ME NU 1 2 CL EA R 4 3 5 7 6 8 INP UT 9 0 RE VE RS E AN TE NN A PL AY RE C•V CR + Accessory Order Form Remote Control This is the remote control that came packed with your TV. Replacements or spares can be ordered as needed. VC R1 DV D MU TE FO RW AR D ST OP PIP PA US E SW AP CH Qty Price $3.95 Description Screw-on antenna cable (3-ft) Part No.
Other Information Placing an Order Charge your order on your VISA, MasterCard, or Discover Card by filling in below To place your order by phone, have your Visa, MasterCard or Discover Card ready and call the toll-free number listed below. USE YOUR CREDIT CARD ® IMPORTANT: Copy complete account number from your VISA card Use this number only to place on order for accessory items listed on this order form.
This page left intentionally blank.
This page left intentionally blank.
This page left intentionally blank.
This page left intentionally blank.
This page left intentionally blank.
Index Symbols 16:9 Mode 2, 57 A Accessory Order Form 67 Adjust Projection TV 56 Age-Based Ratings 47 Anamorphic Mode (16:9) 57 ANTENNA Button 26 Audio Menu 54 Output 14 Processor 54 Audio Menu Sound Logic Stereo 55 Speakers 55 Tone Controls 54 Second Audio Program 55 Audio/video cables 7, 13 Audio/video jacks 13 Auto Channel Search 18, 58 Color 55 Converge 56 Tuning 58 Automatic Code Search 28 Automatic Convergence 56 Autotuning 2, 43 DVD Channel 43 Front Input 44 High Resolution Input 44 SAT/CABLE Channel
Index K O Key Features Overview 1 OK Button 27 ON•OFF Button 26 On-screen Program Guide 1 Order form 67 L Labels 58 Language 56 Languages, selecting 18 Limited Warranty 65 Locating remote sensor 15 Lock, Parental Controls 51 M Memory 58 Menu Audio 54 Channel 58 Editor 40 Grid Guide 35 Messages 39 News 38 Picture Quality 55 Schedule 38 Setup 40 Sort 37 Time 58 Menu Background Color 56 MENU Button 26 Menu Language 56 Menus 54 GUIDE Plus+ System setup 19 Messages menu 39 Modes, remote control 30 Mono 54 M
Index V V-Chip 45 Age-Based Ratings 45 Blocking Movies 50 Content Themes 45 V-Chip: Parental Controls 1 Variable Output 12, 14 VCR 1 Channel 43 2 Channel 43 VCR1 Button 27 VCR2 Button 27 W Warranty 65 Y Y Pb Pr jacks 13 76 Chapter 5
This page left intentionally blank.
Visit the RCA website at www.rca.com Please do not send any products to the Indianapolis address listed in this manual or on the carton. This will only add delays in service for your product. Thomson multimedia Inc. 10330 North Meridian Street Indianapolis, IN 46290 ©2001 Thomson multimedia Inc.