
Switch User Manual


Thank you for buying the 3-In 1-Out HDMI
Switcher. The switcher allows you to easily share a
single HDMI display or a HDMI-compatible TV
with three HDMI devices.
Features
• Supports 480i, 480p, 720p, 1080i and 1080p
screen resolutions.
• Supports HDCP compliant devices.
• Easy to install and simple to operate.
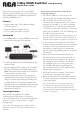
Installation
1. Use HDMI cables to connect HDMI sources to the
inputs on the rear panel of the switcher.
2. Connect the cable from your HDMI display to the
switcher output.
3. Plug the supplied 5V DC adaptor into the switcher
DC input. The LED power indicator lights green.
Note: The power unit is intended to be oriented in
a vertical or oor mount position.
4. Select the desired input sources by pressing the
appropriate button on front of the switcher or by
using your remote control after programming the
Learning function of the switcher outlined in the
following section. The related LED indicator on the
front panel indicates which input is selected. The
default input is INPUT1.
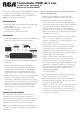
Learning Function
This switcher is equipped with a unique
Learning circuit, which allows it to learn the
on/off commands from your infrared component
remote(s) so that you can use them to toggle
through inputs.
Note: After the Learning function is completed, when a
component is turned on, the switcher automatically selects
that input.
3-Way HDMI Switcher with IR Learning
DH3HSL User’s Guide
Follow these instructions to activate the
Learning function:
1. Press the LEARN key on the front of the
switcher panel. The LEARN LED light turns on.
2. Press the INPUT key on the front of the
switcher for the component remote you wish to
program. For example, if you want to program
your DVD remote to operate the switcher and
your DVD is connected to INPUT 2 on the back
panel, press the INPUT 2 key. The LED light for
the input you pressed turns on.
Note: When programming the Learning function, be sure
to double-check your notes on the reference chart below to
determine which component is connected to each input jack.
3. As you connect your components to the input
jacks, note which component you have connected
to each jack in the space provided below. This
information is important to have handy and is
necessary when programming remotes to operate
the switcher.
4. Point your remote at the switcher then press
and hold the key on your remote that turns on
the component whose content you want to play
on your display device (HDTV). The INPUT
key LED light turns on. A few seconds later,
the LEARN LED indicator light blinks for
ve seconds and turns off. The INPUT LED
indicator light turns back on.
5. The Learn function is complete. Your remote
now switches to the appropriate source.
6. Repeat this procedure for each additional remote
you wish to program for components connected
to the other inputs.
Note: Universal remotes can also be programmed in
the same manner to operate the switcher. You must be
sure you have the remote in the operational mode that
corresponds with the component plugged into that input on
the back of the switcher.