User manual Manuel d’utilisation Manual del Usuario DRC69707E EN FR ES It is important to read this instruction book prior to using your new product for the first time. Il est important de lire ce manuel d’instructions avant d’utiliser l’appareil pour la première fois. Es importante que lea este libro de instrucciones antes de comenzar a usar su nuevo producto. DRC69707E RCA 3L MTK.
Safety Instructions On Placement EN ** SEE BOTTOM OF UNIT FOR GRAPHIC SYMBOLS ** The lightning flash with arrowhead symbol, within an equilateral triangle, is intended to alert the user to the presence of uninsulated “dangerous voltage” within the product’s enclosure that may be of sufficient magnitude to constitute a risk of electric shock to persons.
Ventilation Warning • Do not block the ventilation openings or holes. If the ventilation openings or holes are blocked by a newspaper or cloth, etc., the heat may not be able to get out. • Do not operate the unit in a confined space, such as a bookcase or built-in cabinet. Allow about 4 inches (10cm) of free space all around the unit for adequate ventilation.
EN FCC Statements NOTE: This equipment has been tested and found to comply with the limits for a Class B digital device, pursuant to Part 15 of the FCC Rules. These limits are designed to provide reasonable protection against harmful interference in a residential installation. This equipment generates, uses and can radiate radio frequency energy and, if not installed and used in accordance with the instructions, may cause harmful interference to radio communications.
Note: • Numbers identify each title, chapter, and track on a disc. Most discs have these numbers recorded on them, but some do not. Notes on Unauthorized Discs You may not be able to play back some DVDs on this unit if they were purchased from outside your geographic area or made for business purposes. EN Accessories Please check and identify the supplied accessories. Remote control (with battery)..........x 1 Car power adapter with splitter.......x 1 Straps.............................................
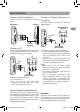
Control Reference Guide 1) VIDEO MODE Button Adjusts Brightness, Screen Size or Contrast of the screen. 2) PREV Button Moves back through titles, chapters or tracks on a disc. 3) / SEARCH Buttons SEARCH: Fast reverse playback. SEARCH: Fast forward playback. 4) GOTO Button Skips directly to a location on a CD/ DVD. 5) Cursor ( , , , ) Buttons Moves between selections on a menu screen and adjusts certain settings. ENTER Button Confirms selections on a menu screen.
Control Reference Guide DVD Player 1) OPEN Button Press the OPEN button and hold the front panel to open the disc door. 2) STANDBY(power off) / ON Switch 3) Headphone Jack 4) VOLUME Control Adjusts the volume. 5) AUDIO / VIDEO OUT Jacks 6) DC IN 9V-12V Jack 7) Remote Sensor Receives the remote control signal. 8) STOP Button Stops playing a disc. MENU Button Accesses DVD Disc Menu if a DVD disc is currently playing. Accesses Setup menu if disc is not playing.
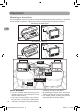
Power Supply Using the car power adapter with splitter The included 12V car power adapter allows the unit to be used with vehicles that have a 12V, negative ground electrical system. DVD player Monitor EN TO AV OUT TO 9-12V DC IN TO 9-12V DC IN TO 12V power outlet Built-in AV cable Car Power adapter Fuse replacement instructions WARNING: Disconnect the car power adapter when not in use. Not for use in 24V vehicles. CAUTION: • Use the provided 12V car power adapter only.
Connections Connect with the Monitor Connect the built-in AV cable to the DVD Player. DVD player Monitor Connect a Stereo Receiver or Amplifier The DVD player can play two channels Dolby Digital. Stereo Receiver / Amplifier EN AUDIO IN TO AUDIO OUT TO AV OUT Built-in AV cable Connect a TV If your TV has Audio/Video inputs, you can connect the DVD player to your TV using a standard AV cable (not included). TV VIDEO IN TO AV OUT AUDIO IN AV cable (not included) Watching a DVD on your TV 1.
Placement Mounting in the vehicle Use the supplied mounting straps to install the DVD Player and the monitor on the back of the vehicle's headrests. Tightly wrap the mounting straps around the headrest.
Unit Operation Turning the unit on 1. Slide the STANDBY / ON switch on the DVD player to the ON position. Slide the ON / OFF switch on the monitor to the ON position. 2. The start-up picture will appear on the screens. 3. After use, slide the STANDBY / ON switch on the DVD player to STANDBY (power off). Slide the ON / OFF switch on the monitor to the OFF position. EN Playing a Disc - Basic Functions This owner’s manual explains the basic instructions for operating this unit.
Notes: • The DVD player mutes sound and subtitles during reverse and forward scan of DVDs. • The fast playback speed may differ depending on the disc. Skip (Forward / Reverse) EN • Press the NEXT button to advance titles, chapters/tracks. • Press the PREV button to go back to current or previous titles, chapters/ tracks. • For an Audio CD, use the number buttons on the remote control to go directly to the desired track number.
Display function (DVD) While the disc is playing, press the DISPLAY button repeatedly to display information on operation status: Adjust the LCD screen For the DVD player, you can adjust brightness, screen size and contrast of the screen. 1. Press the VIDEO MODE button. 2. Press the or button to select brightness, screen size or contrast. 3. Then press the or to change the setting. 4. Press the VIDEO MODE button again to exit the menu.
Locating a Desired Section Locating a Specific Chapter/Title If you know the chapter/title number for the chapter/title that you want to play, you can locate it by directly selecting that number. 1. Press the GOTO button. Locating a Specific Time You can move to a specific location by entering its corresponding time (hours, minutes, seconds). 1. Press the GOTO button two times. / EN 2.
Note: • You can press the PAUSE button to freeze the picture. Press the PLAY button on the remote control or button to resume picture slide show. • You can press the STOP button to quit playback. • You can press the PREV or NEXT button to change the picture. • You can press the ANGLE button on the remote control to rotate direction of the picture by 90°. • Some discs may not permit this operation.
Customizing the DVD Function Settings Language Setup EN 1. Press the SETUP button on the remote control or MENU button on the unit in stop mode (when disc is not playing). 2. Press the button to select Language Menu. 3. Use the or button to select the option (Player Menu, Audio, Subtitle or Disc Menu), then press the button. 4. Use the or button to select your preferred language, then press the ENTER button to confirm. 5. Press the button to go back to the previous menu.
TV Display Pan Scan • When wide-screen video is played, this mode clips the right and left sides of the image so that it can be viewed on a conventional screen. • Some wide-screen DVDs that do not permit Pan Scan mode playback are automatically played in letterbox mode (black bands that appear at the top and bottom of the screen). Letter Box • When wide-screen video is played in this mode on a conventional screen, black bands appear at the top and bottom of the screen.
• Clean the disc. The disc does not play • There is no disc inside the unit (“No Disc” appears on the screen). • Insert the disc correctly with the graphics facing up. • Clean the disc. EN • A non-NTSC disc has been inserted, or the disc region number does not match the region number of the unit. • Condensation may have formed inside the unit due to a sudden change in temperature. Wait about an hour for it to clear and try again.
AVC MULTIMEDIA (“AVC”) makes the following limited warranty. This limited warranty extend to the original consumer purchaser and is limited to non-commercial use of the product. One Year Parts & Labor Warranty AVC products purchased in the United States are warranted to be free from defects in materials or workmanship for a period of one year from the date of their original retail purchase.