DVD Recorder/VCR Combo User’s Guide DRC8300N Changing Entertainment. Again.
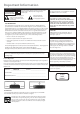
Important Information CAUTION RISK OF ELECTRIC SHOCK DO NOT OPEN This symbol indicates that this product incorporates double insulation between hazardous mains voltage and user accessible parts. This symbol indicates “dangerous voltage” inside the product that presents a risk of electric shock or personal injury. This symbol indicates important instructions accompanying the product.
Table of Contents Chapter 1: Connections and Setup Types of Discs . . . . . . . . . . . . . . . . . . . . . . . . . . . . . . . . . . . . . . . . . . . . . . . . . . . . . . . . . . .2 Things to consider before you connect . . . . . . . . . . . . . . . . . . . . . . . . . . . . . . . . . . . . . .2 Unpack the Box . . . . . . . . . . . . . . . . . . . . . . . . . . . . . . . . . . . . . . . . . . . . . . . . . . . . . . . . .2 Choose your connection . . . . . . . . . . . . . . . . . . . . . . . . . . . . . .
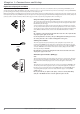
Chapter 1: Connections and Setup Types of Discs DVD+Rewritable DVD+R RECORDING: TYPES OF DISCS YOU CAN USE FOR RECORDING DVD+R 2.4x, 4x, or 8x ONLY; DVD+RW 2.4x and 4x ONLY. NOTES: It is NOT possible to record on CD-R or CD-RW discs. IMPORTANT: It is NOT possible to record content that is copy-protected. This is usually true for most pre-recorded DVD discs and most pre-recorded VHS tapes. PLAYBACK: TYPES OF DISCS YOU CAN PLAY Some discs may not be compatible due to laser pickup and disc design.
Chapter 1: Connections and Setup Choose Your Connection There are several ways to connect your DVD/VCR. Please use the following chart to determine which connection is best for you. Turn to the appropriate page for specific instructions. Components USE PLAY/PA FWD REV STOP RECORD OSE OPEN/CL P+ CH+/SKI CH-/SKIP INPUT DVD/VCR Connection Go to • Coaxial • Audio/video • S-Video TV p. 8 • Coaxial • Audio/video • S-Video TV + cable box p.
Chapter 1: Connections and Setup Explanation of Input Jacks and Cables This section describes the jacks and cables you can use to make connections (only an S-Video and a set of audio/video cables are packed with your DVD/VCR—you can purchase other cables by calling 1-800-338-0376, order online at www.rca.com, or go to your local electronics store). There are several ways to connect your DVD/VCR to your TV depending upon the cables you have and the jacks that are on the back of your TV.
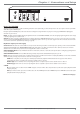
Chapter 1: Connections and Setup DVD/VCR CABLE/ANTENNA INPUT VIDEO S-VIDEO OUTPUT VIDEO INPUT CABLE/ANTENNA IN L AUDIO OUTPUT CH3 R AUDIO R CH4 Y Pb L OUT DVD Playback Only COMPONENT DIGITAL VIDEO OUTPUT AUDIO OUT Pr PROG. SCAN OPTICAL OFF ON AC-IN Back of the DVD/VCR The back of your recorder might look a little overwhelming at first. This section explains what goes where and why. There are two sets of jacks on the back of your DVD/ VCR—INPUT jacks and OUTPUT jacks.
Chapter 1: Connections and Setup DVD/VCR CABLE/ANTENNA INPUT VIDEO S-VIDEO OUTPUT VIDEO INPUT CABLE/ANTENNA IN L AUDIO OUTPUT CH3 R AUDIO R CH4 Y Pb L OUT DVD Playback Only COMPONENT DIGITAL VIDEO OUTPUT AUDIO OUT Pr PROG. SCAN OPTICAL OFF ON AC-IN OUTPUT: These jacks send the content (audio and video) from your DVD/VCR OUT to the TV so you can see it on the TV screen and hear it through the TV’s speakers.
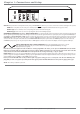
Chapter 1: Connections and Setup DVD / VCR / VIDEO CD / CD / MP3 PLAYER DIGITAL VIDEO DISC RECORDER DRC 8300 COPY STANDBY/ON RECORD STOP/EJECT REV FWD INPUT PLAY/PAUSE CH-/SKIP- CH+/SKIP+ OPEN/CLOSE RECORD STOP REV FWD PLAY/PAUSE S-VIDEO VIDEO L AUDIO R Front of the DVD/VCR COPY – Shortcut to transfer tapes (VCR) to disc (DVD), which is great for converting your camcorder recordings that are on videocassette tape to a DVD disc.
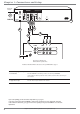
Chapter 1: Connections and Setup In from cable or antenna DVD/VCR CABLE/ANTENNA INPUT S-VIDEO OUTPUT VIDEO VIDEO INPUT 1 CABLE/ANTENNA IN L Y Pb L AUDIO DVD Playback Only DIGITAL AUDIO OUT COMPONENT VIDEO OUTPUT AUDIO Pr OUT DVD/VCR PROG. SCAN OUTPUT R CH3 R OPTICAL AC-IN ON OFF CH4 3a 2 3b 3 3c VIDEO S-VIDEO L R INPUT1 S-VIDEO CABLE/ANTENNA INPUT2 TV The back of your TV might look different than the one pictured here.
Chapter 1: Connections and Setup Connection: DVD/VCR + TV 1. Connect the signal (cable or antenna): Note: Depending upon how you currently have your TV connected, you’ll have to disconnect the cable from your TV’s Antenna Input jack (sometimes labeled CABLE/ANTENNA) or your VCR’s Input jack before you connect the cable as explained below. Cable service: If you have cable service via a cable that comes out of the wall, connect the end of that cable to the CABLE/ANTENNA INPUT jack on the DVD/VCR.
Chapter 1: Connections and Setup The back of your TV and/or Cable Box might look different than the ones pictured here. DVD/VCR CABLE/ANTENNA INPUT S-VIDEO OUTPUT VIDEO VIDEO INPUT CABLE/ANTENNA IN L AUDIO OUT 1b DVD/VCR Y Pb L AUDIO DVD Playback Only DIGITAL AUDIO OUT COMPONENT VIDEO OUTPUT Pr PROG.
Chapter 1: Connections and Setup Connection: DVD/VCR + TV + Basic Cable Box 1. Connect the cable box signal. Note: Before you connect the DVD/VCR, you’ll need to disconnect some of the cables first in order to reconnect them. 1b. Connect the RF Coaxial cable that is connected to the cable box’s Output jack (sometimes labeled CABLE OUT) to the CABLE/ANTENNA INPUT jack on the back of the DVD/VCR. RF Coaxial cable 2.
Chapter 1: Connections and Setup The back of your satellite receiver might look different than the one pictured here. SATELLITE DISH ANTENNA AUDIO OUT R LOW SPEED DATA SATELLITE IN OUT TO TV IN FROM ANT VIDEO S-VIDE O PHONE JACK L 1 2c 2a 2b DVD/VCR CABLE/ANTENNA INPUT S-VIDEO DVD Playback Only DIGITAL AUDIO OUT COMPONENT VIDEO OUTPUT OUTPUT VIDEO VIDEO Y INPUT DVD/VCR CABLE/ANTENNA IN L Pb L AUDIO AUDIO Pr OUT PROG.
Chapter 1: Connections and Setup Connection: DVD/VCR + TV + Satellite Receiver The following instructions enable you to record the programs from your satellite receiver. Because the jack configuration and labels vary on different satellite receivers and televisions, the steps provided are general guidelines. Consult your Satellite Receiver and/or Television User’s Guides for additional information.
Chapter 1: Connections and Setup DVD/VCR CABLE/ANTENNA INPUT VIDEO S-VIDEO OUTPUT VIDEO INPUT CABLE/ANTENNA IN L AUDIO OUTPUT CH3 R Y Pb L AUDIO OUT DVD Playback Only COMPONENT DIGITAL VIDEO OUTPUT AUDIO OUT Pr R PROG. SCAN OPTICAL CH4 OFF ON DVD/VCR OUTPUT AUDIO L (left) and R (right) DIGITAL AUDIO OPTICAL AC-IN Consult the manual that came with your receiver to connect it properly.
Chapter 1: Connections and Setup Install Batteries in the Remote 1. Remove the battery compartment cover on the back of the remote. 2. Insert new batteries. Match the polarities (+ and –) on the batteries with the diagram on the remote. 3. Put the battery compartment cover back on the remote. Important Battery Information • If you’re not going to use the remote for a month or more, be sure to remove the batteries because they can leak and cause damage.
Chapter 1: Connections and Setup Antenna-Cable Antenna-Cable 2) Select the Signal that’s connected to the CABLE/ANTENNA INPUT jack Completing this information lets the DVD/VCR know what program signals are being sent to it. Choose the type of signal that is connected to the CABLE/ANTENNA INPUT jack.
Chapter 1: Connections and Setup 7) Time and Date Year Date Time Your DVD/VCR has an automatic clock, but it may take awhile for the DVD/VCR to find the correct channel for the clock. Therefore, you might want to set up the clock manually here. 2004 04/29 Tue 29-April 01:47 PM Use the number buttons on the remote to enter Year, Date, and Time. To change the AM/PM setting when you’re entering the Time, press the right arrow button.
Chapter 1: Connections and Setup How to find your TV’s Video Input Channel In order to see what’s playing on your DVD/VCR, you need to tune the TV to the Video Input Channel that corresponds to the Input Jacks on your TV that you used to connect the DVD/VCR to the TV. The Video Input Channel(s) varies for different brands and different models of TVs.
Chapter 2 The Remote Control • Explanation of the buttons • Find out if the remote can operate your TV • Programming the remote to operate your TV • Programming the remote to operate other components Graphics contained within this User’s Guide are for representation only. Some of the menu screens, buttons, and display messages might be different in your product than they appear in this book. The on-screen help text provides the most current operational information.
Chapter 2: The Remote Control Explanation of Buttons ON-OFF You can use this remote to operate the DVD/VCR, and to access the features available. The remote is also designed to operate most RCA, GE, and Proscan components (TVs, VCRs, DVD players, audio components and satellite receivers). If you have another brand, you can program the remote control to operate those components (go to page 19 for instructions).
Chapter 2: The Remote Control Find out if the remote can operate your TV ON-OFF ON•OFF button This remote control is designed to operate most RCA, GE, and Proscan TVs. TV TV button 1. Press the TV button (if the TV turns on, this remote will operate your TV; if it doesn’t turn on, go to step 2 below). DVD/VCR CABLE AUX SAT AUDIO 2. Press the ON•OFF button (if the TV turns on or off, this remote will operate the TV). 3.
Chapter 2: The Remote Control Programming the remote to operate other components This remote is already programmed to operate most RCA, GE, and Proscan components—just press the applicable component button to operate the component (for a satellite receiver, press the SAT button; for an audio component, press AUDIO, etc.).
Chapter 2: The Remote Control Code List for TV button Admiral 1002 1097 1118 Aiko 1015 Akai 1003 Amtron 1026 Anam National 1004 1026 1110 1111 1112 AOC 1005 1006 1007 1099 1100 1113 Apex 1140 1148 1150 Audiovox 1026 Bell & Howell 1002 1029 1045 Broksonic 1143 1151 Celebrity 1003 Centurion 1009 Citizen 1005 1007 1008 1015 1026 1045 1063 1095 1119 Colortyme 1005 1007 1010 Contec/Cony 1011 1012 1013 1026 Craig 1026 Crown 1026 1038 Curtis Mathes 1001 1005 1007 1014 1029 1045 1063 1095 1119 1130 1157 Daewoo 100
Chapter 2: The Remote Control Code List for TV button TV (continued) Soundesign 1005 1007 1008 1026 1027 Starlite 1026 Supre-Macy 1098 Sylvania 1005 1007 1008 1018 1038 1040 1041 1046 1047 1048 1055 1073 1092 1154 Symphonic 1024 1026 1107 Tandy 1097 Tatung 1004 Technics 1032 Techwood 1005 1007 1032 Teknika 1002 1005 1006 1007 1008 1011 1012 1013 1015 1026 1027 1047 1063 1094 1095 1121 1128 Telecaption 1074 24 Toshiba 1029 1043 1044 1045 1063 1067 1074 1075 1091 1092 1145 1147 Totevision 1095 Universal 103
Chapter 2: The Remote Control Code List VCR (continued) AUX button Sears 2008 2011 2018 2020 2030 2031 2034 2035 2054 Sharp 2014 2025 2048 2049 2069 Shintom 2004 2035 2037 2050 Signature 2069 Singer 2018 2037 2072 Sony 2004 2050 2051 2063 2086 STS 2018 2054 Sylvania 2018 2019 2023 2038 2039 2040 2066 Symphonic 2023 Tandy 2008 Tashiko 2011 Tatung 2058 Teac 2023 2058 Technics 2018 2056 Teknika 2011 2018 2023 2052 Toshiba 2012 2030 2031 2034 2040 2060 Totevision 2010 2011 Unitech 2010 Vector Research 2006 200
Chapter 2: The Remote Control CD Player AUDIO button ADC 4066 4067 4077 Aiwa 4051 4068 Akai 4069 Denon 4071 Emerson 4052 Fisher 4053 4074 4075 GE 4076 Hitachi 4054 JVC 4055 Kenwood 4056 4078 4079 Luxman 4080 26 Marantz 4058 MCS 4081 Mitsubishi 4082 4083 Nakamichi 4085 4086 NEC 4057 Onkyo 4059 4087 4088 Optimus 4089 4090 4091 Panasonic 4060 Pioneer 4061 4092 Proscan 4007 RCA 4073 4100 Sanyo 4099 Sears 4070 Sherwood 4093 Sony 4062 4072 4094 Teac 4095 4096 4097 Technics 4063 Toshiba 4084 Yamaha 4064 4065 4
Chapter 3 Recording, Playback & Features • Watching TV • DVD Recording (DVD+R and DVD + RW) • Disc Library • DVD Playback • VCR Recording • VCR Playback Graphics contained within this User’s Guide are for representation only. Some of the menu screens, buttons, and display messages might be different in your product than they appear in this book. The on-screen help text provides the most current operational information.
Chapter 3: Recording, Playback & Features Watching TV Turn on the DVD/VCR to Watch TV 1. Turn on the TV, and tune the TV to the correct Video Input Channel (this channel corresponds to the input jacks on your TV that you used to connect the DVD/VCR to the TV). 2. Turn on the DVD/VCR (the DVD/VCR’s main menu appears). 3. Since the Watch TV menu is already highlighted, just press the OK button on the remote (the DVD/VCR tunes to the last station you watched and a channel banner appears).
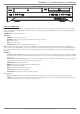
Chapter 3: Recording, Playback & Features DVD / VCR / VIDEO CD / CD / MP3 PLAYER DIGITAL VIDEO DISC RECORDER DRC 8300 COPY RECORD STANDBY/ON STOP/EJECT REV FWD INPUT PLAY/PAUSE CH-/SKIP- CH+/SKIP+ OPEN/CLOSE RECORD STOP REV FWD PLAY/PAUSE S-VIDEO VIDEO L AUDIO R VCR PLAY/PAUSE button DVD RECORD button Watching a videocassette tape while you record to disc 1. Start recording on the disc (tune the DVD/VCR to the channel you want to record) and press RECORD). 2.
Chapter 3: Recording, Playback & Features Timer Recordings Watch TV Disc Tape Disc Library Timers Setup Setting up timer recordings to record programs automatically 1. From the DVD/VCR’s main menu, use the remote’s arrow buttons to highlight Timers, and press the OK button. Tip: You can also access the Timers menu by pressing the TIMER•GUIDE button on the remote control. 2. Since Add Timer is highlighted, just press OK (the Timer Setup screen appears). 3.
Chapter 3: Recording, Playback & Features Watch TV Disc Tape Disc Library Timers Setup Live - Ch 6 Disc Library 4 Library Disc(s) You can find a show you recorded to disc more quickly by using the DVD/VCR’s Disc Library. Everytime you use your DVD/VCR to record a program, the DVD/VCR assigns the disc a number, and keeps track of what you’ve recorded and when you recorded it.
Chapter 3: Recording, Playback & Features Watch TV Disc Tape Disc Library Timers Setup DVD Playback Live - Ch 2 To play recordings, do the following: Maggie’s Disc 1. Turn on the TV and the DVD/VCR. 1 Library Disc(s) 2. Make sure the TV is tuned to the correct Video Input Channel (for help, go to p. 18). 3. Insert the DVD+R or DVD+RW disc you want to play. 10:49 am Thu 17-Mar 2003 4. Once the DVD/VCR reads the disc’s contents, the main menu appears.
Chapter 3: Recording, Playback & Features 1- Disc name The top menu bar is the name of the disc. With the disc name highlighted, press OK and the options described below appear: Maggie’s Disc Note: You cannot select the disc name for a finalized DVD+R disc.
Chapter 3: Recording, Playback & Features Editing Titles with the Hide Chapter Feature Rename Title As with most editing features on recorded discs, Hide Chapter is only available with DVD+RWdiscs. Some people use it to hide commercials or introductions to programs. You have to Insert a Chapter Marker at the beginning and the end of the part of the recording you want to “hide.
Chapter 3: Recording, Playback & Features Advanced VCR Features ON-OFF TV The VCR portion of your DVD/VCR combo works like most VCRs, but has some additional features for playback and copying tapes to disc. Most importantly, you need to understand the difference between digital and analog as it applies to the VCR portion of your DVD/VCR combo.
Chapter 3: Recording, Playback & Features VCR Recording After you put a videocassette tape in the VCR deck, there are several ways to record programming. The quickest way to start recording is to press the RECORD button (on the front of the DVD/VCR next to the STANDBY/ON button) while you’re watching a show. You don’t even need to remember to press the stop button if you use the Express Recording feature in the recording banner.
Chapter 4 Playing Discs • Regional Coding • Types of Discs You Can Play • How to Load and Play Discs • Using the Different Menus • Search Options • Playback Options • Using the On-Screen Info Display Graphics contained within this User’s Guide are for representation only. Some of the menu screens, buttons, and display messages might be different in your product than they appear in this book. The on-screen help text provides the most current operational information.
Chapter 4: Playing Discs Regional Coding Both the DVD/VCR and the discs are coded by region. These regional codes must match in order for a pre-recorded DVD to play. This player’s code is region 1. However, discs you use for recording (DVD+R and DVD+RW) aren’t assigned region numbers. Types of discs you can play DVD+Rewritable DVD+R C C Note: Some discs may not be compatible due to laser pickup and design. Caatt ''tt C cchh an • DVD+R and DVD+RW discs – used to record programming.
Chapter 4: Playing Discs Using Different Menus Each disc is programmed with different features. There are three separate types of menus that you can use to access features: • The Disc menu – The Disc menu is part of each disc and is separate from the DVD/VCR’s menu. The contents of each Disc menu vary according to how the disc was authored and what features are included. To make the Disc menu appear, press the MENU button while the disc is playing.
Chapter 4: Playing Discs Using the On-Screen Info Display The on-screen Info Display contains many playback features. To see the Info Display, press the INFO button on the remote while a disc is playing (the Info Display appears across the top of the screen). Each feature is illustrated with an icon. Use the left and right arrow buttons to move through the different icons in the Info Display. When an icon is highlighted, use the up and down arrow buttons on the remote to scroll through the choices.
Chapter 4: Playing Discs Time Display (DVD, Video CD, and Audio CD) Hour Seconds Minutes This feature displays the time that has elapsed during playback. For DVD discs, the time displayed refers to the current title and acts as a Time Search feature. For example, if you like a particular scene in a movie, you can enter the elapsed time the scene plays and skip right to it. 1. Highlight the Time Display and use the number buttons on the remote to enter the elapsed time you want to go to in that title.
Chapter 4: Playing Discs Repeat Icon (DVD, Video CD, and Audio CD) By default, the Repeat feature is Off. There are three Repeat options: • Title – repeats the title that is playing • Disc – repeats the disc that is playing • A-B – repeats a segment of the disc that you select. For DVD discs and VCDs, play modes are also available from the Repeat Icon: DVD and VCDs: Play mode standard plays the discs chapters in the order they were placed on the disc.
Chapter 4: Playing Discs Camera Angle Icon (DVD) Some discs contain multiple angles of a particular scene or sequence. If the disc only has one angle, this feature won’t work. Currently, very few discs have this feature. 1. While a disc is playing, press ANGLE on the remote. If the disc wasn’t created with multiple angles, the invalid symbol appears. If the disc contains multiple angles, the Angle icon appears with the current angle number and the number of angles available.
Chapter 4: Playing Discs IntroScan Icon (Audio CD) Use the IntroScan feature to preview each track on the CD. 1. While the CD is playing, press INFO (the Info Display appears). 2. Use the arrow buttons to highlight the IntroScan icon. 3. Press OK (the first 20 seconds of each track starts playing). Playback Control (PBC) Icon (Video CD) Use the arrow buttons to highlight the Playback Control icon. Press the up or down arrow button to go back and forth between On and Off.
Chapter 4: Playing Discs .. PLAY 01.THE REASON -3.jA- - LET_S_ 02.IMMORTALIT 04. WHY ON WHY 4. Select a file using the and buttons, press OK (the playback options appear). Use the buttons to scroll through the options and press OK when desired option appears. • 03.TREAT HER 04.WHY ON WHY 05.
Chapter 5 Menu System • Overview of the DVD/VCR’s Menu System • Watch TV Menu • Disc Menu • Tape Menu • Disc Library Menu • Timer Menu • Setup Menu Graphics contained within this User’s Guide are for representation only. Some of the menu screens, buttons, and display messages might be different in your product than they appear in this book. The on-screen help text provides the most current operational information.
Chapter 5: Menu System Overview of the DVD/VCR’s Menu System Since this product has many features, it has a wealth of menus and options. To access the main menu during playback, press the STOP button on the remote. To access the main menu when you’re not playing a disc or tape, press the MENU button. How to navigate through on-screen menus Throughout the DVD/VCR’s menu system, you’ll see arrows on the on-screen menu bars.
Chapter 5: Menu System Watch TV Disc Tape Disc Library Timers Setup Live - Ch 2 No Disc 1 Library Disc(s) Watch TV The Watch TV menu shows the current channel or input. To watch TV, press OK when the Watch TV menu is highlighted (the channel banner appears to show you available program information, such as channel, name, and time). For more information, go to page 28. 10:49 am Thu 17-Mar 2003 To watch TV, press OK.
Chapter 5: Menu System Watch TV Disc Tape Disc Library Timers Setup Play Disc Disc Options AutoPlay: When you select On, a pre-recorded DVD disc immediately starts playing after you insert it into the player (there’s no need to press the PLAY button). With AutoPlay On, recordable discs (DVD+R or DVD+RW) with content recorded on them will automatically display contents.
Chapter 5: Menu System Disc Library The disc library accesses information about what you’ve recorded onto discs. Details of this feature and the submenus are described on page 31. Timers Timer: You can add timers and view or edit existing timers from this menu for automatic recording. Timer recordings are especially useful when you have a favorite program that you want to record every week and/or every day.
Chapter 5: Menu System To set Ratings: Parental Control Lock System Options Rating Limits 2. Since Parental Control is already highlighted, just press OK (the Parental Control menu items appear). Unrated Titles 3. Highlight Rating Limits and press OK (the 8-level rating list appears). Recording Options 1. From the DVD/VCR’s main menu, select Setup and press OK (the Setup menu items appear). Disc Options Languages Installation 4.
Chapter 5: Menu System Recording Options: Parental Control Record Destination: Choose whether you want to record to a disc (DVD) or a tape (VCR). System Options Recording Options Record Destination Disc Options Recording Quality Languages Tape Speed Installation SmartRecord Recording Quality: The better the quality, the more memory (space) the recording will use on the DVD+R or DVD+RW disc or tape. The choices for a disc are: 1 Best 1 hour recording time on an empty 4.
Chapter 5: Menu System Installation: Parental Control The submenus contained in the Installation menu pertain to the type of signal that is connected to your DVD/VCR (cable or off-air antenna). If you move, or change any of the information you entered when you first set up your DVD/VCR, you need to change the information in the following menus.
Chapter 6 Additional Information • Troubleshooting • Handling Cautions • Maintenance of Cabinet • Limited Warranty • Accessory Information Graphics contained within this User’s Guide are for representation only. Some of the menu screens, buttons, and display messages might be different in your product than they appear in this book. The on-screen help text provides the most current operational information.
Chapter 6: Additional Information Troubleshooting General Problems Player won’t work (locks up) • • Try unplugging the AC power cord and plugging it back in. Reset the DVD/VCR: on the front of the unit, press and hold the STANDBY/ON button while you press and hold the STOP button—wait at least 3 seconds before you release both of the buttons.
Chapter 6: Additional Information Play starts, but then stops immediately • • The disc is dirty. Clean it. Condensation has formed in the DVD/VCR. Allow it to dry out. The picture is distorted and/or fuzzy; or “jumps” during disc playback • • • • • • The disc might be damaged. Try another disc. It is normal for some distortion to appear during forward or reverse scan. The disc might be dirty. Clean it (go to page 58 for instructions).
Chapter 6: Additional Information mp3 files The following recommendations can’t be taken as a guarantee that the DVD/VCR will play mp3 recordings, or as an assurance of sound quality. Certain technologies and methods for mp3 file recording on CD-R discs prevent optimal playback of these files on your product. • Make sure the file is a true mp3 file. You can only play true MP3 files in the DVD/VCR—some products use software to compress mp3 files and convert them to other formats such as MPX.
Chapter 6: Additional Information Remote Control Remote won’t work • • • • You might be in the wrong mode. To operate your DVD/VCR, press the DVD/VCR button on the remote before you press any other buttons. If you’re operating the TV, press the TV button first, etc. (this remote operates most RCA, GE, and Proscan TVs and satellite receivers, and you can program it to operate other brands of televisions). Insert new batteries in the remote. Operate the remote control at a distance of no more than 20 feet.
Chapter 6: Additional Information Limited Warranty What your warranty covers: • Defects in materials or workmanship. For how long after your purchase: • One year from date of purchase for parts and labor. The warranty period for rental units begins with the first rental or 45 days from date of shipment to the rental firm, whichever comes first. What we will do: • Pay any Authorized RCA Service Center the labor charges to repair your DVD/VCR.
Chapter 6: Additional Information Accessory Information There are various accessories available to complement your DVD/VCR. Prices are subject to change without notice. All accessories are subject to availability. A shipping and handling fee will be charged upon ordering, and we are required by law to collect the appropriate sales tax for each individual state, country, and locality to which the merchandise is being sent. For more information about accessories, go on-line to www.rca.
Visit our website at www.rca.com Please do not send any products to the Indianapolis address listed in this manual or on the carton. This will only add delays in service for your product. Thomson Inc. 10330 North Meridian Street Indianapolis, IN 46290 ©2004 Thomson Inc.