DRD203RW USER’S MANUAL What is the DSS System? ...3 Using the Program Guide...6 Using the Menu System ...10 Using On-line Help ..........14 Major Features................16 Setting Up the Remote.....36 Connecting the Receiver ..42 Warranty Information .....
Safety Information WARNING To reduce fire or shock hazard, do not expose this receiver to rain or moisture. WARNING RISK OF ELECTRIC SHOCK DO NOT OPEN TO REDUCE THE RISK OF ELECTRIC SHOCK, DO NOT REMOVE COVER (OR BACK). NO USER SERVICEABLE PARTS INSIDE. REFER SERVICING TO QUALIFIED SERVICE PERSONNEL. This symbol indicates “dangerous voltage” inside the product that presents a risk of electric shock or personal injury. This symbol indicates important instructions accompanying the product.
Table of Contents Section 1: Using Your DSS System What is the DSS System? .....................................................................................3 Using this Manual ..................................................................................................4 Important Note about This DSS User’s Manual ...............................................................4 The Only Rule: Point and Select ..........................................................................
Table of Contents Alternate Audio Programs ..................................................................................27 ALT AUD Remote Button...............................................................................................27 Alternate Audio Display Screen .....................................................................................28 Other Features .....................................................................................................29 Picture Size .............
Getting Started What is the DSS System? You’ve purchased the DSS™ Digital Satellite System, so you already know a lot of the great things it offers. You know that the DSS system uses the latest satellite technology to deliver television programming to your home. And you know that programs are broadcast in digital format, so the quality of the picture and audio rivals that of laser discs and CDs. You know the dish is small—18 inches—and that it often can be installed in a matter of hours.
Using This Manual Using this Manual The purpose of this User’s Manual is to give you the information you’ll need to begin using the DSS system. The manual is divided into two parts: Section 1: Using Your DSS System contains the information and the steps necessary to learn how one simple rule—Point and Select—allows you to use every feature in the Program Guide and the menu system. (See The Only Rule: Point and Select on page 5.
The Only Rule: Point and Select The Only Rule: Point and Select You only need to know one rule to use the DSS system: Point and Select. Once you master this rule, you can use any part of the Program Guide or the menu system. What is Point and Select? The Point and Select method has two steps. 1. Point SELECT/DISPLAY ARROW KEYS You point by pressing the arrow keys on the remote or front panel.
Using the Program Guide Using the Program Guide The Program Guide is designed to help you select regular programs and pay-per-view events by listing all the programs and program times that are available to you. (The content of the Program Guide is dependent on your program providers, and may not look exactly like the Program Guide menu, below.) Using the Program Guide is easy as long as you remember the simple point-and-select method.
Using the Program Guide Exiting from the Program Guide There are three ways to exit from the Program Guide: • Point to the Exit button on the bottom of the Program Guide and press SELECT or • Point to a channel and press SELECT or • Press CLEAR on the remote. The Program Guide leaves the screen and you are returned to regular program viewing. If you have selected a pay-per-view program, a display screen allows you to purchase the selected program.
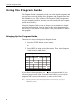
Using the Program Guide Sorting the Program Guide There are six on-screen choices—called “buttons”— at the bottom of the Program Guide: ▼ (down arrow), Movies, Sports, Other, All, and Exit. The down arrow and the Exit button allow you to see other parts of the guide or remove the guide from the screen.
Using the Program Guide Program Guide Channel 7:30PM 8:00PM 8:30PM Sports Other 7:35PM 9:00PM 9:30PM 122 123 Your program providers may periodically change the names and functions of the sorting buttons to reflect different ways of simplifying the Program Guide. 124 125 126 ▼ Movies Movies All Exit Movies Button Simplifies your Program Guide to list movies only.
Using the Menu System Using the Menu System There are two parts to the menu system: menus and display screens. Menus Menus are lists of choices. The first menu is called the Main menu. To bring up the Main menu, press MENU on the remote. Any time you want to get out of a menu or the Program Guide, press CLEAR on the remote. Status There are two ways to make a choice in a menu: • Point to the choice and press SELECT. or • Press a corresponding number key on the remote.
Using the Menu System Status Example 2: To choose Help from the Main menu using number keys: 1. Press MENU on the remote to bring up the Main menu. 2. Press 6 on the remote. The Help menu screen comes up. Status Display Screens As you can see from the previous examples, some menu choices bring up other menus. The rest of the choices bring up display screens. A display screen is the place you do the actual work in the menu system.
Using the Menu System 4. Point to Channel Limits and Lists and press SELECT. The Channel Limits and Lists display screen comes up. 5. Point to a check box on the display screen. 6. Press SELECT to add the channel to the channel list. 7. Press SELECT again to remove the channel from the list. 8. To save your changes and leave the display screen, point to OK and press SELECT. For more information about building channel lists, see Setting Up Your Channel Lists, page 20.
Using the Menu System Commonly Used Push Buttons You will find on most display screens one or more “push” buttons that allow you to save your changes, leave the screen, or get Help information. OK OK Buttons You’ll see an OK button in many of the display screens. Any time you point to an OK button on a display screen and press SELECT, your changes are saved and you leave that display screen.
Using On-line Help Using On-line Help On-line Help is available for all of the menus and display screens. The DSS System provides three types of Help: Auto Help, Help buttons, and Menu Help. Auto Help Most menus contain a short description of the menu you are using. When using the point-andselect method in a menu, a help message describing the highlighted item appears at the bottom of the screen. Status Help Buttons Help buttons appear in many display screens.
Using On-line Help Menu Help Select Help from the Main menu to choose from a list of on-line Help topics. Then, use your remote control to find out about the specific parts of the DSS system. Status Point to Remote Control and press SELECT to see an on-screen display of the remote control. Point to the different remote buttons to see a brief description of the highlighted button. Press MENU to return to the Help menu.
Major Features Major Features The DSS menu system offers you access to more features than a single user’s manual can explain in detail, so you should spend some time exploring the different menus and display screens.
Major Features Using the Program Guide for PPV Programs The Program Details screen comes up if you point to a PPV program in the Program Guide and press SELECT. Program Details To purchase this program, point to BUY and press SELECT. Then, point to EXIT and press SELECT. Dogzilla Returns Exit Start time: 10:00 pm Buy Stop time: 12:00 am Times Cost to view: $ 6.
Major Features Reviewing PPV Purchases The Past Purchases display screen, which is accessed through the Options menu, allows you to review the programs that • you have purchased • have been broadcast • have not yet been billed to your account. The list may be longer than one screen; use the down arrow keys to see more items. The Purchase History display screen also shows the title, channel, date, time, and cost of each program. Note: This list may be modified after each billing cycle.
Major Features How to tell when you have mail: There are two ways to tell if you have mail, depending on whether the DSS receiver is turned on or off. • If the DSS receiver is turned on, a mail icon appears in the channel marker. • If the DSS receiver is turned off, the power light on the front panel of the receiver flashes. Checking your mail: 1. Press MENU to bring up the Main menu. 2. Point to Mailbox and press SELECT. The Mailbox display screen shows a list of the messages that have been sent.
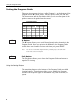
Major Features Mailbox Size The DSS mailbox has enough memory to store ten (10) forty character messages. You should periodically review and erase your mail messages to prevent any mail messages from being erased by the DSS system when memory runs low. Setting Up Channel Lists You set up your channel lists by bringing up the Channel Lists and Limits display screen and placing check marks in boxes corresponding to the channels you want in each list.
Major Features indicates that the channel will be included in your channel list. The Parent-approved list, which is actually a channel limit, allows you to select the channels that can be viewed when the system is locked. A channel with a check mark in this column can be viewed at any time, whether the system is locked or unlocked. (For more information about the Parent-approved column, see Setting Channel Limits, page 24.
Major Features Choosing Your Channel List There are two ways to choose the channel list that you want to use: 1. Press the FAV (Favorite Channel List) Button or 2. Bring up the Select Channel List display screen (accessed through the Options menu). FAV Button The FAV button allows you to simplify the Program Guide to show only those channels in your selected list. Press the FAV button to select a channel list. Each time you press FAV, a different list is activated.
Major Features Select Channel List Point to a channel list and press SELECT. Then, point to OK and press SELECT. Normal List Favorite List A OK Help Favorite List B All Channels 4. Point to the list you wish to use and press SELECT. 5. Point to OK and press SELECT. This list becomes the list that is in effect until you change the list again or turn the DSS receiver off. The Normal list is in effect each time you turn on the DSS receiver.
Major Features Status Setting the Ratings Limit The Ratings Limit display screen allows you to set a maximum viewing limit for rated programs, so long as the program provider has transmitted the proper code. This feature can be used to prevent certain rated programs from being viewed. Once a ratings limit is set and the system is locked, programs that have a higher rating than the set limit cannot be viewed without first entering your four-digit key. You can change your ratings limit whenever you wish.
Major Features 1. Press MENU to bring up the Main Menu. 2. Point to Options and press SELECT. 3. Point to Locks, Limits, and Channel Lists and press SELECT. 4. Point to Channel Limits and Lists and press SELECT. The Channel Limits and Lists display screen comes up. The very first time turn on your receiver, all the channels in the Parent-approved column are checked—no channel limit is in effect until you make changes to the Parent-approved column and lock the system. 5.
Major Features Unlocking the System The Unlock System display screen—which is available only when the system is locked—allows you to unlock the system. Unlocking the system turns off any ratings, spending, or channel limits you have set. You must re-lock your system to enforce your limits again (the limits stay the same). An open lock icon appears in the channel marker when the system is unlocked.
Major Features Session Unlock If you override a limit when the system is locked, the system enters Session Unlock, meaning that the system is only unlocked from the time you override the limit until the receiver is turned off. NO ratings, spending or channel limits are enforced until you turn the receiver off and on again. To relock system, turn the receiver off and on again. To fully unlock the system, choose Unlock System from the Locks, Limits, and Channel Lists menu.
Other Features check mark next to the program means you have selected that program. The DSS system will then automatically set the audio program to the selected audio program type, when that type is available. Other Features The following paragraphs describe several DSS system features, but don’t provide step-by-step instructions. Explore the menu system, if for no other reason than to find out about the different features.
Other Features it is available if you need more information. Picture Size The Picture size display screen allows you to choose between a standard TV screen and a Cinema option. A standard TV screen has an aspect ratio of 4:3; the Cinema option has an aspect ratio of 16:9. Note: You should only use the Cinema option if you have a CinemaScreen® TV: using the Cinema option on a standard TV screen could crop the picture.
Parts of the System Parts of the DSS System One way to understand the DSS system is to look at the different parts of the system—from the studio down to the DSS receiver and remote control in your living room. World View Satellite DIsh Antenna Uplink Center These parts make up the DSS system “big picture.” Satellite Authorization Center Uplink Center Transmits programming up to the satellite. Satellite Relays the programming signals back to your satellite dish.
Parts of the DSS System Home View Satellite DIsh DSS Receiver Telephone Jack These parts are inside of or attached to your house. Access Card and Security Clip Remote Control DSS Satellite Dish Picks up the satellite’s coded program information and relays it to your DSS receiver. (Your satellite dish may be installed in different locations on or around your house. The satellite dish must, however, be pointed in a southern direction toward the satellite.
Parts of the System Back Panel CH 3 CH 4 SATELLITE IN IN FROM ANT PHONE JACK OUT TO TV VIDEO S-VIDEO R AUDIO L WIDE BAND DATA •••••••• ••••••• LOW SPEED DATA ••••• •••• 3/4 SWITCH If you use the OUT TO TV jack to connect your DSS receiver to the TV, set the switch to 3 view the programming on TV channel 3. Set the switch to 4 to show the programming on channel 4. IN FROM ANT Used to connect a normal television antenna or cable service to your DSS receiver.
Parts of the System Front Panel* ON/OFF TV/DSS MENU SELECT/DISPLAY MESSAGE ON/OFF/MESSAGE Turns the DSS receiver on and off. When the DSS receiver is turned off, a flashing light indicates that a message has been sent by the Customer Service Center. Note: the DSS receiver is never really “off,” but is put into a standby state. TV/DSS Switches the OUT TO TV connection from DSS programming to the normal TV antenna or cable input. Similar to the TV/VCR button on many VCRs.
Parts of the System Remote Buttons OFF/ON TV VCR DSS ALT SELECT/DISPLAY GUIDE MENU CLEAR PREV CH 1 2 3 4 5 6 7 8 9 CHAN VOL 0 TV/DSS FAV ALT AUD MUTE REW STOP PLAY FF REC PAUSE TV/VCR ARROWS Used to point to different items in the Program Guide or menu system. SELECT/DISPLAY SELECT/DISPLAY Selects items in the Program Guide and the menu system. When viewing a program, SELECT/DISPLAY brings up a channel marker providing detailed program information.
Parts of the System GUIDE GUIDE Brings up the Program Guide. Pressing the GUIDE button more than once brings up the the different guide views, or channel groupings, as they are made available by your program providers. Continue to press the GUIDE button to return to the normal guide view. MENU MENU Brings up the Main menu. If you are already in a menu, pressing MENU has the same effect as pressing SELECT.
Setting Up the Remote Setting up the Remote The DSS remote can be programmed to control most brands of remote controllable TVs, VCRs,and cable boxes. Most RCA, GE and ProScan TVs and VCRs are already programmed. Other manufacturer’s brands need to be programmed. Installing the Batteries Follow these steps whenever you need to install or change the batteries in your DSS remote. 1. Pull off the cover of the battery compartment. 2.
Setting Up the Remote Programming the Remote to Control Your VCR To determine whether your remote needs to be programmed, turn the VCR on, point the remote at the VCR, and press the VCR button. Then press POWER or CHAN UP or DOWN to see if the VCR responds to the remote commands. Follow these steps to program your remote to control your VCR: 1. Turn on the VCR to be programmed. 2. Look up your VCR brand and its code number(s) on the code list on page 40. 3. Press and hold the VCR button. 4.
Setting Up the Remote Programming the remote to control a cable box Follow these steps to program the ALT button to control a cable box 1. Turn on the cable box. 2. Look up your brand and its code number(s) on code list on page 41. 3. Press and hold the ALT button. 4. Press and release the DSS button. 5. Enter the three-digit code from the code list. 6. Release the ALT button and press POWER or CHAN UP or DOWN to see if the cable box responds to the remote commands. 7.
Setting Up the Remote Using the Remote Buttons to Control a Device Once the remote has been programmed with the correct codes, you are ready to use it to control your devices. To operate the device: 1. Press the device button (TV, DSS, VCR, or ALT) to set the remote to control the device. 2. Press OFF/ON to turn the device off or on. Note: For PROSCAN, RCA,and GE devices, pressing the device button will usually turn the device on; use the POWER button to turn the device off. 3.
Setting up the Remote TV Codes Akai...................................................002 Anam National..................................038 AOC ..............................011,019,027,088 Candle .................................011,027,033 Citizen ..........................011,027,033,064 Colortyme ...........................011,027,084 Concerto ....................................011,027 Contec/Cony .........036,037,040,042,064 Craig..................................................064 Curtis Mathes...
Setting Up the Remote Cable Box Codes ABC ..............................022,046,053,054 Anvision .....................................007,008 Cablestar ....................................007,008 Diamond...........................................056 Eagle ..........................................007,008 Eastern Int. .......................................002 General Instuments ..........................046 GI 400.................................004,005,015, ...............................
Connecting the DSS Receiver Connecting Your DSS Receiver to Your TV If your DSS system has not been professionally installed, or if you move your system or add a component, refer to these pages to help you connect your system. Jacks and Cables S-Video Jack and Cable* (S-VHS) The S-Video jack provides the best picture quality for your DSS system. See Connection A. This jack is available on many TVs and is used in conjunction with audio cables to connect the DSS receiver to your TV.
Connecting the DSS Receiver Choosing a Connection The following pages show four examples of hookups commonly used to connect the DSS receiver with a TV and other components. Refer to your TV and VCR Owner’s Manuals for more information on hooking up your specific components. The four hookup diagrams are: Connection A Provides the best possible picture and stereo audio quality. To use Connection A, you must have: • TV with S-Video input, plus separate RF and audio/video inputs (jacks).
Connecting the DSS Receiver Connection A (Best Picture and Sound Quality) To use this connection you must have: • TV with separate RF, audio/video, and S-Video inputs (jacks) • VCR with RF and audio/video inputs • Coaxial, audio/video, and S-Video cables To connect TV, VCR and antenna or cable box. 1. Connect coaxial cables as shown. 2. Connect audio/video cables as shown. 3. Connect S-Video cable as shown. To receive DSS programming: 1. Tune TV to receive the S-Video output from the DSS receiver. 2.
Connecting the DSS Receiver CAUTION Do not stack electronic components or other objects on top of the DSS receiver. See Safety Information, inside front cover.
Connecting the DSS Receiver Connection B (Very Good Picture and Sound Quality) To use this connection you must have: • TV with separate RF and audio/video inputs (jacks) • VCR with RF and audio/video inputs • Coaxial and audio/video cables To connect TV, VCR and antenna or cable box. 1. Connect coaxial cables as shown. 2. Connect audio/video cables as shown. To receive DSS programming: 1. Tune TV to receive line output from DSS receiver (often called Input 1). 2. Tune DSS receiver to desired channel.
Connecting the DSS Receiver CAUTION Do not stack electronic components or other objects on top of the DSS receiver. See Safety Information, inside front cover.
Connecting the DSS Receiver Connection C (Good Picture and Sound Quality) To use this connection you must have: • TV with RF input (jack) • VCR with RF and audio/video inputs • Coaxial and audio/video cables To connect TV, VCR, and antenna or cable box. 1. Connect coaxial cables as shown. 2. Connect audio/video cables as shown. To receive DSS programming: 1. Set DSS receiver 3/4 switch to CH3 or CH4 (whichever is not being broadcast in your area.) 2.
Connecting the DSS Receiver CAUTION Do not stack electronic components or other objects on top of the DSS receiver. See Safety Information, inside front cover.
Connecting the DSS Receiver Connection D (Good Picture and Sound Quality) To use this connection you must have: • TV with RF input • Coaxial cables To connect TV and antenna or cable box: 1. Connect coaxial cables as shown. To receive DSS programming: 1. Set DSS receiver 3/4 switch to CH3 or CH4 (whichever is not being broadcast in your area.) 2. Tune TV to whichever channel you set the DSS receiver 3/4 switch to in the previous step. 3. Tune DSS to desired channel.
Connecting the DSS Receiver CAUTION Do not stack electronic components or other objects on top of the DSS receiver. See Safety Information, inside front cover.
Glossary Glossary Access Card Identifies you to the DSS service providers and is required for your DSS system to work. Do not remove the access card except when a new card has been issued to replace the original. Alternate Audio Refers to the different audio channels that may be broadcast in conjunction with a video program. A foreign language translation is an example. Attractions Previews of special programs broadcast by your program provider.
Glossary Parent-Approved Channels that are checked in the Parent-approved column of the Channel Lists and Limits display screen are the only channels that can be viewed when your system is locked. Point and Select The method of using the remote control (or front panel) buttons to navigate to and make choices among the different parts of the onscreen displays. Program Guide Lists and updates the programs and services available from your program providers.
Menu Tree Menu Tree The following diagram shows the structure of the on-screen menu system. You can access all display screens through these menus. Dish Pointing Point to a menu item and press SELECT. Pressing the number also selects the item.
Troubleshooting Troubleshooting The DSS System Test allows you to run a basic diagnostics check on your DSS system. If you are experiencing any trouble with your system, run the system test. Make sure that • All connections—jacks, cables, etc. are correctly in place. See Connecting Your DSS Receiver, page 38, for more information. • There are batteries in the remote, and that they are working correctly. • The access card is installed in the receiver.
Warranty Information Warranty Information Toll-free telephone product help You can reach Thomson at the following number: 1-800-679-4776 (Toll free inside U.S.A.) Our toll-free number operates from 9:00 a.m. to 6:00 p.m. EST on weekdays. Thomson provides a toll-free telephone number to help you with any problems you may encounter with your DSS System, as many problems can be diagnosed over the phone. If necessary, a replacement unit can be shipped to you.
Warranty Information Limited Warranty What your warranty covers: • DSS System—any defect in materials, workmanship. • DSS System Basic Installation—any defect in materials or workmanship, provided installation is performed by a Thomson Consumer Electronics Authorized Installer. For how long after your purchase: • 90 days for labor charges. • One year for parts.
Warranty Information • If you are not located near an exchange point: 1. Provide your Discover, Mastercard or Visa account number and expiration date to your phone representative. This is for security purposes only and your account will not be charged at this time. 2. We will send you a replacement unit next business day delivery. 3.
Warranty Information What your warranty does not cover: • Acts of God, such as but not limited to lightning damage. • Adjustment of customer controls. • Damage from misuse or neglect. • A unit that has been modified or incorporated into other products or is used for institutional or other commercial purposes. • Batteries for remote control hand units. • Units purchased, serviced or operated outside the U.S.A. • Loss of programming.
FCC Regulations FCC Regulations FCC REGISTRATION INFORMATION Your DSS equipment is registered with the Federal Communications Commission and is in compliance with parts 15B and 68, FCC Rules and Regulations. 1. Notification to the Local Telephone Company On the bottom of this equipment is a label indicating among other information, the FCC Registration number and Ringer Equivalence Number (REN) for the equipment. You must, upon request, provide this information to your telephone company.
FCC Regulations RADIO INTERFERENCE This equipment has been type tested and found to comply with the limits for a Class B Digital Device in accordance with the specifications in Part 15 of FCC Rules. These rules are designed to provide reasonable protection against radio and television interference in a residential installation.
FCC Regulations Canadian D. O. C. Regulations NOTICE: The Canadian Department of Communications label identifies certified equipment. This certification means that the equipment meets certain telecommunications network protective, operational and safety requirements. The Department does not guarantee the equipment will operate to the user’s satisfaction. Before installing this equipment, users should ensure that it is permissible to be connected to the facilities of the local telecommunications company.
✄ Cut Here Accessories Accessories Order Form for DSS Accessories Cables and Connectors RG-6 Coaxial Burial Cable with weatherproof “F” connectors: Stereo Audio Video Cable with gold RCAtype connectors. D912 (12 feet) D925 (25 feet) D950 (50 feet) D901 (100 feet) Cable D906Single (6A/Vfeet) D914 (12 feet) S-VHS Video Cable D913 (12 feet) (2) Weatherproof “F” Connectors for RG-6 coaxial cable Description Stock No.
✄ Cut Here Accessories USE YOUR CREDIT CARD United States Orders To place your order by phone, have your Visa or MasterCard ready and call the toll-free number listed below between 8AM and 8PM Eastern Standard Time. Use this number only to place an order for accessory items listed on this order form. ® Copy complete account number 1 – 800 – 338 – 0376 Card expires: s r Copy complete account number r Most times your order will be shipped UPS within 72 hours of receipt.
Index 0-9 keys...............................................35 3/4 Switch ...........................................32 Access Card...................................29, 31 new card setup ...........................31 security clip.................................31 Access card slot ..................................33 Accessories ....................................63-64 All sorting button..................................9 ALT AUD.......................................27, 35 Alternate Audio..............
Printed in U.S.A.