
User's Manual

user manual
DSB772WE
www.RCAav.com
General Controls Reference Guide
Unit
Wi-Fi Streaming Media Player
with 1080p HDMI output
It's important to read this instruction prior to using your new product for the first time.
EN - 1 EN - 2 EN - 3 EN - 4 EN - 6
To Change Remote Battery
2. Insert one
CR2032
(3V) size
battery.
1.
Open the
battery
door.
Take out the plastic sheet
before
operating
the Remote
Control.
EN - 5
Safety Precautions
This device complies with Part 15 of the FCC Rules. Operation is subject to the following two conditions: (1) This
device may not cause harmful interference, and (2) this device must accept any interference received, including
interference that may cause undesired operation.
This equipment has been tested and found to comply with the limits for a Class B digital device, pursuant to
Part 15 of FCC Rules. These limits are designed to provide reasonable protection against harmful interference
in a residential installation. This equipment generates, uses, and can radiate radio frequency energy and, if not
installed and used in accordance with the instructions, may cause harmful interference to radio communications.
However, there is no guarantee that interference will not occur in a particular installation. If this equipment does
cause harmful interference to radio or television reception, which can be determined by turning the equipment
off and on, the user is encouraged to try to correct the interference by one or more of the following measures:
• Reorientorrelocatethereceivingantenna.
• Increasetheseparationbetweentheequipmentandreceiver.
• Connecttheequipmentintoanoutletonacircuitdifferentfromthattowhichthereceiverisconnected.
• Consultthedealeroranexperiencedradio/TVtechnicianforhelp.
WARNING: Changesormodicationsnotexpresslyapprovedbythepartyresponsibleforcompliancecould
void the user’s authority to operate the equipment.
HDMI, the HDMI logo and High-
Definition Multimedia Interface are
trademarks or registered trademarks
of HDMI Licensing, LLC.
Manufactured under license from
Dolby Laboratories.“Dolby” and
the double-D symbol are trade-
marks of Dolby Laboratories.
The lightning flash with an arrowhead symbol, within the equilateral
triangle, is intended to alert the user to the presence of uninsulated
“dangerous voltage” within the product’s enclosure that may be
of sufficient magnitude to cause an electric shock.
WARNING:
TO REDUCE THE RISK OF ELECTRIC SHOCK, DO NOT REMOVE COVER (OR BACK). NO USER-SERVICEABLE
PARTS INSIDE. REFER SERVICING TO QUALIFIED SERVICE PERSONNEL.
WARNING:
TO PREVENT FIRE OR SHOCK HAZARD, DO NOT EXPOSE THIS APPLIANCE TO RAIN OR MOISTURE. DO NOT
PLACE OBJECTS FILLED WITH LIQUIDS ON OR NEAR THIS UNIT.
RISK OF ELECTRIC SHOCK
DO NOT OPEN
CAUTION
Theexclamationpointwithintheequilateraltriangleisintended
to alert the user to the presence of important operating and
maintenance (servicing) instructions in this owner’s manual.
FCC RF Radiation Exposure Statement :
Thisequipmentcomplieswith FCCradiationexposurelimitsset forthforan uncontrolledenvironment.This
equipment should be installed and operated with minimum distance 20 cm between the radiator and your
body.Endusersmust followthe specicoperating instructionsfor satisfyingRF exposurecompliance.This
transmitter must not be co-located or operating in conjunction with any other antenna or transmitter.
CAUTION: Regulations of the FCC and FAA prohibit airborne operation of radio-frequency wireless devices
because their signals could interfere with critical aircraft instruments.
1. IR (remote control) sensor
2. Status indicator
3. DC IN power jack
4. Analog AUDIO OUT jacks
5. Composite VIDEO OUT jack
6. HDMI OUT jack
34
5
6
12
1. POWER button
Presstoturnon/offtheplayer.
2. RETURN button
Press to return to the previous screen.
3. Audio button
Press to select the audio mode.
4. VOLUME +/- buttons
Press to adjust the volume.
5. Reverse Scan button
Press to fast reverse playback.
6. A, B, C, D buttons
If a color-coded menu option appears on your
screen, you can press the corresponding color-
coded button to select this option.
7. NETFLIX button
PresstoaccessNetixservicedirectly.
8. Mute button
Press to mute all sound.
9. Home button
Press to display the main menu of the player.
10. , , , (Cursor) buttons
Press to select items or settings in on-screen
menus.
OK/ENTER button
Press to confirm or select menu items.
11. Subtitle button
Press to display the subtitle menu.
12. Play/ Pause button
Press to start playback.
Press to pause playback.
13. Stop button
Press to stop playback.
14. Forward Scan button
Press to fast forward playback.
15. VUDU button
Press to access VUDU service directly.
16. Pandora button
Press to access Pandora service directly.
Accessories
• ACAdapter.................................................................x1
• Remote Control (with battery) ............................. x1
CAUTION: Dangerofexplosionifbatter yis
incorrectly replaced. Replace only with the
same or equivalent type.
Remote Control
Battery Replacement
When the bat tery beco me weak, the operat ing
distance of the remote control is greatly reduced
and you will need to replace them.
Notes:
• Iftheremotecontrolisnotgoingtobeusedfora
long time, remove the battery.
WARNING:
• Do notdispose ofthe batteryin are or it may
leakand/orexplode.
• Batteriesshouldnotbeexposedtoexcessiveheat
such as sunshine, fire or the like.
2
8
9
10
11
12
13
14
15
16
3
4
5
6
7
1
Re
m
ov
e
b
e
f
o
r
e
u
s
e
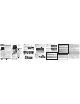
Connect an audio cable (not included) to the red and white AUDIO OUT jacks on your player and to the AUDIO
IN jacks on your AV receiver or amplifier.
1
2
A. Using an HDMI cable (for best connection)
Connect an HDMI cable (not included) to the HDMI OUT jack on your player and to the HDMI IN jack on your
TV.
Connecting to a TV
Connecting to an Audio System
B. Using an A/V cable
Connectthe yellowconnec torson anA/V cable (not included) to the VIDEO jack on your player and the
VIDEO IN jack on your TV. Connect the red and white connectors to the AUDIO OUT jacks on your player and
L/RAUDIOINjacksonyourTV.
Notes:
Do not tilt the connector when inserting it into the HDMI jack, and make sure the shapes of the jack and •
the connector are matched.
HDMI IN
High
Definition
TV
4
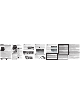
Connecting to Your Network
Your player can be connected to your home network by connecting the player to your Wi-Fi network.
Modem Cable
Modem Port
Wireless access point
A. Connecting your player to a wireless access point or router
B. Connection Status
To check your network connection status, select the Settings Option from Main Menu, then select
Network -> Network Test.
Note:
Do not place anything on the top of your player. Placing objects on the top of your player may interfere with
the wireless signal, or cause the player to overheat.
Your player has an integrated Wi-Fi device
and ant enna. No phys ical conn ectio n
to the wireless router is necessary. Place
your player within range of your wireless
networ k. Duri ng c onfigurat ion of y our
player for network access, you may need
to enter a password if your network has
security turned on.
Unit
3
Powering up & Initial setup
A. Operating with the remote control
To use, point the remote control at the remote sensor located on the front of the player. Please ensure the front of
theplayerisnotobstructed.Donotexposetheremotesensorofyourplayertoastronglightsourcesuchasdirect
sunlight or other illumination. If you do so, you may not be able to operate your player via the remote control.
B. Starting up & Basic setup
1. After all connections are complete, connect the power adaptor to your player.
2. If Player doesn’t turn on automatically within ten seconds, press on the remote control to turn on your
player.
3. Turn on your TV. Ensure your TV is switched to the input source that you’ve connected the player. (For details,
refer to TV’s user manual).
If the TV is connected by an HDMI cable, please allow a few moments for the opening screen to display.
4. The Player will display a basic setup screen which will guide you though initial setup.
AV receiver/amplifier
AUDIO IN
R
L
(White)
(Red)
(White)
(Red)
(Yellow)
AUDIO IN
R
L
VIDEO IN
Standard
Definition
TV
(White)(White) (Red)(Red)
(Yellow)
When using non-HDCP compatible TV, •
the image will not display properly.
An HDMI cable carries both v ideo and •
audio si gnals. If you wan t to us e T V
speakers, you do not need to make an
additional audio connection if you are
using an HDMI cable.
The picture noise appears “noisy” or degraded
• YourPlayermaybesettoaHDMIresolutionthat’shigherthanyourTV’s.Changetheresolutiontomatch
your TV’s resolution.
Player doesn’t display video on my TV screen
• SelecttheappropriatevideoinputmodeontheTVsothepicturefromthePlayerappearsontheTVscreen.
• MakesureyourHDMIcableorRCAcableissecurelyinsertedinboththePlayerandyourTV.
• YourTVmaynotsupporttheresolutionyouhavesetonthePlayer.Changetheresolutiontomatchyour
TV’s resolution.
• Theplayer’sHDMIOUTcableisnotsecurelyconnectedtoyourplayeroryourTV.
I need to input text to manually configure log-in IDs, passwords or network settings, but I don’t see
an on-screen keyboard
• Trypressingthe OKbutton onyourremote controlwhile thecursoris blinkingon thescreen’sentry
field, this should bring up an on-screen keyboard. Try adjusting the frequency range and channel of your
network.
The Player has a poor or intermittent connection to the Wi-Fi access point (eg wireless router)
• Thewirelesscommunicationmaybeinterruptedfromhouseholddevicesthatareusingradiofrequencies.
Move the Player away from them.
• TheAccessPointislocatedtoofarfromthePlayer.
How can I check if my network connection is OK?
• GotothePlayer’sSettingsMenu,thenselectNetwork->NetworkTest.Thiswilltestifyouaresuccessfully
connected to your Home Network and if your broadband connection is connected to the internet.
• GotothePlayer’sEntertainmentMenu,selectVUDUMovies->MyVUDU->Info&Settings->Network
SpeedTest.Thiswilltestthespeed/performanceofyournetwork
The remote control does not work properly
Check the following:
• Thebatteriesareinsertedcorrectly.
• Thebatteriesarefresh.
• TheremotecontrolispointeddirectlyattheremotesensorofthePlayer.
• TheremotecontrolisnotbeingusedfromtoofaradistancefromthePlayer.
• Nothingisobstructingremotesensor(locatedonfrontofthePlayer).
5
Settings & Entertainment
Troubleshooting
Settings options
Network --> Info --> Quick Setup --> Display --> Audio
--> Language --> System
The main menu includes Settings & Entertainment options. Press
, , , to highlight an option, press OK/
ENTER to confirm your selection and setting , press to return to previous menu.
Streaming video services (such as YouTube™, etc.) often stop, pause or “buffer” during playback
• YourWi-FiAccess Point(eg wirelessrouter) maybe too farfrom thePlayer. Ifpossible,try to locate
yourWi-Firoutercloserto yourPlayer,orconsultanexpert onwaystoimprove yourhomenetwork’s
bandwidth.
• Yourbroadbandser vicespeed maynot be fastenough tostream video services.If so,yourInternet
Service Provider (ISP) may have other service plans that provide higher bandwidth.
Player does not work
• UnplugtheACpoweradapter,waitatleasttenseconds,thenplugitbackin.
• EnsuretheACadapter issecurelyinser tedintothePlayer’spower jackandan ACoutlet.ThePlayer’s
green power indicator should turn on within ten seconds of the Player’s AC Adapter being plugged in.
• Seetroubleshootingtipsbelow.
My Wi-Fi network is not displayed on the “Network List”
• TheaccesspointorwirelessLANroutermaynotbroadcastitsSSID.
- Manually enter your access point’s SSID in the Network Settings Menu of the Player.
- Or set your access point to broadcast its SSID.
• YourWi-Finetworkmay not beset tothe frequencyrange orrange of channelsthat thisPlayer can
support.Tryadjustingthefrequencyrangeand/orchannelofyournetwork.
The Player has “frozen” or stopped working
• ToresetthePlayer,unplugtheACpoweradapter,waitatleasttenseconds,andthenplugitbackin.
• MakesureyourRemoteControlisfunctioningproperly.
My Player seems to shut down by itself, is there a problem?
• No,inordertosaveyoupower,thePlayerwillshutdownafter prolongedperiodsoninactivity -don’t
worry, it won’t shut down while you’re using it.” Note: you c an disable this feature, or adjust the Auto
Power Down Duration by going to Settings -> System -> Auto Power Down
Need More Help?
Please visit online help at http://www.RCAav.com
Settings: Use to defi ne your bas ic setti ngs to your
preference. To return to a previous screen, press
.
Important Information Relating to Network Services
All information, data, documents, communications, downloads, les, text, images, photographs,
graphics, videos, webcasts, publications, tools, resources, software, code, programs, applets, widgets,
applications, products and other content (“Content”) and all services and offerings (“Services”) provided
or made available by or through any third party (each a “Service Provider”) is the sole responsibility of
the Service Provider from whom it originated.
The availability of and access to Content and Services furnished by the Service Provider through this
device are subject to change at any time, without prior notice, including, but not limited to the suspension,
removal or cessation of all or any part of the Content or Services.
Should you have any inquiry or problem related to the Content or Services, you may refer to the Service
Provider’s website for the most up-to-date information. AVC Multimedia is neither responsible nor liable
for customer service related to the Content and Services. Any question or request for service relating
to the Content or Ser vices should be made directly to the respective Content and Service Providers.
Please note that AVC Multimedia is not responsible for any Services provided by the Service Provider
or any changes to, removal o f, or cessation of such Services and does not warrant or guaranty the
availability of or access to such Content or Services.
Entertainment: This gives you access to many applications
and services. Some of the services may require a log-in
ID and password, some of th e ser vices may require a
subscription. The Player will provide you with on-screen
instructions if a log-in ID or password is required.
Limited warranty
AVC MULTIMEDIA (“AVC”) makesthefollowinglimitedwarranty.Thislimitedwarrantyextendtotheoriginal
consumer purchaser and is limited to non-commercial use of the product.
One Year Parts & Labor Warranty
AVC produc ts purchased in the United States are warranted to be free from defects in materials or
workmanship for a period of one year from the date of their original retail purchase. If the unit fails to conform to
this warranty, we will service the product using new or refurbished parts and products, at AVC’s sole discretion.
During a period of one year from the effective warranty date, AVC will provide, when needed, service labor
to repair a manufacturing defect at its designated Service Center. To obtain warranty ser vice in the United
States, you must first call our Customer Support Center at 1-800-506-5746 or 1-877-252-6873, during
the hours listed in the box below. The determination of service will be made by AVC Customer Support.
PLEASE DO NOT RETURN YOUR UNIT TO AVC WITHOUT PRIOR AUTHORIZATION. New or remanufactured
replacements for defective parts or products will be used for repairs by AVC at its designated Service Center
for one year from the effective warranty date. Such re placement pa rts or products are warran ted for an
additional one year from the date of repair or replacement. The Customer will be required to ship the unit to
the Service Center indicated at the time Customer Support is contacted to make the necessary repairs. The
customer is responsible for all transportation charges to the service facility.
Packaging and Shipping Instruction
When you send the product to the AVC service facility youmust usethe original cartonbox andpack ing
material or an equivalent as designated by AVC.
LIMITED WARRANTY
Your Responsibility
1) You must retain the original sale receipt to provide proof of purchase.
2) These warranties are effective only if the product is purchased and operated in the U.S.A. or Canada.
3)Warran tiese xtend only tod efects inm aterial or workmansh ip,and don otex tend toany produ cto r
parts which have been lost or discarded, or damage to produ ct or parts caused by misuse, accid ent,
improper operation or maintenance, or use in violation of i nstructions p rovided with the pro duct, or
to produc t which has been altered or modified w ithout authorization of AV C, or to products or parts
thereof which have had the serial number removed or changed.
Out of Warranty
Important:
Also keep your "Bill of Sale" as proof of purchase.
Model no. .................................................................................... Product name ........................ ................................... ............
Type of set ................................................................................... Serial no. ....................................................................................
Invoice no. .................................................................................... Date purchased .................................................................. ...
Dealer name ..............................................................................................................................................................................................
FOR SERVICE AND REPAIR, PLEASE VISIT www.RCAav.com
Specificationsandexternal appearanceare subjecttochange withoutnotice.
Inthe eventyourproduc trequiresrepair afterthe limitedwarranty period hasexpired,pleasecontact
our Customer Support Center at 1-800-506-5746, 1-877-252-6873 or www.RCAav.com
Hours: Monday–Thursday: 9am–7pm, Friday: 9am–5pm, Saturday: 9am–NOON Eastern time.Important:
You are responsible for any transportation, shipping or insurance relative to the return of product to our
Product Returns Center.
All warranties implied by state law, including the implied warranties of merchantability and fitness for a particular
purpose,areexpressly limitedto the durationof thelimited warranties setforth above.Withthe exception
ofanywarranties impliedby statelaw ashereby limited,theforegoingwarranty isexclusiveand inlieu ofall
other warranties, guarantees, agreements and similar obligations of manufacturer or seller with respect to the
repair or replacement of any parts. In no event shall AV C be liable for consequential or incidental damages.
Noperson,agent,distributor,dealerorcompanyisauthorizedtochange,modifyorextendthetermsofthese
warranties in any manner whatsoever. The time within action must be commenced to enforce any obligation
of AVC arising under the warranty or under any statute, or law of the United States or any state thereof, is
hereby limited to one year from the date of purchase. This limitation does not apply to implied warranties
arising under state law.
This warranty gives you specific legal rights and you may also have other rights, which may vary, from state to state.
Some states do not allow limitation on how long an implied warranty lasts, when an action may be brought, or
theexclusionorlimitationofincidentalorconsequentialdamages,sotheaboveprovisionsmaynotapplytoyou.
For more information on other products and services, please visit our web site at www.RCAav.com
©2011 AVC Multimedia Trademark(s) ® Registered Printed in China
811-772291W010