DIRECTV® HD Receiver User’s Manual Model: DTC210 Changing Entertainment. Again.
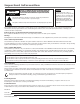
Important Information CAUTION RISK OF ELECTRIC SHOCK DO NOT OPEN CAUTION: TO REDUCE THE RISK OF ELECTRIC SHOCK, DO NOT REMOVE COVER (OR BACK). NO USER SERVICEABLE PARTS INSIDE. REFER SERVICING TO QUALIFIED SERVICE PERSONNEL. This symbol indicates “dangerous voltage” inside the product that presents a risk of electric shock or personal injury. This symbol indicates important instructions accompanying the product.
IMPORTANT SAFETY INSTRUCTIONS 1. Read these instructions. 2. Keep these instructions. 3. Heed all warnings. 4. Follow all instructions. 5. Do not use this apparatus near water. 6. Clean only with dry cloth. 7. Do not block any ventilation openings. Install in accordance with the manufacturer’s instructions. 8. Do not install near any heat sources such as radiators, heat registers, stoves, or other apparatus (including amplifiers) that produce heat. 9.
Notices Attention: Telephone Line Interruption A continuous land-based phone line connection is required for DIRECTV® Pay Per View functionality and sports subscriptions. Any calls generated by the DIRECTV® HD Receiver are toll free. These calls are typically made in the middle of the night; your phone is in use for approximately 30 seconds. Trademark and copyright statements DIRECTV and the Cyclone Design logo are registered trademarks of DIRECTV, Inc., a unit of Hughes Electronics Corp.
Table of Contents Chapter 1: Introduction .....................................4 Chapter 5: Using the Menu System ................51 What kinds of TV programming can I watch with the DIRECTV® HD Receiver? ................................................. 4 Aspect ratio ....................................................................... 6 Dolby Digital 5.1 ............................................................... 7 Using the Menu System .................................................
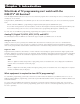
Notices Chapter 1: Introduction What kinds of TV programming can I watch with the DIRECTV® HD Receiver? Your HD (High-Definition) Receiver lets you receive television programs from a wide range of sources, and display them on virtually any TV or monitor. Using the AIR IN, SATELLITE IN, and CABLE IN jacks on the back of the HD Receiver, you can receive television programs from: • HDTV and SDTV DIRECTV® programming via digital satellites (through the SATELLITE IN jack).
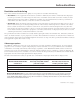
Introduction Resolution and interlacing Two of the elements that determine the quality of a TV picture are resolution and interlacing. • Resolution: For TV equipment and broadcasts, resolution is defined by the number of horizontal lines displayed to make up each frame of a video image. The more lines of resolution used to draw each frame of video, the more detailed and sharp the picture will be. Standard TV resolution uses 480 horizontal lines to make up each frame of video.
Introduction For example, if you have a standard-resolution TV, you would set the RESOLUTION SELECT switch to 480p/i. Then programs received by the DIRECTV® HD Receiver at any resolution would be converted to a resolution of 480p or 480i for display on your television. This information can also help you decide how to connect your TV and VCR to the HD Receiver.
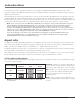
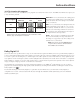
Introduction 16:9 TVs showing 4:3 programs For a wide-screen 16:9 TV, a standard 4:3 TV program is too tall to fit on the screen. The DIRECTV® HD Receiver gives you 3 ways to fix the problem: Source Signal 16:9 Monitor Format Options Pillar box Full Zoom 4:3 16:9 Not available Not available Note: You can set the color of the horizontal or vertical bars displayed for Letter box and Pillar box screen formats to either black or gray. See Chapter 61 for details.
Chapter 2: Connections & Setup Things to Consider Before Making Connections Before you begin connecting your components to the DIRECTV® HD Receiver, please note the following important safety and setup tips. Protect your components from power surges • Always turn off and unplug your HD Receiver, TV, and any other components before connecting or disconnecting any of the cables.
�� �� Connections & Setup Choose Your Connection How you connect your DIRECTV® HD Receiver to your TV or monitor depends on the jacks available on your TV or monitor. Please use the following chart to determine which kind of connection you should use based on the kind of input jacks your TV or monitor offers. Proceed to the appropriate page and connect your HD Receiver.
Connections & Setup Installing the batteries in the remote control Follow these steps whenever you need to change the batteries in your DIRECTV® HD Receiver's remote control. 1. Remove the cover from the battery compartment. 2. Insert batteries in the battery compartment, matching the + and – end of each battery. 3. Replace the cover. 4. Test the remote control to make sure the batteries have been inserted correctly. Press the DIRECTV button and make sure the button lights up.
Connections & Setup ����������������� ������� DVI jack and cable Using the DVI jack and a digital DVI cable, your HD Receiver can provide the unconverted digital signal from digital off-air, analog cable, or DIRECTV® programming directly to A/V components that are capable of decoding the digital video information. The DVI jack uses HDCP content protection to allow you to view HD programming that has been encoded using the HDCP protection system.
Connections & Setup ����� ��������������� 2 �������������������� ��������� ������� ����� ����� ��������� ������ �������� ������ ��� ���� ������� �� � ����������������� ������������������� 1 ����������� ������������ ������������ ��������� ������� 3 ����� ������� ����������������� ������� ����� ��������� ����� ����� 4 ����� �������� ���������� 7 6 5b – OR – 5a ���������� ��������������������������������� ����� ����� � � ���������������������� ������������ ��������� ���������
Connections & Setup 6. Connect the audio from the DIRECTV® HD Receiver to your monitor. Connect a pair of RCA-type cables to the AUDIO jacks on the back of your DIRECTV HD Receiver. Connect the other ends of the cables to the audio input jacks on the back of your TV, monitor (shown on the previous page) or audio receiver (not shown). Make sure you match the Left (white) output with the Left input and the Right (red) output with the Right input.
Connections & Setup ����� ��������������� 2 �������������������� ��������� ������� ����� ����� ��������� ������ �������� ������ ��� ���� ������� �� � ����������������� ������������������� 1 ����������� ������������ ������������ ��������� ������� ������� ����������������� ������� ����� ��������� ����� 3 ����� 4 ����� �������� ���������� 7 5 ����� ��������� ����������� 6 ���������� ����� � �� � �� � ������ ����� Connection 2: DIRECTV HD Receiver + Monitor with component vid
Connections & Setup 6. Connect the audio from the DIRECTV® HD Receiver to your monitor. Connect a pair of RCA-type cables to the AUDIO jacks in the COMPONENT VIDEO section of the back of your DIRECTV HD Receiver. Connect the other ends of the cables to the audio input jacks on the back of your TV, monitor (shown on the previous page) or audio receiver (not shown). Make sure you match the Left (white) output with the Left input and the Right (red) output with the Right input.
Connections & Setup ����� 2 ��������������� 7 ��������� ������� ����� ����� ��������� �������������������� ������ �������� ������ ��� �� � ���� ������� ����������������� ������������������� 1 ������������ ��������� ������� ����������� ������������ ������� ����������������� ������� ����� ��������� ����� ����� 4 ����� �������� ���������� 5b 3 6 ����� 5c 5a ���������� ����� � � �������� ����� ������ ����� ���������� Connection 3: DIRECTV HD Receiver + Analog TV/Monitor 1.
Connections & Setup 6. Connect the audio from the DIRECTV® HD Receiver to your monitor. Connect a pair of RCA-type cables to the AUDIO jacks on the back of your HD Receiver. Connect the other ends of the cables to the audio input jacks on the back of your TV, monitor (shown on the previous page) or audio receiver (not shown). Make sure you match the Left (white) output with the Left input and the Right (red) output with the Right input.
Connections & Setup Optional Connections Once you've connected the DIRECTV® HD Receiver to your TV or monitor, you can connect it to a VCR or a digital audio receiver. You can also connect a VCR controller, as well as an RF antenna for use with your remote control. The next four pages show you how to make these optional connections.
Connections & Setup Optional Connection 2: DIRECTV® HD Receiver + Digital Audio Receiver Cable: Either Optical or Coaxial Digital Audio Use this connection to take advantage of Dolby Digital quality sound, when available. Your HD Receiver’s digital output jacks can output digital audio signals in either PCM or Dolby Digital format (depending on your selection in the Sound setup menu; see Setting the Digital Audio Format at the bottom of this page for more information).
Connections & Setup Optional Connection 3: RF Remote Antenna Connection This connection allows your remote control to communicate with the DIRECTV® HD Receiver even when you do not have line-of-sight to the receiver’s front panel remote sensor. Just as you would adjust a rabbit-ear antenna to get a better picture, your RF remote may need similar adjustments depending upon your environment.
Connections & Setup To Find the VCR’s Remote Control Sensor: 1. Hold the VCR’s remote control so that it is touching the front of the VCR. 2. Slowly move the remote control over the front of the VCR while repeatedly pressing the remote control’s power button. 3. When your VCR turns on/off, you have located the remote control sensor. Note: To test the VCR controller’s position, use a piece of vinyl tape to temporarily attach the VCR controller to the spot where you think the sensor is located.
Connections & Setup Turning on your receiver for the first time You have completed the connection steps and are ready to start using your DIRECTV® HD Receiver. The first step is to turn on the HD Receiver. 1. Turn on your TV and set it to display the signal from your HD Receiver. If you connected the HD Receiver to video input jacks on your TV, you will need to set your TV to display the input from these jacks. Usually this is done by pressing a VIDEO, INPUT, or MODE button on your TV’s remote control.
Connections & Setup Acquiring the correct dish pointing angles The Dish Pointing menu item in the Dish Setup menu allows you to find out exactly how to point your satellite dish by entering your ZIP code. If you have not yet successfully aligned your satellite dish, or if you need to realign it, follow these instructions to find the exact angles you should use to point your dish: 1. Press the MENU button on your remote control (the main menu appears). 2.
Connections & Setup Checking the satellite signal strength The Signal Meter allows you to check the strength of the signal from the satellite to your satellite dish. This is useful while setting up your satellite dish, and while troubleshooting any reception problems you may encounter. Satellite signal strength can be affected by how accurately you have pointed the satellite dish, and by any obstructions between the satellite and the satellite dish (tree limbs, for example).
Connections & Setup Setting the dish type manually To function properly, your DIRECTV® HD Receiver needs to know what type of satellite dish you are using. You can set the dish type manually using the instructions below. See the next page for information on how to set the dish type automatically. Note: For access to DIRECTV® High-Definition programming, you will need an oval, triple LNB satellite dish antenna. To set the dish type manually: 1.
Connections & Setup Using Auto Detection to set the dish type To function properly, the DIRECTV® HD Receiver needs to know what type of satellite dish you are using. You can specify the dish type using the instructions on the previous page, or you can follow the steps below to use Auto Detection to automatically set the dish type. Before you can use Auto Detection to set the dish-type, the dish must be correctly aligned and the HD Receiver must be receiving a strong signal from the satellite.
Connections & Setup Testing the DIRECTV® HD Receiver The System Test lets you check the status of your satellite signal, access card, phone line connection, and other system information. This is helpful in troubleshooting should you experience problems with your HD Receiver. To start the System Test: 1. Press the MENU button on your remote control. 2. Highlight SYSTEM SETUP and press SELECT. 3. Highlight System and press SELECT. 4. Highlight System Test and press SELECT.
Connections & Setup Setting up local networks programming schedules You can use your DIRECTV® HD Receiver to receive program guide information via satellite for local off-air and cable TV channels (when this information is available). To use this feature, you must connect your HD Receiver to a satellite dish as described earlier in this chapter, and you must set up the Local Network Programming option in the menu system. To set up the Local Network Programming menu option: 1.
Connections & Setup The Scan Type list appears allowing you to choose to set your DIRECTV® HD Receiver to automatically scan for channels from Digital Off-Air sources (offair ATSC broadcasts), Analog Off-Air sources (standard, NTSC TV broadcasts), Cable TV (standard, NTSC cable TV services), or all of these. If this is the first time you are setting up this HD Receiver to receive local channels, the All setting is recommended. 5. 6.
Chapter 3: Using the Remote Control Remote Control Buttons ������ ��� ��� ���� ���� ������� �� ���� �� �� ������ ���� ���� ���� ���� ���� ������ ��� ���� ���� 1 2 3 4 5 6 7 8 9 0 ������ � ���� ������� ������ ���� ���� � ����� ����� � ��������� ������ � � The right arrow button is also used as a delimiter (to enter separate parts of channel numbers, like a dash). AUDIO (A) While watching DIRECTV® programming, press this button to select an alternate audio track.
Using the Remote Control HELP In DIRECTV mode, displays instructions about the screen or menu currently displayed. INFO In DIRECTV mode, displays the Channel Banner and information about the current program. MENU In DIRECTV mode, displays the DIRECTV® HD Receiver’s on-screen Menu. MUTE Mutes or unmutes the TV audio (if the remote control has been programmed to control your TV).
Using the Remote Control Programming the Remote Control The DIRECTV® HD Receiver’s remote can be programmed to control most brands of remote controllable components. The remote is already programmed to control most RCA, GE and Proscan components; it may need to be programmed to control other manufacturers’ brands.
Using the Remote Control Using Direct Entry Important: This remote may not be compatible with all models of all brands of components. It also may not operate all functions of the remote that came with your component. Note: 1. Turn on the component to be programmed. 2. Look up the brand and code number(s) for the component on the code list at the end of this section. 3. On your remote control, press and hold the component button you want to program. 4.
Using the Remote Control Controlling a Second RCA Satellite Receiver Note: If you want to control a second non-RCA satellite receiver, use the AUX1 or AUX2 buttons. See the Using Automatic Code Search section on the previous page for more information. The remote can control two RCA satellite or HD receivers. From the main menu, select System Setup, then Installation, then Remote Setup. Then follow the on-screen instructions.
Code Lists TV Codes (programmable to the TV, AUX1 and AUX2 buttons) Abex .....................................................................................1172 Admiral.............................................................1001, 1173, 1211 Adventura ............................................................................1174 Aiko......................................................................................1016 Akai .........................................................................
Code Lists Olympus ..............................................................................2021 Optimus .....................................................................2014, 2132 Optonica ..............................................................................2096 Panasonic........................... 2021, 2022, 2109, 2125, 2126, 2127 Pentax .......................................... 2016, 2055, 2056, 2107, 2120 Pentex Research ...............................................................
Chapter 4: Special Features Getting info on the program you're watching Your DIRECTV® HD Receiver provides several kinds of information about the TV programs you watch. The Channel Banner Each time you change the channel on your HD Receiver, the Channel Banner appears. After a few seconds, the Channel Banner disappears. If you want to clear it right away, press EXIT on your remote control.
Special Features The Full Channel Banner The Channel Banner provides quick information as you switch channels on your DIRECTV® HD Receiver. If you want to see information about the channel you are currently watching, simply press the INFO button on your HD Receiver’s remote control. Pressing the INFO button displays the Full Channel Banner. The Full Channel Banner displays all the information found in the smaller Channel Banner, plus more details about the program.
Special Features Schedule For future programs, allows you to set your receiver to remind you when the program is about to start, or to set the receiver and VCR to record the program. Unschedule For programs you have previously scheduled for a reminder or recording, allows you to cancel the reminder or recording. Episodes For programs broadcast as episodes, allows you to view a list of the program's other episodes present in the guide.
Special Features Setting the default Guide style The Program Guide menu item allows you to set which style of guide is displayed when you press the GUIDE button on your remote control. To set the default Guide style: 1. Press MENU on your remote control. The main menu appears on your screen (the PROGRAM GUIDE item is highlighted). 2. Press SELECT (the Program Guide menu appears). 3. Use the up- and down-arrow buttons on your remote to highlight Set Guide.
Special Features Using the Grid Guide The Grid Guide displays a Channel Banner and a channel list. It provides access to the complete set of guide features including the ability to search for programs, schedule reminders and recordings, etc.
Special Features 5. To get information on a channel (rather than a program), use the arrow keys on the remote control to highlight the channel entry in the guide. The Channel Banner displays information about the highlighted channel. 6. Press the INFO key on your remote control while a channel entry is highlighted to see a Channel Detail Screen containing more information about the highlighted channel. Tuning to a channel with the Grid Guide To tune to a program or channel listed in the Grid Guide: 1.
Special Features The following chart explains each time control. Exits the time control bar. Moves the guide view back 6 hours (unavailable when viewing the current time). Moves the guide view back 30 minutes (unavailable when viewing the current time). Moves the guide view ahead 30 minutes. Moves the guide view ahead 6 hours. Moves the guide view to the current time. Moves the guide view back 24 hours (unavailable when viewing the current time). Moves the guide view ahead 24 hours.
Special Features Using the Logo Guide The Logo Guide displays 21 channel logos and a Channel Banner showing information about the program currently showing on the highlighted channel.
Special Features 4. As you highlight each channel logo in the Logo Guide, information about the program currently showing on the highlighted channel appears in the Channel Banner. To see more information on the program, press the INFO button on your remote control. The Program Detail screen appears, showing complete information about the program on the highlighted channel, and a list of actions you can take related to that program.
Special Features Searching by Credits, Title, or Text To find programs that star a certain actor, share a director, have a particular character, have won a specific award, or were created in a certain year, search By Credits. To search for a program whose title you know, search By Title. Searching By Text looks at both credits and titles to find programs that match your search terms. 1. While viewing the guide, press the D button (SEARCH) on your remote control.
Special Features Scheduling program reminders and recording timers There are two kinds of timers you can set to help you manage your TV viewing: • reminders to alert you when a program is about to begin. • timers that will automatically record a program on your VCR. To set your DIRECTV® HD Receiver to remind you when a program is about to begin, or to record a program for you on your VCR: 1. Press the GUIDE button on your remote. The guide appears. Note: Timers are not available in the Logo Guide.
Special Features Pay per view programs Your DIRECTV® HD Receiver gives you access to many pay per view movies, sporting events, concerts, etc. All you need to order these events is a DIRECTV account, a land-based telephone line connected to your HD Receiver, and your remote control. Identifying and ordering pay per view programs Pay per view icon There are several ways to identify pay per view programs.
Special Features 3. Press SELECT to view a list of your past pay per view purchases (the Past Purchases screen appears). 4. To see details for the listed purchases, highlight a purchase, then press SELECT. A screen displaying program details for the selected purchase appears. 5. To return to the Past Purchases screen, press PREV. Note: The Past Purchases screen only displays pay per view programs you’ve purchased and watched.
Special Features Choosing an alternate audio format for a program Many programs on your DIRECTV® HD Receiver offer several audio formats. For example, some programs are available in alternative languages. Some are available in Dolby Digital format (a high-quality digital audio format). You can tell if a program offers alternative audio formats by pressing the INFO button on your remote control while watching a program.
Using the Menu System Chapter 5: Using the Menu System Using the Menu System To display the main menu, press MENU on the remote control. To use the menu system, press the remote control’s arrow buttons to highlight your on-screen choice and press the SELECT button to select it. While using the program guides or menu system, you will often see a line of text at the bottom of the screen explaining what you are seeing on-screen, or telling you what your next step is.
Using the Menu System Program Guide Selecting PROGRAM GUIDE from the main menu displays a menu with a variety of display options available. You can select the logo or channel guide, search by category or style, or change the active profile. Note: Displaying Program Guides The program guide is described in detail in the previous chapter, Special Features, starting on page 37. In addition to selecting PROGRAM GUIDE in the main menu, you can press the GUIDE button on the remote control.
Using the Menu System Editing user profile names The four user profiles – User 1 to User 4 – can be renamed for members of your household. The Family and All Channels profiles cannot be renamed. You can change the names of User 1 to User 4 profiles to anything you wish, using up to eight letters and numbers. 1. Press the MENU button on your remote control (the main menu appears). 2. Highlight PROFILES and press SELECT (the Profiles menu appears). 3.
Using the Menu System To edit a channel list: 1. Press the MENU button on your remote control. 2. Highlight the PROFILES menu item and press SELECT (the Profiles menu appears). 3. Highlight the profile with the channel list you want to edit (Family, or User 1 - 4) and press SELECT (the menu for that user profile appears). 4. Highlight Edit Channel List and press SELECT (the Edit Channel List screen appears). Note: Editing the Family channel list changes channel access for all profiles.
Using the Menu System Setting the rating limits for TV programs To set the maximum viewable TV program rating for the TV programs: 1. Press the MENU button on your remote control. 2. Highlight PROFILES and press SELECT (the Profiles menu appears with the Family profile is highlighted). 3. Press SELECT to display the Family profile menu (the Family profile menu appears). 4. Highlight Rating Limit and press SELECT (the Rating Limit menu appears). 5.
Using the Menu System Setting rating limits for movies To set the maximum viewable rating for movies, follow these steps: 1. Press the MENU button on your remote control. 2. Highlight PROFILES and press SELECT (the Profiles menu appears, with the Family profile highlighted). 3. Press SELECT to display the Family profile menu. 4. Highlight Rating Limit and press SELECT (the Rating Limit menu appears, with Movies highlighted). 5. Press SELECT to display the Movies screen. 6.
Using the Menu System 4. Highlight Pay Per View and press SELECT. A list appears, from which you can choose to Allow or Block pay per view purchases. 5. Highlight Allow or Block and press SELECT. The list disappears, and the Pay Per View menu item indicates your choice. 6. To clear the menu from your screen, press EXIT on your remote control.
Using the Menu System Locking and unlocking your DIRECTV® System If you've set ratings limits, spending limits, or channel lists for your DIRECTV System, you need to lock the system to make those settings take effect. To change those settings, you need to unlock the system to access the controls for those settings. Locking the system involves entering a four-digit password. You need to remember this password to unlock the system. Write down the password and keep it in a safe place.
Using the Menu System Reading your mail The MAILBOX menu lets you to read the mail sent to you by DIRECTV or your service provider. 1. Press the MENU button on your remote control. 2. Highlight MAILBOX and press SELECT. The Mailbox screen appears, displaying all of the mail you have received (both read and unread). 3. To read one of the pieces of mail, highlight that piece of mail in your mailbox and press SELECT. The selected mail message appears. 4.
Using the Menu System Setting the language for on-screen Menus and Guides To choose a language for the menu and guide screens, follow these steps: 1. Press the MENU button on your remote control. 2. Highlight SYSTEM SETUP and press SELECT. 3. Highlight Preferences and press SELECT. 4. Highlight Default Language and press SELECT. A list of languages you can use for guide and menu screens appears. 5. Highlight the language you want to use for menus and guides, then press SELECT.
Using the Menu System For widescreen 16:9 TVs displaying standard 4:3 programs, your choices are: Pillar Box: Displays the entire program image, fitting the program to the screen by applying black/gray bars to the left and right sides of the screen. Full: Displays the entire program image, fitting the program to the screen by stretching the image horizontally so that it fills the screen. Zoom: Enlarges the image to fill the screen (cropping some of the top and bottom edges of the program image). 7.
Using the Menu System Setting the default screen color and translucency The Screen Color options in the Preferences menu let you set a default screen color for the menu and guide screens. There are four color choices: Cobalt Blue, Seagrass, Periwinkle and Spiced Burgundy. Screen colors can also be set separately for the Family profile and the four User profiles; those choices will override the default screen color selection you set here when those profiles are active.
Using the Menu System Reviewing and modifying reminders and recording timers The Timers item in the SYSTEM SETUP menu lets you review, modify, or create new program reminders and program recording timers. Chapter 5 1. Press the MENU button on your remote control. 2. Highlight SYSTEM SETUP and press SELECT (the System Setup menu appears). 3. Highlight Timers and press SELECT (the Timers screen appears—if you've already scheduled reminders or recording timers, they'll be listed here). 4.
Using the Menu System Reviewing and controlling Caller ID The Caller ID item in the System Setup menu lets you view a list of the calls you've received on the telephone line connected to your DIRECTV® HD Receiver. It also lets you turn the Caller ID feature on or off. The Caller ID feature only works if you subscribe to the caller ID service provided by your local telephone service. To turn the Caller ID feature on or off: 1. Press the MENU button on your remote control. 2.
Using the Menu System Setting the Local Time options The Local Time setting (in the Installation section of the System Setup menu) lets you set how the following two time settings are controlled – either by you ("locally") or by your service provider: • the time zone your DIRECTV® HD Receiver uses, and • whether your HD Receiver observes Daylight Savings Time. If you turn the Local Time setting on, you set the time zone and decide whether or not to observe Daylight Savings Time.
Using the Menu System Centering the DIRECTV® HD Receiver’s picture If you’re using the RGB or DVI outputs to connect the HD receiver to your monitor, you can change the position of the HD receiver’s picture on your monitor’s screen using the Monitor Setup option in the Installation menu. To center the receiver’s picture on your monitor’s screen: 1. Press MENU on the remote control. 2. Highlight SYSTEM SETUP and press SELECT. 3. Highlight Installation and press SELECT. 4.
Chapter 6: Additional Information Troubleshooting Use the tips below to help solve any problems you have with the DIRECTV® HD Receiver: I have no picture and no sound and the POWER light does not light. • Make sure your HD Receiver is plugged into a working power outlet. If it is, make sure the unit is turned on. If the receiver is plugged into a power strip, make sure the strip is plugged in and turned on. Check the batteries in the remote control. I have sound but no picture.
Additional Information I cannot purchase a pay per view program. • It may be too late to purchase the program. Try purchasing another showing of the same program. • Make sure the telephone line is properly connected. • If your system is locked, make sure the purchase does not exceed your spending or rating limit. • Your access card may have reached its limit. Call your service provider for assistance. I've forgotten my password. • If you subscribe to DIRECTV: call DIRECTV for assistance.
Additional Information Front panel controls and lights Your front panel has a flip-down door which you need to open to access its controls. To open this door, push firmly on the top middle part of the door to unlatch it. Then, gently pull the door out and down. The front panel door will flip down.
Additional Information Back Panel Switches and Input/Output Jacks The diagram below illustrates the location of the input and output jacks on the back of the DIRECTV® HD Receiver. Step-by-step setup instructions for connecting your HD Receiver appear in Chapter 2.
Additional Information DTV OUTPUT SELECT switch This switch determines the signal type your DIRECTV® HD Receiver outputs. Set it according to the way you connected the HD Receiver to your monitor: either for the COMPONENT OUT jacks, or for the DVI/HDCP OUT and RGB OUT outputs. CH 3/4 switch TV.
Additional Information FCC Customer Information This equipment complies with Part 68 of the FCC rules and the requirements adopted by the ACTA. On the back or bottom side of this equipment is a label that contains, among other information, a product identifier in the format US:G95XXXXXXXXX. If requested, this number must be provided to the telephone company.
Additional Information DIRECTV® HD Receiver Specifications Power supply Input/Output Interface Input Voltage: AC 100-120V, 50/60Hz (SMPS type) Power Consumption: 40W max Satellite In 1 input Video 2 RCA 1 Component video output (Y, Pb, Pr) 1 RGB output 1 DVI output 6 RCA (3 pairs X Left & Right), 1 Optical digital audio output 1 Coaxial digital audio output 1 output 2 input (1 off-air, 1 analog cable), 1 output (channel 3/4 modulated) RF antenna (input) 1 VCR control output 1 mini-jack Physical Speci
Additional Information RCA Satellite Product System or Receiver Limited Warranty What your warranty covers: • Defects in materials or workmanship. For how long after your purchase: • 90 days from date of purchase - Unit exchange, which includes parts and labor. • 91 days to 1 year from date of purchase - Unit exchange, which includes parts only; you pay the labor. • The warranty for rental units begins with the first rental or 45 days from date of shipment to the rental firm, whichever comes first.
Additional Information What your warranty does not cover: • Customer instruction. (Your Owner’s Manual describes how to install, adjust, and operate your unit. Any additional information should be obtained from your dealer.) • Acts of nature, such as but not limited to lightning damage. • Adjustment of customer controls. • Damage from misuse or neglect. • A unit that has been modified or incorporated into other products or is used for institutional or other commercial purposes. • Batteries.
Additional Information Accessory Information There are various accessories available to complement your HD Receiver. Prices are subject to change without notice. All accessories are subject to availability. A shipping and handling fee will be charged upon ordering, and we are required by law to collect the appropriate sales tax for each individual state, country, and locality to which the merchandise is being sent.
Index A D M Accessories 76 Access card 9, 66 Activating your DIRECTV account 29 All Channels 52 Alternate audio 7, 30, 37, 50 Analog Inputs 9, 10, 70 TV 4, 16 ANTENNA button 30 Arrow buttons 30 Aspect ratio 6, 7 16:9 6, 7 4:3 6, 7 ATSC 4 Audio Button 30 Digital 7, 11, 19 Jacks 10 Language preference 62 Automatic code search 32 Auto detection 26 Auto resolution 5, 65 AUX1/AUX2 buttons 31, 36 Digital audio 7, 19 Coaxial 11 Format 19 Optical 11 Output 19 Receiver 19 Digital TV 4 DIRECTV button 30 Dolby Dig
Visit the RCA website at www.rca.com If your HD Receiver needs service, please contact your dealer or the nearest Service Center from the Yellow Pages. Please do not send any products to the Indianapolis address listed in this manual or on the carton. This will only add delays in service for your product. Thomson Inc. 10330 North Meridian Street Indianapolis, IN 46290 ©2004 Thomson Inc. Trademark(s)® Registered Marca(s) Registrada(s) DIRECTV and the Cyclone Design logo are trademarks of DIRECTV, Inc.