DV2011 CD / MP3 / WMA / DVD PLAYER / RECEIVER Installation and Operation Manual DV2011 COMP ACT MP3 WMA DIGITAL AUDIO MUTE LOUD MODE LOC EQ BAND 1 INT RPT RDM 2 3 4 5 6 A/PS DISP AV IN
DV2011 INTRODUCTION System Features HARDWARE KIT CONTENTS Features of the Jensen DV2011 mobile audio system include: • • • • • • • • • • • • • • • • • • • • • • • • 3-Wire power (ACC, Batt, Gnd) Detachable faceplate 1-DIN (sleeve-mount) chassis design Segmented LCD Display Blue LED panel illumination Electronic AM/FM tuner (US) Station presets (18FM, 12AM) Auto-Store (AS)/ Preset Scan (PS) Single DVD / CD player (Plays DVD, CD-A, CD-R/RW Media) Plays MP3 and WMA Encoded Discs Electronic Skip Protection (
DV2011 SAFETY INFORMATION When Driving Region Management Information Keep the volume level Iow enough to be aware of the road and traffic conditions. This Mobile DVD Player is designed and manufactured to respond to the Region Management Information recorded on individual DVD discs. If the Region number described on the DVD disc does not correspond to the Region number(s) supported by this Mobile DVD Player, the disc will not play in this unit.
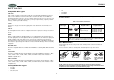
DV2011 DISC NOTES Compatible Disc Types • • • DVD Video DVDs contain excellent sound and video quality due to Dolby Digital and MPEG2 encoding. A DVD is 12 cm in diameter and can hold more than seven times the data of a CD-ROM. The maximum playing time can be up to 2 hours (a double-sided DVD is up to 4 hours). There are four types of DVD discs: single-layer single-sided (1), two-layer single-sided (2), single-layer doublesided (3), and two-layer double-sided (4).
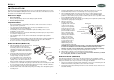
DV2011 INSTALLATION This unit can be property installed with either a “Front” (conventional DIN front mount) or “Rear” (DIN rear mount installation, utilizing threaded screw holes at the sides of the unit chassis) mount. For details, refer to installation methods A and B. 5. 6. Before You Begin 1. 2. Disconnect Battery Before you begin, always disconnect the battery negative terminal. Remove Transport Screws 7. 8.
DV2011 3. 4. 5. 6. Detachable Control Panel (DCP) Remove the factory mounting brackets and hardware from the existing radio and attach them to the new radio. Select a position where the screw holes Screws of the bracket and the screw holes of the main unit are Dashboard aligned (are fitted). Tighten the screws at 2 places on each side. Do not exceed M5 x 9 MM Factory maximum screw size. Longer Mounting screws may damage Bracket components inside the chassis.
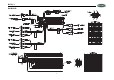
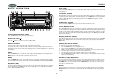
FRONT RCA LINE-OUT REAR RCA LINE-OUT DV2011 WIRING 7
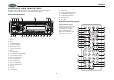
DV2011 CONTROLS AND INDICATORS The buttons located on the unit and the remote control that perform the same function are assigned the same number for reference on the diagrams and in the text. 19. Band Select Front Panel Operation 21. Rewind/Previous Chapter 20. Fast Forward/Advance Chapter 22. Auxiliary Input (AUX IN2) 7 6 1 4 24 10 23 2 23. Infrared Sensor 20 24.
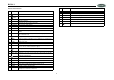
DV2011 Remote Control Functions Ref # 1 Button /POWER 3 4 /EJECT >>|/TRACK 5 Ref # Button 32 TITLE Display the TITLE menu stored on DVD disc 33 TUNE- Tune down one step 34 <>/TRACK Search forward rapidly Skip to the next track/chapter 36 0-9 Enter track/chapter number directly. Use GOTO to search.
DV2011 Area (EQ) BASIC OPERATION 7 6 1 4 24 10 23 2 Press and hold the EQ button (8) to select the appropriate frequency spacing for your area: USA or EU (Europe). 20 Loudness (LOUD) When listening to music at low volume levels, this feature will boost the bass and treble ranges to compensate for the characteristics of human hearing. Press the LOUD button (10) to activate this feature. “LOUD ON” appears on the display panel. Press the LOUD button again to turn the LOUD function off.
DV2011 AUDIO MENU Press the volume control button (4) to access the Audio Menu. You can navigate through the Audio Menu items by pressing the volume control button repeatedly. Once the desired menu item appears on the display, adjust that option by turning the audio control knob within 10 seconds. The unit will automatically exit the Audio Menu after six seconds of inactivity. The following menu items can be adjusted.
DV2011 TUNER OPERATION Recall a Station 7 6 1 4 24 10 23 2 20 Select a band (if needed). Press a preset button (12-17) to select the corresponding stored station. Automatically Store / Preset Scan DV2011 COMP ACT MP3 WMA DIGITAL AUDIO MUTE Automatically Store LOUD MODE Select a band (if needed). Press A/PS (11) for more than three seconds to automatically select six strong stations and store them in the current band. The new stations replace any stations already stored in that band.
DV2011 AUDIO CD OPERATION 7 6 1 4 24 10 23 2 Repeat Play (3/RPT) 20 Press the 3/RPT button (14) on the control panel (or the RPT button on the remote control) during disc play repeatedly to activate Repeat Mode: • • • DV2011 COMP ACT MP3 WMA DIGITAL AUDIO MUTE Press 3/RPT once to turn repeat off. Press 3/RPT twice to repeat play the current track. Press 3/RPT three times to repeat play the whole disc.
DV2011 MP3/WMA OPERATION Entering ID3 Tag MP3 and WMA (Windows Media Audio) music files are digital audio files that are compressed to allow more files on a single CD. This unit can play MP3/WMA directly from files contained on a CD-R/RW using the buttons on the receiver (or optional remote) as described below. Many types of software are available for converting audio files into MP3/WMA formats. Jensen recommends Nero, MusicMatch Jukebox or Roxio Easy CD Creator.
DV2011 DVD/DISC OPERATION Once a DVD disc is inserted into the unit, the unit will automatically start playback from the beginning of the disc. Once the preview tracks have been played, the DVD MENU, ROOT or TITLE of the DVD disc will appear on the TFT monitor and “ROOT” will be displayed on the LCD panel. Press the MENU button on the remote control to bypass previews and access the root menu.
DV2011 Title Menu Function (DVD Only) • If the DVD has multiple titles recorded on the disc, you can select a specific title from the title menu from which to start playback. 1. Press the TITLE button on the remote control during playback to display the title menu. 2. Select the preferred title using the remote control arrow keys (29) and confirm by pressing the ENTER button. • • Choose DISC GO TO to select an exact playback starting point relative to the total disc playing time.
DV2011 On-Screen Display Function Display Subtitles (DVD/VCD Only) Press the display ( ) button repeatedly during disc playback to view playback information at the top of the screen. If you are watching a disc recorded in multiple languages with subtitles, press the button on the remote control to choose the language in which you would like the subtitles to appear. Continue pressing to select “SUBTITLE OFF” and turn off subtitles.
DV2011 SYSTEM MENU • Press the (setup) button on the remote control to access the SYSTEM SETUP menu. Use the arrow (<, >) buttons to choose between from the following menu categories: • • • • • General Setup Speaker Setup Dolby Digital Setup Video Setup Preference Setup • • While in the setup menus, use the (<, >, /\, \/) buttons (29) to select options and change settings. 1. 2. 3. Speaker Setup Page Use the /\ (up) / \/ (down) buttons to select the setting to be changed.
DV2011 Preference Page TV TYPE • PAL AUTO • NTSC AUDIO • ENGLISH FRENCH GERMAN SPANISH ITALIAN PORTUGUESE THAI SUBTITLE ENGLISH FRENCH NOTE: Parental Control functions only if the DVD title has it encoded in its program. Parental control does not work for VCD/SVCD/CVD or CD Audio. GERMAN SPANISH • ITALIAN PORTUGUESE THAI OTHERS DISC MENU the language list on the disc menu, the language originally recorded on the disc will be used.
DV2011 TROUBLESHOOTING SPECIFICATIONS DVD/CD Symptom No power Cause Solution Signal to Noise Ratio. . . . . . . . . . . . . . . . . . . . . . . . . . . . . . . . . . . . . . . . . . . . . . . . . . > 90dB Dynamic Range. . . . . . . . . . . . . . . . . . . . . . . . . . . . . . . . . . . . . . . . . . . . . . . . . . . . . . > 90dB Frequency Response . . . . . . . . . . . . . . . . . . . . . . . . . . . . . . . . . . . . 20Hz to 20KHz +/- 3dB Channel Separation. . . . . . . . . . . . . . . . . . . . . .
DV2011 21
DV2011 22
ASA Electronics Corporation www.asaelectronics.com www.jensenrvdirect.com ©2010 ASA Electronics Corporation v.
DV2011 24