USER'S GUID C 0
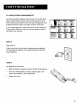
WARNING To reduce the risk of electric shock, do not remove cover (or back). No user serviceable parts inside. To reduce the risk of fire or Refer servicing to qualified shock hazard, do not expose this TV to rain or moisture. This symbol indicates "dangerous voltage" inside the product that presents a risk of electric shock or personal injury. Caution: service personnel. _This important symbol instructions indicates accompanying the product.
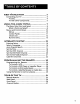
FIRST T_IINGS FIRST ....................................... 3 Connecting your TV ....................................................... TV Only .......... . .......................................................... TV with other Components ..................................... 4 4 5 USING THE MENU SYSTEM ........................... The Menu Rule: Point and Select ................................. What is Point and Select? ........................................ Menus and Control Panels .............
QUICK Audio REFERENCE ........................................ 39 40 Menu ................................................................. Picture Quality Menu .................................................. Screen Menu ................................................................ Channel Menu ............................................................. Time Menu .. .......... ....................................................... Parental Controls Menu .........................................
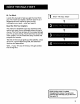
Hi, I'm Mark. I wrote this manual to help you get the most from your TV. I know you expect a lot from your TV, so I designed this user manual to give you the information you need.., when you need it. 1 FIRSTTHING5 I FIRST V Read the first four chapters The manual is designed to get you started quickly... and let you catch up on the details when you get a chance. The first four sections of the manual will get your TV up and running.
STE P 1 Unpack the TV. Make sure to locate the remote control and Connections Foldout. Important Information: Optional Stand CAUTION: Matching stands were designed to be used with the table model TV included in this book. The recommended stands are provided with hardware to secure the TV to the stand so that it cannot be easily pushed off, pulled off or tipped over. Your RCA dealer can help you choose the appropriate stand for your TV.
TV WITH OTHER Use the Connections COMPONENTS Fo_dout to connect your TV to a VCR, DVD player, and/or satellite other components, detailed information If your components receiver. After connecting proceed to the next step. See AppendixA for about using each of these connections. don't match those shown on the foldout, if you prefer a different component ' your TV and connection, or see your dealer or specific user manuals. STEP 3 Plug in the TV.
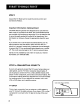
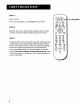
STEP 5 _o_ Turn on the IV. PressTV on the remote, or press POWER on the 1-V itself. v oR1 SAT,C_ O0 REVERSE PLAY RECORD STOP _1t mTV FORWARO <_ _> _> PAUSE STEP 6 Read the next section, Using the Menu System, which is a brief • overview of the basic rules for getting around in the menus. STEP 7 Proceed to section three, Interactive Setup. The interactive setup MUTE CH- _0 _0 _0 _0 _0 _0 _AvuTo _, 0 GO BACK _0 _0 _0 0 _.-.
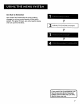
One Rule to Remember You control and customize changes to various control the TV by making panels in the menu system. The great thing is, you only one rule: point and select. ¥ need to know 2 USING THE MENU SYSTEM ¥ V J have to use some kind of menuing system. Look at it this way: you only I If you towant a lot cool features, you | need know oneofrule.
THE MENU RULE: POINT AND SELECT You only need to know one rule to use the on-screen menus and control WHAT panels: point and select. IS POINT AND The point and select method 1. SELECT? has two steps. Point to a menu item using the MOVE arrows on the remote. To point up or down, press the up or down arrows. To point left or right, press the left or right arrows. 2, Select a menu item by pressing MENU°SELECT.
3. Press MENU to select Channel. The Channel menu comes up. 4, Point to Exit and press MENU to return to the Main menu. 5. Point to Exit and press MENU to leave the menu system and return to TV viewing. If you ever want to leave the menu system, press CLEAR. Once you know how to point and select your way through the menus, you can apply this rule in the control panels, which do the real work in the menu system.
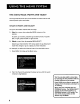
MENUS AND CONTROL PANELS There are two parts to the menu system: menus and control panels. But before you can use a control panel, you first have to move through at least one menu--the Main menu. MENUS The first menu is called the Main menu. To bring up the Main menu: 1. Press MENU on the remote or front panel: Menus take you to another menu or a control panel. There are two ways to make a choice in a menu: • Point and select with the MOVE arrows and MENU. • Pressa number button on the remote.
CONTROL PANELS Control Panels do the work in the menu system: it's where you choose a setting, enter a number, or adjust a level such as tint or brightness. There are three kinds of control panels: sliders, choice lists, and numeric entry. Sliders Sliders are used to make adjustments to a particular control. For example, to adjust the TV's contrast: 1. Press MENU to bring up the Main menu. 2. Point to Picture Quality and press MENU. The Picture Quality menu comes up. 3.
CHOICE LISTS Choice lists are used to choose a particular setting from a list of settings. The current setting in a choice list is always the highlighted item. For example, to indicate whether you're currently using a home antenna or a cable TV signals: 1. Press MENU to bring up the Main menu. 2. Point to Channel and press MENU. The Channel menu comes up. 3. Point to Signal Type and press MENU. The Signal Type choice list comes up with the current setting highlighted.
NUMERIC ENTRY A numeric entry control panel is used to enter numbers or letters. For example, to set the current time: 1. Press MENU to bring up the Main menu. 2. Point to Time and press MENU. 3. Point to Set Time and press MENU. The Set Time numeric entry control panel comes up. Notice the pointer the first dash. 4, Press the up arrow to enter a number underneath in that column. 5. Press the right arrow to move to the next column, the up or down arrow to enter a number.
There's an on-screen setup routine Your "IV has software that tells it what to do, just like a computer. The interactive setup routine takes you through the steps needed to configure the TV: • Select a menu language • Search for available • Set the time • Set theVCR1 • Set the DVDeVCR2 • Set the SAToCABLE channel • Make V channels V channel the channel channel list and labels 3 I NTE RACTIVE I S ETU P V Language and Auto Channel Search, to receive antenna or cable TV signals.
ENTERING SETUP Setup is accessed through the Main menu: 1. Press MENU to bring up the Main menu. 2. Point to Setup and press MENU. The first Setup screen comes up, asking you to confirm 3. that you want to begin. Press MENU to begin the Setup routine. SELECT A LANGUAGE The first part of the setup routine preferred system. 1, Press MENU to select English as your preferred the menuing system. 2.
AUTO CHANNEL SEARCH The next part of the setup routine search automatically antenna asks you if you want the TV to for all channels available through your or cable TV system. This is sometimes called "autoprogramming." , Press MENU to tell the TV to begin searching for channels. The display gives you a progress report and tells you when it has finished. 2. Press MENU to continue. You must complete the Auto Channel Search to receive TV signals and put channels in memory.
SETTHE TIME The next step lets you set the time of day. I 1. . Press MENU to bring up the Set Time control panel. Use the left and right arrows to point to the hour and minutes spaces. Use the up and down arrows to scroll through the numbers and change from AM to PM. 3. 18 Press MENU to continue.
SETTHE VCR1 CHANNEL The next step lets you set the VCR1 channel. When you set the VCR1 channel, you're telling the TV what channel to tune to when you press the VCR1 button on the remote. For example, if you have a VCR connected to the Video 1 input jacks on the back of the TV, you want the TV to tune to the Video 1 input channel when you press the VCR1 button. If you don't have a VCR1 component connected to the TV, skip this step or select Not Connected from the VCR1 Channel choice list.
SET TH E DVD'VCR2 CHANN EL The next step lets you set the DVD*VCR2 channel. When you set the DVDoVCR2 channel, you're telling the TV what channel to tune to when you press the DVDeVCR2 button For example, on the remote. if you have a DVD player connected to the Video 2 input jacks on the back of the TV, you want the TV to tune to the Video 2 input channel when you press DVDoVCR2.
SETTHE SAT.CABLE CHANNEL The next step lets you set the SAT*CABLE channel. When you set the SAT,CABLE channel, you're telling the TV what channel to tune to when you press the SAT,CABLE button on the remote. For example, if you have a cable box connected to the Antenna jack on the back of the TV, and you usually tune your TV to channel 3 to see cable stations, you want the TV to tune to channel 3 when you press SAT,CABLE.
LABEL THE CHANNELS The next step lets you make your channel list and label your channels. (For more, see List and Labels in the Quick Reference section.) 1. Press MENU to bring up the List and Labels control 2. Use the left and right arrows to point to the three different areas of the control panel (called "fields"), . Use the up and down arrows to scroll through and letters and select Yes or No in the Normal panel. the numbers List field.
What Now? Now that you've finished the interactive setup, you can sit back, relax, and enjoy the TV. Or... Program the Remote Since you've gone this far, you can take a few minutes to program the remote to control your VCR, DVD player, laserdisc player, and other component. To find out how to program the remote, go to the next section.
If you have a VCR or other component... The universal remote can be programmed to control most brands of remote controllable VCRs, satellite receivers and cable boxes. If you have an RCA, GE, or ProScan component, program it at all---other need to be programmed. V you probably don't need to manufacturer's brands V Now watch some TV! Once you've programmed the remote, you will have completed all four setup sections. Now you can sit back and enjoy the TV.
PROG RAMMI NG TH E REMOTE The universal remote can be programmed to control most brands of remote controllable VCRs and cable boxes. The remote is already programmed to control most RCA, GE and ProScan TVs VCRs, DVD players, laserdisc players and satellite receivers. Other manufacturer's brands need to be programmed. PROGRAMMING THE REMOTE TO CONTROL A VCR To determine whether the universal remote needs to be programmed, turn the VCR on, point the remote at the VCR, and press the VCR1 button.
Universal Remote Admiral ................................. 06,79 Aiwa ........................................... 15 Akai ................... 03,17,22,23,63,66 Audio Dynamics .................... 14,16 Bell&Howell ............................... 02 Broksonic ................................... 10 Candle ........................ 07,09,13,44, .......................................... 45,46,52 Cannon .................................. 08,53 Capehart .................................... 01 Citizen ..........
PROGRAMMING A DVD PLAYER THE REMOTE OR LASERDISC TO CONTROL PLAYER The remote's DVDoVCR button is preprogrammed to control the primary functions of a GE, ProScan or RCA DVD player. If you would like this button to control a device other than a DVD player, you may program the remote to control a laserdisc player or VCR. To program the DVD.VCR button to control a device, use the DVD player or laserdisc player codes at the right or the VCR codes on the previous page. .
PROGRAMMING SATELLITE THE RECEIVER REMOTE TO CONTROL A OR CABLE BOX Refer to the Connection Foldout or contact your cable company to hook up your cable box. If you have a cable box with its own remote, then you may also be able to use the TV's remote with your cable box. This remote may not operate all models of the brands that are shown. Use the codes at the right, or on the sheet packed with your remote. 1. Turn on the cable box or satellite receiver. 2.
A picture book tour This section talks about the TV's main Parts (at least the parts you'll actually use): • The Remote Control • The Channel Marker • The Back Panel • The Front Panel 31
REMOTE BUTTONS POWER When in "IV mode, turns off the TV. In VCR mode, and if programmed, turns on and off most VCRs. VCR1 If programmed, turns on VCR and puts the remote in VCR mode. Also turns on the TV. SAToCABLE if programmed, turns on satellite receiver or cable box. Puts the remote in SAToCABLE mode. Also turns on the TV. DVD.VCR2 REVERSE RECORD If programmed, turns on DVD player or second VCR PLAY STOP FORWARD PAUSE or laserdisc player. Puts the remote in DVD.VCR2 mode.
ANTENNA Functions as TVNCR button in VCR mode, TV/ receiver button in SAT, Cable mode and TV/DVD button in DVD mode. CLEAR Removes any menu or display from the screen and returns you to "IV viewing. MENU,SELECT Brings up the Main menu. When in the menu system, selects highlighted items or returns you to the previous menu. When in VCR mode, it functions as a PROGRAM button. RESET Resets picture quality controls to the Bright Lighting Picture Control Preset.
BACK PANEL VIDEO INPUT 1 VIDEO _ R _ UMONO R INPUT 2 ANT UMONO INPUT 1 Lets you connect a video component such as a VCR, satellite receiver, DVD player or laserdisc player. L/MONO Provides left audio connection. connecting a mono component, left audio connector use the L/MONO input. The is usually white. RIGHT Provides right audio connection. connector VIDEO Or, if you are The right audio is usually red. Provides video connection. The video connector is usually yellow.
AUDIO OUTPUT Provides variable-controlled or fixed-level stereo audio output. Variable output is ideal when connecting the TV to an amplifier that does not have its own volume control or remote control. Fixed output is ideal when connecting to an AJV receiver or amplifier that has its own remote control. You can choose the type of audio output Output & Speakers control by selecting the Audio panel in the Audio menu. the TV, use the left (L) AUDIO OUTPUT I jack.
FRONT MENU PANEL Brings up the Main menu. When in the menu system, it selects highlighted CH v items. Also returns you to the previous menu. Scans down through the current channel list. In the menu system, it points down to items and adjusts menu controls. CH ^ Scans up through the channel list. In the menu system, it points up to items and adjusts menu controls. VOL - Decreases the volume. When in the menu system, VOL- is used to point left to items and adjust menu controls.
CHANNEL MARKER There are several indicators that come up when you change channels, press the INFO button, or press the TV button. This display is called the Channel Marker. 12:01 Mute Displays the current time. or Stereo Mute is displayed when you mute the audio. Stereo is displayed when the current channel is broadcasting in Stereo. CC Displayed when Closed Captioning is avagabte on the current channel. SAP Displayed when the current channel is broadcasting SAP (Second Audio Program) information.
A SHORT GUIDE TO THE MENU SYSTEM This section provides a brief explanation of all the menu commands. These commands are organized in the chapter by their location in the Main menu. • Audio Contains the controls that the way the TV sounds. • Picture Quality Contains you adjust the picture. • Screen Contains the controls that let you adjust the Closed-Caption mode and display.
AUDIO Mute MENU Press MENU to reduce the TV's volume to it's minimum level. Press MENU again to restore the volume. Tone Controls Displays the slider controls for adjusting the TV's treble, bass and balance. Audio Processor Displays a choice list of available audio modes, which control the way the sound comes through your speakers. Mono Plays the sound in mono only. Use this setting when receiving broadcasts with weak stereo signals.
PICTURE QUALITY Basic Picture Controls MENU Displays the five slider controls for adjusting the way the picture looks. Contrast Adjusts the difference between the light and dark areas of the picture. Color Tint Adjusts the richness of the color. Adjusts the balance between the red and green levels. Black Level Sharpness Auto Color Adjusts the brightness of the picture. Adjusts the crispness of edges in the picture.
SCREEN MENU Closed Caption Display Displays a choice list that lets you choose the way closed captioning information screen. Off No captioning information On Always available. is shown on the displayed. Captioning information shown always, when On When Sound is Muted Displays captioning information, when available, whenever the TV's sound is muted by pressing the MUTE button. The captioning information Closed Caption is not displayed when the sound is not muted.
CHANNEL MENU Signal lype Displays a choice list that lets you select the current antenna type. UHF/VHF Antenna Choose this if you are currently using an off-air antenna for TV signals. Cable TV Choose this if you are currently using cable or a cable box for TV signals. List and Labels Displays a control panel that lets you custom- build your Normal channel list and choose a six-character label for each channel. Follow the on-screen directions to enter your channels and other information.
(Channel Menu continued) Auto Tuning Displays a choice list that lets you set up the "IV to automatically tune to the correct input channel when you press a component button (VCR1, DVD.VCR2, or SAT.CABLE). Set VCR 1 Channel Displays a choice list that lets you select the channel that the TV tunes to when you press the VCR1 button. Set DVD*VCR 2 Channel Displays a choice list that lets you select the channel that the TV tunes to when you press the DVD*VCR2 button.
TIME MENU Sleep Timer Displays a control panel that lets you select the amount of time you want to give the TV before it shuts itself off. Schedule Displays a control panel that lets you set up a schedule for turning the TV on and off automatically. Make sure to turn the schedule On. The on-screen directions guide you through the steps needed to set the schedule. Set Time Displays a control panel that lets you enter the current time.
PARENTAL CONTROLS MENU Displays the menu items that let you adjust the Parental Controls feature. Parent Approved Channels Displays a control panel that lets you decide what channels can be viewed or selected using the TV's front panel controls. Chan# Use the up and down arrows to scroll up and down through the channel scan list. You can enter the channel number directly using the number buttons.
SETUP MENU The setup routine is detailed earlier in the manual in the Interactive Setup section.
This sections details TV's important how to use FIVE of the features: • PIP (Picture-in-Picture) Operation • Fetch Menu • Choosing • Using Closed Captioning • Displaying Display an audio on-screen processor Program Details menus and control panels in the menu system, see the Quick I For more about the different Reference section.
PIP (PICTURE-IN-PICTURE) The PIP feature (picture-in-picture) OPERATION lets you display a second, smaller picture on top of the main picture. Main Picture There are six remote buttonsthat control the way the PIP window works: PiP Brings up the PIP window. Press PIP again to remove the window. MOVE buttons of the screen. Let you move the PIP window to different areas MOVE SWAP Switches, or "swaps," the video from the PIP window with the main picture.
Two Tips for Using PIP Buttons Skip to PIP: Channel Surfing in the Main Picture You can surf through the channels during commercial breaks using the SKIP and CH (channel) buttons. 1. Press SKiP to set the commercial skip timer and bring up the PIP window. The current channel appears in both the main picture and the PIP window. 2. Pressthe CH ^ (channel up) or CH v (channel down) buttons. The main picture surfs through the channel list.
FETCH MENU The FETCH menu is a short-cut to several commonly used features and appears as colored icons at the bottom of your screen. You can display the FETCH menu by pressing the FETCH button on the remote. Use the arrow buttons to highlight item and press MENU to select it. an Main Picture Sleep Timer Select this item to go directly to the Sleep Timer control panel. Use the arrow buttons to adjust the timer. Front Panel Lockout Takes you directly to the Front Panel Lock control panel.
CHOOSING AN AUDIO PROCESSOR Changing the audio processor changes the way your TV sounds. There are two ways to change the audio processor: a) from the Audio menu, and b) by pressing SOUND on the remote. more, see Audio menu in the Quick Reference section. For Choosing an audio processor from the Audio menu 1. Press MENU to bring up the Main menu. 2. Press MENU again to select the Audio menu. 3. Point to Audio Processor and press MENU.
CLOSED CAPTIONING Many programs are encoded with closed captioning information, which lets you display the audio portion of a program as text on the TV screen. You can tell the TV to display closed captioning: a) never, b) whenever it is available, or c) whenever the program is muted. TO DISPLAY CLOSED CAPTIONING 1. Press MENU to bring up the Main menu. 2. Point to Screen and press MENU. The Screen menu comes up with Closed Caption Display highlighted. 3.
CLOSED CAPTIONING MODES The TV offers eight closed-captioned modes, To Set the Closed Captioning modes, including four text Mode: 1. Select Screen from the Main menu 2. Point to Closed-Captioned Mode and press MENU. This choice list comes up: 3. Point to your choice and press MENU to select it and return to the Screen menu. Turning off Closed Captioning 1. Select Screen from the Main menu. 2. Press MENU to select Closed Caption Display 3. Point to Off and press MENU.
ON-SCRE EN PROG RAM DETAI LS Program providers have the option of sending information through the airwaves along with their programs. If this information is available, the TV can display it up when you press INFO on the remote. To display the on-screen program I. Press INFO once to bring up the channel marker. 2. Press INFO again to bring up the program details: title, the program's length and elapsed time. 3. 4.
Things to DO Before Protect your Connecting components from Components power surges • Connect all components before cords into the wall outlet. plugging • Always turn off the TV and/or component connect or disconnect any cables. any power before you Position cables correctly to avoid audio hum or interference • Insert all cable plugs firmly • Place the audio/video into their jacks. cables to the sides of the TV's back panel instead of straight you connect your components.
TV AND MONO This information Foldout. Connection • • VCR (CONNECTION applies to Connection A) A in the Connections A provides: stereo sound from broadcast programs mono sound from VCR • Picture in Picture (PIP) • Watch one channel on TV while recording another channel To use this connection • (2) audio/video • (2) coaxial cables you must have: cables To connect: 1. Connect cables as shown in Connection A. 2.
•TV AND STEREO VCR (CONNECTION B) This information applies to Connection B in the Connections Foldout. Connection B provides: • • stereo sound from broadcast stereo sound from VCR • Picture in Picture (PIP) • Watch one channel on TV while recording To use this connection programs youmust • (2) coaxial cables • (3) audio/video • (1) S-Video cable (optional) another channel have: cables To connect: 1. Connect cables as shown in Connection B. 2.
TV, VCR AND DVD (CONNECTION C) PLAYER This information applies to Connection C in the Connections Foldout. Connection C provides: • • stereo sound from broadcast programs stereo sound from VCR • Picture in Picture (PIP) • Watch one channel on TV while recording To use this connection • (2) coaxial cable another channel you must have: • (6) audio/video • (1) S-Video cable (optional) cables To connect: 1. Connect cables as shown in Connection C. 2.
TV AND (2) VCRS (CONNECTION This information Foldout. applies to Connection D) D in the Connections You can record from one tape to another Connection D provides: (tape dubbing): 1. Insert original tape into VCR2. • • stereo sound from broadcast programs stereo sound from VCR • Picture in Picture (PIP) • • Watch one channel on TV while recording Record from one VCR to the other ° 2. Insert blank tape into VCR1. 3. Press VCR1. another channel 4.
TV AND DVD This information Foldout. Connection PLAYER (CONNECTION E) applies to Connection E in the Connections E provides: • stereo sound from broadcast programs • Picture in Picture (PIP) To use this connection you must have: • (1) coaxial cable • (3) audio/video cables • (1) S-Video cable (optional) To connect: 1. Connect cables as shown in Connection E. 2. Return to First Things First, then follow the steps in the Interactive Setup. USING To watch 1.
TV AND SATELLITE (CONNECTION This information Foldout. Connection RECEIVER F) applies to Connection F in the Connections F provides: • • stereo sound from broadcast programs stereo sound from the satellite receiver • Picture in Picture (PIP) To use this connection you must have: • (3) coaxial cable • (3) audio/video * (1) S-Video cable (optional) • stereo sound from satellite cables programming To connect: 1. Connect cables as shown in Connection 2.
TV, VCR, AND SATELLITE RECEIVER (CONNECTION G) This information Foldout. Connection applies to Connection G in the Connections G provides: • • stereo sound from broadcast programs stereo sound from VCR • Picture in Picture (PIP) • Watch one channel on TV while recording To use this connection • (4) coaxial cable • (6) audio/video • (1) S-Videocable another channel you must have: cables (optional) To connect: 1. Connect cables as shown in Connection G. 2.
TV, VCR, SATELLITE RECEIVER, PLAYER (CONNECTION This information Foldout. Connection • • applie_to AND DVD H) Connection H in the Connections H provides: stereo sound from broadcast stereo sound from VCR programs • Picture in Picture (PIP) • Watch one channel on TV while recording To use this connection another channel you must have: • (4) coaxial cable • (6) audio/video • (1) S-Video cable (optional) cables. To connect: 1. Connect cables as shown in Connection H. 2.
TV, (2) VCRS, AND (CONNECTION SATELLITE RECEIVER I) This information applies to Connection I in the Connections Foldout. Connection I provides: • stereo sound from broadcast programs • stereo sound from VCR • • Picture in Picture (PIP) Watch one channel on TV while recording To use this connection another channel you must have: • (5) coaxial cable • (9) audio/video • (1) S-Video cable (optional) cables TO connect: 1. Connect cables as shown in Connection 2.
8. If you want to watch a different channel, set the TVNCR switch on both VCRs to TV; press TV; then tune to a channel. To record off-air (cable or antenna) broadcasts and watch a different channel: 1. Turn off VCR2, 2. Insert blank tape into VCR1. 3 PressVCR1. 4. Make sure to set VCR1 to line input. 5. Press RECORD to begin recording 6. To watch another channel, make sure the TVNCR switch on the VCR is set to TV; then press iV and tune to a channel. To play a tape on VCRI: 1.
CONNECTING CONNECTING 1, AUDIO COMPONENTS A STEREO AMPLIFIER Connect the amplifier's TV audio inputs to the left (L) and right (R) AUDIO OUTPUT jacks. 2. You may prefer to turn off the TV's internal speakers by selecting Audio Output and Speakers from the Audio menu, then turning the speakers off. If your audio amplifier remote control, settings. Important: is part of a system that uses its own you may prefer to select the fixed output Do not use the amplifier's PHONO inputs.
CONNECTING A CAMCORDER FOR PLAYBACK This connection is recommended for playing back from the camcorder to the TV: 1. Connect the camcorder's audio/video outputs or INPUT 2 audio and video jacks on the TV. 2. Press INPUT on the remoteuntil VlD1. 3. Start playback on the camcorder. to the INPUT 1 the channel marker displays PLAYBACK FROM AN S-VHS CAMCORDER To connect a camcorder 1. with S-Video capability: Connect an S-Video cable from the camcorder to the S-VIDEO jack on the TV. 2.
TROUBLESHOOTING Troubles sometimes are caused by simple "faults" that you can correct without the help of a service technician. If you experience any difficulty with your TV, check a few basic remedies before calling your service technician. TV will not turn on • Check to make sure it is plugged in. • Check the wall receptacle (or extension cord) to make sure it is "live" • Maybe batteries in remote control are "dead." • Maybe remote control iS not aimed at remote sensor.
Blank screen • Maybe the device connected to the input jacks is not turned on. • Try another channel. • Press RESET,in case the picture controls are set too low. No sound, picture okay • Maybe sound is muted. • Maybe TV's speakers are turned off. Check the Audio Output and Speakers control panel in the Audio menu. • If using an S-VHS component, TV's L and R INPUT 1 jacks.
What your warranty • covers: Any defect in materials or workmanship. For how long after your purchase: • 90 days for labor charges. • One year for parts. • Two years for picture tube. (The warranty period for rental units begins with the first rental or 45 days from date of shipment to the rental firm, whichever comes first.) What we will do: • Pay any Authorized RCA Television Servicenter the labor charges to repair your television.
CARE AND CLEANING You can clean the TV as required, to occasionally using a soft cloth or the dusting attachment vacuum the ventilation To clean the TV screen, use a soft cloth dampened polish on the TV cabinet or screen. While cleaning do not spray liquid directly and inside the TV. Also, avoid placing with a diluted ventilation. soap and water mixture. on the screen, or allow drinks or vases with water increase the risk of fire or shock hazard or damage I for your vacuum cleaner.
General Cable Information The following Antenna (or cable-TV) connections are made with either coaxial antenna cable or twin-lead cable. dealers and electronics supply stores in case you want Coaxial cables are shielded so they are less susceptible to hum or interference from adjacent cables. accessories are available from most to position your components additional cables.
AudioNideo Cables continued Stereo Audio Accessory Order Form for RCA TV Models Cable Double gold-tipped generally Description cable Part No. Signal Splitter used for 3old-Tip Push-on Antenna Cable (6-f_) AHg65G $5.95 Sold-Tip Push-on Antenna Cable (10-ft) AH066G $4.95 connecting stereo audio components. Gold-Tipped cable AH072G (3-ft) Sold-Tip AudioNideo Cable (3-ft) AH069G $3•95 Gold-Tip Audio/Video Cable (5-ft) AH070G $7.99 AH072G $11.95 Dubbing Cable (6-ft) AH075G $5.
To order Dealer. Charge your order on your VISA or Maste_ard by filling in below accessories, CREDIT IMPORTANT: Copy complete account number from your VISA card Mycardexpires: below to order by telephone. VISA" United States and Canadian _ expires: on MasterC_d AUTHORIZED SIGNATURE Prices are subject to change without notice. PLEASE Print or type your name and address clearly. This will be your mailing label. A complete and correct order will save you days of waiting.
A F R Accessories 74 Amplifier 68 Antenna (ANT) 34 Audio menu 40 AUDIO OUTPUT 35 Audio Output Volume & Speakers 40 Audio Processor 40, 53 Auto Channel Search 6, 17, 43 Auto Color 41 Fetch menu 52 Fixed images 73 Fixed output 35 Fixed Output, Speakers Off 40 Front panel buttons 36 Front Panel Lockout 46, 52 Remote Control Programming 26 Remote batteries are low 37 AutoTuning Inputs Audio, video 34 INPUT 1,2 34 19, 20, 21, 44 B Back panel jacks 34 Basic Picture Controls 41 Batteries 5, 37 Black Level
CREATING A GREENER FUTURE At Thomson Consumer Electronics we are dedicated to the preservation of our natural heritage and to a healthy, and safe wa_yof life for current and_future generations. This is a global effort which encompasses every THOMSON facility throughout the world. We believe that clean air, clean water, a protected earth, and healthy people are not only practical and desirable goals, but achievable ones as well.