HDTV/DVD Monitor User’s Guide
Important Information WARNING To reduce the risk of fire or electric shock, do not expose this product to rain or moisture. CAUTION THIS PRODUCT UTILIZES A LASER. USE OF CONTROLS OR ADJUSTMENTS OR PERFORMANCE OF PROCEDURES OTHER THAN THOSE SPECIFIED HEREIN MAY RESULT IN HAZARDOUS RADIATION EXPOSURE. DO NOT OPEN COVERS AND DO NOT REPAIR YOURSELF. REFER SERVICING TO QUALIFIED PERSONNEL.
Important Information IMPORTANT SAFETY INSTRUCTIONS 1. Read these instructions. 2. Keep these instructions. 3. Heed all warnings. 4. Follow all instructions. 5. Do not use this apparatus near water. 6. Clean only with dry cloth. 7. Do not block any ventilation openings. Install in accordance with the manufacturer’s instructions. 8. Do not install near any heat sources such as radiators, heat registers, stoves, or other apparatus (including amplifiers) that produce heat. 9.
Introduction Key Features Overview Your TV is equipped with features that will add to your TV viewing experience. The following information summarizes a few of these features. Chapter 4 provides more information about the rest of the TV’s features and how to use them. DVI-HDTV Input Lets you connect an HD receiver with a DVI output. L/MONO DVI-HDTV R • DVI (Digital Visual Interface) Provides an uncompressed, digital video interface developed for highbandwidth digital connection.
Table of Contents IMPORTANT SAFETY INSTRUCTIONS ................ 1 Introduction Key Features Overview............................................... 2 DVI-HDTV Input ............................................. 2 Dolby* Virtual ................................................... 2 PIP (Picture-In-Picture) and POP (Picture-Outside-Picture) ................................ 2 MP3 Audio Disc Playback ................................. 2 The On-Screen DVD Information Display ........
Table of Contents The Lock Menu ......................................................... 28 Locking Your DVD ...........................................29 Unlocking Your DVD ....................................... 29 Changing Your Password ................................ 29 Setting the Ratings Limits .............................. 29 Unrated Titles .................................................. 30 System Test ...................................................... 30 The Display Menu .................
Chapter 1: Connections & Setup Things to Consider Before You Connect Protect Against Power Surges • Connect all components before you plug any of their power cords into the wall outlet. • Turn off the TV and/or component before you connect or disconnect any cables. • Make sure all antennas and cables are properly grounded. Refer to the Important Safety Instructions on page 1. Protect Components from Overheating • Don’t block ventilation holes on any of the components.
Connections & Setup Choose Your Connection There are several ways to connect your TV/DVD. Please use the following chart to determine which connection is best for you. Proceed to the appropriate page and connect your TV/DVD. Note: If you prefer, we can provide you with the name of an Authorized Service Representative who will visit your home for a fee to install your electronic entertainment system and to instruct you in its operation. For details about this service, call 1-888-206-3359 or visit rcascenium.
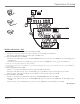
Connections & Setup CABLE T V/D O R VD OFF-AIR ANTENNA HD RECEIVER 1A S-VIDEO ANT IN VIDEO R AUDIO PB Y L L PR R ANT OUT L PR PB Y R SAT IN HD iver e Rec 1B 2B 2A 3B Satellite Receiver L/MONO CMP1 L/MONO R PR PB Y DIGITAL AUDIO OUTPUT TV/DVD DVI-HDTV PB Y L/MONO R PR CMP2 R EXT/INT COMPONENT INPUTS + + RIGHT LEFT EXTERNAL SPEAKERS 3C COMPOSITE INPUTS L/MONO S-VIDEO V AUDIO/VIDEO OUTPUT R VID2 S-VIDEO 3A VID1 VCR L/MONO V V ANTENNA/ CABLE R SU
Connections & Setup SATELLITE RECEIVER VIDEO S-VIDEO /D TV AUDIO L R VD 3A 3C Y PB PR L/MONO R L/MONO TV/DVD CMP1 DIGITAL AUDIO OUTPUT DVI-HDTV Y 3B PB PR L/MONO R CMP2 R EXT/INT COMPONENT INPUTS + + RIGHT LEFT EXTERNAL SPEAKERS COMPOSITE INPUTS S-VIDEO L/MONO V L/MONO 1C VCR R AUDIO/VIDEO OUTPUT VID2 S-VIDEO V VID1 S ate e llit VARIABLE AUDIO R SUBWOOFER L R 1A 1B VCR CABLE FIXED AUDIO R L V ANTENNA/ CABLE VIDEO L AUDIO R IN L O OUT O R VID
Connections & Setup Y PB PR L/MONO R Y PB PR L/MONO R L/MONO CMP1 DIGITAL AUDIO OUTPUT TV/DVD DVI-HDTV CMP2 TV R D /DV EXT/INT COMPONENT INPUTS + + RIGHT LEFT EXTERNAL SPEAKERS S-VIDEO L/MONO R AUDIO/VIDEO OUTPUT VID2 VCR V VID1 S-VIDEO COMPOSITE INPUTS V FIXED AUDIO R L V ANTENNA/ CABLE VARIABLE AUDIO L/MONO R SUBWOOFER L 1A 1B VCR CABLE R 1C VIDEO L AUDIO R IN L O OUT O R VIDEO L AUDIO ANTENNA IN R ANTENNA OUT OFF-AIR ANTENNA 2 TV/DVD + VCR 1.
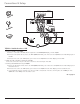
Connections & Setup TV/DVD+ A/V Receiver or Speakers These are two different ways your TV/DVD uses a component to hear audio. 1. Connect audio cables to either the FIXED or VARIABLE AUDIO L and R OUTPUT jacks and to the Audio Inputs on the A/V receiver. • FIXED provides fixed-level audio output from the TV/DVD. This audio output is ideal for connecting to an A/V receiver that has its own volume control. • VARIABLE provides variable-level audio output.
Connections & Setup Explanation of Jacks This section describes the jacks you can use to make connections. There are several ways to connect components to your TV/DVD. DIGITAL AUDIO OUTPUT Lets you connect a Dolby Digital receiver to your TV/DVD, if your receiver has an optical input. Use an optical cable (or SPDIF cable) to connect your TV/DVD to the receiver for theatre-quality sound. Go to page 30 for more information on digital audio.
Connections & Setup The Front of Your TV/DVD Front Inputs The TV/DVD has front inputs for convenience: one set of audio/video inputs, an S-Video and a headphone jack. Locate the jacks either on the front of the TV/DVD or on one of the sides. You can access the component you connected to the front of the TV/DVD by pressing the INPUT button on your remote until FRNT appears on the screen. The jacks are ideal for using a video game console or a camcorder.
Connections & Setup Set the Menu Language The first part of the setup allows you to select your preferred language for the menu system. 1. Highlight your preferred language for the menu system using the arrow buttons. 2. Press OK to select that language (the Channel Setup screen appears with Auto channel search highlighted). Complete Auto Channel Search This part of the setup allows the TV to search for all channels viewable through your antenna or cable TV system.
Chapter 2: Using the Remote Control The Buttons on the Remote Control Indicator (0-9) Number Buttons Enter channel numbers and time settings directly through the remote control. ON OFF VCR1 DVD TV SAT CABLE AUX VCR2 MUTE SKIP VOL VOL Backlight Lights up some of the buttons in the dark. CH - GUIDE GO BACK DISC MENU INFO ZO OK O ZO OM + FREEZE CLEAR 1 2 3 4 5 6 8 RECORD PIP FORWARD STOP SWAP When using PIP or POP, changes the channel in the picture window.
Using the Remote Control TV Turns on the TV and puts the remote in TV mode. Also displays current status. VCR1 Puts the remote in VCR1 mode and, if Autotuning is enabled, will turn on the TV and tune to the correct input channel. VCR2 Puts the remote in VCR2 mode and, if Autotuning is enabled, will turn on the TV and tune to the correct input channel. VOL – or VOL + Decreases or increases the TV’s volume.
Using the Remote Control Important Using Direct Entry 1. Turn on the component to be programmed. You must continue pressing the component button while you enter the code. 2. Look up the brand and code number(s) for the component on the code list in this section. 3. Point the remote at the component. Let’s say you have a Zenith VCR. To program the universal remote to operate the VCR, you would: 4. Press and hold the component button you want to program on the remote. 5.
Using the Remote Control VCR Codes continued Programmable for SAT•CABLE and AUX buttons. ABC ........................................... 5002, 5003, 5004, 5006, 5053 Antronix ................................................................... 5008, 5009 Archer ............................................................. 5008, 5009, 5010 Cabletenna ........................................................................... 5008 Cableview .....................................................................
Chapter 3: Playing DVDs Regional Coding Both the TV/DVD unit and the discs are coded by region. These regional codes must match in order for the disc to play. If the codes don’t match, the disc won’t play. This unit’s code is region 1. Using Different Menus Each disc is programmed with different features. There are three separate menu paths that you can use to access features: • The Disc menu – The disc menu is part of each disc and is separate from the DVD’s menu system.
Playing DVDs Repeat Subtitles Time Display Chapter Audio Title Transport mode Camera angle Bookmarks Text about your Info Display selection appears here Time Display This feature displays the audio/video time. For DVD discs, the time displayed refers to the current title time. For Audio CDs, it refers to the current track time. For DVD video discs, the Time Display also acts as a Time Search feature. This lets you go to a particular scene in a movie by entering the time that scene is played.
Playing DVDs Changing the Audio Language If the disc was created with different language tracks (recorded in different languages), you can use the Info Display to temporarily change the DVD’s Audio Language setting. 1. While a disc is playing, press SOUND•ANT on the remote. The current audio language appears in the text box below the row of icons. 2.
Playing DVDs Using Bookmarks The bookmark feature lets you mark a point on the disc that you can go to quickly. You can store up to 6 bookmarks per disc. When you turn the TV/DVD off or remove the disc, bookmarks are cleared. Storing a Bookmark 1. While a disc is playing, press INFO on the remote. 2. Highlight the Bookmark icon and press OK. 3. The Bookmark Menu appears. An available unmarked icon will be highlighted (a disc with two arrows). 4. When you reach the scene you want to mark, press OK.
Chapter 4: Using the TV’s Features Channel Banner There are several indicators that might appear when you press the TV or INFO buttons on the remote. This display is called the Channel Banner. The following list describes the items on the Channel Banner screen (left to right and top to bottom). 4/3 format Mono (or Stereo) SAP Sample displays on a Channel Banner. Displays the current screen format. Mono displayed when the current channel is broadcasting in mono.
Using the TV’s Features Parental Controls and V-Chip The first three choices in the Parental Controls menu involve software inside your TV (referred to as V-Chip) which allows you to block TV programs and movies based on violence, sex, or other content you may believe children should not view. Once you block programs, you can unblock programs by entering a password. By default, the software inside your TV is turned “off.” Note: Parental Control settings are not available for DVI, CMP1 or CMP2 inputs.
Using the TV’s Features The V-Chip Rating Screen The following is an example of where items are located within the Rating Limit screen. Rating Status Field Lets you select whether the status of the age-based rating limit to the left is View or Block. Rating Field Lets you select from a list of age-based ratings you can block or view. Content Themes Lists the content themes you can block or view.
Using the TV’s Features Viewing Specific Content Themes If you block specific content themes, you have the option of going back and changing some of the content themes back to ( ) View: 1. Determine the content themes you want to change to ( ) View. 2. Press the down arrow button to scroll to the rating whose content theme you want to change, such as under language (L) corresponding with TV-14. 3. Press the right arrow button to move the yellow highlight to a particular content theme status. 4.
Using the TV’s Features PIP (Picture-in-Picture) and POP (Picture-outside-Picture) Operation The PIP (picture-in-picture) feature lets you display a second, smaller picture on top of the main picture. POP (picture-outside-picture) lets you display two windows side by side. Note: PIP and POP are not available for DVI or component video sources (CMP1 or CMP2).
Chapter 5: Using the DVD Menu The DVD’s Menu System The DVD’s menu system is not the same as the disc menu or the Info Display. The DVD’s main menu comes up when there is no disc playing. If you are playing a disc, press STOP on the remote control to stop playback and bring up the DVD’s main menu. The Play/Resume Play Option To get to the DVD’s main menu, press STOP on the remote control. The first item in the main menu is the Play/ Resume Play option.
Using the DVD Menu Editing a Program Deleting Chapters To delete chapters from the playlist: 1. If the disc is playing, press STOP to stop playback (the DVD’s main menu appears). 2. Highlight Play Mode and press OK (the Play Mode menu appears). 3. Highlight Edit Program and press OK (the Edit Program screen appears). 4. Highlight the item in the playlist you want to delete. To delete an entry from the playlist, highlight it, then highlight Delete and press OK. 5. Highlight Delete, and press OK. 6.
Using the DVD Menu Locking Your DVD 1. If the disc is playing, press STOP (the DVD’s main menu appears). 2. Highlight Lock and press OK (the Lock menu items appear). 3. Highlight Lock Player and press OK. The Enter New Password screen appears. 4. Press the number keys on the remote to enter the password you want to use (similar to entering your PIN when you use a bank machine). 5. After you’ve entered the last number in the password, press OK. Confirm Password appears.
Using the DVD Menu 1. From the Lock menu, highlight Ratings Limits and press OK (the Ratings Limits menu is displayed). 2. Highlight Rated Titles and press OK (the 8-level rating limits list appears). 3. To change the rating limit, press the up or down arrow button. • The ratings that don’t require a password (free access) appear under the bar, in the green part of the block. • The ratings that require a password appear above the bar, in the red part of the block.
Using the DVD Menu The Sound Menu The Sound menu lets you select different sound settings to match the equipment you have connected to your unit. Digital Output Digital output lets you choose which type of digital audio is output from your unit. If you’ve used an optical cable to connect a Dolby Pro Logic, Dolby Digital, or DTS receiver, you must adjust this setting. There are two options: • Dolby Digital: Choose this setting if you connected a Dolby Digital receiver.
Using the DVD Menu 4. Enter the code from the Language Codes list at the end of this chapter and press OK (the previous menu appears with your selection shown next to the language option you changed). 5. Press the left arrow button or press GO BACK to return to the previous menu screen. Note: Remember, your TV/DVD can’t play the disc in the language you have chosen if the disc wasn’t created with that language option.
Chapter 6: Using the TV’s Menu System Sound Menu Sound settings Displays a choice list that lets you adjust the TV/DVD’s speakers and subwoofer. Left & Right balance Use the left or right arrow to center the bar under the arrow to balance the left and right speakers. Amplifier Use the left or right arrow to select External (if your TV/DVD is using external amplifier only) or Internal (if your TV/DVD is using the speakers in the TV/DVD).
Using the TV’s Menu System Video noise reduction Allows you to choose a setting to reduce picture “static” or any type of interference. It is especially useful for providing a clearer picture in weak analog signal conditions. Press the right arrow to choose between: Off for no noise reduction; Minimum for a softer, smoother picture and retains picture sharpness and detail; Medium for a slightly softer picture than the Minimum setting; Maximum for an even softer, smoother picture than the other settings.
Using the TV’s Menu System Setup Menu Channel setup Signal Type TV chooses signal type during initial setup. If you change cable after setup, choose Cable if you are using cable or a cable box for TV signals. Choose UHF/VHF Antenna if you are using an off-air antenna for TV signals. Auto channel search Searches for channels the signal is receiving. Go to page 13 for more information. Auto channel update them to the list.
Chapter 7: Information Displays Using the Info Display Your TV/DVD gives you many options when playing different types of discs. You can access these features through the on-screen Info Display. To access the Info Display while a disc is playing, press INFO on the remote. The Info Display appears across the top of the screen. Each of the playback features is represented by an icon. To access a feature, use the arrow buttons on the remote to highlight the icon.
Information Displays Selecting a Specific Index (Available only on Video CDs) 1. Press INFO on the remote. 2. Highlight the Index icon from the Info Display. 3. Use the number button(s) on the remote to enter the index number you want to play, or use the up/down arrows to scroll through the index numbers. When a new index number is entered, that index will begin playing.
Information Displays Editing a Playlist 1. If the disc is playing, press STOP to stop playback. The DVD’s main menu appears. 2. Highlight Play Mode and press OK (the Play Mode menu appears). 3. Highlight Edit Program and press OK (the Edit Program screen appears). 4. Highlight the item in the playlist you want to delete. 5. Highlight Delete, and press OK. 6. When you’ve rearranged the playlist and/or deleted all the tracks necessary, press OK.
Information Displays Using IntroScan (Available only on Audio CDs and MP3s) IntroScan plays the first ten seconds of each track on the CD (similar to the scan feature that’s on many car radios). To use IntroScan: 1. Press INFO on the remote (the Info Display appears). 2. Highlight the IntroScan icon. Press OK. The first ten seconds of each track will play. • After IntroScan goes through all of the tracks, it stops. • If you want to stop IntroScan while it’s in progress, press PLAY on the remote.
Chapter 8: Other Information Troubleshooting Most problems you encounter with your TV can be corrected by consulting the following troubleshooting list. Note: If you prefer, we can provide you with the name of an Authorized Service Representative who will visit your home for a fee to install your electronic entertainment system and to instruct you in its operation. For details about this service, call 1-888-206-3359 or visit rcascenium.com.
Other Information The menu is displayed in a foreign language • The Menu Language preference is set to that language. From the DVD’s main menu, select the Languages option (In Spanish, shown as Idiomas; in French, as Langues). From the Languages menu, select the Player Menus option (In Spanish, shown as Menús del Lector; in French, as Menus Lecteur). Highlight the language you prefer and press OK.
Other Information TV turns on unexpectedly • Wake up timer might have been activated. Go to page 34 for instructions. • Auto on might have been activated. Go to page 34 for instructions. • You might have pressed CH+, CH- or INPUT on the remote accidentally. Blank screen • Make sure the component connected to the TV is turned on. • Try another channel. No sound, picture okay • Maybe the sound is muted. Try pressing the volume up button to restore sound.
Other Information The Remote Control Doesn’t Work • Something might be between the remote and the remote sensor on the component. Make sure there is a clear path. • Maybe the remote isn’t aimed directly at the component (TV or VCR) that you’re trying to operate. • Maybe remote is not in TV Mode. Press the TV button so remote will control TV. • Maybe batteries in remote are weak, dead, or installed incorrectly. Put new batteries in the remote.
Other Information Limited Warranty What your warranty covers: • Defects in materials or workmanship. For how long after your purchase: • One year from date of purchase for labor. • One year from date of purchase for parts. • Two years from date of purchase for the picture tube. The warranty period for rental units begins with the first rental or 45 days from date of shipment to the rental firm, whichever comes first.
Other Information Remote Control This is the remote control that came packed with your TV. Replacements or spares can be ordered as needed. VC R1 ON DV D TV R2 AU X MUT E VOL CH IDE MEN U GO INFO OK F MEN U 1 7 INPU Screw-on antenna cable (6-ft) VH82 $4.95 Push-on antenna cable (6-ft) VH89 $5.95 Monaural VCR Dubbing Cable (6-ft) VH83 $5.95 Stereo VCR Dubbing Cable (6-ft) VH84 $9.95 S-Video Cable (6-ft) VH976 $7.95 S-Video Cable (12-ft) VH913 $14.
Visit the RCA Scenium website at www.rcascenium.com Please do not send any products to the Indianapolis address listed in this manual or on the carton. This will only add delays in service for your product. Thomson multimedia Inc. 10330 North Meridian Street Indianapolis, IN 46290 ©2002 Thomson multimedia Inc.