Complete 7-Piece 600-Watt Home Theater Audio System with 3-DVD Changer
CONTENTS Important Safety Instructions ................................................. Note to CATV System Installer ............................................... The FCC Wants You to Know ..................................................... Notes on Copyright .................................................................... 3 4 4 4 Read ead Be Before Using This produc duct ....... ........ ........ ........ ........ ........ ........ ........ ........ ........ .....
IMPORTANT SAFETY INSTRUCTIONS Careful attention is devoted to quality standards in the manufacture of your system, and safety is a major factor in its design. However, safety is also your responsibility. This section lists important information that will help you properly use and enjoy your system. Read all the included safety and operating instructions before using your system. Follow them closely, and retain them for future reference. 1.
24. Replacement Parts — When replacement parts are required, be sure the service technician uses replacement parts specified by the manufacturer or having the same characteristics as the original part. Unauthorized substitutions may result in fire, electric shock, or other hazards. 25. Safety Check — Upon completion of service or repairs to this product, ask the service technician to perform safety checks to determine that the product is in proper operating condition. 26.
Notes on Unauthorized Discs You may not be able to play back some DVD video discs on this player if they were purchased from outside your geographic area or made for business purposes. When you try to play back an unauthorized disc, “Check Regional Code” appears on the TV screen. • Do not mix old and new batteries or different types of batteries. 1. Slide the battery compartment cover in the direction of the arrow to remove it. 2.
CONNECTIONS 6
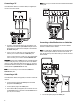
PLACING THE RECEIVER Connect the center speaker’s wires to the receiver’s terminals (Blue/Black). SPEAKERS CENTER Do not place objects directly on top of the receiver as it could prevent proper heat dispersal. When installing in a rack or shelf, be sure to leave an adequate amount of space above and behind the receiver for air circulation. Connect the subwoofer’s wires to the receiver’s SPEAKERS SUB WOOFER terminals (Brown/Black). 3. Release the speaker terminal. 4.
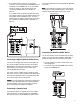
Connecting a TV Note: Make sure you connect the VCR to both the IN and OUT sets of jacks. Use audio/video cables or an S-Video cable (not supplied) to connect a TV to the receiver. Connecting a Satellite Receiver or Cable Box 1. For audio, connect the plug from the TV’s AUDIO OUT right jack to the receiver’s right AUDIO TV IN jack and the plug from the TV’s AUDIO OUT left jack to the receiver’s left AUDIO TV IN jack. 2.
2. If your satellite receiver or cable box has analog audio connections, connect red plugs to the right AUDIO jacks and white plugs to the left AUDIO jacks. To use your satellite receiver (or cable box), select the SAT function (see “Controlling a Satellite Receiver or Cable Box” on Page 21). connect the cassette deck to both the TAPE IN and TAPE OUT sets of jacks. Note: If the cassette deck is placed too close to the receiver, noise might occur during cassette playback.
CONNECTING ANTENNAS an area where the FM signals are particularly weak, it may be necessary to use one with 5 or more elements. If you have an FM antenna that uses coaxial cable, connect it directly to ANTENNA FM 75 Ω. If you have a twin-lead FM antenna, connect it to the supplied transformer, then plug the transformer into ANTENNA FM 75 Ω. (see Steps 1–3 of “FM Indoor Antenna”). AM Indoor Loop Antenna The supplied high-performance AM loop antenna is sufficient for good reception in most areas.
A QUICK LOOK AT THE RECEIVER’S CONTROLS DISC SKIP/TUNING MODE – Press to skip discs in DVD/CD mode. In tuner mode, press to switch between presets and manual tuning (see “Switching Between Preset Stations and Manual Tuning” on Page 20). TUNING/PRESET – Repeatedly press to tune to AM or FM stations and select preset stations in tuner mode. In DVD/CD mode, can also be used to skip and scan through discs. FUNCTION – Rotate to select the desired audio or audio/ video source.
A QUICK LOOK AT THE REMOTE CONTROL MUTE — Press to immediately stifle the sound level. CKJ; appears on the receiver’s display panel. To restore the sound, press again. COMPONENT SELECTION KEYS — Press to select or to control a desired component. – PRESET+/) -ý— Press to make selections in tuner mode (see “Using the Tuner” on Page 19).. In DVD/ CD mode, functions as skip ahead or skip back. BAND/ Jý — Selects AM or FM band while using the tuner. Functions as PLAY in DVD/CD mode.
SETTING UP THE SURROUND SOUND SYSTEM Your Home Theater Audio System speakers are timbre matched and ready to use “as is” as soon as you unpack them. If you wish to fine-tune the system (for example, substitute different speakers or alter the sound distribution), follow the directions below. Important Notes: • To change the surround sound settings, the receiver must be in a surround mode that uses all the speakers (for example, Dolby Digital).
2. Press SETUP. IFýI?P; appears. 3. Press 7.
• Do not push on the disc tray or put any objects other than discs on the disc tray. Doing so may cause the DVD player to malfunction. • Keep your fingers well clear of the disc tray as it is closing. Keep children’s fingers away from the closing disc tray as there is a risk of personal injury. • When š appears on the TV screen when a button is pressed, it means the function is not available on the disc you are playing. • Depending on the DVD disc, some operations may be different or restricted.
While in Dolby Digital or Dolby Digital Stereo mode, press NIGHT MODE to turn Night Mode on. The receiver displays D?=>JýED. D?=>JýED Press NIGHT MODE again to turn it off. The receiver displays D?=>JýE<<. D?=>JýE<< Note: Night Mode is not available for movies using DTS mode, or when the audio is set to PCM mode. Recording Audio from the Receiver to Digital Audio Equipment Some DVDs might be encoded with an anti-copy digital signal.
The DVD menu’s contents and operation differ from disc to disc. The following procedure explains the basic operation when this feature is used. 1. Press MENU during play. The DVD menu available on the disc now appears. Pressing RETURN resumes play from the scene when MENU was first pressed. Note: The resume play option might not be possible on certain discs. 2. Press8, 9, 6, or 7on the remote, then ENTER. Or press the numeric button(s) to select the desired item. The selected item is now executed.
*0)ýB8 (Letterbox) — If you have a conventional TV set and your DVD is formatted for widescreen viewing, use this setting. All video material not formatted in the Pan and Scan style is played back in the letterbox style. Black bands appear at the top and bottom of the screen. ',0/ýM?:; (Widescreen) — If you have a widescreen TV set, use this setting. The DVD plays in full size. (You must also set your widescreen TV to “full size”).
Press REPEAT during playback or when the player is stopped. Each time you press this button, the repeat mode displayed on the TV screen changes between REPEAT ONE, REPEAT ALL, and REPEAT OFF. If you select REPEAT ONE the disc repeats a file. If you select REPEAT ALL the disc repeats a folder. Note: If the DVD player cannot read an MP3 file properly,? appears before the file name on the TV screen. When you listen to very weak FM stereo stations, you might hear higher-than-normal background hiss.
Note: Press MEMO again to stop auto scanning sooner. To store stations on the other band, repeat Steps 1–4, substituting the other band in Step 1. Switching Between Preset Stations and Manual Tuning If you store preset stations, pressing PRESET ) or - (or TUNING/PRESET )# or ,- on the receiver) scrolls through the preset stations, rather than changing the frequency station by station.
Programming Tracks You can program up to 32 tracks for playback in any desired order. This function only operates with audio CDs (not DVDs). Note: The disc must be recognized by the receiver, so play the disc for a little while after loading, then program it. 1. Press FM MODE/ ' twice. 2. Press PROGRAM. &'ý¶ý¶ appears. 3. Repeatedly press DISC SKIP to select the desired CD (if necessary). The CD number appears to the far right of the display.
To control the satellite receiver or cable box with the remote control, see “Using the Remote Control to Control Additional Components” on Page 22. USING THE SLEEP TIMER You can set the sleep timer to turn off the receiver after a set period of time. Repeatedly press SLEEP to set the sleep timer to the desired time ('& '&, '& (&, (& )&, )& *&, *& +&, +& ,&, ,& -&, -& .&, .& or /& minutes or OFF). When the desired sleep time appears, let the sleep timer time out (do not press SLEEP again).
Brand Codes Brand Codes FUTURETEC 138 NIKKO GE 103, 104, 106, 110, 119, 121, 122, 152, 154, 155, 185, 187, 200, 221, 230, 264, 265, 281 ONWA 138 ORION 135 PANASONIC 103, 154, 162, 230, 270 PHILCO 103, 104, 105, 106, 108, 112, 119, 162, 169, 174, 175, 177, 283, 284 PHILIPS 103, 104, 108, 112, 119, 162, 169, 174, 175, 176, 186, 187, 188, 189, 230 PILOT 104, 271 PIONEER 104, 106, 190, 191, 192, 279 PORTLAND 104, 105, 106, 271 PRICE CLUB 205 PRISM 154 GIBRALTAR 104 GRUNDY 138, 14
Brand Codes Brand Codes TELECAPTION 205, 270, 271 GARRARD 426 TOSHIBA 149, 172, 189, 205, 209, 210, 217, 218, 221, 260, 262 GE 401, 412, 413, 421, 453, 515, 520 GRADIENTE 426 UNIVERSAL 152, 187 HARLEY DAVIDSON 426 VICTOR 166 HARMAN KARDON 409 VIDTECH 104, 105, 106 HARWOOD 461 WARDS 101, 104, 105, 106, 107, 124, 146, 152, 162, 169, 174, 175, 176, 185, 187, 188, 219, 220, 284 HEADQUARTER 411 HI-Q 423 YAMAHA 104, 105, 106, 119 HITACHI ZENITH 104, 247, 253, 254 421, 455, 456
Brand Codes Brand Codes OPTONICA 496 TEKNIKA ORION 435 TMK 413 PANASONIC 421, 446, 509, 525, 526, 531 TOSHIBA 415, 449, 451, 455, 465, 493, 506, 516 PENTAX 416, 455, 456, 507, 520 TOTEVISION 413, 414 PENTEX RESEARCH 418 UNITECH 413 PHILCO 421, 462, 463 VECTOR RESEARCH 409, 410, 415, 416, 513 PHILIPS 421, 462, 496, 524 VIDEOSONIC 413 PILOT 414 WARDS PIONEER 410, 443, 455, 480, 481, 523 PORTLAND 416, 417 413, 414, 415, 421, 423, 426, 429, 455, 456, 461, 496, 501, 502, 503
Brand Codes Brand Codes PHILIPS 711, 712, 713, 714, 725, 730, 731, 732 REALISTIC PIONEER 701, 733, 734, 742 SONY 772, 725, 727, 740 PULSAR 726 STS1 764 RADIOSHACK 770, 771, 779, 780 STS2 765 RCA 747, 749, 752 STS3 766 REALISTIC 709, 749 STS4 767 REGAL 722, 735 TOSHIBA 768 REGENCY 717 UNIDEN 769 REMBRANDT 703 RUNCO 726 S.
TROUBLESHOOTING This receiver has been manufactured to the specifications of RadioShack and is covered by a limited warranty from RadioShack. If your receiver is not operating as it should, take it to your local RadioShack store or call 1-800-THE-SHACK for assistance. If you think that there is something wrong with this component, check the points below. Investigate the other components and electrical appliances being used. Sometimes the trouble may lie in another component.
Symptom Considerable noise in radio broadcasts. Cause Remedy Incorrect frequency. Tune in the correct frequency. The antenna is not connected. Connect the antenna. ΠRF (AC-3) and/or digital cables are near the antenna terminals and wires. Route ΠRF (AC-3) and digital cables away from the antenna terminals and wires. (For FM) The FM antenna is not fully extended or is poorly positioned. Fully extend the FM wire antenna, position for best reception, and secure to a wall.
• Do not place discs on top of the receiver. • Do not touch the playback side of the disc. • Do not attach paper or tape to discs. • Do not store discs in a place subject to direct sunlight or near heat sources. • Do not store discs in places subject to moisture and dust such as a bathroom or near a humidifier. • Store discs vertically in a case. Stacking or placing objects on discs outside of their case may cause warping.
(AM) Sensitivity (Loop Antenna) .................................................................................................................................. 600 µV/m (AM) Selectivity, +/– 10K ................................................................................................................................................... > 25 dB (AM) S/N Ratio................................................................................................................................................
SETTING A RATING LEVEL AND PASSWORD You can prohibit the playing of specified DVDs which are unsuitable for children. Some DVD discs contain a restriction level which enables parents to remove scenes or prevent playback of discs by children. Your DVD player has a password device designed to prevent children from changing the level. SETTING A PASSWORD If you change the rating level to 7 or lower, you must enter a 4digit password to access playback of discs with higher ratings.
Limited Two-Year Warranty This product is warranted by RadioShack against manufacturing defects in material and workmanship under normal use for two (2) years from the date of purchase from RadioShack companyowned stores and authorized RadioShack franchisees and dealers.