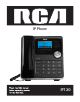
IP Phone IP120
Interference Information This device complies with Part 15 of the FCC Rules. Operation is subject to the following two conditions: (1) This device may not cause harmful interference; and (2) This device must accept any interference received, including interference that may cause undesired operation. Privacy of communications may not be ensured when using this phone. This equipment has been tested and found to comply with the limits for a Class B digital device, pursuant to Part 15 of the FCC Rules.
Table of Contents Getting Started Packing List Assembling IP120 Configuration and Registration Basic Configuration via Web Page Account Settings Basic Configuration using phone keypad Overview LEDs Icons User Interface User levels Administrator Mode Reboot Customizing Your Phone General Settings Phone Status Time and Date Keypad Lock Audio Settings Volume Ring Tones Codec Selection Contact Management Edit/Add/Delete Contacts Basic Call Func
Table of Contents Pick Up Call Park Voice Mail Prefix Redial Trouble shooting Appendix A.
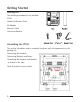
Getting Started Packing List The following components are included: IP120 Line 3 IP120 Handset & Handset Cord AC Adaptor Ethernet Cable Instruction Booklet Assembling the IP120 o This section introduces how to assemble the phone with the components in the packing list. Connecting the Handset; Connecting Network and Power. Connecting the Handset and Headset, as shown to the side: Note: A headset is not provided.
Connect Network and Power Plug the IP120 to the AC Power directly using the power adapter (included) and the phone will start up automatically. The IP120 can also share the network connection with other network devices such as PCs. Connect the phone’s PC port and computer’s network port together using an Ethernet cable.
Configuration and Registration Some simple configurations are needed to get the phone ready for making calls. First, users must enter the network and account information into the phone. Parts of the set up process may require knowledge of the local area network configuration. Please contact the network administrator or internet service provider for more details. Telephone Features and VoIP Service Providers Not all phone features are available with all VoIP service providers.
Note: Using the wrong network parameters may result in the phone failing to connect to the service provider and may also have an impact on network performance. Please contact the network administrator. Account Settings The phone will automatically register to the service provider’s server using the account data provided by automatic or manual provisioning. While using the web interface, choose ACCOUNT [ ACCOUNT SETTINGS. Select Account to Account 1.
Fill the fields and press the SAVE button. The phone will try to register to the SIP service provider. If no accounts are successfully registered, the phone will display “No Service” on the screen. Note: Should the IP PBX, SIP Server or Service Provider require an authentication, a correct password is needed. This must be entered via the web user interface. Basic Configuration using phone keypad There are three user types programmed into the phone, each one giving a different level of access to settings.
Changing phone to admin mode: Press MENU[7. Press the right navigation key until the user type reads “admin” on the screen. Then press the down key to be prompted for the password. The password is “admin” by default. Type this in using the dial pad and press OK or Save. Network Settings: Press MENU[3. SETTINGS[2 .ADVANCED[OK. Enter the admin password, and choose 2. NETWORK[1.WAN PORT, 2.VLAN, 3.WEB TYPE or 4.802.1X Settings to change the network configurations. Account Settings: Press MENU[3.SETTINGS[2.
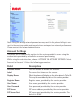
Overview 3 Lines Soft Keys Mute/Cancel Volume Up Volume Down Speaker Voicemail Redial Headset Hot Key/Call Log 11
LEDs Table 1 Line Keys LED Status Description Steady blue Blinking blue Off The account is active There is an incoming call to the account there is a call on hold The phone is in idle status or this account is not provisioned Table 2 Power Indication LED LED Status Description Steady blue Blinking orange Off New messages or new missed calls When there is an incoming call, when a call is muted or when the network is not available In Idle mode Icons The IP120 displays differe
Icon Description New missed calls Incoming call Outgoing call Call forwarding activated Do not disturb function activated Auto answer activated Voicemail Call on hold Flashes when internet is disconnected Keypad Lock User Interface There are two ways to customize specific options on the phone: • Using the keypad and display on the phone. • Using the web user interface in an internet browser.
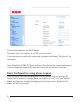
PHONE OPTIONS PHONE UI WEB UI Status IP MAC Firmware Network Phone Accounts 4 4 4 4 4 4 4 4 4 4 Call Features Call Forward Call Waiting Function Keys End of dialing key Hot Line Anonym Call DND Logs Setting 4 4 4 4 4 4 4 4 4 4 4 4 4 4 4 4 4 4 4 4 4 4 4 4 4 4 4 4 4 4 Basic Phone Functions Time & Date Ring Tone Phone Volume Advanced Phone Functions Accounts Network Reset Factory Keypad Lock Set Password Set AES Key Auto Provision Other Feat
Maintenance Tasks User levels The IP120 allows three modes to configure the phone: • User Mode (username : user, password : user) • VAR mode (username : var, password : var) • Administrator Mode (username : admin, password : admin) Administrator mode grants unlimited access to the phone configuration on both the web and phone interface. User Mode is not able to access the settings on the phone interface such as: Accounts, Network, Reset to Factory, and other advance phone settings.
Reboot Users should reboot the phone when prompted. The phone may prompt a reboot after applying specific changes to phone configuration. To reboot via Web interface: 1) Go to SYSTEM[UPGRADE. 2) Click REBOOT button. Note: Please do not power off during reboot, or it may cause a flash memory error. Customizing The Phone General Settings Phone Status Users can view the status of the phone using the phone interface or the web interface.
Time and Date Time and date are displayed on the IP120 idle screen. By default the date and time of the phone are configured manually, but users can set the phone to obtain them from a preconfigured SNTP server if desired. Please contact the network administrator if the time or date is incorrect. To change Time and Date via the phone interface: Press the Menu soft key [3.SETTINGS[ 1.BASIC-[1.TIME & DATE[OK. If SNTP is chosen, the phone will automatically get the time from an NTP Server.
The icon will be displayed on the top row of the idle screen. To unlock the phone via Phone interface: Press Menu soft key, enter the password of current user type, and then press OK button. This will disable the keylock and allow acces to the phone menu. To enable keypad lock via Web interface: Choose Phone Preference web page to change the Keyboard lock option. Audio Settings Volume Handset, speaker, headset and ringer volumes can be adjusted independently.
Codec Selection The IP120 supports the following voice codecs: • PCM a-law , PCM u-law, G.729, G.722, G.726, iLBC, iLBD-20 Users can enable/disable the desired codecs via the web interface. Please contact the Network Administrator for more details about the codecs. To enable or disable the codecs via the web interface: Choose ACCOUNT[ACCOUNT SETTINGS (ACCOUNT 1/ACCOUNT2/ACCOUNT3) Select the desired codecs in the Codecs section. Click the SAVE button to save the changes.
Contact Management Edit/Add/Delete Contacts The IP120 features a 300-entry local phonebook and 11 additional speed dial keys. With the local directory users can: • add, • edit, • delete, • dial, • search for a contact in this directory. • create groups of contacts The Phonebook also includes a Directory and a Blacklist. To add a contact via the phone interface: Press the Dir soft key [ 1. LOCAL DIRECTORY or Press the Menu soft key [6. DIRECTORY[ 1. LOCAL DIRECTORY.
Use the RIGHT and LEFT navigation keys to select Speed Dial, then use the UP and DOWN navigation keys to select Account, use the LEFT or RIGHT navigation keys to assign this speed dial keys to a specific account Then use the UP and DOWN navigation keys to select Value, enter the desired number and press the Save soft key or the OK button to confirm. To use a Speed Dial button, press and hold the button for 2 seconds while in idle mode or during a conversation to initiate a multi-party call.
Manage Blacklist via the web interface Choose CONTACT [ BLACK LIST To move a contact from Call Log to Contacts via the phone interface: Press the Menu soft key [5. HISTORY Use the navigation keys to highlight a record, then press the Option soft key. Select 2 .Add to Contacts. To add, delete or edit the Contact list via the web interface: Choose CONTACT [ LOCAL PHONE BOOK To search a contact via the phone interface: Press the Dir soft key [ 1. LOCAL DIRECTORY or Press the Menu soft key [6. DIRECTORY [ 1.
Basic Call Functions Outgoing calls Call Devices You can make a phone call via the following devices: Pick up the handset, icon will be shown on the screen. Press the SPEAKER button, and the icon will be shown on the idle screen. Press HEADSET button if the headset is connected to the Headset Port. The icon will be shown on the idle screen. This is a toggle key. Pressing it again will unselect headset as the audio device.
End of dialing key configuration Admin can set a specific button (“#” or “*”) as the send key. If this feature is enabled, once a number is dialed, users can press this send key to dial the number immediately. To set the send key via the phone interface: 1) Make sure active User Type is admin or var 2) Press Menu soft key [ 2.FEATURES [ 4. END OF DIALING Key to enter the configuration page.
Anonymous call Anonymous call, also known as Caller ID restriction, allows callers to request the network to hide their Caller ID identity when outgoing calls are dialed. The IP120 supports Permanent Caller ID restriction, meaning that while enabled all calls will request to be anonymous and callers need to disable if they want their identity to be transmitted. This service can be performed locally, or by sending an activation code to the network. This feature may be overridden by the service provider.
To set Anonymous Call Services using the web interface: Go to ACCOUNT [ACCOUNT SETTINGS (Basic) Dial Plan A dial plan establishes the expected number and pattern of digits for a telephone number. This includes country codes, access codes, area codes and all combinations of dialed digits. Dial plans can be used for least-cost routing, dialing convenience or to prevent users from calling specific numbers or groups of numbers. Dial plans require admin or var privilege.
Here is a dial plan example: (111T|[0-4] xxxxxxxxT) Explanation: 111T This will dial 111 immediately after you entering the third digit. [0-4]xxxxxxxxT Any 9-digit number starting with 0,1,2,3 or 4 will be dialed out immediately after entering the 9th digit. To create a Dial Plan in the web interface, use the following fields: • Dial Plan: Enter the dial plan here. • DP Enable: To enable or disable the dial plan. • Dial Plan tmo: Timeout before the dial plan converts the calling number (if enabled).
DND When the DND function is enabled, the icon shows and all incoming calls will be rejected. Users can find a record of rejected calls in the incoming call record in the Call History. When the DND soft key is pressed in idle mode, the DND function is activated or deactivated. To configure the DND function via Phone interface: 1) Press the Menu soft key [2. FEATURES[5. DND to enter the configuration interface. 2) Use the RIGHT or LEFT navigation keys to enable or disable the feature.
2) There are 3 options: Always, Busy and No Answer. 3) Make a selection and press the OK button or Enter soft key. Choose to activate or deactivate the feature, then press the DOWN navigation key to enter the phone number to which calls will be forwarded. For the No Answer feature, users can also select the No Answer Timeout by pressing the DOWN navigation button. 4) To have the server perform this function, enter the On Code and Off Code options.
Call Log The IP120 can store up to 100 calls in the Call log. There are 5 different lists: • All calls • Forwarded calls • Missed calls • Received calls • Dialed calls The call logs can be accessed through the web interface (CONTACT [PHONE CALL INFO). Accessing the Call log Users can access the Call log by pressing the LEFT navigation button from idle mode. This is the “All calls” list, where calls are sorted sequentially, and each call is marked with the corresponding icon.
During an Active Call Mute This function allows users to mute the microphone of the phone during a call. Users cannot be heard by the other party, but can still hear all other parties while mute is enabled. To mute or resume the conversation: Press MUTE/CANCEL button during a conversation to mute the current call, the icon will be shown on the screen, and the indicator LED will blink. Press MUTE/ CANCEL again to unmute the call. Call Hold This call function allows users to place an active call on hold.
Call Waiting Configuration To configure Call Waiting via the phone interface: 1) Make sure the active User Type is admin or var. 2) Press the Menu soft key[2. FEATURES[2.CALL WAITING. 3) Use the LEFT or RIGHT navigation keys to enable or disable the call waiting feature. 4) Use the navigation keys to enable the disable the Play Tone option. This option is used to determine whether to play an alert tone when there is an incoming call during an active call.
3-way Conference The IP120 is able to establish a three-party conference by locally connecting the audio signals of two calls. To establish a conference via the phone interface: 1) Once the 1st call is active, press the Conf soft key and the 1st caller is put on hold. 2) Dial the 2nd call. 3) When with the 2nd call is active, press the Conf soft key to establish the conference. 4) Hang up to disconnect all calls. To split a conference : Press the Split soft keyand both lines will be put on hold.
To listen to new messages via the phone interface: 1) Press the VOICEMAIL button. 2) The users will be prompted to enter the password which is needed to connect to the VoIP telephony system. 3) The voice mailbox is called and users are able to listen to their new and old voicemails. Note: 1. Before retrieving the voicemails, please make sure that the connecting code has been set on the phone. 2.
These parameters can only be configured via the web interface: 1) Go to ACCOUNT [ ACCOUNT SETTINGS. 2) Select desired account. 3) Set any desired parameters in the Advanced section. Check with the network administrator or service provider for more information. Network Settings Please refer to the “Configuration and Registration” section for the Basic Network WAN setting information. The next paragraphs will describe other Network related settings.
HTTPS The IP120 supports HTTPS (Hypertext Transfer Protocol over Secure Socket Layer). Adding an SSL layer under HTTP, in short, adds a security layer to HTTP. Administrators can set this transmission mode via the web interface. To configure the HTTPS settings via the web interface: Go to NETWORK [ADVANCED, choose the Web Server option. In the pull-down menu of Type field, choose the transmission mode, then click the CONFIRM button to save the changes. 802.1X IEEE 802.
Note: When perform a factory reset, all current settings including contact list, call history, account settings, etc will be lost. The phone will have to be configured manually or reprovisioned. Firmware Update and Autoprovisioning The phone is delivered with pre-installed firmware. If users require updating the phone’s firmware, please contact the system administrator. Updating the firmware can only be done via the web interface.
Note: Ask the network administrator for the decrypt password. To set the AES Key via the phone interface: Press the Menu soft key[3. SETTINGS[2. ADVANCED[6. Set AES Key. Enter the Common AES and the MAC-oriented option. Press the OK button or Save soft key to save the changes. System Log Export This feature capture a record of the system log to track any errors that may occur. To enable the system log capture via phone interface: 1) Make sure active User Type is admin 2) Press Menu soft key [ 2.
Programmable keys The keys from 0-9 ( memory keys ) and the Hot key on the keypad are editable. Users can customize specific features for these keys according to their needs. (The keys are only available when the phone is in idle mode).
Line The most frequent usage for line keys is assigning them one of the three possible user accounts for call management. To assign the key as Line via the web interface: Go to PHONE [ FUNCTION Keys (Line Key) Speed Dial Users can configure the line keys as a simplified speed dial key. This function allows users to easily access the most frequently dialed numbers.
Transfer Users are able to configure a line key as a transfer key to perform the Blind/Attended/Semi-Attended Transfer. The main difference with Transfer hard key is in this case users can pre-configure the number to which transfer will be performed. This is very useful when there is a limited number of numbers to which users will transfer their calls. To assign the line key as Transfer via the web interface: Go to PHONE[FUNCTION Keys (Line Key) Hold The line key can be configured as a hold key.
Call Park Call Park is a feature that allows a user to put a call on hold at one telephone set and continue the conversation from any other telephone set. Not all service providers support this feature. Please check with the service provider or IP PBX vendor for more details. The “call park” feature is activated by pressing a preprogrammed button or a special sequence of buttons.
Trouble shooting The phone cannot register to the server Check the IP address (press the OK key for status). Check the gateway. Check the DNS server. Make sure all account information is verified correct as received from the service provider. Check whether the SIP server is on. Check the SIP register port, the default value is 5060. The phone can’t get an IP address Make sure the Ethernet cable is plugged into the WAN port.
How can a user refuse incoming calls during a call? To refuse current incoming call press the MUTE/CANCEL button. To refuse all incoming calls that may arrive when users are in on active calls, they can turn on the DND feature. How to update the firmware? Enter the webpage of the phone, go to SYSTEM [ UPGRADE. 1) Select the file to update, and then click the upgrade button. Note: Make sure the firmware chosen is provided by the service provider, or the device may crash after the update.
Service If trouble is experienced with this equipment, for repair or warranty information, please contact customer service at 1-800-511-3180. If the equipment is causing harm to the telephone network, the telephone company may request that you disconnect the equipment until the problem is resolved. This product may be serviced only by the manufacturer or its authorized service agents. Changes or modifications not expressly approved by Telefield NA Inc.
Warranty Limited Warranty What your warranty covers: • Defects in materials or workmanship For how long after your purchase: • Two years, from date of purchase What we will do: • Provide you with a replacement unit. The exchange unit is under warranty for the remainder of the original product’s warranty period. How you get service: • Locate your proof of purchase in the form of a bill of sale or receipted invoice which is evidence that the product is within the warranty period.
• Products purchased or serviced outside the USA • Acts of nature, such as, but not limited to lightning damage • 3rd party products, such as headsets Product Registration: • Please complete and mail the Product Registration Card packed with your unit. It will make it easier to contact you should it ever be neccessary. The return of the card is not required for warranty coverage. Limitation of Warranty: • THE WARRANTY STATED ABOVE IS THE ONLY WARRANTY APPLICABLE TO THIS PRODUCT.
Visit the RCA web site at www.rca4business.com Please do not send any products to the Oregon address listed in this manual or on the carton. This will only add delays in service for your product. Telefield NA Inc. 4915 SW Griffith Dr. #205 Beaverton, Or 97005 RCA is a trademark of RCA Trademark Management S.A., Used under license. © 2012. All rights reserved.