Interference Information This device complies with Part 15 of the FCC Rules. Operation is subject to the following two conditions: (1) This device may not cause harmful interference; and (2) This device must accept any interference received, including interference that may cause undesired operation. Privacy of communications may not be ensured when using this phone. This equipment has been tested and found to comply with the limits for a Class B digital device, pursuant to Part 15 of the FCC Rules.
Table of Contents Getting Started 4 Call Forward 16 Packing List 4 Call log 16 Setup the base 4 Accessing call logs 16 Setup the desk phone 4 Call list item management 17 Registration 5 During an active call 17 SIP account Configuration 5 Mute 17 Base Web interface 5 Hold 17 Retrieving the base IP address 5 Call Waiting 17 Input SIP account information Call Transfer 17 via web interface 5 Call Conference 17 Desk Phone menu 6 Contacts 18 Overview 7 Advanced Functio
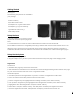
Getting Started Packing List The following components are included in your package: IP DECT Gateway IP170 DECT Desk Phone AC Adaptor (6V, 0.5A) for Desk Phone AC Adaptor (5V, 0.5A) for Gateway 1.5M Ethernet Cable (CAT 5) Quick Setup Guide Setup the base 1. Plug the adaptor (5V, 0.5A) into a power output and connect its power plug to the base. 2. Connect the base to a router or switch with the Ethernet cable to access the internet. The IP address of the base is assigned dynamically by default.
8. If registration fails, ensure that the base is still in registration mode (with the led blinking blue and amber) and that the base and desk phone are in close proximity, then try again. SIP account Configuration The SIP account can be configured through IP DECT base web interface or desk phone menu. Base Web interface Retrieving the base IP address In order to access the web interface of the base, the IP address is required. This information can be obtained from a properly registered desk phone.
Enter display name, user ID, password, SIP Server, and Outbound Proxy server of the SIP account. Check the Active field to Enable/Disable. Press the “Save” button to confirm. If the SIP settings are configured correctly, the desk phone will now be able to make and receive VOIP calls.
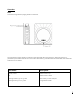
Overview Base Functions of registration/paging button on the base. The registration/paging button is located on the right hand side of the gateway. When the gateway is powered up, the status LED will be on and amber colored for 5 seconds. After the initialization, the LED status indicators are as follows: LED status Description Steady amber Network link is up Off Network link is down Blinking amber (0.3s on, 03s off) Data activity on the LAN port Blinking blue (0.5s on, 0.
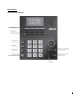
Desk Phone Desk Phone key layout 8
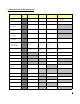
Functions of Key on the desk phone Key Key Idle Menu Edit Off Hook Press Line 1 Key Tap Line 1 Line 1 Line 1 ** Refer to MMI Line 2 Key Tap Line 2 Line 2 Line 2 ** Refer to MMI Soft Key 1 Tap Logs Back Clear Tap Directory -- Abc Tap DND -- -- Tap Menu Select Save Cancel Tap Direct Memory List on Direct Memory Direct Memory List on Direct Memory List on Display Display List on Display Display Direct Memory Direct Memory Direct Memory Direct Memory Dialing Dia
4 5 6 7 8 9 0 # Hold Direct Memory Tap 4 Hold Direct Memory Tap 5 Hold Direct Memory Tap 6 Hold Direct Memory Tap 7 Hold Direct Memory Tap 8 Hold Direct Memory Tap 9 Hold Direct Memory Tap 0 Hold Direct Memory Tap # Dial Text & Number Dial Text & Number Dial Text & Number Dial Text & Number Dial Text & Number Dial Text & Number Dial Text & Number Dial * Insert space Dial during text edit * Insert "#" during number edit * Hold Silent On/Off Tap *
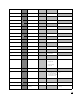
RJ9 Headset Tap Missed Call Log Headset ON Headset ON Headset ON Headset ON Missed Missed Tap Call Log Call Log Volume Up Tap Volume Up Volume Up Volume Down Tap Volume Down Volume Down Speakerphone Tap Speakerphone Mute Tap Speakerphone Speakerphone Speakerphone Mute / Unmute 11
Master Desk Phone When a SIP account is created on the gateway through desk phone menu, the handset will be set as the master headset of the SIP account. Users of this desk phone can configure the settings in base related to the SIP account through the menu on the master desk phone. The administrator can change the master desk phone of SIP accounts via the web interface of the gateway. Desk Phone Menu Tree Those functions marked with (*) are available in the master desk phone only.
Contacts Private Directory Accesses local phonebook, Maximum 150 entries Public Directory Accesses shared phonebook which is stored in the gateway, Maximum 300 entries Network Directory Call Lists Accesses network phonebook by LDAP Outgoing Calls Accesses outgoing calls list from the gateway Accepted Calls Accesses answered calls list from the gateway Missed Calls Accesses missed calls list from the gateway Voicemail SIP Account X VM Accesses external voicemail box Settings Date & Time Se
System Status Network Views the network settings of the gateway H/S User Password Changes desk phone user password. System Admin Password Changes the system Admin Password Firmgrade Upgrade Upgrades deskphone software Handset Factory Default Resets desk phone settings to factory default Base Factory Default Resets base settings to factory default SIP Account Status Views SIP Account information on the gateway. Only those SIP accounts attached to this desk phone are visible.
General Settings Phone status Enter “Status” menu. Select item “SIP Account Status” to view the associated SIP accounts status (registered/disabled). Select item “Network Status” to view the base network information. This includes base network type, IP Address, subnet mask, default gateway and DNS. Time and date Enter “Settings” menu, Select item “Date & Time”. To enter manually, select “Manual Setting”. Enter the date and time and then press “Save” soft key. The date format is DD/MM/YYYY.
Incoming calls Answering an incoming call When there is an incoming call, pick up the handset, press the speakerphone key or press the headset key to answer the call. Rejecting an incoming call When there is an incoming call, press the “Reject” soft key to reject the call. DND On the master desk phone, Enter “Services” [“DND” menu or “DND” soft key during idle. Highlight and select the SIP account you want to enable/disable DND, select enable or disable to confirm. A DND icon should appear on H/S screen.
Call list item management To make call from the call log list, highlight a call log record and pick up the handset or press speakerphone. To save the record to phonebook, highlight a record, press the “Options” soft key and select “Save Number” option. You can select “Private Phonebook” to save in the desk phone or select “Shared Phonebook” to save the phone number to base. During an active call Mute Press the Mute button. Press the button again to unmute. Hold Press “Hold” soft key during call.
Contacts There are two types of contact list. They are private phonebook and shared phone- book. Each desk phone has its own private phonebook. This phonebook holds a maximum of 100 records. These numbers are only viewable to this desk phone. The shared phonebook is stored in the IPDECT gateway and is viewable to all of the desk phones. This phonebook holds a maximum 250 records. To access the contact lists, press the left navigation key when the display is idle screen.
Maintenance Tasks User Levels Desk Phone: There are different types of security levels to access the desk phone settings User level password: User with this password is allowed to change call settings (i.e. call waiting) of the desk phone. If the desk phone is the master desk phone of SIP accounts, user can also modify settings (anonymous call/anonymous call reject/ blacklist records/DND and Call forward) of the SIP accounts.
Desk Phone Keys Programmable keys Speed Dial Keys: On the desk phone, user can program 0-9 keys as speed dial key. Go to the menu. “Services” [“Speed Dial”. Select a key to program the number and decide which account will make the call. Direct Access Keys: On the desk phone, user can program 12 available direct access keys as speed dial key with directory lookup on the LCD display. Go to the menu “Services”[ “Direct Access Key”.
Service If trouble is experienced with this equipment, for repair or warranty information, please contact customer service at 1-800-511-3180. If the equipment is causing harm to the telephone network, the telephone company may request that you disconnect the equipment until the problem is resolved. This product may be serviced only by the manufacturer or its authorized service agents. Changes or modifications not expressly approved by Telefield NA Inc.
Warranty Limited Warranty What will your warranty cover? • Defects in materials or workmanship For how long after your purchase? • Two years, from date of purchase What we will do: • Provide you with a replacement unit. The exchange unit is under warranty for the remainder of the original product’s warranty period. How to get service? • Locate your proof of purchase in the form of a bill of sale or receipted invoice which is evidence that the product is within the warranty period.
Product Registration: • Please complete and mail the Product Registration Card packed with your unit. It will make it easier to contact you should it ever be necessary. The return of the card is not required for warranty coverage. Limitation of Warranty: • THE WARRANTY STATED ABOVE IS THE ONLY WARRANTY APPLICABLE TO THIS PRODUCT. ALL OTHER WARRANTIES, EXPRESS OR IMPLIED (INCLUDING ALL IMPLIED WARRANTIES OF MERCHANTABILITY OR FITNESS FOR A PARTICULAR PURPOSE) ARE HEREBY DISCLAIMED.