Television User’s Guide Changing Entertainment. Again. 1644105Ae.
Important Information CAUTION RISK OF ELECTRIC SHOCK DO NOT OPEN This symbol indicates that this product incorporates double insulation between hazardous mains voltage and user accessible parts. When servicing use only identical replacement parts. Caution: To reduce the risk of electric shock, do not remove cover (or back). No user serviceable parts inside. Refer servicing to qualified service personnel.
Table IMPORTANT SAFETY INSTRUCTIONS of Contents Read before operating equipment 1. Read these instructions. 2. Keep these instructions. 3. Heed all warnings. 4. Follow all instructions. 5. Do not use this apparatus near water. 6. Clean only with dry cloth. 7. Do not block any ventilation openings. Install in accordance with the manufacturer’s instructions. 15.
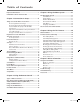
Table of Contents Important Information .................................................... 2 IMPORTANT SAFETY INSTRUCTIONS ................................ 3 Chapter 1: Connections & Setup 5 Chapter 1: Connections & Setup .......................5 Things to Consider Before You Connect ......................... 5 Protect Against Power Surges ................................... 5 Protect Components from Overheating ................... 5 Position Cables Properly to Avoid Audio Interference ................
Chapter 1: Connections & Setup Things to Consider Before You Connect Protect Against Power Surges • Connect all components before you plug any of their power cords into the wall outlet. • Turn off the TV and/or component before you connect or disconnect any cables. • Make sure all antennas and cables are properly grounded. Refer to the Important Safeguards sheet packed with your TV. Protect Components from Overheating • Don’t block ventilation holes on any of the components.
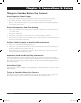
Audio/Video Jacks Audio/Video Jacks Connections & Setup TV ANT TV ANT DSCI Port DSCI Port Digital Audio Out Jack Digital Audio Out Jack TV ANT TV ANT Phone Jacks Model J32F635 Models J24F635 and J27F635 Phone Jacks Explanation of Jacks and Cables Y P P B R This manual covers TV models that have different back panels. Match the back panel of your TV to one of the back panels shown. This section describes the jacks you can use to make connections.
Digital Audio Out Jack Connections & Setup SCI ort VIDEO 2 (Model J32F635 only) VIDEO, AUDIO R and L/MONO and Y, Pb, Pr INPUTS component video source, such as a DVD player. Phone Jacks TV ANT TV ANT Y PB Let you connect a second • Y, Pb, Pr Provide optimum picture quality because the video is separated into three signals. Use three video-grade cables for the connection. When using Y, Pb, Pr, make sure to connect left and right audio cables to the VIDEO 2 AUDIO Input jacks.
Connections & Setup The Front of Your TV Front Input Jacks The TV has front input jacks for your convenience: one set of audio/video inputs, an s-video and a headphone jack. These jacks are towards the front of the TV on the side. To access the component you connected to the front of the TV, press the INPUT button on your remote until FRNT appears on the screen. The jacks are ideal for connecting a video game console or a camcorder.
Connections & Setup Place All Available Channels Into Memory AUTO CHANNEL SEARCH 1. To go to the Setup menu, with the master remote (CRK17TD1), press MENU then select Setup. In this menu you'll be able to set your Signal Type. Next go to Auto Channel Search, the TV will search for all channels viewable through your antenna or cable TV system. 2. Select which channel list you’d like to find channels for (List A is the default). 3. Press the down arrow button to select Start.
Connections & Setup MAIN MENU - MASTER Exit Sound Picture Access and Power Options Parental Control Time Setup The Master Main menu. Understanding the Menus This television displays two levels of menus: master and basic. Master Menus The master menus are accessible by pressing MENU on the master remote (CRK17TD1). This menu shows all menu options. The person who chooses the settings available to the basic end user is called the “master user.
Connections & Setup Sound Menu SOUND Go Back Sound Type Treble �� Stereo... Bass Initial Volume Minimum Volume Maximum Volume Auto Vol Level Volume Hold Go Back Takes you to the previous menu. Sound Type You'll have different options depending on which jacks you use and what connections have been made. Choose from Mono, Stereo, Enhanced, SAP, and LEFT. Stereo splits the incoming stereo audio signal into left and right channels. Most TV programs and recorded materials have stereo audio.
Connections & Setup Picture Menu PICTURE Go Back Picture Preset Bright... Auto Color Color Warmth The Picture menu items allow you to adjust the appearance of on-screen images for each video input source. Scroll to the feature you want to set. Use the right arrow button to change the setting. Go Back Normal... Brightness Color Takes you to the previous menu. Picture Preset Choose between Soft, Natural, Bright or Personal. The default setting is Natural. Auto Color is Off.
Connections & Setup On Always disabled. The TV is always on and cannot be turned off; the Sleep Timer, Schedule and Energy Saver settings are Notes: When On Always is being used, KidPass is unavailable. When the DSCI (Digital Serial Communications Interface) port is used to turn the TV on and off, the On Always setting is overridden. Switched setting. The TV can be turned on or off; Sleep Timer, Schedule and Energy Saver can be enabled.
Connections & Setup Parental Control PARENTAL CONTROL Go Back USA V-Chip ... Canada V-Chip ... Unrated/Exempt Prg. KidPass ... Front Panel Lock Lock Par. Controls ... Par. Control Access ... Note: The master user is always able to enter Parental Controls and change the password. This menu shows all Parental Control menu options. As the master user, you choose which options are available to the basic end user. Scroll to the feature you want to set.
Connections & Setup Time Menu TIME Time Config. ... This control panel lets you control several time-related functions. Scroll to the feature you want to set. Use the right arrow button to change the setting. Sleep Timer 00:00 Go Back Wake-Up Timer ... Time Config. Schedule ... Go Back Takes you to the previous menu. Go Back Takes you to the Time Configuration menu. Takes you to the previous menu. Time Displays the current time if the master user has set the time.
Connections & Setup Setup Menu SETUP Go Back Language English... Use this menu for choosing options to get you started watching TV. Scroll to the feature you want to set. Use the right arrow button to change the setting. Signal Type Cable... Weak Signal Disp. None... Auto Ch. Search ... Language List & Labels ... Channel Selection ... Channel Guide ... Signal Type Displays a choice list to choose the signal your TV is receiving.
Chapter 2: Using the Remote Control Types of Remote Controls CCPOWER All of the remote controls mentioned here, in addition to other remotes and accessories, are available from your RCA distributor. The accessory page at the back of this user's guide lists items. Descriptions of the remote buttons and how they work are on the next pages. Except as otherwise specified, the master remote is the remote described throughout the manual for operating the TV and setting up the TV’s features.
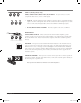
Using the Remote Control SKIP (Commercial Skip- CRK17TC1) Press once before changing the channels and the TV waits 30 seconds before returning to the original channel. Each subsequent press adds 30 seconds to the skip time. Press CLEAR to cancel. SLEEP Displays the Sleep Timer control panel, which allows the user to set a time for the TV to turn itself off. SYSTEM Allows the remote to change between TV1 and TV2 mode. It also allows access to system-defined functionality, when available.
Using the Remote Control Using the INPUT Button CCPOWER SYSTEM VOL In addition to a cable or antenna signal, you might have VCR, DVD etc. or other signals coming in to your TV (not all inputs are available on all models). Use the INPUT button to select the desired signal source. SLEEP GO CHAN MUTE BACK SYSTEM button 1. Make sure that the component you want to view is turned on. 2. Press INPUT until you have selected the desired input source.
Using the Remote Control ClonePRO™ Remote Buttons The ClonePRO can be used as a master remote. First, press ON to turn the remote on. Some of the buttons only apply when using the ClonePRO to download or upload information to or from a TV. Those buttons are described in Chapter 5. Note: After 30 seconds of inactivity the remote will turn itself off. RESET Returns the picture to the original settings and displays the Picture Presets choice list.
Chapter 3: Using the Menu System The Basic Menu System MAIN MENU The basic menus are accessible through basic remote controls and the front panel. Which menu items are available will depend on the restrictions set by the master user and the active input. For instance, if Basic Menu Access has been set to Disabled in the Access and Power Options menu, the basic menus and many features will not be available.
Using the Menu System Parental Control Menu PARENTAL CONTROL The basic Parental Control menu will depend on the options set by the master user. If the master user chooses Allow Basic on menu items, then all options are available. To set movie and TV ratings, content themes, etc., go to Chapter 4. Go Back USA V-Chip Canada V-Chip Go Back Unrated/Exempt Prg. Takes you to the previous menu. KidPass USA V-Chip Displays settings for the US version of V-Chip.
Using the Menu System Language & CC Menu LANGUAGE & CC Go Back Go Back Language English... CC Display On... CC Mode CC1... Takes you to the previous menu. Language Displays your preferred language for the menus. Select English, Français (French) or Español (Spanish). CC Display Use the CC button on the remote to choose whether closed captioning information is shown on the screen. CC Mode When CC Display is turned on, displays the CC mode: CC1, CC2, CC3, CC4, T1, T2, T3 or T4.
Chapter 4: Using the TV's Features Channel Banner There are several items that might appear on-screen when you press the TV or INFO button on the remote. This display is called the Channel Banner. The following list describes the items on the Channel Banner screen (left to right and top to bottom). SAP SAP Stereo 06 ABCDEF KidPass: 2:24 Skip: 0:30 CC 07:18am X Displayed when the current channel is broadcasting SAP (Second Audio Program) information. Displayed when V-Chip has been activated.
Using the TV’s Features USA V-Chip Rating System TV-MA (Mature Audience Only) Specifically designed to be viewed by adults and may be unsuitable for children under 17. It contains one or more of the following content themes: crude indecent language (L), explicit sexual activity (S), or graphic violence (V). TV-14 (Parents Strongly Cautioned) Contains some material that many parents would find unsuitable for children under 14.
Using the TV’s Features C (Children) Programming intended for children under age 8. Violence Guidelines: Careful attention is paid to themes which could threaten children’s sense of security and well being. There will be no realistic scenes of violence. Depictions of aggressive behavior will be infrequent and limited to portrayals that are clearly imaginary, comedic or unrealistic in nature. Other Content Guidelines: There will be no offensive language, nudity or sexual content.
Using the TV’s Features The V-Chip Rating Screen The following is an example of where items are located within the TV RATING LIMIT screen. Rating Status Field Lets you select whether the status of the age-based rating limit to the left is View or Block. TV RATING LIMIT Go Back Rating Field Lets you select from a list of age-based ratings you can block or view.
Using the TV’s Features Content Themes D Sexually explicit dialogue L Adult language S Sexual situations V Violence FV Fantasy Violence Blocking Specific Content Themes You can block programs based on their content. (Content is represented by the D, L, S, V and FV on your screen.) When you block a content theme for a particular rating, you automatically block that content theme for higher rated programs as well. To block program content: 1. 2. 3. 4. Determine the content themes you want to block.
Using the TV’s Features ENGLISH RATINGS Go Back 18+ 14+ PG G Blocking Canadian V-Chip Ratings If you receive Canadian programs you can block Canadian English and French V-Chip by ratings only. When you block a particular rating, you automatically block the higher rated programs as well. To block Canadian English and French program ratings: 1. Select Canada V-Chip from the PARENTAL CONTROL menu. C 2. Highlight English Ratings or French Ratings and press OK.
Using the TV’s Features KidPass The KidPass feature allows parents to set a certain amount of time every day of the week that a child can watch TV. To set KidPass: 1. Select Parental Control from the main menu. 2. Select KidPass (the KIDPASS menu appears with Current Day highlighted). Note: If you can’t select KidPass, you need to set the time. Highlight Go Back and press OK. Select Time and press OK. Enter the Time Config. menu. Set the time using the arrow and number buttons. 3.
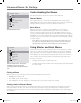
Other Information Information Chapter 5: Other Using the ClonePRO™ Modes of operation The ClonePRO operates from one of two modes: DSCI Connect a DSCI cable to the ClonePRO and to the TV’s DSCI port on the back panel. IR (Infrared) This operation is wireless. Press ON to begin using the remote in IR mode. The corresponding “ready” light indicates the mode of operation, and the corresponding “busy” light indicates activity in this mode.
Other Information Across the screen are red dashes. Press any button on the remote control you are using. Red pulses should appear, telling you the TV is recognizing the remote and is able to send out that information. If red pulses don’t appear, contact your RCA distributor. TEACH: This begins the process of teaching the settings stored in the ClonePRO to the TV to which it is connected. Note: Pressing TEACH overwrites any settings already in the TV.
Other Information Cloning a TV Use the ClonePRO or a master remote to complete any necessary setup steps to the TV, such as Auto Channel Search, changing Access & Power options, etc. Go to Chapter 1 for more information on setting up the TV. When you have finished setting up the TV, you can use it as your example TV. 1. Connect the ClonePRO to the example TV’s DSCI port. 2. It is recommended, though not required, to turn on the TV. Press the POWER button. 3.
Other Information Troubleshooting Most problems you encounter with your TV can be corrected by consulting the Troubleshooting list that follows. Note: If you prefer, we can provide you with the name of an Authorized Service Representative who will visit your location for a fee to install your electronic entertainment system and to instruct you in its operation. For details about this service, call 1-888-206-3359. To contact the nearest RCA Service Center call 1-800-880-5966.
Other Information Noisy stereo reception • The station might be weak. Change the Sound Type in the Sound menu from stereo to mono. No picture, no sound but TV is on • Maybe the cable/air setting is set to the wrong position. Select Signal Type from the master Setup menu. Go to Chapter 1 for more information. • • The channel might be empty — change channels.
Other Information Menu Problems • Menu access may be blocked by ClonePRO programming. • Try unplugging the TV for two minutes and then plug it back in and turn it on. • The Energy Saver settings won’t work if the TV Power is set to On Always in the Access & Power Options menu. • The basic menu options might be restricted by master menu settings. • The ClonePRO might have disabled master menus. • Sleep and Schedule functions won’t work if the TV Power is set to On Always.
Other Information Limited Warranty What your warranty covers: • Any defect in materials or workmanship. For how long after your purchase: • One year for labor charges. • One year for parts. • Two years for picture tube. (The warranty begins at time of first installation or 45 days after shipment, whichever comes first.) What we will do: • Pay any Authorized RCA Commercial Television Service Center the labor charges to repair your television.
Other Information • REPAIR OR REPLACEMENT AS PROVIDED UNDER THIS WARRANTY IS THE EXCLUSIVE REMEDY OF THE CONSUMER. TTE TECHNOLOGY, INC. SHALL NOT BE LIABLE FOR INCIDENTAL OR CONSEQUENTIAL DAMAGES RESULTING FROM THE USE OF THIS PRODUCT OR ARISING OUT OF ANY BREACH OF ANY EXPRESS OR IMPLIED WARRANTY ON THIS PRODUCT. THIS DISCLAIMER OF WARRANTIES AND LIMITED WARRANTY ARE GOVERNED BY THE LAWS OF THE STATE OF INDIANA.
Other Information CC SLEEP POWER CCPOWER SYSTEM SYSTEM VOL SLEEP VOL GO CHAN MUTE BACK GUIDE GO CHAN MUTE BACK INFO GUIDE CLEAR MENU INFO OK OK MENU 1 2 3 1 2 5 6 4 5 6 7 8 9 7 8 9 0 SKIP Description Part No. Price Screw-on antenna cable (3-ft) VH81 $3.95 Screw-on antenna cable (6-ft) VH82 $4.95 Push-on antenna cable (6-ft) VH89 $5.95 Monaural VCR Dubbing Cable (6-ft) VH83 $5.95 Stereo VCR Dubbing Cable (6-ft) VH84 $9.95 S-Video Cable (6-ft) VH976 $7.
As an ENERGY STAR® Partner, Thomson Inc. has determined that this product meets the ENERGY STAR guidelines for energy efficiency. ENERGY STAR is a U.S. registered mark. Visit the RCA website at www.rca.com Please do not send any products to the Indianapolis address listed in this manual or on the carton. This will only add delays in service for your product. TTE Technology, Inc. 10330 North Meridian Street Indianapolis, IN 46290 ©2005 TTE Technology, Inc.