reality: reproduced. LCD User's Guide Connections ............page 9 Menus ....................page 34 Remote ............ page 19 FAQs ............... page 39 Features ............... page 29 Warranty ...............
Important Information CAUTION RISK OF ELECTRIC SHOCK DO NOT OPEN Caution: To reduce the risk of electric shock, do not remove cover (or back). No user serviceable parts inside. Refer servicing to qualified service personnel. This symbol indicates "dangerous voltage" inside the product that presents a risk of electric shock or personal injury. This symbol indicates important instructions accompanying the product.
Important Information Important Safety Instructions Important Safety Instructions 1. Read these instructions. 2. Keep these instructions. 3. Heed all warnings. 4. Follow all instructions. 5. Do not use this apparatus near water. 6. Clean only with dry cloth. 7. Do not block any ventilation openings. Install in accordance with the manufacturer’s instructions. 8.
This page intentionally left blank
Table of Contents Important Safety Instructions ....................................... i Chapter 3: Using the TV's Features Chapter 1: Connections and Setup Channel Banner ........................................................... 29 Parental Controls and V-Chip ..................................... 29 How V-Chip Works for USA and Canada ............. 30 USA V-Chip TV Ratings ......................................... 31 V-Chip Movie Rating Limit ...................................
Chapter 1: Connections and Setup Things to Consider Before You Connect Protect Against Power Surges • • • Connect all devices before you plug any of their power cords into the wall outlet or power strip. NEVER plug your TV into an outlet that is controlled by a wall switch. Turn off the TV and/or device(s) before you connect or disconnect any cables. Make sure all antennas and cables are properly grounded. Refer to the Important Safety Instructions at the beginning of the User's Guide.
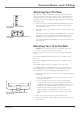
Connections and Setup Attaching Your TV’s Base Your TV comes shipped without the base attached so that you can choose to mount your TV either to its base or to a wall (wall mount sold separately). If you want to mount your TV to the wall, don’t attach the base and instead follow the Mounting Your TV to the Wall instructions below. 1. Locate the base. For models L26WD22 and L32WD22, locate the four screws. For models L26WD23, L32WD23, and L37WD23, locate the three screws. 2.
Connections and Setup Get the Picture The first part of connecting your TV is to get the picture, also known as the signal. The back panel of your TV allows you to receive analog and digital channels by using the ANTENNA/CABLE INPUT. ANTENNA/ CABLE INPUT (DIGITAL AND ANALOG) (The location of the jack varies on your TV's model.
Connections and Setup Choose Your Connection Note for US customers: If you prefer, we can provide you with the name of an Authorized Service Representative who will visit your home for a fee to install your electronic entertainment system and to instruct you in its operation. For details about this service, call 1-888-206-3359. For additional assistance while using your RCA product, please visit www.rca.com/customersupport. There are several ways to connect your TV.
Connections and Setup Video (Basic) Connection This is an example of a connection using the Video jack. Go to the top of page 11 for specific instructions. 1 COMPOSITE VIDEO INPUT Don't forget: If necessary, connect antenna or cable to get a picture. Go to page 8 for instructions.
Connections and Setup Connecting the Device with Video (Basic) Red Yellow White Composite cables are color coded- Yellow= video; Red= right audio; white= left audio This connection allows you to connect a device that has a Video Out jack, for example, a DVD player. Note: If the device you're connecting also has Component Video jacks and you have component video cables, we recommend you use the Component Video (Advanced) Connection instead. See the next set of instructions below.
Connections and Setup HDMI Connection This is an example of a connection using the HDMI jack. * *Don't forget: If necessary, connect antenna or cable to get a picture. Go to page 8 for instructions.
Connections and Setup Connecting the Device High-Definition Multimedia Interface (HDMI) technology is an uncompressed digital connection that carries both video and audio data by way of an integrated mini-plug cable. Using the example of a set-top box: • If your set-top box has a DVI jack, connect an HDMI cable and an HDMI/DVI adapter. A. Connect an HDMI cable to the HDMI1 Input jack on the back of the TV. HDMI cable B.
Connections and Setup VGA Connection This is an example of a connection using the VGA jacks. 1 Don't forget: If necessary, connect antenna or cable to get a picture. Go to page 8 for instructions. VGA INPUT AUDIO INPUT PC INPUT 2 3 Connecting the Device This connection allows you to connect to a personal computer. 1. If necessary, connect your cable or off-air antenna as described on page 8. 2. Connect your monitor cable.
Connections and Setup Plug in the TV Plug the end of the power cord into the back of the TV. For models L26WD23, L32WD23, and L36WD23, plug the power cord into the power adapter, then plug the power adapter into the TV. Plug the other end of the power cord into a grounded wall outlet. Insert the plug completely into the outlet. Do not plug into an outlet controlled by a light switch.
Connections and Setup Complete the Initial Setup Customizing items in the Setup menu allows your TV to perform correctly. Make sure you've connected the TV to cable or an off-air signal before you continue.
Connections and Setup What To Expect Watching TV • Your TV allows you to change the format of the picture you're viewing by pressing the FORMAT button on your remote or accessing the Screen Format option in the Setup menu. The format changes as you press the FORMAT button and the format type is displayed at the top of the screen. Depending on the type of signal you're viewing, a different format might not be available. • Analog video is sent in a 4/3 format.
Connections and Setup Explanation of Jacks (in alphabetical order) This section describes the jacks on the back panel of your TV. There are several ways to connect devices.
Connections and Setup DIGITAL AUDIO OUTPUT (COAXIAL) Use this jack to connect an audio receiver to the TV for enhanced sound quality. Make sure you set the Audio output correctly in the Advanced Audio Menu. Go to page 37 for more information. HDMI 1 INPUT (High-Definition Multimedia Interface) Provides an uncompressed digital connection that carries both video and audio data by way of an integrated mini-plug cable. Lets you connect a device, such as a digital cable box, with an HDMI output.
Connections and Setup ▲ VOL ▲ CH ▲ Buttons On Your TV ▲ MENU INPUT/OK If you cannot locate your remote, you can use the buttons on your TV to operate many of the TV’s features. Models L26WD22 and L32WD22 buttons are located on the right side. Models L26WD23, L32WD23, and L37WD23 buttons are located on the top panel. MENU Displays the TV Main menu. If the main menu is displayed, exits the menu; if a sub menu is displayed, takes you back to the previous menu.
Chapter 2: Using the Remote Control The Buttons on the Remote Control Arrows Used to highlight different items in the TV menu and to adjust the menu controls. ON•OFF TV SAT•CBL DVD•VCR FORMAT GO BACK VOL CH MUTE INFO GUIDE Number Buttons Enter channel numbers. To enter a digital channel with a sub-channel, enter the main channel, then press the SUB CH button to enter the sub-channel and press OK. CC Toggles through the CC settings: CC Off, CC On, and CC On When Mute.
Using the Remote Control SLEEP Sets the TV to turn off after 30 min, 60 min, or 90 min. SOUND For an Analog channel, switches the sound mode options. For a Digital channel, switches the audio language. In VGA mode, switches to the audio input you selected from the VGA Sound Source option. SUB CH When entering a digital channel that has a subchannel, press this button to enter a subchannel. Once the channel is entered, press the OK button to tune to the channel.
Using the Remote Control Programming the Remote ON•OFF TV SAT•CAB DVD•VCR FORMAT GO BACK VOL CH There are three ways to program the remote control to operate other devices: Direct Entry, Manual Code Search, and Automatic Code Search. If you have recently purchased the device you want to control or if the device has many codes, you might want to try the manual code search first. MUTE INFO GUIDE MENU Using Direct Entry 1. Turn on the device you want to control. 2.
Using the Remote Control 4. 5. 6. Press and release the ON•OFF button once. There is a delay of approximately 6 seconds before the remote starts the code search. The device buttons blinks each time the remote control sends a code to test with your device. Keep pointing the remote at the device. Once the device turns off, quickly press the OK button to save the code.
Using the Remote Control 1. On your remote control, simultaneously press and hold the ON•OFF and MUTE buttons (approximately 3 seconds) until a device button remains lit. Then release the buttons. 2. 4. 5. Press and hold the MUTE button until the device button blinks off, then release the MUTE button. Press and release the device button that you programmed to operate the audio system (receiver or amplifier). Press and release the MUTE button. Now, test it by turning on your audio system. 6.
Using the Remote Control TEXSCAN .................................................................. 499 TIME WARNER .......................................................... 506 TOCOM ................................................ 464 513 520 501 TOSHIBA .................................................................. 486 TV86 .......................................................................... 487 UNIKA ......................................................... 468 469 471 UNITED CABLE ..........
Using the Remote Control ZENITH .............................................................[405 245] DVR/DVD Combos HUMAX ......................................................................912 PANASONIC ...............................................................387 PIONEER .............................................................909 977 TIVO ...................................................................912 909 TOSHIBA ............................................................
Using the Remote Control QUASAR ......................................... 363 374 225 381 292 RADIO SHACK ..................................... 225 226 227 239 . 245 268 342 354 361 363 248 251 254 274 292 300 337 RADIX ........................................................................ 245 RANDEX .................................................................... 245 RCA .. [225] 245 [308] 309 311 312 313 314 315 316 335 342 ..................................................
Chapter 3: Using the TV's Features Channel Banner There are several indicators that might appear when you press the INFO button on the remote. This display is called the Channel Banner. The following list describes the items on the Channel Banner screen (left to right and top to bottom).
Using the TV’s Features How V-Chip Works for USA and Canada Parental Controls Menu USA Parental Locks Canada Parental Locks Unrated Programs To Move V-Chip reads the program’s age-based rating (TV-MA, TV-14, etc.) and content themes [(Violence (V), Adult Language (L), etc.)]. If you have blocked the rating and/or content themes that the program contains, you will receive the message This program is blocked. Press MENU key to enter password. Go to page 42 for the US and Canada ratings explanations.
Using the TV’s Features USA V-Chip TV Ratings Hierarchy of Age-Based Ratings TV-MA Mature Audience Only TV-14 Parents Strongly Cautioned TV-PG Parental Guidance Suggested TV-G General Audience TV-Y7 Directed to Children 7 years and older TV-Y All Children Blocking Age-Based Ratings You can automatically block all program ratings above a specified agebased rating level. 1. Choose Options (lock icon) from the main menu, then highlight Parental Controls. Enter your password. 2.
Using the TV’s Features V-Chip Movie Rating Limit USA Parental Locks Movies (MPAA) All Reset Reset G TV-Y PG TV-Y7 PG-13 TV-G R TV-PG NC-17 TV-14 X TV-MA To Move TV Ratings FV L S V D Set movie rating limits by blocking movies rated above a specified level. To access Movie Ratings: MENU To Exit OK To Select 1. Press MENU on the remote control. 2. Choose Options (lock icon) from the main menu, then highlight Parental Controls. Enter your password. 3.
Using the TV’s Features Additional Features There are additional features available unrelated to Parental Controls. These features can be found in other menus. Picture Processing With a focus on exceptional picture performance, all RCA models feature Enhanced Natural Vision (EN-V). EN-V picture processing is designed to provide enhanced color and contrast so you can enjoy a bright, crisp picture. Go to page 35 to adjust picture settings.
Chapter 4: Using the TV's Menu System Using the Menu System Setup Signal Source DTV Signal Strength Auto Channel Search Manual Channel Setup Channel Labels Menu Language Screen Format Favorite Channel To Move OK To Select Cable TV u u This section explores the menus of your TV. Each menu is outlined and detailed to help you get the most from your TV. The Parental Controls menu is discussed in the Features chapter.
Using the TV's Menu System Setup Signal Source DTV Signal Strength Auto Channel Search Manual Channel Setup Channel Labels Menu Language Screen Format Favorite Channel To Move OK To Select Cable TV u u Start u u u u English Stretch Off u u Channel Labels Allows you to add or change a seven character label to a channel, which is displayed on-screen when you tune to the channel. Press the up and down arrow button to scroll through the available characters.
Using the TV's Menu System Advanced Picture Menu Advanced Picture Menu Video Noise Filter Color Temperature 3D Comb Filter Reset All To Move u Low Warm On Reset OK To Select u u u Video Noise Filter Reduces picture “static” or any type of interference. This feature is especially useful for providing a clearer picture in weak analog signal conditions.
Using the TV's Menu System Advanced Audio Menu Advanced Audio Menu Audio Language Digital Audio Output TV Speakers VGA Sound Source Reset All To Move English Digital On VGA Reset OK To Select MENU To Exit u u u u u Audio Language (only available on digital channels) Press the right arrow to choose from the audio languages available for the program you're watching. The language you choose becomes your preferred audio language for all channels on the digital tuner until you turn the TV off.
Using the TV's Menu System Digital Captions If available, lets you select a closed caption mode for digital channels. Use Service1 if you are unsure what to use. Digital Captions Setup Text Style Text Size Font Text Color Text Opacity Background Color Background Opacity Edge Effect Edge Color Custom Normal Default White Solid Black Solid None Red u u u u u u u u u OK To Select Text Style If you want to customize the digital closed caption options, choose Custom.
Chapter 5: Other Information Frequently Asked Questions (FAQs) How can I view High Definition (HD) video? There are several ways you can view high definition video. If you have regular cable, your TV is able to receive some digital channels because it has a capability called QAM. QAM is a tuner that enables reception of unscrambled digital cable content. After you run a channel search, the digital channels begin at the end of the analog channel list.
Other Information Troubleshooting Most problems you encounter with your TV can be corrected by consulting the following troubleshooting list. TV Problems TV won’t turn on • Make sure the TV is plugged in. • Check the wall receptacle (or extension cord) to make sure it is “live” by plugging in something else. No picture, no sound but TV is on • You might be tuned to an input with no device connected to it to view.
Other Information Can’t select certain channel • Channel may be blocked or not approved in the Parental Controls menu. • If using a VCR, check to make sure the TV/VCR button on the VCR is in the correct mode (press the TV/VCR button on your VCR). • Press the TV button and then try to change channels. Noisy stereo reception • May be a weak station. Press the Sound button and choose Mono. Black box appears on the screen • Closed-captioning might be on. Check Analog or Digital Captions in the Options menu.
Other Information V-Chip Rating Explanations US V-Chip Rating System TV-MA (Mature Audience Only) Specifically designed to be viewed by adults and may be unsuitable for children under 17. It contains one or more of the following content themes: crude indecent language (L), explicit sexual activity (S), or graphic violence (V). TV-14 (Parents Strongly Cautioned) Contains some material that many parents would find unsuitable for children under 14.
Other Information C8+ (Children 8 and Older) Programming generally considered acceptable for children 8 years and over to watch on their own. Violence Guidelines: Violence will not be portrayed as the preferred, acceptable, or only way to resolve conflict or encourage children to imitate dangerous acts which they may see on television. Any realistic depictions of violence will be infrequent, discreet, of low intensity and will show the consequences of the acts.
Other Information Limited Warranty What your warranty covers: • Defects in materials or workmanship. For how long after your purchase: • 90 days from date of purchase for labor. • 1 year from date of purchase for parts. What your warranty does not cover: • Acts of nature, such as but not limited to lightning damage. • Adjustment of customer controls. • Damage from misuse or neglect.
Other Information If you purchased your product outside the United States or seek warranty coverage outside the United States: • This warranty does not apply. Contact your dealer for warranty information. Service calls which do not involve defective materials or workmanship are not covered by this warranty. Costs of such service calls are the sole responsibility of the purchaser. Care and Cleaning CAUTION: Turn OFF your TV before cleaning. You can clean the TV as required, using a soft lint-free cloth.
This page intentionally left blank
This page intentionally left blank
ENERGY STAR and the ENERGY STAR mark are registered U.S. marks Manufactured under license from Dolby Laboratories. FCC Information This equipment has been tested and found to comply with the limits for a Class B digital device, pursuant to Part 15 of the FCC Rules. These limits are designed to provide reasonable protection against harmful interference in a residential installation.