user’s guide LCD HDTV/DVD Combo contents connections 6 remote 23 features 32 menus 38 FAQs 48 warranty 54
Important Information CAUTION RISK OF ELECTRIC SHOCK DO NOT OPEN This symbol indicates that this product incorporates double insulation between hazardous mains voltage and user accessible parts. When servicing use only identical replacement parts Caution: To reduce the risk of electric shock, do not remove cover (or back). No user serviceable parts inside. Refer servicing to qualified service personnel.
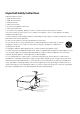
Important Safety Instructions Important Safety Instructions 1. Read these instructions. 2. Keep these instructions. 3. Heed all warnings. 4. Follow all instructions. 5. Do not use this apparatus near water. 6. Clean only with dry cloth. 7. Do not block any ventilation openings. Install in accordance with the manufacturer’s instructions. 8. Do not install near any heat sources such as radiators, heat registers, stoves, or other apparatus (including amplifiers) that produce heat. 9.
Table of Contents Important Safety Instructions .................................................................................................................... i Chapter 1 I Connections & Setup Things to Consider Before You Connect ....................................................................................... 6 Protect Against Power Surges ...................................................................................................... 6 Instructions at the Beginning of User's Guide ....
Chapter 3 I Using TV Features Channel Banner ............................................................................................................................ 32 Autotuning ..................................................................................................................................... 32 Parental Controls and V-Chip ...................................................................................................... 33 How V-Chip Works for USA and Canada ....................
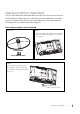
1 Connections and Setup Things to Consider Before You Connect Protect Against Power Surges • Connect all devices before you plug any power cords into the wall outlet or power strip. NEVER plug your TV/DVD into an outlet that is controlled by a wall switch. • Turn off the TV/DVD and/or device(s) before you connect or disconnect any cables. • Make sure all antennas and cables are properly grounded. Refer to the Important Safety Instructions.
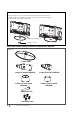
Attaching TV/DVD to Table Stand Your TV comes without the table stand attached so that you can choose to mount your TV/DVD either to its table stand or to a wall (wall mount sold separately). If you want to mount your TV/DVD to the wall, don’t attach the table stand, and instead, follow the Mounting Your TV to the Wall instructions on page 11. Table Stand Assembly for model L26HD33D Step 1 Parts List 1. Take the TV/DVD bag and place it on a flat table. 2.
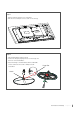
Step 3 Attach the table stand to the TV cabinet by inserting the stand into the stand connector support, and aligning the three screw holes, from the bottom, tightening three M4 St-screws with a screwdriver.
Step 1 1. Take the TV bag and place it on a flat table. 2. Take the TV set and place it face down on the TV bag. Step 2 1. Take the Stand Base and the Hinge. 2. Position the Hinge by aligning the slot on the Hinge and the notch on the Stand Base. 3. Attach the Hinge to the Stand Base with four Size M5 screws, from the bottom, with a Philips head #2 Hinge Slot screwdriver.
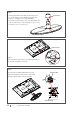
Step 3 Fastener 1. Take the Stand Base Assembly and the Hinge Cover. 2. Locate the Hinge Cover by aligning the biggest tab fastener to the biggest slot on the Stand Base. 3. Push and fasten the Hinge Cover to the Stand Base. Be sure all 3 tab fasteners snap firmly in place. (Note: model L32HD33D only has 2 tab fasteners) Stand Cap Step 4 Remove the Stand Cap from the TV cabinet by pushing on the small tab and pulling out the Cap.
Step 6 Secure the Table Stand to the TV cabinet by tightening the Size M8 screw with a Philips head #3 screwdriver. Mounting TV/DVD to Wall To mount your TV to the wall you need to purchase a VESA wall mount Model L26HD33D Purchase a VESA 100 x100, Size M4 screw Caution:Your wall mount must bear a minimum of Model L32HD33D Purchase a VESA 200 x100, Size M4 screw five times the TV’s net weight without causing damage.
Get the Picture The first part of connecting your TV/DVD is to get the picture, also known as the signal. The back panel of your TV/DVD allows you to receive analog and/or digital channels by using the ANTENNA/CABLE INPUT. Getting Channels What You Need Antenna ("rabbit ears") or outdoor antenna with coaxial cable OR Coaxial cable with cable service A. Do you have an indoor or outdoor antenna? If not, go to step B.
Choose Your Connections There are several ways to connect devices such as DVD players and set-up boxes to your TV. Please use the following chart to determine which connection is best for you. Proceed to the appropriate page to connect your TV/DVD. Jacks Used Cable Needed Go to...
Connecting a Device with Composite Video (Good) This connection allows you to connect a device that has a Video Out jack, for example, a DVD player. Using the example of a DVD player: 1. If necessary, connect your cable and/or off-air antenna as described on page 12. 2. Connect your yellow video cable. Connect a video cable to the (VID1) VIDEO jack on the back of the TV/DVD and to the VIDEO OUTPUT jack on the DVD player. 3. Connect your red and white AUDIO cables.
Component Video Connection This is an example of a connection using the component video jacks. Go to page 14 for specific instructions. Don’t forget: If necessary, connect antenna or cable to get a picture. Go to page 12 for instructions.
HDMI/DVI Connection (Best) This is an example of a connection using the HDMI2/DVI jack. Go to page 15 for specific instructions. Don’t forget: If necessary, connect antenna or cable to get a picture. Go to page 12 for instructions. Red White OR HDMI Cable HDMI Cable + HDMI/DVI Adapter + Audio cables are color coded Red=right audio; white=left audio Connecting a PC Device This connection allows you to connect to a personal computer and use your TV/DVD as a monitor. 1.
PC Connection This is an example of a connection using the PC VIDEO jack. Go page 16 for specific instructions. Don’t forget: If necessary, connect antenna or cable to get a picture. Go to page 12 for instructions. Viewing Picture from Connected Device 1. Plug in the TV (see page 18 for details) and the device, if they aren't already plugged in. 2. Turn on the TV and the device you want to view, for example a DVD player. 3.
Plug in TV/DVD Plug the end of the power cord into the back of the TV/DVD. Plug the other end into an outlet. Insert the plug completely into the outlet. Do not plug into an outlet controlled by a light switch. Put Batteries in Remote • Remove the battery compartment cover from the back of the remote by pushing the tab and lifting off the cover. • Insert two fresh batteries. Make sure the polarities (+ and -) are aligned correctly. • Replace the cover.
Complete Initial Setup The menu system in your TV/DVD allows the TV’s features to work properly. The first time you turn on your TV/DVD, the language screen appears. Set Menu Language Menu Language The first part of the setup allows you to select your preferred language for the menu system. English Français Español If English is your preferred language, press OK and go to set the TV Location Mode.
What To Expect Watching TV • Remember: Look for an A at the top of the screen to see if you're watching an analog channel. Analog video is sent in a 4/3 format, or your TV/DVD can display these channels in a16/9 format by pressing the FORMAT buttons to view the different formats available. Go to page 37 for more explanation of screen formats. • Remember: Look for a D at the top of the screen to see if you're watching a digital channel.
Explanation of Jacks (in alphabetical order) This section describes the jacks on the back panel of your TV/DVD. There are several ways to ANTENNA/CABLE INPUT Lets you connect a coaxial cable to receive the signal from your AUDIO antenna, cable, or cable box. AUDIO/VIDEO INPUT 1 (VID1) VIDEO Lets you connect a device that has composite video jacks, such as a VCR or DVD player. • L AUDIO HDMI 1/DVI INPUT Provides left audio connection when using the VIDEO INPUT 1 jack.
Buttons and Other Jacks On Your TV/DVD Side Input Jacks Headphones Allow you to connect headphones to listen to the sound coming from the TV/DVD. VIDEO INPUT 2 Receives video from another device such as a camcorder, video game console, VCR, or DVD player. To access a device connected to the VIDEO jack, press the INPUT button on your remote repeatedly to select VID2 displayed at the top of the screen.
2 Using the Remote Control Remote Control Buttons TV Functions Alphanumeric Buttons Enter channel number and options with letters, using these buttons. To enter a channel, press the number buttons and press OK. To enter a digital channel with a sub-channel, enter the main channel, then press the right arrow button to enter the sub-channel and press OK. Arrows( / / / ) Used to highlight different items in the TV menu and to adjust the menu controls.
OK When in the menu system, selects highlighted items. PIC Press to display the Picture submenus. ON•OFF When in TV mode, turns the TV/DVD on or off. If in another mode (SAT/AUX or DVD) and programmed, will turn the device on or off. REW, REPLAY, PLAY, NEXT, FWD, REC, STOP, PAUSE (buttons at TOP of the remote) If programmed, provides transport control for some remote-controllable devices, for example, VCRs or DVD players. ZZZ (SLEEP) Press to display the Time menu and set Sleep Timer.
Programming Remote to Operate Other Devices The universal remote can be programmed to operate many brands of remote-controllable VCRs, audio devices, DVD players, cable boxes, satellite receivers and other devices. In addition to being programmed to operate your television, it’s already programmed to operate some RCA devices. Notes: • The TV button can’t be programmed on this remote to control any device; it controls only this TV. • The remote may not be compatible with all models of all brands of devices.
Using Manual Code Search Note: Before using manual code search, you must use Direct Entry first. This lets the remote know which type of device should begin searching codes. Then proceed with the following steps. 1. Turn on the device you want to control. 2. On your remote control, simultaneously press and hold the ON•OFF and MUTE buttons (approximately 3 seconds) until the CANCEL button lights up. Then release the buttons. 3. Press and release the device button (SAT/AUX or DVD) you want to program. 4.
Manual Reset of Remote Manual Reset is used to reset the remote settings to default. Note: The reset can also be done by replacing the batteries, but replacing the batteries does not always cause a reset, so you can perform a manual reset if the remote doesn’t reset after battery replacement. 1. On your remote control, simultaneously press the V-Chip, ON•OFF and MUTE buttons. 2. The CANCEL button will long blink to indicate success, and the remote control returns to normal operation.
Remote Code List Note: The codes are programmable to any of the device buttons (SAT /AUX or DVD) on the remote. The remote code is a 4-digit code. The first digit indicates the database device type (0 for DVD, 1 for Satellite TV, 2 for Cable, 3 for DVR, 4 for VCR, 5 for Audio and 6 for CD), the following 3 digits indicate the brands as follows: Audio Codes Accuphase ......................................................032 Accurus ...........................................................033 ADC .........
NET Brazil ....................................................006 Novavision ....................................................027 NSC ..............................................................064 Oak .........................................................053 066 Pace ...................007 008 009 010 011 012 013 014 015 016 017 022 024 025 Panasonic .......................................077 080 085 Paragon ..........................................................085 Philips ....................
Sonic Blue ...................................059 061 063 066 Sony ..........001 020 037 115 118 121 122 123 131 133 135 154 155 158 163 168 223 229 268 283 306 307 308 335 354 358 360 362 381 392 394 427 428 433 435 440 442 446 455 464 466 482 483 Sungale ........................................................270 Superscan ........................................................023 SVA ..............................................................096 Sylvania ................
Akai .............................................017 018 033 127 Alienware...........................................................038 American High .................................................025 Apex ...............................................................074 Asha ...............................................................021 Audio Dynamics ...............................................019 Audiovox ..........................................022 035 121 Bang & Olufsen ...................
3 Using TV Features Channel Banner There are several indicators that might appear when you press the INFO button on the remote. This display is called the Channel Banner. The following list describes the items on the Channel Banner screen (left to right and top to bottom). Parental Control TV-G English D 10 CBS Parent Control TV-G Stereo 720p Stretch CC ZZz 25 min. 06:05 PM The Parent Control state (locked or unlocked) of the current program.
You can select from the following inputs or channels: Disabled Choose this if you don’t have a device connected to the TV/DVD or if you don’t Autotuning want the TV to automatically tune to the correct channel/input when you’re using this device. Channel 3 or 4 Device is connected to the ANTENNA/CABLE jack on the back of the Go Back Set DVD Channel Set SAT-AUX Channel Disabled Disabled TV/DVD, and you want the TV to tune to channel 3 when you press the corresponding button on the remote.
Lock/Unlock Parental Controls Parental Control Go Back Lock Parental Control Select Channel Block Channel Button Block V-Chip Change Password • When the Parental Control menu is accessed from the Main menu and the parental controls 51 MTV are permanently unlocked, the following message is displayed: ... ... “Parental controls are UNLOCKED. Rating limits and channel block will NOT require a password to view the picture. Use “Lock parental controls” to lock. Press OK key to continue.
6. Use the MENU button repeatedly to get back to the Parental Control menu. 7. Select Lock Parental Control from the Parental Control menu for rating limits to take effect, you must press OK and enter a 4-digit password. To view age-based ratings after you've locked them, follow the same steps as above to unlock. Blocking Specific Content Themes You can block programs based on their content. (Content is represented by the D, L, S, V and FV on your screen.
Blocking Canada V-Chip Ratings English Ratings Go Back CE-18+ CE-14+ CE-PG CE-G CE-C8+ CE-C If you receive Canadian programs you can block Canadian English and French V-Chip by ratings only. When you block a particular rating, you automatically block the higher rated programs as well. To block Canadian English and French program ratings: 1. Press MENU on the remote control (the TV's Main Menu appears). 2. Select Parental Control. 3. Select V-Chip. 4. Select Canada V-Chip. 5.
Change Password Change Password This option let you set a new V-chip password. 1. Press MENU on the remote control (the TV's Main Menu appears). 2. Select Parental Control. 3. Select Change Password and press OK to display the password resetting menu. 4. Using number buttons to enter the new password, press OK. Enter the new password again and press OK to confirm. Create Password - - - Confirm Password - - - - Press OK when finished.
4 Using TV Menu Using Menu System This section explores the menus of your TV. Each menu is outlined and detailed to help you Main Menu TV Exit Picture Sound Channel Parental Control Setup Time get the most from your TV. The Parental Control menu is discussed in Chapter 3. To access the menu system: 1. Press the MENU button. 2. Use the up and down arrow buttons to highlight an option and press OK to display it. The name of the menu is displayed at the top of the menu screen. 3.
Film Mode (3:2 Pulldown) Automatically detects video sources that were originally recorded on film (like most movies) and subsequently converted to a different format (for TV broadcast, for example). Film mode processes the converted signal so that it looks as close as possible to the original. Another name for this process is reverse 3:2 pulldown. The On setting (recommended): place a check in the box, enables the feature only when the TV detects that movie playback quality could be improved.
Channel Menu The Channel Setup menu lets you configure the TV to fit its surroundings and your preferences. Press MENU on the remote, and then select Channel from the Main Menu. Channel List The Channel List menu allows you to view all the channels available in your channel list. Press the up or down arrow button to highlight a channel then press OK to tune to the channel. Press left and right arrow buttons to scroll to the next page.
Analog CC Type If available, lets you select the captioning mode used for displaying captioning information. If you are unsure of the differences among the modes, you may prefer to leave the closed captioned mode set to CC1, which displays complete text of the program in the primary language in your area. Digital CC Type If available, lets you select a closed caption service mode (1.6) for digital channels. Digital CC Preset If available, lets you select between Default and Custom options.
5 DVD Functions-Playing Discs Regional Coding Your DVD player has been designed to process regional management information that is stored on DVD discs. DVD discs that have different regional codes to that of your player cannot be played. The regional code for your player is 1. All means all regions. When you buy a disc check that it bears the correct logo.
Still image While the disc is playing, press PAUSE once to freeze frame. To resume normal playback, press PLAY. Changing title/chanpter/track While the disc is playing, press REPLAY or NEXT on the remote to go immediately to the previous or next title/chanpter/track. Accelerated play While the disc is playing, press REW or FWD button one or more times to vary the speed and direction of the accelerated play: x2, x4, x8, x20 ( For DVDand CD) . To resume normal playback, press PLAY.
Changing the audio language (DVD) Press F1 repeatedly to switch between different audio languages for DVD. Subtitles Press CC repeatedly to switch between different subtitle languages available in the disc. Repeat play mode This function allows you to repeat a title, chapter, track, a programmed sequence or whole disc. The repeat play options vary depending on the disc type.
6 DVD Functions-Menus Display the DVD Main Menu DVD Main Menu This DVD Player setup is carried out via the TV, enabling you to customise the DVD player to Exit TV Menu DVD Disc Menu DVD Player Menu suit your particular requirement. 1. Turn on the TV/DVD, press the DVD button to turn to DVD mode. 2. Press the MENU button to display the DVD Main Menu. 3. Use the up and down arrow buttons to highlight an option and press OK to display it..
Rating Menu This feature lets you set a playback limitation level. The rating level from 1 to 8 and are country dependent. You can prohitbit the playing of certain disc that are not suitable for your SYSTEM SETUP PASSWORD RATING DEFAULT SHORTCUT children or have certain discs played with alternative scenes. 1 KID SAFE 2G 3 PG 4 PG13 5 PG-R 6R 7 NC-17 8 ADULT EXIT SETUP UnLock the disc by entering the four-digit password before you can access to RATING menu. 1. Display SYSTEM SETUP menu. 2.
Language Setup With this menu, you can set the language for player menus, audio, subtitles and the disc menus. 1. Press Menu to display the Main Menu. 2. Press the up or down arrow button to select DVD Player Menu. LANGUAGE SETUP 3. Press the left or right arrow button to select LANGUAGE SETUP. 4.
7 Other Information Frequently Asked Questions (FAQs) What’s the quickest way to view High Definition (HD) video? Connect an off-air antenna to the ANTENNA/CABLE Input to view free local digital channels. You might need to purchase an antenna. Go to page 12 for more information. Visit www.antennaweb.org for help deciding what type of antenna to use to receive the local digital channels available to you.
Troubleshooting Most problems you encounter with your TV can be corrected by consulting the following troubleshooting list. TV Problems TV won’t turn on • Make sure the TV is plugged in. • Check the wall receptacle (or extension cord) to make sure it is “live” by plugging in something else. • The side panel controls may be locked (disabled). Use the remote control to unlock the side panel controls by selecting the Button Block feature on the Parental Control menu and press OK to uncheck the box.
Buttons don’t work • The side panel controls may be locked (disabled). Use the remote control to unlock the side panel controls by selecting the Button Block feature in the Parental Control menu and press OK to uncheck the box. • Unplug the TV for ten minutes and then plug it back in. Turn the TV on and try again. TV turns off unexpectedly • Sleep timer may have been activated. Go to page 41 for instructions. • Electronic protection circuit may have been activated because of a power surge.
Problems with V-Chip/Parental Controls Rating limits don’t work You must lock the settings. Go to the Main Menu (press MENU on your remote), select Parental Control, select Lock Parental Control. I don’t remember my password and I want to unlock TV If you forget your password, you can enter the factory default code: 4116. V-Chip won’t let me watch a program even though it’s not rated as violent. Maybe the movie was given an NR (Not Rated) status.
V-Chip Rating Explanations US V-Chip Rating System TV-MA (Mature Audience Only) Specifically designed to be viewed by adults and may be unsuitable for children under 17. It contains one or more of the following content themes: crude indecent language (L), explicit sexual activity (S), or graphic violence (V). TV-14 (Parents Strongly Cautioned) Contains some material that many parents would find unsuitable for children under 14.
G (General Audience) Programming considered acceptable for all ages groups. While not designed specifically for children, it is understood younger viewers may be part of the audience. Violence Guidelines: Will contain very little violence, either physical or verbal or emotional. Will be sensitive to themes which could frighten a younger child, will not depict realistic scenes of violence which minimize or gloss over the effects of violent acts.
TTE Technology, Inc. (“TTE”) Limited Warranty All LCD Models EXCEPT TO THE EXTENT PROHIBITED BY APPLICABLE LAW, THIS WARRANTY DOES NOT COVER, AND AS DESCRIBED BELOW TTE EXPRESSLY DISCLAIMS, ALL ACTUAL AND IMPLIED WARRANTIES WITH RESPECT TO ANY PRODUCT USED FOR INSTITUTIONAL OR OTHER COMMERCIAL PURPOSES (INCLUDING BUT NOT LIMITED TO RENTAL PURPOSES).
• • • • • Damage resulting from non-approved installation methods. Signal reception problems not caused by your unit. Damage from misuse or neglect. Batteries. A television that has been modified or incorporated into other products or is used for institutional or other commercial purposes (including but not limited to rental purposes). • A unit purchased or serviced outside the U.S.A. • Acts of nature, such as but not limited to lightning damage. • Special, incidental or consequential damages.
ENERGY STAR® and the ENERGY STAR mark are registered U.S. marks manufactured under license from Dolby Laboratories. “Dolby” and the double-D symbol are registered trademarks of Dolby Laboratories. SRS, SRS and are trademarks of SRS Labs, Inc. FCC Information This equipment has been tested and found to comply with the limits for a Class B digital device, pursuant to Part 15 of the FCC Rules.