Please register your product at WWW. sarcoma Please keep your sales receipt and keep the record of the serial number and the date of purchase in order to receive warranty parts and service. The serial number is located at the back of the TV. Serial Number / Geronimo de aerie de TV Date of Purchase / Chafe de la copra LED LCD TV User's Manual Model Number. LED19830RG Made for Today. WWLFCA.
Child Safety Guide 0 [DRY 1134) H It Makes A Difference How and Where You Use Your Flo Panel Display Congratulations on your purchase! As you enjoy your new product, please keep these safety dips in mind: THE ISSUE * The home hearer entertainment experience is o gre ks, che: THIS MANUFACTURER CARES! «th y is commuted lo shelves, infomercial WALL MOUNTING: IF YOU DECIDE TO WALL MOUNT YOUR FLAT PANEL DISPLAY, ALWAYS: WS CEA + bow om ne «A minims 0 PROPS Te 1a
Chile Safena Cuide IHD TET El Como y Donde Usted Usar Su Monitor de Pantalla Plana Marca La Diferencia {Muchas gracias por su uso del presente producto! Cuando usted disfruta de su nuevo producto, por favor tenga en cuenta los consejos de seguridad: POSIBLES PROBLEMAS » La experiencia de entorpecimiento de cine en ceas es una pendencies reciente y los grandes monitores de pantalla plana son muy populares.
Table of Contents Child Safety Guide Caution and Warning FCC Notice .. Safety Precautions Preparation for Your New TV, Check Ae Connection and Using TV Stand Installation TV Signal Connection . Cable Connections Side Panel Connections Connecting AV Campos: Connecting Ypres Cor Connecting HDMI device Connecting a Corpus How to Obtain Various Kinds TV Jacks Explanation Back Panel and Front Pane BUFFOONS Front Panel... Remote Control Instructions.
Lo] RoI Role Ip CI MIE OSD Menu Operations Adjust the OSD Ser Picture Mani. Sound Menu Chignon Menu tol Menu .. Frequently Asked Questions Troubleshooting V-Chip Rating Explanations US V-Chip Rating System Canadian En Hating Sy Canadian Hating S . Wall Mounting Unit Specification USB Media Play Product Specification.
CAUTION RISK OF ELECTRIC SHOCK A Caution: To reduce the risk of electric shock, do not remove cover or back. No user-serviceable parts inside. Refer servicing to qualified service personnel, DO NOT OPEN The lightning flash with arrowhead symbol, within an equilateral triangle is intended to alert the user to the presence of insulated dangerous voltage within the product enclosure that may be of sufficient magnitude to constitute a risk of electric shock.
Safety Precautions GRR No 11. Only use attachments Read these instructions, Keep these instructions. Head all warning Follow all instructions. Do not use this apparatus near water, For example, do not use near a laundry tub, in a wet basement, or near a swimming pool, and the like. Clean only with dry cloth. Do not block any ventilation openings. Install in accordance with the manufacturer's instructions.
Safety Precautions 23, WARNING: To prevent injury, this apparatus must be securely attached to the floor/wall in accordance with the installation instructions. 24. To reduce the risk of electric shack, the grounding of center pin of plug must be maintained. 25. If an outside antenna or cable system is connected to the TV, be sure the antenna or cable system is grounded to provide some protection against voltage surges and built-up static charges.
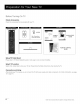
Preparation for Your New TV Before Turing On TV Check Accessories Check the accessories that are packed with your TV, [EE pee g » Rad ” y | BUICK START Bid x 12mm, dos | : Pratt RE01TBA12H | GUIDE AAA AAA REMOTE CONTROL GUIDE Setup TV Table Stand Please refer to TV Stand Installation guide in next page to carry out stand installing, Select TV Location Select a flat, stable table to place your TV set.
TV Stand Installation TV LED19BR0RQ is packaged with the TV stand separated from the cabinet. To setup the TV table stand, please cray out the installation according to the instructions below, Step One Place the TV faced down on a soft cloth or cushion to prevent the panel from being damaged. The panel can be scratched easily, so please! 1. Choose an absolutely flat surface to place the TV on. 2. Use soft cloth or cushion to face the TV panel. Do not put TV on the table directly.
IRS i K@ ela] oti fol] The first step In connecting your TV is obtaining the signal. Your TV has a side panel, which allows you to receive analog ardor digital television channels via TV jack. Before connecting your TV, determine using an antenna or a cable service to obtain the signal. A. Antenna Connect the antenna to TV via coral cable on TV jack of the side panel. You are ready to receive air local digital and analog channels. B.
Cable Connections Choose Your Connections Your TV supports various connections to other devices {such as DVD), VCR, Set-top bax, etc). Please follow the table to choose the cables which adapt to your device. Ei ee Goth page 12 Go to page 13 COMPONENT IN Y/Po/Pr R-AUDIO-L HDMI-D VI cable [) F = Goth page 14 HOMINOID, 2,3 HDMI cable nt GE Audio cable with 3.
Side Panel Connections Connecting AY Composite device (Good Video Quality) To connect a composite AV device, such as a DVD player, follow these steps: 1. Connect the AV IN VIDEOS jack on the back of TV to the video output jacks of device via video cable {yellow). 2. Connect the R-AUDIO-L jacks on the back of TV to the audio output jacks of device via audio cable.
Side Panel Connections Connecting Ypres Component device (Better Video Quality) To connect a component device, such as a DVD player, follow these steps: 1. Connect the COMPONENT IN Y/P/Pr jack on the back of TV to the video output jacks of device via video cable (green, blue and red). 2. Connect the R-AUDIO-L jacks on the back of TV to the audio output jacks of device via audio cable. Notice the left channel jack and plugs are white and the right channel jack and plugs are red.
Side Panel Connections Connecting HDMI device (Best Video Quality) To connect a HOME device, such as a DVD player, please connect the HDMI 1/01, 2, or 3 jack on the back of TV to the output jack of device via HDMI cable, To connect a DVI device, such as a computer via DVI port of PC and HDMI jack of TV: 1. Connect the HOME ADVIL 2 or 3 jack on the back of TV to the DVI port of PC via HDMI-D VI cable. 2. Connect the SOUNDNESS! jack on the back of TV to the audio output jack of computer with audio cable (3.
Side Panel Connections Connecting a computer To connect a computer, follow these steps: 1. Connect the VGA port on the back of TV fo the VGA output jack of device via D-sub 15-pin cable. 2. Connect the SOUNDING Jack on the back of TV to the audio output jack of computer with audio cable (3.5mm). Note: if you want to use your TV as a monitor, please notice that the maximum resolution for LEDTOB30RQ is 13667768. Firebase set the computer graphic correctly.
TV Jacks Explanation HEAD PHONE: Connect a 3.5mm headphone for personal audio. ANT/CABLE: Connect fo receive the signal from your antenna or cable via coaxial cattle, PC INPUT { VGA, SOUNDING ): VGA: Connect your computer or other device with a VGA output to this jack using a 15-pin, D-sub cable. SOUNDING: Use to obtain sound when a PC or DVI device is connected to the VGAMDMI Input. Use 3.5mm stereo min-pin cable to connect PC or DV device to TV.
Back Panel and Front Panel Back Panel Buttons you cannot locate your remote, you can use the back panel buttons on your TV to operate many TV features. INPUT: Displays the Source Select List. MENU : Displays the TV Main Menu, CH v : Scans down through the channel list. In the TV menu system, it acts like the down arrow on the remote control and can be used to select menu options. CH a 1 Scans up through the channel list.
Remote Control Instructions Inserting Batteries in the Remote « Remove the cover of battery cabin on the back of the remote control by pushing the tab and sliding the cover. « Insert two AAA batteries. making sure the polarities (+ and -) are aligned correctly.
Learning about Remote Control POWER i Remote Control Buttons POWER {O): Turns the TV on or off. MUTE (BX): Reduces the TV volume to its minimum level. Press again to restore the volume. Numeric Buttons: Ut “wu”: To enter a digital channel with a sub-channel. enter the main channel; then. press this button to enter the sub-channel and press ENTER. Arrows Uses the four arrows to highlight different items in the TV menu or change the value.
Initial Setup If it Is the first time yous turn on your TV. or you have done Clear Channel List option (see page 30). the initial setup menu appears automatically. faked Bela Step One Please select Menu Language. Available languages: English, Sp; Step Two Please select the TV installation mode. press the up/down arrow select the mode you need: Home, Re tall. If you select Home mode, the next option is step three, If you select Re tall mode.
Basic Operations Turning On and Off Connect the AC cord to power the LED LOD TV. At this time the TV will enter standby mode and power indicator will tum red Use Power button: (4) on the top panel the remote control to turn on the TV, After switching off the TV for 5 seconds. You can turn on TV aga, Choosing TV Channel Tuning To Analog Channels An analog channel has a channel number beginning with “A”.
Basic Operations Channel Bar Press the DISPLAY button on the remote control, the channel bar will appear on the top right comer of the screen. It displays the current channel's information. The following list describes the rems on the channel bar a2 | «D501 My ee ae Eel 4801 Fae Set ne ese ne ey ATV DTV A2/D50-1 If the channel is analog, A is displayed. If It's a digital channel, D is displayed. For example, in the pictures above, AZ Is an analog channel, and D50-1 fs a digital channel sub-channel number).
OSD Menu Operations Adjust the OSD Screen The OSD (On Screen Display! menu enables you to approach to the TV functions. To use OSD menu system. press MENU bunion on remote control. then use firefighting arrow to highlight an option from PICTURE. SOUND, CHANNEL, PARENTAL, SETUP or OTHERS and press ENTER/down button. Press the up and down arrow to move 10 a different option within each menu, If necessary.
OSD Menu Operations Screen Size Screen Size: Select a screen aspect ratio, {Available ratio: Wide, Cinema, Zoom, and Normal.) Please choose the ratio that applies to your video nal format Settings {only available in PC mode) Er 4 Auto Adjust: Adjust the PC picture display automatically. * Horizontal Position: Adjust the horizontal position of picture. + Vertical Position: Adjust the vertical position of picture, * Clock: Adjust the clock of picture. = Phase: Adjust the phase of picture.
OSD Menu Operations Sound Menu The Sound Menu lets you adjust audio output. To access the Sound Menu, press MENU on the remote, and then select SOUND fom the Main Menu. Press ENTER/down button to proceed to SOUND menu. Use up/down to choose the function you need, press ENTER or right arrow to adjust or enter a sub-menu. The sub-menu image and explanation are shown below Sound Settings = RIT Sound Mode: Choose the preset sound mode of your TV: Standard, Soft, User, Dynamic.
OSD Menu Operations Equalizer Settings een The seven-band graphic equalizer allows you to adjust the audio frequency settings. You can select one of the equalizer presets {Of Pop, Rock, Jazz) or aerate your own personal preset (User), Press the left or right arrow to select the frequency {100Hz, 250Hz. 500Hz, kHz, kHz, kHz, KHZ) oo you want fo adjust. Use the up or down arrow to adjust CTE Channel Menu The Channel Menu enables you to search, view and edit channels. It is available in TV made only.
OSD Menu Operations Signal Type Select your TV signal type: Alr or Cable, Auto Channel Search Execute an auto channel search {see page 20) Parental Menu The Setup Mani enables you to lock program with special content, panel key board and input source. Press MENU and choose PARENTAL from the Main menu. Press the ENTER/down button to proceed to PARENTAL menu. Lock Parental Control + When the Parental Control Menu is accessed from the Man Menu, you need to enter password to unlock the menu function.
OSD Menu Operations Movie Rating Picture Use arrow keys to select the rating level you want to black, press ENTER to blackjack the rating level, If you have blocked a lower level rating, the higher ratings will be blocked too RL] | For example, when PG-13 is blocked, RB, NC-17 and X BE will be blocked at the same time. es @ rr Boo Similar with Movie Rating.
OSD Menu Operations Canada V-Chip Press ENTER or right arrow to enter US V-Chip ratings many, which contains two sub-menus: English Rating and French Rating English Rating Press ENTER or right arrow to enter English rating menu, French Rating Press ENTER or right arrow to enter French rating menu. BSR me [OY 5 Block Unrated Show Block all the unrated program, Downloadable Rating, Clear Downloadable Data Activate or downloadable rating data. if available.
OSD Menu Operations Change Password Change the password of parental menu. pre (“Rs ~~ Input the old password. Input the new password, Input the new password again to confirm, Remote Select your Remote: Off, Remote! or Remote?. This is for special purpose. ss Que @wer Hos Keypad Lock Select this option to block or unblock the TV's side panel buttons so that they can't be used.
OSD Menu Operations Setup Menu The Setup Menu lets you con fig the TV with your preferences. Select SETUP from the Main Menu. Press ENTER/down button fo proceed to SETUP menu. Tessa Use up/down to choose the function you need, press ENTER or right arrow to adjust or enter a sub-menu.
OSD Menu Operations Digital CC Style Select the item you want to adjust in Digital CC Style menu with up/down mows After changing. you can preview the caption style here. = ‘ [CT Menu Language To choose your menu language, press the left/right arrow until the language you need appears Available languages: English, French and Spanish. Menu Transparency To chaise your menu ir: Off, Low, Medium, High.
OSD Menu Operations Others Menu The Others Menu lets you con fig the TV with your preferences in other features. Choose OTHERS from the Main Menu, Press ENTER/down button to proceed to SETUP menu Dryer ie Use up/down to choose the function you need. press ENTER or right arrow to adjust or enter a sub-menu, The sub-menu image and explanation are shown below.
Frequently Asked Questions (FAQs) What's the most convenient way to view High Definition (HD) video? Connect an antenna to the TV Input jack to view free local digital channels, You may need to purchase an antenna, (See page for more Information about antenna setup). Wist www.antennaweb.org for assistance in deciding what type of antenna to use to receive the local digital channels available to you.
Troubleshooting Identifying Problems If there are any problems when using the product, please consult the fist below. If the list does not solve the problem, call our Customer Service Center Immediately. TV Problems The TV can't be turned on. * Make sure the AC cord is plugged in. * Check the wall outlet, make sure the AC output works normally and stably. + Tha top panel may be locked (disable.
Troubleshooting Can't select a certain channel. * The channel may be blocked or not approved in the PARENTAL Menu. * The channel may be skipped in channel list in CHANNEL Menu, Check the blocking and skipping status of channel, The stereo sound performance is bad. = may be a weak station. Use the SOUND Menu and set Analog Sound as Mono, A black box appears on the screen.
V-Chip Rating Explanations US V-Chip Rating System TV-MA (Mature Audience Only): Specifically designed to be viewed by adults and may be unsuitable for children under 17, contains one or more of the following content themes: crude indecent language {1}, explicit sexual activity (8).
V-Chip Rating Explanations C8+ {Children 8 and older): Programming generally considered acceptable for children 8 years and over to watch on their own. Violence Guidelines: Violence will not be portrayed as the preferred, acceptable, or only way to resolve conflict or encourage children to imitate dangerous acts which they may see on television. Any realistic depictions of violence will be infrequent, discreet, of low Intensity and will show the consequences of the acts.
Wall Mounting Unit Specification Ce LED19B30RQ VASE 100x100 14 screws, length 10mm 100 EEE fa 100 Note: A. The wall mount is not contained in the accessories sold with television. We only provide the installing specifications but not the wall mount itself, If you need the mount, please consult with the local dealer for a VASE wall mount B. We strongly suggest to set the wall mount with equipment of specification we ordered, If not, inappropriate installing may cause damage 1o device or people. Warnings: 1.
USB Media Play With USB Media Play, you can enjoy music and photo files stored in a USB storage device on your RCA TV. Connecting a USB storage device » Connect a USB storage device to the USB port in the back of the TV. # Press “INPUT” and select “Media”. » “USB Media Play” menu will appear, Playing back Music files » Press arrow fo select “Music” and press "ENTER". The file or folder list will show up.
Product Specification =e Diagonal Display Size 18.
42 RE | Made for Today. WWW. Ica.com a timed Warranty for USA and Mexico Coverage ~ Labor For a period of 12 months from date of purchase of your RCA product, we will pay an authorized RCA service center the labor charge to repair any defects in materials or workmanship in your television. If your television is unrepeatable we will provide you with a refurbished unit of the same or better model.
Items Not Covered By Limited Warranty Your limited warranty does not cover the following items: Installation, installation and adjustment of customer controls and operating instruction Batteries and customer replacement fuses. Damage due to misuse, abuse, negligence or neglect including but, not limited to, damage resulting from exposure to moisture, humidity or salt. Inability to receive a signal due to problems not caused by the product Damage to the product due to images burnt info the screen.
a4 Hecho para Hoy. www. comarca 4 Garantía limitada para EE.UU y México Cobertura-Trabajo Durante un periodo de 12 meses desde la fecha de compra de su producto RCA, pagaremos a un centro autorizado de servicio de RGA el cargo de mano de obra para reparar cualquier defecto en materiales o mano de obra en el televisor. Si su televisor es inseparable que Je proporcionar una unidad re acondicionada del mismo modelo o superior.
Elementos no cubiertos por la garantía limitada Su garantía limitada no cubre los siguientes temas: ® Un-instalación, montaje y ajuste de controles del clienta e instrucciones de funcionamiento. Las pilas y los fusibles de repuesto al cliente. ® Danos por uso indebida, abuso. negligencia o descuido incluyendo pero no limitado a, los nadas derivados de la exposición a la humedad, fa humedad o la sal.
ON Corp US, Inc. 10920 Via Front era, Ste 540 San Diego, CA 92127, US.A. ©2012 ON Corporation RCA is a trademark of RCA Trademark Management SAS used under license to ON Corporation. RCA es una arcade RCA Trademark Management SAS USDA banjo alliance de ON Corporation.