Lyra Personal Jukebox User’s Guide Changing Entertainment. Again. RD2825 / RD2840 It is important to read this instruction book prior to using your new product for the first time.
Important Information WARNING CAUTION To reduce the risk of fire or electric shock, do not expose this product or AC charger to rain or moisture. RISK OF ELECTRIC SHOCK DO NOT OPEN To reduce the risk of electric shock, do not remove cover (or back). No user serviceable parts inside. Refer servicing to qualified service personnel. Battery can only be repaired or replaced by qualified service personnel.
Important Information RCA RD2825 Tested to Comply With FCC Standards FOR HOME OR OFFICE USE RCA RD2840 Tested to Comply With FCC Standards FOR HOME OR OFFICE USE FCC Regulations state that unauthorized changes or modifications to this equipment may void the user’s authority to operate it. FEDERAL COMMUNICATIONS COMMISSION INFORMATION This equipment has been tested and found to comply with the limits for a Class B digital device, pursuant to Part 15 of FCC Rules.
Table of Contents Important Information ...................................................................... 2 FEDERAL COMMUNICATIONS COMMISSION INFORMATION ............................................. 3 Table of Contents ............................................................................... 4 Before You Begin ............................................................................... 6 Unpacking Your Unit .....................................................................................
Table of Contents Lyra•jukebox .................................................................................... 23 Overview of General Controls ............................................................................................ 23 Front View ................................................................................................................... 23 Navigation Controls .......................................................................................... 23 Playback Controls ......
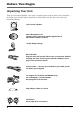
Before You Begin Unpacking Your Unit Your Lyra Personal Jukebox came with everything you need to make music portable — all of the items shown below should have been packed in the box with your Lyra Personal Jukebox.
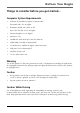
Before You Begin Things to consider before you get started... Computer System Requirements • Pentium III 500MHz or higher recommended Macintosh iMac G3 or higher • Windows ®98SE, Me, 2000, or XP Mac OS X Version 10.1.5 or higher • Internet Explorer 4.0 or higher • Internet access • 100MB free hard disk space for the software • 64MB RAM (128 MB recommended) • CD-ROM drive capable of digital audio extraction • USB port (2.
Before You Begin Back up your data As with any portable device that has a hard drive, you must back up the drive regularly. RCA and Thomson are not responsible for lost data. Important Battery Information • The battery used in this device may present a risk of fire or chemical burn if mistreated. Do not separately recharge, disassemble, heat above 100C (212F), or incinerate. • Battery replacement should only be made by trained technicians. Refer to Limited Warranty (page 50) for details.
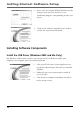
Getting Started: Software Setup The Music Management CD that came with your Lyra Personal Jukebox contains all of the necessary software components you need to make your Lyra Personal Jukebox work properly.
Getting Started: Software Setup 3. Select your Lyra model (RD2825/RD2840) on the startup screen and click Install to access installation programs corresponding to your Lyra device. 4. Click on the software component you want to install. See next Section for details. Installing Software Components Install the USB Driver (Windows 98SE and Me Only) For Windows 98SE and Me systems, you need to install a USB driver before your computer can recognize your Lyra Personal Jukebox. 10 1.
Getting Started: Software Setup Install System Applications 1. Click Install System Application to install applications that will help you better manage your Lyra Jukebox. Note: The installation program will detect whether your system requires a USB driver. If you see the Install USB driver/System Applications option, click it to install the USB driver. (Refer to the previous section for details) 2. Follow the on-screen instructions to install all necessary files. 3.
Getting Started: Software Setup 2. The Welcome Screen appears, click Next to continue and show the License Agreement. 3. After you’ve read the license agreement, click Yes to accept (to continue, you must click Yes), or No to decline. If you click Yes, the User Registration Information screen appears. 4. Enter your name, e-mail address, postal code, country, year of birth and sex (male or female). Click Next to continue. Note: You must enter an e-mail address to proceed.
Getting Started: Software Setup 7. After installation is complete, click Finish. 8. If necessary, close the main setup screen. 9. Some computers might require you to restart your computer. If this is necessary, a dialog box will appear on the computer screen. Note: As with any device that has a hard drive, you must back up the drive. RCA and Thomson are not responsible for lost data. For more information on MusicMatch Jukebox, click Tutorials on the CD or go to www.musicmatch.com.
Getting Started: Software Setup Install Additional Services Click on Install ID3man by Auditude, Get 100 Free mp3 Tracks from eMusic or Try Rhapsody Music services for additional digital music services provided by our partners. Launch the MusicMatch software The MusicMatch software converts audio files to the mp3, mp3PRO and WMA format so you can play them on your Lyra Jukebox. The MusicMatch icon found in your computer’s system tray. 1. Remove the Music Management CD from your computer. 2.
Getting Started: Software Setup Connecting Lyra HD to the Computer Connect the Lyra Personal Jukebox to your computer with the mini USB cable provided. Turn on the unit by pressing the ON/OFF button. The Lyra Personal Jukebox will appear as a Removal Disk drive letter. Note: It might take several seconds for the device (the Lyra Personal Jukebox) to be detected, especially in Windows 2000/XP. Click Refresh in My Computer or Explorer to make sure the device has been detected.
Getting Started: Software Setup Transfer Files via MusicMatch Jukebox 1. Drag and drop desired tracks from the Music Library to the Playlist display. 2. From the menu area, select Files/Send to Portable Device to display the Portable Device Manager screen. Under the Attached Portable Devices item, select Lyra Personal Audio Player. 3. Select the playlist item and drag it to the Lyra Personal Audio Player. The songs in the playlist will now be automatically transferred to your Lyra Personal Jukebox.
Getting Started: Software Setup Transfer Files via Windows Explorer (Drag and Drop) If your Lyra Personal Jukebox isn’t already connected to your computer, connect the Lyra Personal Jukebox to the computer using the provided USB cable as illustrated on page 15. From Windows Explorer, highlight all the files/folders you want to transfer to your Lyra Personal Jukebox and drag them to the drive letter that is associated with it.
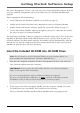
Getting Started: Software Setup Disconnecting Your Lyra from the Computer USB 2.0 Hi-speed capable connected... Safe to unplug Note: Before disconnecting the USB cable from the computer or the Lyra Personal Jukebox, be sure the “Safe to unplug” message is displayed. From the System Tray, left click on the icon and select Unplug or eject hardware. The Unplug or Eject Hardware screen appears. Select the drive corresponding to your Lyra Personal player and click Stop.
Getting Started: Software Setup System Tray Applications Profile New files that are transferred to your Lyra Personal Jukebox using Windows Explore (drag and drop) will not appear in the Navigation Menus until you profile the contents. If MusicMatch Jukebox was used to transfer files, profiling will be done automatically. 1. Connect your Lyra Personal Jukebox to the computer using the provided USB cable if it is not already connected. 2.
Getting Started: Software Setup Updating System File You can upgrade your Lyra Personal Jukebox or repair system files on your device if it becomes damaged by downloading the latest firmware from http://www.rca.com/digitalaudiodownloads. After you have downloaded the latest firmware, follow the steps below to update your system files. 1. Connect your Lyra Personal Jukebox to the computer using the provided USB cable if it is not already connected. 2.
Getting Started: Software Setup LyraSync Files and folders can be synchronized between your PC and your Lyra Personal Jukebox. 1. Connect your Lyra Personal Jukebox to the computer using the provided USB cable if it is not already connected. 2. 3. Right click on the Lyra icon in the System tray (bottom right hand corner of the computer screen and select LyraSync. The LyraSync Options screen appears. 4. Click Insert to select the paths of files and folders to synchronize between your PC and the Device.
Getting Started: Software Setup System Selections Items in the Dislikes playlist can be viewed and deleted in system selections. 1. Connect your Lyra Personal Jukebox to the computer using the provided USB cable if it is not already connected. 2. Right click on the Lyra icon in the System tray (bottom right hand corner of the computer screen and select System Selections.... 3. Files tagged as dislike on the unit will show on the Lyra Jukebox System Selections screen.
Lyra • jukebox Overview of General Controls 12 - VOLUME + 13 15 LIKE MENU 8 7 10 14 / OFF ON 3 6 1 2 4 5 SELECT DISLIKE 9 11 Front View 1. MENU/ Lock - Returns to Top Menu. - Press and hold to select between key lock and key activation. Navigation Controls 2. SELECT - Selects a highlighted item in navigation mode. Press SELECT to tag any item to be included in the My Selection playlist. These items can be individual songs, or a group of songs under an artist, album, etc.
Lyra • jukebox Playback Controls 7. Play / Pause - When the unit is on, press to play and pause music. 8. LIKE - Puts the currently playing song into the Like playlist (active only during playback). 9. DISLIKE - Puts the currently playing song into the Dislike playlist (active only during playback). 10. NEXT - When you’re playing music, press and release to skip forward to the next song. To scan forward in the current song, press and hold. 11.
Lyra • jukebox Display Overview 2 1 7 8 3 TOP MENU Artist Artist/Album Album Title Genre MAX MIN 4 9 5 6 1. Charger is connected. 2. The lock icon is displayed when the key lock function is activated. This can be activated by pressing and holding the MENU/ Lock button until the lock icon is displayed. To unlock, press and hold again until the lock icon is turned off. 3. The battery indicator shows battery level. - Battery full - Battery empty 4.
Lyra • jukebox Basic Operation The information in this section presumes you’ve successfully transferred files to your Lyra Jukebox, and you’re ready to play some music. If you need specific set-up information (downloading music, transferring files, installing software), go to “Getting Started: Software Setup” on page 9-22. If you want more detailed information about the Lyra Jukebox’s features, go to page 23.
Lyra • jukebox Playback Operation + 233/2356 - 128k 1:00 Once the item that you want to play is on the screen, press Play/Pause to begin playback. This item can be an artist, an album, a playlist, or a song. Press again to pause playback. The unit will automatically power off after remaining in pause mode for more than the Power Save interval (length of this Power Save interval can be modified in the Setting menu). • To scan backwards in the track that’s playing, press and hold the Previous button.
Lyra • jukebox Step-by-Step Example The following example illustrates (with more detail than the previous information) how you find the song you want to play. 1. These instructions presume you’ve already done the following: • Installed the MusicMatch Jukebox software and the Lyra Personal Jukebox profiler application (go to page 11 for detailed instructions).
Lyra • jukebox 4. Connect the clip phones to your Lyra Personal Jukebox (insert the end of the clip phones connector into the phones jack on the side of the Lyra). How to Use Your Clip Phones (The e.clipz) R L The right ear clip phone is labeled R while the left ear clip phone is labeled L. a. Pull the ear hook away from the ear pad slightly. You will hear a click sound. b. Slide the ear hook behind the ear with the ear pad on the front of the ear.
Lyra • jukebox Navigation Menu The following example illustrates steps to select and play songs in the Artist/Album category. TOP MENU Artist/Album Album Title Genre Year Artist Artist Artist Artist Artist ARTIST 1 2 3 4 5 1. Highlight Artist/Album (use the Navigation Up or Navigation Down arrow button). 2. Press the Enter button (the Artist menu appears with the artists stored on your Lyra Jukebox listed in alphabetical order).
Lyra • jukebox Highlight the desired song. Artist 3 Album 1 Song 4 Genre mp3PRO 0:55 Song Song Song Song Song • To play the song, press the Play/Pause button. 233/2356 Album 1 1 2 3 4 5 Song Info Artist: Artist 3 Album: Album 1 Title: Song 4 Genre: Pop year: 2002 • To go to the previous menu, press the Back arrow button. • To get more info about the song, press the Enter arrow button. • To end playback, press the Stop button.
Lyra • jukebox Additional Features Lyra Personal Jukebox has three System Playlist selections: My Selection, Like and Dislike. My Selection You can create a My Selection temporary playlist using the Lyra Personal Jukebox. Song Song Song Song Song Album 1 1 2 3 4 5 1. In navigation mode, move the cursor to highlight the item to be selected. • To scroll up and down the display, press the Navigation Up or Navigation Down button. • To enter the highlighted folder, press the Enter button.
Lyra • jukebox Likes During playback, you can select and place songs you like into the Likes playlist. These songs are played more frequently during Smart Shuffle mode (Refer to page 36 for Smart Shuffle details). 128k 0:55 Artist 3 Album 1 Song 4 Genre 233/2356 √ 1. When a song is playing, press the LIKE button to tag the song and place it into the Likes system playlist. The √ icon will show on the bottom right corner of the display to show the song has been tagged as a “like” song. 2.
Lyra • jukebox View User Playlists 1. Use Navigation Up or Navigation Down buttons to scroll to highlight User Playlists on the TOP MENU screen. 2. Press Enter playlists. USER PLAYLISTS My Selection Likes Dislikes Playlists 1 Playlists 2 3. Scroll up and down the User Playlists menu to select the desired playlist to be viewed using Navigation Up or Navigation Down buttons. MY SELECTION Song 1 Song 2 Song 3 4. Press Enter to view tagged items in the selected playlist.
Lyra • jukebox Pre-defined Playlists Pre-defined playlists are those playlists created on the PC and transferred to the Lyra Personal Jukebox. Refer to page 17 for details on creating Pre-defined Playlists and transferring them to your Lyra Personal Jukebox. USER PLAYLISTS My Selection Likes Dislikes Playlists 1 Playlists 2 Follow the steps under “View System Playlists” to enter the User Playlists menu.
Lyra • jukebox Additional Menu Settings 1. Highlight Settings from the Top Menu. (Use the Navigation Up or Navigation Down button). 2. Press Enter TOP MENU Year User Playalists All Files Settings Profile Contents to view the Settings Menu. SETTINGS Shuffle On Repeat One DSP Bass System Settings Playlist Smart Shuffle When Smart Shuffle is On, songs are played in random order. If shuffle is activated, the songs in the folder where playback begins are played randomly.
Lyra • jukebox TOP MENU Year User Playlists All Files Settings Profile Contents 3. Use the Back button or the MENU button to return to the main Menu. 4. Use the Navigation buttons to select the folder where you want shuffle playback to begin. Press Play/Pause to begin playback. All songs/folders in the folder where playback begins will be played randomly. SETTINGS Shuffle Off Repeat One DSP Bass System Settings Playlist 5. To de-select the shuffle option, repeat steps 1 and 2 to select Shuffle Off.
Lyra • jukebox Repeat Three repeat options are available on the Lyra Personal Jukebox. • Repeat Off - No repeat option selected. • Repeat One - Plays the current song repeatedly. The repeat one icon on the display. • Repeat All - Plays all songs in the current play mode repeatedly. The repeat all icon will show on the display. SETTINGS Shuffle On Repeat One DSP Bass System Settings Playlist 1 will show 1. In the Settings Menu, highlight Repeat. (Press the Navigation Up or Navigation Down button).
Lyra • jukebox Adjusting DSP Settings DSP Settings (Digital Signal Processor settings) adjust the various levels of the audio output for different types of songs. For example, the DSP setting for BASS makes the bass sounds more prominent. You can also personalize the levels via the Graphic EQ menu item. The default DSP setting for your Lyra Personal Jukebox is FLAT. SETTINGS Shuffle On Repeat One DSP Bass System Settings Playlist 1.
Lyra • jukebox Graphic EQ + 4. Press Enter 5. Press Enter to move among frequency adjustments (60Hz, 250Hz, 1kHz, 4kHz and 12 kHz). 0 FREQ=60HZ +8dB to show the Graphic EQ display. Press the Navigation Up or Navigation Down button to adjust levels between +15 and -15. 6. Press the Back button to return to the previous menu or the MENU button to return to the main Menu. System Settings You can personalize the display settings. SETTINGS Shuffle On Repeat One DSP Bass System Settings Playlist 1.
Lyra • jukebox Emptying User Playlists SETTINGS Shuffle On Repeat One DSP Bass System Settings User Playlist 1. In the Settings Menu, highlight User Playlist. (Press the Navigation Up or Navigation Down button). User Playlist Empty My Sel. Empty Like list Empty Dislike list 2. Press Enter to view the Sub Settings menu under the User Playlist. 3. Highlight the User Playlist to be emptied using the Navigation Up or Navigation Down button. 4. Press Enter 5.
Lyra • jukebox System Info System Information shows Lyra Personal Jukebox system details which includes the number of songs you have on your Jukebox, the amount of free space available and your firmware version. System Info No. of Songs Free Space Firmware Version 1. For Lyra Personal Jukebox information, select System Info in the Settings menu using the Navigation Up or Navigation Down button. 2. Press Enter 3. Press the Back button or the MENU button to return to the main Menu.
Lyra • jukebox Connecting your Lyra HD to your Car Stereo (Included with RD2840 only) The cassette adapter lets you listen to the Lyra in an automobile or RV safely without having to wear headphones. The car kit is only included with the RD2840 Lyra Personal Jukebox. This accessory kit includes a car cord adapter and a cassette adapter. The car cord adapter lets you power your Lyra from the cigarette lighter socket of a car, truck, or RV. It converts 12-volts to a 5 volt output. 1.
Lyra • jukebox Connecting Your Lyra Personal Jukebox on your stereo system Your Lyra Personal Jukebox came with a Line Out Cable that you can use to connect your Lyra to your audio system. 1. Make sure your Lyra Personal Jukebox is off. 2. Connect the black end of the cable to the LINE OUT jack on your Lyra Personal Jukebox player. 3. Connect the red (audio left) and white (audio right) cables to the corresponding left and right audio jacks on your stereo system. 4.
Lyra • jukebox Portable Hard Drive Capability Since Lyra Personal Jukebox has a hard drive (RD2840 : 40-gigabyte / RD2825 : 20gigabyte), you can use it to transport files - any files, not just music files. Some possible uses for this feature are as follows: • Create back-ups/archive files. • Connect to other computers - at work, for example. • Transport digital photo albums. • Transport files from one computer to another computer.
Additional Information Tips and Troubleshooting Problem: Audio distorted at high volume. • Select another DSP setting. • Turn down the volume. Problem: The audio tracks on my Lyra keep skipping or popping. • You’ll need to re-record the audio track – make sure you close all other applications on your PC when you record. • Try recording with Error Correction setting turned on. Problem: Player turns itself off.
Additional Information FAQ (Frequently Asked Questions) Question: What is mp3? mp3 is an abbreviation for MPEG-1, Layer 3 Audio (MPEG = Motion Picture Experts Group). This is a digital sound encoding and compression process that was developed by the Fraunhofer Institut fur Integrierte Schaltungen and Thomson. mp3 is an international standard and is well suited for the transfer of high quality audio files over telephone or ISDN lines, and over the internet.
Additional Information Hard Disc • External Hard Disc Drive: When connected to a computer via USB, the Lyra Hard Disc player is capable of storing any file type allowing the user a fast, convenient method of storing, retrieving, and transferring files. Including word processing files, presentations, spreadsheets and any other computer files. • Capacity: RD2825 : 20 Giga Byte Storage RD2840 : 40 Giga Byte Storage • Rotational Speed: 4200 RPM • Average Access Time: 12 MS • Connection: USB 2.
Additional Information PC Hardware Requirements • Pentium III 500MHz or higher recommended Macintosh iMac G3 or higher • Windows ®98SE, Me, 2000, or XP Mac OS X Version 10.1.5 or higher • Internet Explorer 4.0 or higher • Internet access • 100MB free hard disk space for the software • 64MB RAM (128 MB recommended) • CD-ROM drive capable of digital audio extraction • USB port (2.
Additional Information Limited Warranty (U.S.) What your warranty covers: • Defects in materials or workmanship. For how long after your purchase: • 90 days from date of purchase - Unit repair or exchange, which includes parts and labor. • 91 days to 1 year from date of purchase - Unit repair or exchange, which includes parts only; you pay the labor. • The warranty for rental units begins with the first rental or 45 days from date of shipment to the rental firm, whichever comes first.
Additional Information • Write the SR number on the outside of the carton used to return the unit. Make sure you insure your shipment in case of damage or loss. • Carefully pack the unit using the original box and packing material if possible. Please retain all non-defective accessories that were included with your unit such as the headphones. • Include with the shipment: 1. Evidence of purchase date such as a bill of sale. 2. A brief note describing your unit’s problem. 3.
Additional Information Limitation of Warranty: • THE WARRANTY STATED ABOVE IS THE ONLY WARRANTY APPLICABLE TO THIS PRODUCT. ALL OTHER WARRANTIES, EXPRESS OR IMPLIED (INCLUDING ALL IMPLIED WARRANTIES OF MERCHANTABILITY OR FITNESS FOR A PARTICULAR PURPOSE) ARE HEREBY DISCLAIMED. NO VERBAL OR WRITTEN INFORMATION GIVEN BY THOMSON INC., ITS AGENTS OR EMPLOYEES SHALL CREATE A GUARANTY OR IN ANY WAY INCREASE THE SCOPE OF THIS WARRANTY.
Additional Information Limited Warranty (Canada) Thomson multimedia Ltd. warrants to the purchaser or gift recipient that if any manufacturing defect becomes apparent in this product within 1 year from the original date of purchase, it will be replaced free of charge, including return transportation. This warranty does not include damage to the product resulting from accidents, misuse or leaking batteries. Should your product not perform properly during the warranty period, either: 1.
visit us at www.rca.com Please do not send any products to the Indianapolis address listed in this manual or on the carton. This will only add delays in service for your product. EXPORTER Thomson Inc. IMPORTADOR Comercializadora Thomson de México, S.A. de C.V. Miguel de Cervantes Saavedra 57 Col. Ampliación Granada C.P. 11529 Mexico D.F. Telefono: (55)25 81 53 20 RFC: CTM-980723-KS5 P.O. Box 1976 Indianapolis, IN 46206-1976 ©2003 Thomson Inc. Trademark(s)® Registered Marca(s) Registrada(s) www.rca.