Important Information Attention: Macintosh* Users Please download the digital camera twain driver for the Macintosh* computer from the Thomson Direct website, www.rca.com. If you do not have internet access, please call 1-877-833-3491. We apologize for any inconvenience. *MACINTOSH is a trademark of Apple Computer, Inc.
Change to User’s Guide Date: 12/3/99 Model Number: CDS1000 TOCOM 15549800 This sheet contains changes of product feature information contained in the user’s guide. In order for you to get optimum use from your camera, use this page in place of page 19 in your user’s guide. We apologize for the inconvenience. Software Selecting Images Help for the user(s) To select images one by one: press the Control key (Command key on the Macintosh) and click thumbnails individually to activate the selection.
digitalstillcameradigitalstill cameradigitalstillcameradig italstillcameradigitalstillcam eradigitalstillcameradigitals tillcameradigitalstillcamera digitalstillcameradigitalstill cameradigitalstillcameradig italstillcameradigitalstillcam eradigitalstillcameradigitals tillcameradigitalstillcamera digitalstillcameradigitalstill cameradigitalstillcameradig italstillcameradigitalstillcam eradigitalstillcameradigitals tillcameradigitalstillcamera digitalstillcameradigitalstill cameradigitalstillcameradig italst
Important Safety Information * Be sure to read all the safety information on this page and inside the manual before you begin to use this product. To reduce risk of injury, charge only rechargeable batteries recommended by the manufacturer for this camcorder. Other types of batteries may burst causing damage and personal injury. FCC Regulations state that unauthorized changes or modifications to this equipment may void the user’s authority to operate it.
Assistance We want to make sure you enjoy your new digital still camera. If you have any questions, call: Digital Camera Exchange Warranty . 877-833-3491 Customer Service ................................. 877-833-3491 Accessories ............................................ 800-338-0376 Table of Contents Product Registration .................... i Changing settings .................. 14 Important Safety Information ..... i REC mode ............................. 14 Setting capture mode ..........
Table of Contents Camera Features (Cont.) Using the Self-Timer Mode ... 23 LCD Brightness Control Dial 23 Control Buttons ..................... 24 Macro Mode (ENTER/MACRO button) 24 QUALITY/INDEX button .. 24 ZOOM button ..................... 25 DISPLAY button................. 26 MENU button ..................... 26 LCD button ......................... 26 Monitor status ..................... 27 Tripod Mount ...................... 27 Erase Image(s) .................... 32 Rotate Image(s) ..................
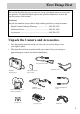
First Things First This section describes the steps necessary to set up your digital camera to record and save pictures. For detailed feature options and operation instructions, refer to the specific portion of this manual. Assistance The toll-free numbers are provided to help with any problem you may encounter: Digital Camera Exchange Warranty .......................... 800-283-6503 Customer Service ...................................................... 800-336-1900 Accessories ............................
First Things First Camera Details A Shutter release button B LCD ON/OFF button C D E A B D H C EFG (Self Timer)/+ (plus) button I J ZOOM button (Flash)/– (minus) button F DISPLAY button G MENU button H QUALITY/INDEX button I ENTER/MACRO button J Power button K Built-in flash L Self-timer LED K M Auto flash detector P L Q M N R O S T U V N View finder window O Lens P Handstrap eyelet Q Digital output port R Video output port S AC power socket Y T View finder eyepi
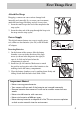
First Things First Attach the Strap Dropping a camera can cause serious damage both internally and externally. So, to secure your investment, attach the hand strap first thing, and use it every time. 1. Insert the small loop at the end of the strap under the strap eyelet. 2. Insert the other end of the strap through the loop to tie the strap onto the strap eyelet.
First Things First Using AC Adapter To power the camera from an electrical outlet, use the supplied AC adapter. To attach the adapter to your digital camera: 1. Open the camera’s connector cover by inserting a thumbnail under the latch and pulling it out. The supplied AC adapter will allow the digital camera to operate without batteries AC Adapter jack 2. Plug in the Adapter Jack. DC IN 7V _ + Important Notes! • Be sure to use the supplied AC adapter only.
First Things First Auto Power Off To prolong battery life, if no buttons or switches are pressed for a certain amount of time, the camera turns off automatically. Press the POWER button on top of the camera to turn it on again. Power source inactivity period: Battery- 2 min.; AC adapter- 30 min. Install the Camera’s Storage Card Your digital camera stores the pictures that it takes on removable storage media called compact flash cards.
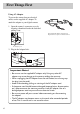
First Things First Recording Pictures Since there needs to be pictures taken before the camera will display stored files, let’s walk through the steps to capture images. The switch on the back of the camera determines if PLAY or REC mode is used. Play is how you view stored pictures and REC is how they are taken (for more information about the specific aspects of PLAY and REC modes, see the next section, “Setting Preferences”).
First Things First Frame Your Picture There are two ways to frame a picture; with the optical viewfinder or with the camera’s LCD monitor. The outer viewfinder box is for 2x Zoom photography. For more information about ZOOM, see the “Camera Features” section. The actual picture captured will be slightly larger than what you see in the optical viewfinder. TIP: For close-up pictures, use the LCD monitor to frame your shots.
First Things First Viewing Stored Images The images stored on the CompactFlash card can be viewed on the camera’s LCD monitor, viewed on a TV screen, or downloaded to your computer. For more information about viewing images on the computer or the TV, see the section, Working with Images, in this manual. LCD Picture Viewing 1. Slide the MODE switch on the back of the camera to the PLAY position. After a moment, an image will appear on the LCD screen. 2.
First Things First Loading Images on a Computer Images stored in your camera can be uploaded to your computer by using the supplied RS-232C digital connector and graphic-editing software. Load the CD ROM’s software and the TWAIN driver from the 3.5” floppy disk(s) following all directions. Once the software is installed properly, the computer can send and receive information to the digital camera. To upload images to your computer: 1. Turn the power of the camera and the computer off. 2.
Setting Preferences On-screen menus To get the most benefit from your digital camera, you must know and be able to navigate through the on-screen menus. In the main menu of either the Record (REC) or Playback (PLAY) mode of the camera, you can set preferences for different aspects of the camera’s performance. That’s right, there are two different main menus, one for PLAY mode and another for REC, whichever you are using the camera for.
Setting Preferences Changing settings The menus are manipulated the same in PLAY or REC modes by using the buttons on top of the camera. • To enter or exit the menu system, press the MENU button. • To scroll through menu choices, use the up (+/ ) or down (–/ ) button to highlight choices. • To select a highlighted menu item, use the ENTER/MACRO button. Before you can use the Playback menus, you have to record some pictures first. So, for now, let’s concentrate on the Main Menu in REC mode.
Setting Preferences To turn pre-flash on, display the Main Menu screen in REC mode by pressing the MENU button on top of the camera. Use the up (+/ ) or down (–/ ) button to select PRE FLASH. Press the ENTER/ MACRO button to change options. MAIN MENU CAPTURE: PRE FLASH: WHITE BAL.: EXPOSURE: FOCUS: SHARPNESS: COLOR: DATE DISP.: SINGLE ON AUTO 0.0 AUTO NORMAL NORMAL OFF Use the up (+/ ) or down (–/ ) button to toggle between ON and OFF.
Setting Preferences Adjusting focus Manual adjustment of focus allows you to determine where the camera’s lens will concentrate. While you can allow the camera to focus automatically, specific distances can also be set. To chose between Auto, 2.0, 0.5, or 0.1 meters (m), bring the Main Menu screen up in REC mode and use the up (+/ ) or down (–/ ) button to move the highlight arrow to FOCUS. Press the ENTER/MACRO button to change options.
Setting Preferences Adjusting date and time display One setting you may definitely want to adjust before your first photo shoot is date and time display. Although it is not required to take and save pictures, date and time information may be useful for archiving purposes later. The information is stored as hidden computer information. • Note: Time Display on this camera is based on the 24-hour clock where 0 through 12 represent a.m. times, and 13 through 24 are p.m. (to get p.m.
Setting Preferences MAIN MENU ERASE ALL: >> ERASE SINGLE: >> PROTECT IMAGE: >> FORMAT CARD: >> DATE DISP.: OFF DATE OPTION: M/D/Y SET DATE >> ERASE IMAGE YES>> ENTER NO>>MENU SELECT>>+/– E0003 Don’t worry- you can still get out of this step in case you do not want to erase all images from the camera. ERASE ALL IMAGES YES NO WARNING: THIS WILL ERASE ALL IMAGES * Note: The default for ERASE ALL PICTURES is “NO” to keep the camera for accidentally completing the process.
Setting Preferences In the PLAY mode Main Menu, select PROTECT IMAGE using the up (+/ ) or down (–/ ) button to move the highlight arrow. Press the ENTER/MACRO button to change settings. When you have an image displayed, you can choose to protect it by pressing the ENTER/MACRO button. PROTECT IMAGE YES/NO>>ENTER SELECT>>+/- E0003 An image that has been locked has a small key appear next to the picture number. To remove protection, press the ENTER/ MACRO button again while in PROTECT IMAGE mode.
Setting Preferences Displaying the date Date display affects on-screen viewing only. Captured images that are captured will not show the date and time as they appear on screen, nor will images downloaded to the computer. To display the date and time on the camera’s LCD, bring up the Main Menu in PLAY mode. Use the up (+/ ) or down (–/ ) button to highlight DATE DISP. Press the ENTER/MACRO button to change settings. MAIN MENU ERASE ALL: >> ERASE SINGLE: >> PROTECT IMAGE: >> FORMAT CARD: >> DATE DISP.
Camera Features Camera Features Digital cameras have a variety of features to help capture the best possible picture. From different methods of flash photography to taking black and white images, your digital camera’s settings can all be customized and allow for a fun experience when capturing images. This section of the manual explains specific details of camera controls.
Camera Features Flash Photography Using Auto Flash Your camera has three flash modes; ON, OFF, and AUTO. If set to AUTO, the camera uses a sensor to determine if enough light is available to take a good picture. If a sufficient light value is measured through the CCD sensor, the built-in flash will not fire. If additional light is required, the built-in flash will fire automatically.
Camera Features Using the Self-Timer Mode This mode is used not only for close-up pictures, but also for distant scenic shots. When taking a scenic picture or a low-light evening scene, using a slow shutter speed and the self timer can give a sharp, vibration-free photograph, if the camera is mounted on a tripod. 1. Select recording mode by sliding the Mode switch on the back of the camera to the REC position. 2. Select the self-timer mode by pressing the ( )/+ button on top of the digital camera.
Camera Features Control Buttons Macro Mode (ENTER/MACRO button) To capture subjects in the range of 0.1 m to 0.5 m, the camera provides a macro auto focus feature. Make sure the camera is in recording (REC) mode, then press the ENTER/MACRO button on top of the camera. If the LCD panel is turned on, you will see the menu bar near the bottom. Pressing the ENTER/MACRO button toggles between standard autofocus ( ) and close up, also called standard macro ( ).
Camera Features see full size. Once the image you want is selected, display it in full size by pressing the ENTER/MACRO button. Pressing the QUALITY/INDEX button again will return the display to thumbnail view. In thumbnail view, when there are more than nine images stored in memory, you can scroll to the next set of images by moving the highlighting arrow past the bottom right or top left image using the + or – buttons on top of the camera.
Camera Features DISPLAY button In both record and play modes, the DISPLAY button on top of the digital camera makes most icons/indicators appear or disappear on the LCD monitor. The camera retains this status until the DISPLAY button is pressed again. For details of icons displayed on the LCD monitor, please refer to Appendix B in the Reference section of this manual. • The DISPLAY button will not remove the lowbattery icon or the self-timer icon (when activated).
Camera Features • For more information about switches, buttons and camera interface, see, First Things First, in this manual. Monitor on-status Pressing the DISPLAY button toggles the display of the icons and indicators on the LCD. Even if icons are hidden, a corresponding icon is displayed for the short period of time when certain actions are initiated. Monitor off-status The DISPLAY button can make the icons and indicators appear on the black-back screen for a short period of time.
Camera Features LCD Icons Date and Time Display 1999, 08, 26 04:37 AC Adapter indicator 2x Zoom indicator Self timer indicator A Automatic Flash setting. Could also be Flash ON ( ) or Flash OFF ( ). Natural Light White Balance setting. Could also be Automatic White Balance (AWB ), or Office/Flourescent Light ( ). 28 E0003 Picture number Economy Picture quality. Could also be Normal (no icon), or Fine (F) Standard macro setting. Could also be Autofocus ( ).
References Introduction to the camera’s TWAIN Driver Using the provided TWAIN application allows the transfer of photos from the digital camera to a computer. Following is a discussion of key software points to make the process of image transfer easier. TWAIN is defined by a standard software protocol and API for communication between software applications and image acquisition devices (digital cameras and scanners).
References Connect the camera to the computer Now that there are images on the camera, you can connect it to the computer and “upload” the data to the TWAIN driver software. Make sure that the proper serial cable is used to connect the camera to the proper COM port (Macintosh users connect to an ADB serial port such as that used for external modems or printers).
References Once you have selected the digital camera as your source for images, the TWAIN driver interface will take over. The software will automatically connect to your computer and begin to download all of the images stored on the CompactFlash card. Once the transfer process is finished, you will be able to move individual images or entire sets of images to your image-editing software.
References Select None of the Images Using this button to select none of the images. Take a Picture Download Image(s) Use this button to take a picture with your camera from the computer. Use this button to download an image from the TWAIN interface to a disk. Note: If Self-timer is activated, the camera will use this timing before taking a picture. The TWAIN driver will get a new photo from camera and display it in the interface window.
References Camera Status Use this button to display camera status information. Record mode: Previews the picture to be taken and displays it on the camera’s LCD monitor. Play mode: Views the photos taken and displays them on the camera’s LCD. Auto Power Off Time: Allows setting of the time interval before auto shut off. (PC user’s note: Left Mouse Button increases numbers. Right mouse button decreases numbers.) Camera Setting Use this button to display camera setting dialog.
References Camera User Interface Camera Top View Basic Button Functionality QUALITY / INDEX DISPLAY ENTER / MACRO MENU Button Power Quality/Index PLAY Mode Power on/off Thumbnail View Enter /Macro Menu selection Display Show/Hide Picture Number REC main menu display Camera Front View Menu Command: • Capture (single/multi) • Pre-Flash (on/off) • White Balance (auto/manual) • Exposure (-2 to +2) • Focus (auto/manual) • Sharpness (normal, sharp, soft) • Color (normal, light, deep, b/w, sepia) • Da
References Specifications Product Type: Digital Still Camera Imaging Device: 1/2-inch CCD, 1.5M pixels, progressive scanning Image Quality: Fine/Normal/Economy Image Resolution: 1360 x 1024 pixels (Fine / Normal); 640 x 480 pixels (Economy) Recording System: Digital (JPEG based)/Field recording Recording Medium: Removable CompactFlash (up to 48Mb). Image Capturing: Single or nine sequential images, saved as one image file. Playback Modes: Single or nine thumbnails, image search function available.
References Taking care of your camera Your camera is a precision instrument designed and manufactured to give you reliable service. Handled and cared for properly, the camera should give years of trouble-free imaging. In order to avoid damaging the unit: Do Not: • Drop or bang the camera. Always transport the unit in a carrying case; • Drop into water or expose the camera to rain or splashing. Your camera is not waterproof and is particularly susceptible to damage from salt water.
References Troubleshooting Q: The camera doesn’t turn on when I press the power button. A: The batteries are missing, dead, or are not loaded correctly. Correctly load new batteries in the battery chamber. If you are using an AC adapter , make sure you are only using the recommended AC adapter for this digital camera. Q: The power suddenly turned off. A: Most likely, the batteries you have are getting too weak to sustain operation of the camera.
References Q: Why does an “ERASE ERROR” message appear on the LCD when erasing a picture? A: A power interruption occurred before the erasing of a picture was complete. Use the ERASE ALL or FORMAT CARD command (under the MENU button in play mode) and make sure that no power interruption occurs. If the error still persists, send the camera to an authorized service center. Q: Why does a “CHARGE ERROR” message appear on the LCD screen? A: The flash charging unit may be damaged.
References Limited Warranty What your warranty covers: • Any defect in materials or workmanship. For how long after your purchase: • One year - Unit exchange, which includes parts and labor. • The warranty for rental units begins with the first rental or 45 days from date of shipment to the rental firm, whichever comes first. What we will do: • Exchange a defective Digital Still Camera with a new or, at our option, refurbished unit.
References To receive a replacement camera after we have received your unit: • Write the RA number on the outside of the carton used to return the unit. Make sure you insure your shipment in case of damage or loss. • Carefully pack the unit using the original box and packing material if possible. Please retain all accessories that were included with your unit. • Include with the shipment: 1. Evidence of purchase date such as a bill of sale. 2. A brief note describing your camera’s problem. 3.
Index A AC Adaptor 6 AC power socket 4 AC Power Supply 3 Accessories 3 included 3 order form 43 Assistance 1, 3 Auto Flash detector 4 Auto flash detector 4 Auto Power Off 7 B Basic Button Functionality 33 Batteries 3, 5 Battery compartment cover 4 C Camera turning on 8 Camera Features 21 Camera Parts 4 Camera Setting 32 Camera Status 32 Camera User Interface 33 Capture Mode 14 Cautions i CDS4100 Digital Camera 3 Changing settings 14 Color 16 CompactFlash 3 CompactFlash card ejector 4 CompactFlash card slo
Index LCD Icons (Cont.
Accessories Order Form for Digital Camera Model CDS4100 Description CompactFlash Cards 16 Mb 32 Mb 48Mb CompactFlash External Drive Parallel Port USB PCMCIA Adapter Battery Charger Rechargeable Batteries (AA) 2-pack Alkaline Batteries 4-pack Alkaline Batteries 2-pack Nickel Metal Hydride 4-pack Nickel Metal Hydride Part No. Price PC16CF PC32CF PV48CF $99.95 $149.95 $199.95 PC200P PC2200U PC490 PC224 $99.95 $129.95 $39.95 $29.95 PC102AK PC104AK PC202MH PC204MH $3.95 $4.95 $9.95 $19.95 Qty.
Accessories USE YOUR CREDIT CARD Charge your order on your VISA,MasterCard, or Discover Card by filling in below IMPORTANT: Copy complete account number from your VISA card ® Expiration date: IMPORTANT: Copy complete account number from your MasterCard s r Copy Number above your name on MasterCard r TM Expiration date: IMPORTANT: Copy complete account number from your Discover Card Expiration date: AUTHORIZED SIGNATURE A complete and correct order will save you days of waiting.
Accessories To order accessories, contact your local Dealer. If a dealer is not nearby, you can also follow the directions below to order by telephone or direct-by-mail. United States and Canada Orders To place your order by phone, have your Visa, MasterCard, or Discover card ready and call the toll-free number listed below between 8 AM and 10 PM (EST) Monday through Friday or between 9 a.m. and 5 p.m. (EST) Saturday. Use this number only to place an order for accessory items listed on this order form.
10330 N Meridian Street Indianapolis, IN 46290 ©1999 Thomson Consumer Electronics, Inc.