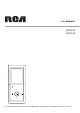
user manual MC5102 MC5104 It is important to read this instruction book prior to using your new product for the first time.
Table of Contents Important Information ............................................................................................................................... 4 End User License Agreement ..................................................................................................................... 6 Before You Begin ........................................................................................................................................ 8 Unpacking your player .................
Table of Contents Radio recording .............................................................................................................................. 32 Record duration ................................................................................................................... 32 Listening to radio recording ............................................................................................... 32 Deleting radio recording ............................................................
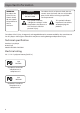
Important Information WARNING To reduce the risk of fire or electric shock, do not expose this product to rain or moisture. CAUTION RISK OF ELECTRIC SHOCK DO NOT OPEN To reduce the risk of electric shock, do not remove cover (or back). No user serviceable parts inside. Refer servicing to qualified service personnel. This symbol indicates "dangerous voltage" inside the product that presents a risk of electric shock or personal injury. This symbol indicates important instructions accompanying the product.
Important Information FCC Regulations state that unauthorized changes or modifications to this equipment may void the user’s authority to operate it. FEDERAL COMMUNICATIONS COMMISSION INFORMATION This device complies with Part 15 of the FCC Rules. Operation is subject to the following two conditions: (1) This device may not cause harmful interference, and (2) this device must accept any interference received, including interference that may cause undesired operation.
End User License Agreement IMPORTANT: READ CAREFULLY BEFORE DOWNLOADING OR INSTALLING THIS SOFTWARE! THIS END USER LICENSE AGREEMENT (THIS “EULA”) IS A LEGAL AGREEMENT BETWEEN YOU AND THOMSON INC., OR ANY THOMSON GROUP ENTITY, AS DEFINED BELOW (COLLECTIVELY “THOMSON ENTITY”), FOR THE RCA OR THOMSON BRANDED PORTABLE DIGITAL AUDIO/VIDEO DEVICE APPLICATION/DRIVER SOFTWARE PROGRAM AND ASSOCIATED DOCUMENTATION, IF ANY (COLLECTIVELY, THE “PROGRAM”).
End User License Agreement NOT ALLOW THE EXCLUSION OR LIMITATION OF LIABILITY OF CONSEQUENTIAL OR INCIDENTAL DAMAGES, THE ABOVE LIMITATION MAY NOT APPLY TO YOU. (b) YOU ASSUME RESPONSIBILITY FOR THE SELECTION OF THE APPROPRIATE PROGRAM TO ACHIEVE YOUR INTENDED RESULTS, AND FOR THE INSTALLATION, USE, AND RESULTS OBTAINED. 7.
Before You Begin Dear RCA Customer, Thank you for purchasing the RCA Player. This player will play open mp3 and Windows Media™ audio (WMA) content as well as content purchased from most online music download services. After purchasing and downloading music to your PC, you are now ready to move content to your player. To transfer the music to your player, you may use Yahoo! Music™ Jukebox or the application recommended by the online music download service.
Before You Begin Things to consider before you get started... Computer system requirements • • • • • • • • • • Pentium III 500MHz or higher recommended Windows XP SP1 (SP= Service Pack) or higher. Internet Explorer 6.0 or higher Internet access (broadband recommended) 250MB free hard disk space for the software 128MB RAM (256MB recommended) CD drive capable of digital audio extraction USB port (2.
Before You Begin Caution while driving Use of headphones while operating an automobile or moving vehicle is not recommended and is unlawful in some states and areas. Be careful and attentive on the road. Stop operation of the player if you find it disruptive or distracting while driving. Back up your data As with any portable player that has a hard drive, you must back up the drive regularly. RCA and Thomson are not responsible for lost data.
Software Setup The Music Management CD that comes with your player contains all of the necessary software components you need to make your player work properly. These components do the following: • enable you to transfer files from your computer to your player, • convert video files and/or automatically update the player (if included on the CD). Inserting the included CD into CD drive 1. Turn on your computer and place the Music Management CD that came with your player into your computer. 2.
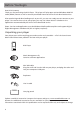
Connecting to the Computer Connecting the player to the computer Connect the player to your computer with the mini USB cable provided. The player will turn on automatically. The player will appear as a Windows portable device (Windows XP) using the Media Transfer Protocol (MTP). The Player USB port of your computer USB cable • It might take several seconds for the player to be detected. Click Refresh in My Computer or Windows Explorer to make sure the player has been detected.
Connecting to the Computer Charging the battery Your player is charged through the USB connection when it is connected to your computer. To fully charge the player, make sure your computer is on and the player is connected for at least 3 hours. Important battery information • Charge the player for at least 3 hours before first use. • Charge the player for at least 3 hours after putting away the player for a long time. • Battery replacement should only be made by trained technicians.
Transferring Files to the Player Transferring files to the player You may select one of the following methods to transfer music contents to your player: 1) Yahoo! MusicTM Jukebox, 2) drag-and-drop via Windows Explorer. For method 1, you first need to have successfully installed the software packages included in the Music Management CD (refer to “Inserting the included CD into CD drive).
Transferring Files to the Player Transferring files via Yahoo! MusicTM Jukebox (Windows XP or higher only) Yahoo! MusicTM Jukebox lets you manage your music easily and organize like a pro. Create your own playlists: music for work, the gym, or even dinner. You can also buy download music and transfer to your player in seconds. Just drag and drop and you’re done. For more information on the installation and operations, please visit: http://music.yahoo.
Transferring Files to the Player Transferring files via Windows Explorer (drag-and-drop) (Windows XP only) In Windows Explorer, when the RCA player is opened in MTP mode, and Windows Media Player 10 is installed, the “Data” and “Media” views will be displayed for the player. The Data folder is used to manage data content on the player, such as text files. The Media folder is used to manage media content supported by the player for playback, such as mp3 and wma.
Transferring Files to the Player Disconnecting your player from the computer Do not disconnect the USB connection during file download. Doing so may corrupt system files or the files being downloaded. For Windows XP users, your player is connected in MTP (Media Transfer Protocal) mode to your computer by default, you may disconnect the USB cable directly when file download is completed.
General Controls Before you begin The following example illustrates what you should do before operating your player. 1. These instructions presume you’ve already done the followings: • Installed all necessary applications. • Transferred music from your computer to the player. • Allowed your player to charge for at least 3 hours while connected to the computer. 2. If you haven’t unplugged the player from your computer, detach the USB cable from the player. 3. Connect the earphones to your player. 4.
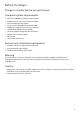
General Controls Overview Top view 2 Left view Front view Right view Back view 8 1 3 4 6 5 7 1. Key lock - slide the key upwards to prevent accidental key activation. To unlock, slide the key to the middle position. Power on/off - slide the key downwards and hold it until the player turns on/off. Stop playback - slide the key downwards during music, picture or video playback and then release to stop the playback. 2. Microphone 3. The display 4. M - Enters or exits the player’s menu.
General Controls 5. Touch sensitive keypad - touch or move your finger along the surface for operations. Scrolls up during menu navigation Scrolls down during menu navigation Skips backward, goes back a level during menu navigation Skips forward, advances a level during menu navigation Starts/ pauses playback, makes selections Moving your finger clockwise along the control pad as seen in the circular arrow will increase the volume. To decrease the volume, just move you finger counterclockwise. 6.
General Controls Navigation display Indicates the mode currently selected 1 2 3 4 5 Indicates the item currently selected 1. 2. 3. 4. 5. Indicates whether the player is playing or paused. Indicates if the shuffle mode is on or off. Indicates what repeat mode is activated or off. Indicates that the key lock function is activated. Indicates the battery level of the player. When charging, the icon will animate.
General Controls Navigation menus The files are sorted according to their file types. Music files are further sorted according to several parameters for quickly searching your favourite music.
General Controls Artist 3 All Songs Album 1 Album 2 Album 3 Album 4 Album 5 4. Scroll up and down the “Albums” menu by touching or . • View the songs from the album highlighted by touching Album 4 All Songs Song 1 Song 2 Song 3 Song 4 Song 5 5. Highlight the desired song by touching (the songs of that album appear in track order). or . • To play the song, touch or . The song’s information will show on the display during playback. • To pause playback, touch .
Listening, Viewing and Recording Music/Audiobooks playback Shows Album Art of digital music* Shows Album Art of digital music* Skips to the previous file**, touch and hold to scan backward within a file. Skips to the next file, touch and hold to scan forward within a file. Starts/ pauses playback, touch and hold to add the current file (music only) in MySelections. Increase or decrease the volume. Moving your finger clockwise along the control pad as seen in the circular arrow will increase the volume.
Listening, Viewing and Recording Music/Audiobooks playback display Read page 21 for details 1 2 3 4 5 6 7 8 9 1. Current file number / total number of files (for audiobooks in “Skipping by Section” mode (refer to the previous page), “Sect” shows before current section number / total number of section) 2. Song name (or title of audiobook) 3. Artist name (or author of audiobook) 4. Album name (or provider of audiobook) 5. Genre type (or category of audiobook) 6. Elapsed playback time 7. Year of the file 8.
Listening, Viewing and Recording Picture viewing Scrolls up during file navigation. Scrolls down during file navigation. Skips backward. Skips forward. Starts/ pauses slideshow. Increase or decrease the volume. Moving your finger clockwise along the control pad as seen in the circular arrow will increase the volume. To decrease the volume, just move you finger counter-clockwise. M Touch during playback to pause and return to file navigation.
Listening, Viewing and Recording Video viewing Scrolls up during file navigation. Scrolls down during file navigation. Skips backward*. Touch and hold to scan backwards within a file. * Touch within the beginning 4 seconds of the current file to skip to previous file. Otherwise, you will return to the beginning of the current file. Skips forward. Touch and hold to scan forward within a file. Starts/ pauses playback. Increase or decrease the volume.
Listening, Viewing and Recording Video converter Before transferring any video files to your player, they must be converted to a compatible format for optimal playback. To do so, you need to install the RCA Video Converter in your computer. The video converter only works on Windows XP or higher. 1. Load the music management CD included with this player in your computer. Installation will start automactically. Follow the on screen instructions to properly install the RCA Video Converter. 2.
Listening, Viewing and Recording 7. If you prefer to convert only a portion of the video file, select the start and end time for conversion by increasing or decreasing the box to the right of Start and End at the lower right corner of the Video Converter application. 8. To rotate the output file by 90O after conversion, select “Yes” from the pull-down menu to the right of "Rotate" at the lower right corner of the Video Converter application. 9.
Listening, Viewing and Recording Radio (switching on) 1. To switch on the radio, touch M in any mode to access the player’s menu (during playback M has to be touched twice). Menu Go to Shuffle Repeat DSP Slideshow Settings 2. While “Go to” is highlighted, touch . Off Off Flat Off Go to Radio Voice Recording Line-in Recording 3. While “Radio” is highlighted, touch the radio. to switch on Radio (switching off) 1. To switch off the radio, touch M in the radio mode.
Listening, Viewing and Recording Radio operations Selecting Radio Frequency Touch or to select frequency. Tip: touch and hold or to search the frequency at a faster rate. Automatic station search Touch and hold or in the radio mode until “Searching...” shows on the display. The search will stop when the next available radio station is found. Saving preset stations 1. Select a radio frequency. 2. Touch M and then touch or to highlight “Save to Preset”. 3. Touch or to make the selection. 4.
Listening, Viewing and Recording Radio recording 1. Touch and hold at any time while listening to the radio to start radio recording. 2. Touch to pause record. Touch again to resume recording. 3. Touch and hold to stop recording. OR Slide the power button downwards and release to stop recording. Record duration You may select the maximum record duration. 1. While listening to the radio, touch M and then touch or to highlight “RecDur”. 2.
Listening, Viewing and Recording Voice recording 1. To start voice recording, touch M in any mode to access the player’s menu (during playback M has to be touched twice). Menu Go to Shuffle Repeat DSP Slideshow Settings 2. While “Go to” is highlighted, touch . Off Off Flat Off Go to Radio Voice Recording Line-in Recording 3. Touch Voice Rec 4. Touch and hold when the display shows “Ready” to start voice recording. touch or to highlight “Voice Recording”. Then to access voice recording mode.
Listening, Viewing and Recording Record duration You may select the maximum record duration. 1. In the voice recording mode, touch M and then touch or to highlight “RecDur”. 2. Touch or to select 5m, 30m, 1h or max (5 min, 30 min, 1 hour and maximum). 3. Touch M to exit the player’s menu. Listening to voice recording 1. In the navigation menu, select “Voice Recs” to show the archive of voice recordings. 2. Select one of the recorded files for listening (refer to page 22 for details).
Listening, Viewing and Recording Line-in recording 1. To start line-in recording, touch M in any mode to access the player’s menu (during playback M has to be touched twice). Menu Go to Shuffle Repeat DSP Slideshow Settings 2. While “Go to” is highlighted, touch Off Off Flat Off Go to Radio Voice Recording Line-in Recording Line-in Rec . 3. Touch or Then touch to highlight “Line-in Recording”. to access the line-in recording mode. 4.
Listening, Viewing and Recording Record duration You may select the maximum record duration. 1. In the line-in recording mode, touch M and then touch or to highlight “RecDur”. 2. Touch or to select 5m, 30m, 1h or max (5 min, 30 min, 1 hour and maximum). 3. Touch M to exit the player’s menu. Listening to line-in recording 1. In the navigation menu, select “Line-in Recs” to show the archive of line-in recordings. 2. Select one of the recorded files for listening (refer to page 22 for details).
Playlists My Selections My Selections is a playlist containing your favorite songs, albums, artists from the player. Audiobook and recorded files cannot be selected as My Selections. Album 4 Song 1 Song 2 Song 3 Added to My Sel Song 4 Song 5 Song 6 1 Highlight the desired song, artist, album etc. and then touch and hold until “Added to My Sel” shows on the display. Repeat this step for selecting more items.
Playlists Playlists from your computer The created playlists from major music management softwares on your computer (e.g. Yahoo! MusicTM Jukebox, Windows Media Player) can be transferred to the player while you transfer music files via these softwares. Follow the steps below to play them. 1. In the home menu, select “Playlists” by touching or . Then touch to enter the Playlists menu. Playlists 2. Highlight a playlist by touching or . Touch to start playback of the selected playlist.
Player’s Menus Accessing player’s menus Touch M in any mode to access the player’s menu. During playback M has to be touched twice to display the player’s menu. Player’s menus Library Radio Voice Recording Line-in Recording Go to Shuffle Repeat DSP Slideshow Settings System Info Customize Menu Brightness Screensaver Power Save Sleep FreqStep Language Restore Defaults Navigation and selection Player’s Menu items Menu Go to Shuffle Repeat DSP Slideshow Settings Off Off Flat Off 1.
Player’s Menus Repeat Touch or to select a repeat mode. This item is only available when you are listening to a music (mp3 or wma) file. • Repeat One - Repeat the current item • Repeat All - Repeat all items. • Repeat Off - Repeat is Off. Repeat and shuffle will work differently if you have highlighted a song or a set (albums, genres, etc.). You can select your desired combination of Shuffle and Repeat to suit you. DSP (Digital Signal Processor) Touch (touch Touch or to select a DSP mode.
Additional Information Tips and troubleshooting • Problem: Player repeats same tracks or all tracks. – Repeat play is turned on. Touch the MENU button (M) to change the play mode. • Problem: Audio distorted at high volume. – Select another DSP setting. – Turn down the volume. • Problem: The audio tracks on my player keep skipping or popping. – You’ll need to re-record the audio track – make sure you close all other applications on your PC when you record.
Additional Information • Why can I not view picture files on my player? – The player only supports .jpg extension file, and does not support other formats like .bmp, .tiff, .jpeg. – All picture files need to be put in the \Media folder of the player (if Windows Media Player 10 installed). • Why does my player not play the video files that were transferred from the computer? – All video files must be converted by the video converter which comes with the player (please refer to the CD).
Additional Information Specifications Hardware • Dimensions: 91 mm H, 40.7 mm W, 7.5 mm D • Unit Weight: 55 g • Stereo Headphones Jack • Mini USB Connection Jack • Battery Operated: Rechargeable lithium polymer battery. Mass storage drive • External mass storage drive: When connected to a computer via USB, the player is capable of storing any file type allowing the user a fast, convenient method of storing, retrieving, and transferring files.
Additional Information Limited warranty (Canada) Thomson multimedia Ltd. warrants to the purchaser or gift recipient that if any manufacturing defect becomes apparent in this product within 1 year from the original date of purchase, it will be replaced free of charge, including return transportation. This warranty does not include damage to the product resulting from accidents, misuse or leaking batteries. Should your product not perform properly during the warranty period, either: 1.
visit us at www.rcaaudiovideo.com Please do not send any products to the Indianapolis address listed in this manual or on the carton. This will only add delays in service for your product. EXPORTER Thomson Inc. P.O. Box 1976 Indianapolis, IN 46206-1976 ©2007 Thomson Inc. Trademark(s)® Registered Marque(s)® Deposée(s) Marca(s)® Registrada(s) www.rcaaudiovideo.com v2.