Mobile DVD Player User's Guide Changing Entertainment. Again.
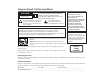
Important Information CAUTION RISK OF ELECTRIC SHOCK DO NOT OPEN This symbol indicates that this product incorporates double insulation between hazardous mains voltage and user accessible parts. When servicing use only identical replacement parts. This symbol indicates "dangerous voltage" inside the product that presents a risk of electric shock or personal injury. This symbol indicates important instructions accompanying the product.
Important Information FCC Statement: This equipment has been tested and found to comply with the limits of a Class B device, pursuant to Part 15 of the FCC rules. These limits are designed to provide reasonable protection against harmful interference in a residential installation. This equipment generates, uses and can radiate radio frequency energy and, if not installed and used in accordance with the instructions, may cause harmful interference to radio communications.
Important Information IMPORTANT SAFETY NOTE: WHEN YOU SECURE THE PLAYER IN THE CAR YOU MUST STRAP IN THE PLAYER WITH THE LAP BELT IN THE REAR SEAT. DO NOT USE EITHER SIDE SEAT BELT TO SECURE THE PLAYER. MAKE SURE THE BELT IS AS TIGHT AS POSSIBLE, AS THE PLAYER COULD MOVE IF THE CAR MAKES ABRUPT STOPS AND/OR STARTS. YOU COULD ENDANGER THE LIVES OF OTHER PASSENGERS IF THE PLAYER IS NOT PROPERLY SECURED.
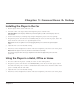
Chapter 1: Connections & Setup Installing the Player in the Car 1. Rest the player in the center of the rear seat. 2. Insert the center seat’s (lap) safety belt through the player’s retainer holes. Important Note: Secure the player with the lap seat belt as tight as possible so that the player does not move around. 3. Fasten seat belt strap by inserting and passing it through the player’s two slot openings. 4. Plug the DC power cable into the DC POWER (CAR) jack on the back of the player.
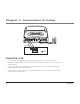
Chapter 1: Connections & Setup OUTPUT PHONES V ID EO L AU DIO INPUT V ID EO R EXTERNAL PANEL EJECT DC POWER (CAR) AC POWER (HOME) L AU DIO R PHONES TV (back panel) VIDEO AUDIO L / MONO R IN L R OUT CABLE/ ANTENNA Connect to a TV 1. Connect audio cables (white and red) to the Audio Input Jacks on the back of the TV (sometimes labeled AUDIO L/MONO and R) and to the AUDIO OUTPUT jacks (L AUDIO R) on the DVD player. 2.
Chapter 1: Connections & Setup Disc slot OUTPUT V ID PHONES EO L AU DIO INPUT R V ID EO EXTERNAL PANEL EJECT DC POWER (CAR) AC POWER (HOME) L AU DIO R PHONES The Back of the Mobile DVD Player Disc slot Insert discs into this slot. PHONES Allows you to connect headphones to listen to the sound. OUTPUT VIDEO Sends the video playing in the DVD player to another component such as a TV.
Chapter 1: Connections & Setup DC POWER (CAR) Connect the DC power cord to this jack from the car’s cigarette lighter socket to give the unit power. AC POWER (HOME) power. Connect the AC power cord to this jack from an AC outlet to give the unit INPUT VIDEO Receives video from another component, such as a VCR, camcorder or an Internet access device, so you can see it on the DVD player’s LCD screen.
Chapter 1: Connections & Setup NEXT ( ) Advances to the next chapter on a DVD disc, track on a CD or song on an MP3. OK When a menu is on the screen, selects the item that is highlighted. PLAY/PAUSE ( POWER ) Switches between play and pause when you’re playing a disc. Turns the DVD player on or off. PREV ( MP3. ) Goes back to the previous chapter on a DVD disc, track on a CD or song on an SCREEN MODE Selects 16:9 or 4:3 screen mode.
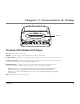
Chapter 1: Connections & Setup The Remote Control (buttons listed in alphabetical order) DVD POWER EJECT SURROUND EQ 1 2 3 4 5 6 7 8 STATUS ANGLE SUBTITLE AUDIO 9 +10 ZOOM 0 MUTE 0-9 and +10 (Number buttons) Enters titles, tracks or chapters. To enter a number above 9, for example 12, press +10 and then 2. Arrow (up, down, left, right) buttons the LCD screen. Use these buttons to access items on A-B Sets the beginning and end of the section you want to repeat.
Chapter 1: Connections & Setup Next ( ) Advances to the next chapter on a DVD disc, track on a CD or song on an MP3. ) PLAY/PAUSE ( Previous ( MP3. ) Switches between play and pause when you’re playing a disc. Goes back to the previous chapter on a DVD disc, track on a CD or song on an REPEAT Changes the REPEAT options by pressing repeatedly. The options vary depending if you are playing a DVD, CD or an MP3. Go to the repeat feature explanation for each disc.
Chapter 1: Connections & Setup Using Different Menus Each disc is programmed with different features. There are two separate menu paths that you can use to access features: the disc’s menu and the DVD’s status banner. Remember that a feature only works if the disc was programmed with that feature. For example, if you choose subtitles, the subtitles only appear if the disc was created with subtitles. The Disc menu – The disc menu is part of each disc and is separate from the DVD’s status banner.
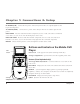
Chapter 1: Connections & Setup To Load and Play a Disc 1. Lift up the LCD screen and position it to your liking. 2. Press the POWER button to turn on the unit. 3. Place a disc gently into the disc slot with the disc’s label facing up (double-sided discs have content on both sides, so you can place either side up). The DVD player reads the disc’s table of contents, and then one of following happens depending on how the disc was programmed: • No disc menu appears. • The disc menu appears.
Chapter 1: Connections & Setup 1. When the disc is first inserted and/or you press DISC MENU, the disc menu appears. 2. Press the up or down arrow button on the remote to highlight the section of the disc menu you want to choose, and press ENTER. In the example on the left, Language has been selected. 3. Press the up or down arrow button to select a language, and press ENTER. 4. Press PLAY/PAUSE to play the disc. This is an example of a disc menu.
Chapter 2: Playing Discs Playback Features Playback operations of DVDs and CDs vary among discs. Since this unit plays DVDs according to the disc contents the software producers designed, some playback features may not be available. Refer to the instructions packed with the DVDs for information. Playback features aren’t usually available during the opening credits of a movie. If a playback feature isn’t available, the invalid symbol (a hand icon) appears on the screen when you press a button.
Chapter 2: Playing Discs Using the A-B Repeat Feature A-B Repeat lets you define a specific segment on the disc that you want to repeat. The A-B Repeat feature works the same for all discs. For example, you might like to watch the dogfight in the movie Top Gun. To watch this scene over and over: 1. Find the spot on the disc that is a few seconds before the beginning of the scene you want to repeat. 2. Press the A-B button. This sets the A point (A TO B SET A appears). 3.
Chapter 2: Playing Discs Changing Surround Sound You can use this feature to add a surround sound effect to the audio. While a disc is playing, press SURROUND. Pressing SURROUND consecutively changes the surround sound options: • SURROUND SOUND • 3D SURROUND • HALL SURROUND • SURROUND OFF As you toggle through the options, the surround sound changes at that time. Playing DVDs For basic information about loading and playing discs, go to page 9.
Chapter 2: Playing Discs Selecting a Chapter Tip You can also advance to the next chapter by pressing NEXT, or go to the preceding chapter by pressing PREV. Because DVD discs use digital technology, a title can be divided into individual chapters (similar to tracks on a CD). You can skip to a specific chapter by using the Chapter feature in the Status Banner. 1. While a disc is playing, press STATUS (the Status Banner appears). 2. Press the right arrow button to highlight the current chapter playing.
Chapter 2: Playing Discs Changing the Camera Angle Some discs contain multiple angles of a particular scene or sequence. Press the ANGLE button to toggle through the different angles. As you toggle through the options, the angle changes at that time. Note: The angle feature only works if the disc was created with multiple angles. Using the Repeat Feature The default mode for the Repeat feature is OFF.
Chapter 2: Playing Discs Playing Audio CDs For basic information about loading and playing discs, go to page 9. When playing an audio CD, the Status Banner appears automatically. It displays the current track and the amount of time for that track playing, the total amount of time on the disc and the current time running on the disc. Press the STATUS button on the remote to display the Status Banner. The options below show you what happens when you press the STATUS button.
Chapter 2: Playing Discs Playing MP3 Discs MP3 is a format for storing digital audio. An audio CD-quality song can be compressed into the MP3 format with very little loss of quality, while taking up much less space. CD-R discs that have been encoded in MP3 format can be played on your DVD player. For basic information about loading and playing discs, go to page 9. Press the STATUS button on the remote to display the Status Banner. The options below show you what happens when you press the STATUS button.
Chapter 2: Playing Discs Skipping Songs Use the Next ( ) button on the remote control to move to the next song. Use the Previous ( ) button to move to the beginning of the currently playing song. Press the button again to move to the previous song. Selecting a Play Mode You can choose what order the songs will play on a disc temporarily. The FOLDER play mode is the default. To access the play mode options, press STOP if the disc is playing.
Chapter 2: Playing Discs 3. Add songs to the program list by pressing OK once the song is highlighted. The song you have chosen and the number of songs you have chosen appear at the top of the screen. For example, if you choose the number five song within the folder and it is the first song you have chosen, PROGRAM P01:05 appears. 4. You can continue to add songs to the list from within the same folder by using the up or down arrow button and then pressing OK to add it to the list. 5.
Chapter 2: Playing Discs The TV Display The TV Display controls how the picture and other information appear on the screen. You may want to adjust the screen setting (aspect ratio). The default setting is WIDE (Widescreen). 1. Press the DVD SETUP button (the Setup menu appears, displaying the TV DISPLAY options). 2. Press the right arrow button to access the TV DISPLAY option menu. 3. Press the up or down arrow button to change the display setting. 4.
Chapter 2: Playing Discs 16 x 9 Wide – Choose this setting if your DVD Player is connected to a widescreen TV. If you choose this setting and you don’t have a widescreen TV, the images on the screen may appear distorted due to vertical compression. If you play a disc recorded in 4 x 3 format on a widescreen TV, the left and right side of the screen will appear black. WIDE (Widescreen) OSD (On-Screen Display) Language Use this feature to change the language for the player’s on-screen menu system.
Chapter 2: Playing Discs Screen Saver The screen saver is what appears after the player has not been active for a certain amount of time. The default is set to off. To turn the screen saver on: 1. Press DVD SETUP (the Setup menu appears). 2. Press the down arrow button until SCR SAVER is highlighted (the screen saver options appear). 3. Press the right arrow button to access the SCR SAVER option menu. 4, Press the up arrow button to highlight ON, then press OK. 5.
Chapter 2: Playing Discs Defaults Use the Default feature to reset ALL options to the factory defaults. 1. Press DVD SETUP (the Setup menu appears). 2. Press the down arrow until DEFAULTS is highlighted (RESET appears). 3. Press the right arrow to highlight RESET, then press OK. 4. Press DVD SETUP to exit. Sub Volume Use the Sub Volume feature to boost or cut the decibels going into headphones or an amplifier. 1. Press DVD SETUP (the Setup menu appears). 2.
Chapter 3: Other Information Troubleshooting If you are experiencing product operation problems, please review the troubleshooting section before you call for service. Refer to the Limited Warranty for information on how to obtain repair service. No power • • • • Try the DVD POWER button on the panel. If using the DC power cable, make sure it is firmly connected to the DC POWER (CAR) jack and to the car’s cigarette lighter.
Chapter 3: Other Information Play starts, but then stops immediately • • The disc is dirty. Clean it. Condensation has formed. Allow player to dry out. No sound or distorted sound. • • Make sure your mobile DVD player is connected properly. Make sure all cables are securely inserted into the appropriate jacks. If you connected an audio or audio/video component to your player, make sure you chose the correct input setting on the receiver and unit.
Chapter 3: Other Information Cannot copy discs to video tape • You can’t record DVD discs onto videocassettes because the discs are encoded with anti-copy protection. Remote Control Doesn’t work • Place the remote control extremely close to the sensor on your mobile DVD player. • Maybe battery is weak or dead. Put new battery in the remote. Care and Maintenance Cleaning the Player CAUTION: Turn OFF your Mobile DVD Player before cleaning.
Chapter 3: Other Information • Exterior influences such as lightning and static electricity can affect normal operation of this player. If this occurs, turn off the player and on again, or disconnect and then reconnect the AC power cord to the AC power outlet. • Be sure to remove the disc, turn off the player and close the LCD screen when not in use. • Don’t place anything other than the disc in the disc slot. • Do not store the player in temperatures below +4˚F (-15˚C) or above +149˚F (65˚C).
Chapter 3: Other Information Limited Warranty What your warranty covers: • Defects in materials or workmanship. For how long after your purchase: • 1 year from date of purchase- Unit exchange, which includes parts and labor. • The warranty for rental units begins with the first rental or 45 days from date of shipment to the rental firm, whichever comes first. What we will do: Exchange the unit with a new or, at our option, refurbished unit.
Chapter 3: Other Information • • • Proof of purchase in the form of a bill of sale or receipted invoice which is evidence that the product is within the warranty period must be presented to obtain warranty service. For rental firms, proof of first rental is also required. A brief note describing your receiver problem. Your name, address and phone number. Option II: 1. For a fee, we will send a replacement unit to our exchange point. 2. The exchange location will notify you of its arrival. 3.
Chapter 3: Other Information What your warranty does not cover: • Acts of nature, such as but not limited to lightning damage. • Adjustment of customer controls. • Damage from misuse or neglect. • A unit that has been modified or incorporated into other products or is used for institutional or other commercial purposes. • Batteries. • Units purchased or serviced outside the U.S.A. • Shipping damage if the unit was not packed and shipped in the manner prescribed by Thomson.
Chapter 3: Other Information How state law relates to warranty: • Some states do not allow the exclusion nor limitation of incidental or consequential damages, or limitations on how long an implied warranty lasts, so the above limitations or exclusions may not apply to you. • This warranty gives you specific legal rights, and you also may have other rights that vary from state to state. If you purchased your product outside the United States: • This warranty does not apply.
Visit the RCA web site at www.rca.com Please do not send any products to the Indianapolis address listed in this manual or on the carton. This will only add delays in service for your product. Thomson multimedia Inc. 10330 North Meridian Street Indianapolis, IN 46290 ©2002 Thomson multimedia Inc.