Mobile Video Cassette Player User’s Guide Changing Entertainment. Again.
Important Information WARNING To reduce the risk of fire or electric shock, do not expose this product or AC charger to rain or moisture. CAUTION RISK OF ELECTRIC SHOCK. DO NOT OPEN. To reduce the risk of electric shock, do not remove cover (or back). No user serviceable parts inside. Refer servicing to qualified service personnel. This symbol indicates "dangerous voltage" inside the product that presents a risk of electric shock or personal injury.
Important Information FCC and Industry Canada Information This equipment has been tested and found to comply with the limits of a Class B device, pursuant to Part 15 of the FCC rules. These limits are designed to provide reasonable protection against harmful interference in a residential installation. This equipment generates, uses and can radiate radio frequency energy and, if not installed and used in accordance with the instructions, may cause harmful interference to radio communications.
Introduction Your new mobile Video Cassette Player has been designed for use in vehicles, hotels, offices, and your home and should provide years of trouble-free use. Make sure to read the entire instruction manual to get the most out of your video cassette player. Your Video Player’s Features Include: 2 • 5.
Table of Contents Table of Contents Your Video Player’s Features ........................ 2 Installation ..................................................... 5 Befor e Y ou Install .................................................... Installing the Player in the Car ................................... Using the Player in a Hotel, Of fice, or Home ................ 6 7 8 Using the System ........................................... 9 Controls,Indicators,andConnectors .........................
This page left blank intentionally
Chapter 1 Installation Chapter Overview: • Safety Information • Installing the Player in a Car • Using the Player in a Hotel, Office, or Home Changing Entertainment. Again.
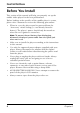
Installation Before You Install This section of the manual will help you properly set up the mobile video player for the best performance. Before looking at the specifics of the mobile player’s system, please take a moment to review the following precautions: • When in a car, the player must be powered from the “Accessory” switch setting (i.e. not directly from the battery). The player’s power should only be turned on when the car’s ignition is turned on.
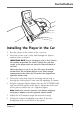
Installation Installing the Player in the Car 1. Rest the player in the center of the rear seat. 2. Insert the center seat’s safety belt through the player’s retainer holes as shown. IMPORTANT NOTE: Secure the player with as little slack in the seatbelt as possible for safety. Tighten the seat belt snugly so the player does not move out from the back of the seat. When the player is not in use the LCD screen should be closed firmly.
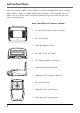
Installation HEADPHONE JACK #2 HEADPHONE JACK #1 AUDIO/VIDEO OUTPUT JACKS EXTERNAL PANEL EJECT AC POWER (HOME) AUDIO/VIDEO INPUT JACKS DC POWER (CAR) Using the Player in a Hotel, Office, or Home 1. Place the player carefully on a table or other resting surface with the bottom of the unit facing down. 2. Plug the AC power cable into the AC POWER (HOME) jack on the back panel of the player. Attach the other end of the power cord to a standard wall outlet.
Chapter 2 Using the System Chapter Overview: • Controls, Indicators, and Connectors • Watching Tapes • Playing Video Games • Using the Auxiliary jacks Changing Entertainment. Again.
Using the System Controls, Indicators, and Connectors HEADPHONE JACK #2 HEADPHONE JACK #1 AUDIO/VIDEO OUTPUT JACKS EXTERNAL PANEL 10 EJECT AC POWER (HOME) AUDIO/VIDEO INPUT JACKS DC POWER (CAR) VOLUME DOWN VOLUME UP POWER BUTTON PICTURE BUTTON PLAY BUTTON FORWARD BUTTON REWIND BUTTON STOP BUTTON Chapter 2
Using the System Watching Tapes To watch a tape, turn on the player’s power, raise the LCD monitor to a desired viewing level, insert the tape into the rear panel loading slot, and press the PLAY button. Note: To eject a tape in playback mode, press the EJECT or STOP button twice; to eject a tape in stop mode, press the EJECT or STOP button once. Adjusting the Video Player Adjust the sound to a desired level using the VOLUME up and down button. If the LCD’s image needs to be adjusted: 1.
Using the System Using AUX Jacks You can view an image from an external source (like a camcorder) using the player’s A/V input jacks. A/V Jacks There are three A/V input jacks and three A/V output jacks on the player’s rear jack panel. You can connect an external device like a game console or camcorder into the A/V input jacks. Note: Make sure to stop all tape playback in the player before connecting an auxiliary device to the player’s A/V input jacks.
Chapter 3 Other Information Chapter Overview: • Troubleshooting • Care and Cleaning • Traveling Tips • Wired Headphones • Specifications • Index • Warranty Changing Entertainment. Again.
Other Information Troubleshooting Tips In this section, you will find answers to common video player questions. Consulting with this section first when there is problem may help you answer common questions. No power • Check to make sure all power cord connections are tight and plugged into an operating power source. Rewind does not operate • Check to make sure the tape is not already rewound. The VCP makes noise when stopped • The player is removing the tape from the playheads. A sound is normal.
Other Information Proper Care and Storage • Keep dirt from entering the player’s cassette tape door. Dust and grit are abrasive and cause excessive wear to the playback heads and/or tapes. • Always close the LCD monitor when not in use. • Before handling the player or tapes, make sure your hands and face are free from any chemical products such as suntan lotion, as damage to the finish or internal parts may occur. • The player might be damaged by improper storage or handling.
Other Information Things to Avoid • Never attempt to disassemble the player. There are no userserviceable parts inside. • Avoid operating the player immediately after moving it from a cold location to a warm location. Give it 1-1/2 to 2 hours to reach a stable temperature before inserting a tape. • Never leave the player in direct sunlight. The resulting heat buildup might permanently damage internal parts. • Do not expose the player or power supply cord to rain or moisture.
Other Information Storage Compartment Storage Compartment Your portable video player has a compartment on its top side that allows you to store the unit’s power cords. Notes: The storage compartment is not intended to store anything but the AC and car-adapter power cords. Placing anything else in the storage compartment may damage the unit and void its warranty. The LCD monitor panel must be lifted first before opening the storage compartment.
Other Information Specifications Color System: NTSC Screen Size: 5.6 inches Audio Track: 1 Track Tape Width: 12.7 mm Tape Speed SP: 33.35 mm/s Playback Time: 180 minutes with T-180 set to the SP speed mode Fast-Forward/Rewind Time: Less than 7 minutes with T-120 Video Output: 1.0 Vp/p, 75 Ohm, unbalanced Video S/N: Better than 40 dB Audio Output: 2x0.
Index Index A P A/V Jacks 12 AUX Jacks 12 Power 1 Precautions 6 C S Care and Storage 15 Cigarette-lighter Converter 1 Cleaning 15 Control Panel 1 Safety information 2 T Features 2 Tapes watching 11 Tips, troubleshooting 14 Travel Tips 16 Troubleshooting 14 G V Game Attachment 1 Video Games playing 11 F H Headphones 1, 16 I Installation hotel, office, or home 8 vehicle 7 L LCD Displays 1 M Monitor external 12 LCD 1 Chapter 3 19
Warranty Warranty What your warranty covers: • Defects in materials or workmanship. For how long after your purchase: • • 1 year from date of purchase- Unit exchange, which includes parts and labor. The warranty for rental units begins with the first rental or 45 days from date of shipment to the rental firm, whichever comes first. What we will do: Exchange the unit with a new or, at our option, refurbished unit.
Warranty • • • Include with the shipment: 1. Proof of purchase in the form of a bill of sale or receipted invoice which is evidence that the product is within the warranty period must be presented to obtain warranty service. For rental firms, proof of first rental is also required. 2. A brief note describing your unit’s problem. 3. Your name, address and phone number.
Visit the RCA website at www.rca.com Please do not send any products to the Indianapolis address listed in this manual or on the carton. This will only add delays in service for your product. Thomson Inc. 10330 North Meridian Street Indianapolis, IN 46290 ©2003 Thomson Inc.