USER USER’S GUIDE colortelevisioncolortelevisionco lortelevisioncolortelevisioncolo rtelevisioncolortelevisioncolort elevisioncolortelevisioncolortele visioncolortelevisioncolortelevi sioncolortelevisioncolortelevisio ncolortelevisioncolortelevisionc olortelevisioncolortelevisioncolor televisioncolortelevisioncolor o n c o l o r t e l ev i s i o n c o l o r t e l ev elevisioncolortelevisioncolortel evisioncolortelevisioncolortelevi sioncolortelevisioncolortelevisio ncolortelevisioncolortelevisionc olortele
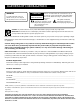
Important Information WARNING To reduce the risk of fire or electric shock, do not expose this product to rain or moisture. Caution: To reduce the risk of electric shock, do not remove cover (or back). No user-serviceable RISK OF ELECTRIC SHOCK. DO NOT OPEN parts inside. Refer servicing to qualified service personnel. This symbol indicates This symbol indicates "dangerous voltage" inside important instructions the product that presents a accompanying the product. risk of electric shock or personal injury.
Table of Contents Setup and connections .......................................................... 3 Step 1: Unpack the TV ...................................................................... 4 Step 2: Connect your TV .................................................................. 4 TV Only ....................................................................................... 4 The Basic Connection ................................................................. 5 Advanced Connections ...............
Table of Contents Audio Menu .................................................................................... 29 Using the Remote to Select an Audio Processor .......................... 30 Picture Quality Menu ..................................................................... 30 Screen Menu ................................................................................... 31 Using Closed Captioning ......................................................... 32 Adjusting the Color Projection Tubes ....
Setup and Connections Getting started The Reference section in the back of the book contains troubleshooting tips, care and cleaning instructions, accessory ordering information and your warranty. 1 Setup and connections Connections Setup and 2 Interactive setup Interactive setup 3 Using the remote remote Using the 4 Features and and Menus Menus Features 5 Reference Reference ➣ This manual is designed to get you started quickly.
Setup and Connections Step 1: Unpack the TV Make sure to locate the remote control. Step 2: Connect your TV There are three types of connections outlined in this section: TV Only: If you’re only going to connect the TV to your home antenna or cable system. The Basic Connection: If you’re going to connect the TV to a VCR or satellite receiver. Advanced Connections: If you’re going to make multiple connections, hooking up the TV to one or two VCRs, DVD player, and a satellite receiver.
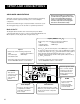
Setup and Connections The Basic Connection The basic connection below (TV and VCR) is the most common connection and is therefore used to illustrate a single component connection with your TV. For better sound and picture quality and multiple component connection information refer to the next section, Advanced Connections. Cables You will use the following cable to make your connection: Coaxial Cables: These cables carry both the audio and video signal to the TV from an antenna, cable, or cable box.
Setup and Connections Advanced Connections Advanced connections give you better sound and video by separating the audio and video signals and enable you to connect multiple components. Once you have made your connections you will want to program the TV to tune to the correct Video INPUT channel in order to see and hear audio and video from the component. You will program this later in the Interactive Setup.
Setup and Connections Sample Connections The following are sample connection scenarios which you may encounter when connecting components to your TV. Cautions: Position cables to Avoid Audio Hum or Interference Cables • Insert all cables firmly into jacks. You will use the following cable to make your connection: • Place the audio/video cables to the sides of the TV’s back panel instead of straight down the middle.
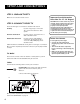
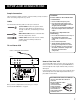
Setup and Connections TV, VCR and Satellite Receiver CABLE, CABLE BOX, OR ANTENNA SATELLITE SATELLITE RECEIVER IN FROM ANT OUT OUT TO TV S-VIDEO VIDEO R L How to View Your Components SATELLITE IN VCR IN FROM ANT IN R AUDIO L VIDEO CH3 CH4 To watch the Satellite Receiver in this connection, press TV to put the remote control into TV mode, then press WHO•INPUT to scroll through the video input channels until you tune to VID1 (or SVID 1) input.
Setup and Connections Step 3: Connect the G-LINK Cable The G-LINK cable enables the GUIDE Plus+ system (the on-screen guide that lists what shows are on TV) to work with your VCR and/or cable box. Cable Box – If your TV is connected to a cable box and you don’t connect the G-LINK cable, no channels will be listed in the on-screen program guide. VCR – If your TV is connected to a VCR and you don’t connect the G-LINK cable, one-touch recording won’t work. The other features of the guide will work properly.
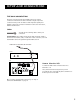
Setup and Connections Step 4: Plug in the TV Plug the end into the wall outlet, matching the wide blade of the plug with the wide slot in the outlet. Be sure to insert the plug completely. Step 5: Place Batteries in Remote • Remove the battery compartment cover from the back of the remote. • Insert fresh batteries. Make sure that the polarities (+ and -) are aligned correctly. • Replace the cover. Step 6: Turn on the TV Press TV on the remote, or press POWER on the TV itself.
Interactive Setup There’s an on-screen setup routine • Search for available channels • Set up the GUIDE Plus+ system • Set the time • Set the VCR1 channel • Set the VCR2 channel • Set the DVD channel • Set the SAT/CABLE channel • Make the channel list and labels 2 Interactive Setup Setup Interactive INTERACTIVE SETUP 3 Using the the remote remote Using USING THE REMOTE 4 Features and and Menus Menus Features FEATURES AND MENUS 5 Reference Reference REFERENCE ➣ Select a menu languag
Interactive Setup Using Point and Select You only need to know one rule when using the remote to access onscreen menus and control panels: point and select. The point and select method has two steps. 1. Point to a menu item using the arrow buttons on the remote. To point up or down, press the up or down arrows. To point left or right, press the left or right arrows. 2. Select a menu item by pressing MENU or OK.
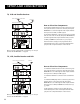
Interactive Setup SETUP Would you like to begin Setup now? 1 Begin setup now 2 Cancel setup 3. Point to Begin setup now and press MENU or OK. Select a Language The first part of the setup routine asks you to select your preferred language for the menu system. SETUP Select the language to be used in these menus. 1 English 2 Español 3 Français 1. Point to your preferred language for the menu system. 2. Press MENU or OK to select that language.
Interactive Setup The GUIDE PIUS+ System The next step lets you set up the GUIDE Plus+ system to display your local program listings, and control your cable box and VCR. You can either press MENU or OK to bring up the GUIDE Plus+ initial menu or point to Skip this Step to move to the next step in the Interactive Setup. You can set up the GUIDE Plus+ system during the Interactive Setup. You can also access the GUIDE Plus+ menus by pressing menu on the remote, and selecting GUIDE Plus+ Menu.
Interactive Setup Select Yes if the cable box changed to channel 9, or No if it did not. If you select No, the system will try another code. If the GUIDE Plus+ system cannot recognize either your cable box or VCR after several tries, a screen stating “Cable Box (VCR) test failed...” Please consult your manual and try again” appears. You have a choice to either Try Again or Skip Cable Box Setup.
Interactive Setup Setting the Time The next step in the Interactive Setup lets you set the time of day. If your GUIDE Plus+ system has not completed its first download, you need to set the time. Once the system has completed its first download, it sets the time for you automatically and you may not see this screen. SETUP Would you like to set the time on the TV? 1 Set time 2 Skip this step 1. Press MENU or OK to bring up the SET TIME control panel. SET TIME : AM Enter 01 to 12 for the hour.
Interactive Setup SETUP Would you like to use a VCR with your TV? 1 Use TV with a VCR 2 Skip this step 1. Press MENU or OK to bring up the VCR1 choice list. SET VCR1 CHANNEL 1 2 3 4 5 Not connected Channel 3 Channel 4 Video 1 Input Video 2 Input 2. Point to the choice that matches the way you have your VCR connected to the TV. If you used audio/video cables, choose the video input you connected the cables to. 3. Press MENU or OK to continue.
Interactive Setup SET VCR2 CHANNEL 1 2 3 4 5 Not connected Channel 3 Channel 4 Video 1 Input Video 2 Input 2. Point to the choice that matches the way you have your second VCR connected to the TV. If you used audio/video cables, choose the video input you connected the cables to. 3. Press MENU or OK to continue. Setting the DVD Channel (auto tuning) The next step lets you set the DVD channel.
Interactive Setup 2. Point to the choice that matches the way you have your DVD player connected to the TV. If you used audio/video cables, choose the video input you connected the cables to. 3. Press MENU or OK to continue. Setting the SAT/CABLE Channel (auto tuning) The next step lets you set the SAT/CABLE channel. When you set the SAT/ CABLE channel, you’re telling the TV what channel to tune to when you press the SAT•CABLE button on the remote.
Interactive Setup Labeling the Channels This last step in the Interactive Setup lets you edit your channel list and label your channels. (For more, see List and Labels in the Features and Menus section.) SETUP Would you like to name each channel? 1 Name channels 2 Skip this step 1. Press MENU or OK to bring up the List and Labels control panel. LIST AND LABELS Channel # 59 Normal List Yes Channel Label ------ Use or , keypad, or CH ^/v to set channel, MENU to exit. 20 2.
Using the Remote How to use your Universal Remote The universal remote can be programmed to control most brands of remote controllable VCRs, satellite receivers, and cable boxes. If you have an RCA, GE or Proscan component, you probably don’t need to program it at all. 1 Setup and connections 2 Interactive setup ➣ This section defines the buttons of the remote and how to program it to control other components.
Using the Remote Remote Buttons (0-9) Number Buttons Enters channel numbers and time settings directly though the remote control. To enter a two-digit channel, press the two digits. To enter a three-digit channel, press and hold the first digit until #-- appears, then add the second two. Example: to tune to channel 123, press and hold 1 until 1-- appears then press 2 and 3. ANTENNA Functions as TV/VCR button in VCR mode and TV/receiver button in SAT•CABLE mode.
Using the Remote PAUSE If you’re operating a VCR or DVD Player with the remote control, press PAUSE when the disc or videotape is playing to pause playback. PIP (Picture-In-Picture) Brings up the small picture-in-picture window. Press again to remove the PIP window. PLAY If you’re operating a VCR or DVD Player, plays the disc or videotape. REC•VCR+ In TV mode, when the GUIDE Plus+ program guide is on the screen, press REC•VCR+ to program your VCR to record a program.
Using the Remote Programming the Remote The universal remote can be programmed to control most brands of remote controllable VCRs, satellite receivers and cable boxes. The remote is already programmed to control most RCA, GE and Proscan TVs, VCRs, DVD players, laserdisc players and satellite receivers. Testing the Remote To determine whether the universal remote needs to be programmed, turn a component ON, such as a VCR, point the remote at the VCR, and press the VCR1 button.
Using the Remote responds to the remote commands. If it doesn’t, try pressing the component button and then ON•OFF again. 6. If you get no response, repeat these steps using the next code listed for your brand, until the component responds to the remote commands. Using the Remote to Control a Component Once the remote has been programmed successfully, you are ready to use it to control your components. To operate the component: 1.
Using the Remote VCR Admiral ......................................................................... 2131 Adventura ..................................................................... 2026 Aiko ............................................................................... 2027 Aiwa .................................................................... 2002, 2026 Akai .... 2003, 2004, 2005, 2007, 2008, 2111,2112, 2113 American High ............................................................ 2021 Asha ...
Features and menus Using the TV Each menu is then outlined and special features are detailed in order to help you get the most from your TV. This section also includes information on using your GUIDE Plus+ system.
Features and menus Menus and Control Panels Using the buttons on both the remote and front panel enable you to access and make changes to the Menus and Control Panels. Menus use the point and select rule to navigate, but control panels use a variety of methods to adjust features on your TV. The following pages detail how to use these controls in order to customize the functions of your TV. Menus The first menu is called the Main menu.
Features and menus Numeric Entry A numeric entry control panel is used to enter numbers or letters. SET TIME : Pointer Enter 01 to 12 for the hour. Press MENU to exit. A pointer appears underneath the column you are changing. 1. Press the up arrow to enter a number in the column above the pointer. 2. Press the right arrow to move to the next column, then press the up or down arrow to enter a number. 3. When you have finished entering information, press MENU or OK.
Features and menus Second Audio Program (SAP) Plays the program’s audio in a second language, if one is available. The TV displays the word SAP when you tune to a program that is broadcast with SAP information. SAP audio is broadcast in mono. SAP is also used to broadcast a program’s audio with descriptions of the video for the visually impaired.
Features and menus Auto Color Displays a choice list that lets you turn on the feature that automatically corrects the color of the picture. (This is especially useful for tracking realistic flesh tone colors as you switch from channel to channel.) Choose On or Off, depending on your preference. It’s your choice.
Features and menus Using Closed Captioning Many programs are encoded with closed captioning information, which lets you display the audio portion of a program as text on the TV screen. Closed captioning is not available on all channels at all times. Only specific programs encoded with closed captioning information are applicable. When a program is closed captioned, the letters CC are displayed in the channel marker.
Features and menus 5. Press 1 to align Green Centering. Use the arrow buttons to center green square on screen. Press MENU when done. 6. Press 2 to align Blue Convergence. Use the arrow buttons to align blue crosshatch to green crosshatch. Press MENU when done. 7. Press 3 to align Red Convergence. Use arrow buttons to align red crosshatch to green crosshatch. Press MENU when done. 8.
Features and menus Channel Menu Signal Type Displays a choice list that lets you select the current antenna type. This option does not appear when the GUIDE Plus+ system is set up. UHF/VHF Antenna Choose this if you are currently using an off-air antenna for TV signals. Cable TV Choose this if you are currently using cable or a cable box for TV signals. Auto Channel Search Tells the TV to search automatically for all the channels available through the antenna input.
Features and menus The choices for each screen are: Not Connected Choose this if you do not have a component connected to an antenna or video input on the back of the TV, or if you don’t want the TV to tune to a channel when the particular component button is pressed. Channel 2 (SAT/Cable only) Choose this if your component is connected to the antenna jack on the back of the TV, and you want the TV to tune to channel 2 when you press the specified component button.
Features and menus Setup Menu The setup routine is discussed earlier in the manual in the Interactive Setup section. The first screen of the Interactive Setup appears automatically when you turn on your TV for the first time or after a power outage. You can also access the Interactive Setup from the Main Menu. Parental Controls and V-Chip The Parental Controls menu allows you to program your TV so that children cannot see certain programs, channels, or use the front panel controls.
Features and menus Age-Based Rating TV-MA TV-14 TV-PG TV-G TV-Y7 TV-Y Description and Content Themes for Age-Based Ratings Mature Audience Only. Specifically designed to be viewed by adults and may be unsuitable for children under 17. It contains one or more of the following content themes: crude indecent language (L), explicit sexual activity (S), or graphic violence (V). Parents Strongly Cautioned. Contains some material that many parents would find unsuitable for children under 14.
Features and menus The Ratings Limits Screen Below is an example of where items are located within the Rating Limits screen. Rating Field Lets you select from a list of age-based ratings you can block or view. Rating Status Field Lets you select whether the status of the agebased rating limit to the left is View or Block. V-CHIP TV RATING LIMIT Rating TV-MA Status VIEW - - Content - - D L S V FV V V V ^ Press ^/v to select rating. Press MENU to exit.
Features and menus In the example discussed previously, you would scroll through the rating field until TV-PG appears, since the highest rating you want the child to watch is TV-G. 4. 5. Hierarchy of Age-Based Ratings Use the right arrow to move the yellow highlight to the rating status field. Press the up or down arrow to toggle from View to Block. The status for the rating listed to the left and all higher ratings automatically changes to Block (B). 6.
Features and menus To block program content: 1. Determine the lowest level of content you do not want the child to watch. 2. Use the left and right arrows to highlight the Rating Field. 3. Use the up and down arrows on the remote to scroll through the age-based ratings until the rating that corresponds with the lowest content you do not want the child to watch appears. (In the example above, you would scroll through the ratings until the TVPG rating appeared.) 4.
Features and menus V-Chip Movie Rating Limit You set movie rating limits by blocking movies rated above a specified level. Blocking Movie Ratings If you only want your child to watch movies that have a PG rating and lower (in other words, movies rated PG and G), then you could automatically block out all other movies with higher ratings. To block movies: 1. Highlight the rating field and press the up and down arrows to find the rating that is the lowest rating you do not want the child to watch.
Features and menus V-Chip Unrated Program Block Selecting this option lets you decide if programs that the V-Chip recognizes as “unrated” can be viewed. Note that “unrated” TV programs may include news, sports, political, religious, local and weather programs, emergency bulletins, public announcements, and programs without ratings.
Features and menus About the GUIDE PIUS+ System Action Buttons Video window Program Information Menu Options The GUIDE Plus+ system is an interactive on-screen program guide that lists TV schedules for your area and allows your TV direct control of a cable box and VCR. You must first set up the GUIDE Plus+ Menu system in order to view it (see the Interactive Setup section for more details). To bring up the GUIDE Plus+ system, press GUIDE.
Features and menus Getting In & Out of the GUIDE Plus+ System To enter the GUIDE Plus+ system: • Press GUIDE on the remote. VCR1 ON OFF TV DVD VCR2 AUX SAT•CABLE There are three ways to exit the GUIDE Plus+ system: MUTE SKIP Highlight a program and press OK to exit the GUIDE Plus+ system and tune to the channel. • Press GUIDE to exit the GUIDE Plus+ system and tune to the channel displayed in the video window. • Press CLEAR to exit the GUIDE Plus+ system and return to the original channel.
Features and menus Grid Guide Action Buttons Grid Guide Action Buttons Action buttons will change according to where you are in the GUIDE Plus+ system. Be sure to look at the action bar before pressing the command numbers. When highlighting the program, the following Action buttons appear: • Watch Press 1 on the remote to place a timer in the Schedule for the TV to turn on and tune to the program highlighted in the channel listing.
Features and menus Sort Sort Menu Action Buttons The Sort menu lets you browse programs by category. The channel to which you are currently tuned is displayed in the video window. To Sort: 1. If the GUIDE Plus+ system isn’t on your screen, press GUIDE on your remote control. 2. Press MENU on the remote to select the Menu bar. 3. Use the arrows to highlight Sort. When Sort is highlighted for the first time, the Movies category is displayed. Thereafter, the last category used becomes the default.
Features and menus News News Menu Selection The News menu lets you browse current news stories by headline. 1. If the GUIDE Plus+ system isn’t on your screen, press GUIDE on your remote control. 2. Press MENU on the remote control to select the menu bar. 3. Use the arrows to highlight News (if MSNBC is available on your TV, it will appear in the video window). 4. Use the up and down arrows to highlight a story. • Use the up and down arrows to browse the list one story at a time.
Features and menus To remove or change the frequency (daily, once, or weekly) of a scheduled event, access the Schedule menu from the Menu bar. 1. Press GUIDE to bring up the GUIDE Plus+ system. 2. Press MENU on the remote to select the Menu bar. 3. Use the arrows to highlight the Schedule menu selection. 4. Use the up and down arrows to highlight the program you want to edit. Then use the Schedule Menu Action Buttons as described next.
Features and menus Messages Menu Action Button When viewing the Messages menu the following Action button will appear on the bar: • Remove Highlight the message you wish to delete and press 1 on the remote. Channels You may customize the channel listing by enabling or disabling the display of certain channels. For instance, you may disable channels that you never watch. You can restore disabled channels at a later point in time. 1. Press GUIDE to bring up the GUIDE Plus+ system. 2.
Features and menus Setup The Setup menu allows you to access the GUIDE Plus+ system setup information. To access the Setup option: 1. If the Guide Plus+ system isn’t on your screen, press GUIDE on your remote control. 2. Press MENU to select the Menu Bar. 3. Use the right arrow to highlight the Setup menu selection. 4. Use the up and down arrows to select Change system settings, Review options, or View demo.
Features and menus PIP Buttons VCR1 Arrow buttons let you move the PIP window to different areas of the screen. DVD VCR2 AUX SAT•CABLE MUTE SKIP CH + CH SOUND GO BACK INFO GUIDE SWAP Switches, or “swaps,” the video from the PIP window with the main picture. CH CTRL (Channel Control) Lets you switch channel control between the PIP window and the main picture. For instance, press PIP to bring up the PIP window.
Features and menus Channel Marker 12:01 Mute CC VCR1 VID1 SAP PIP 59 There are several indicators that come up when you press the TV, INFO, PIP or SWAP button. This display is called the Channel Marker. 12:01 Displays the current time. CC Displayed when Closed Captioning is available on the current channel. VCR1 Displays the label assigned to the current channel. Sleep 00:00 VID1 Displays the current channel or input channel (VID1 or SVID1, VID2 or COMP2 or FRNT for models F32715 and F36715).
Reference Troubleshooting Troubles sometimes are caused by simple “faults” that you can correct without the help of a service technician. If you experience any difficulty with your TV, check a few basic remedies before calling your service technician. TV will not turn on • • • • • Check to make sure it is plugged in. Check the wall receptacle (or extension cord) to make sure it is “live” by plugging in something else. Maybe batteries in remote control are “dead.
Reference No sound, picture okay • • • Maybe sound is muted. Try pressing volume up button to restore sound. Maybe speakers are turned off. Check the Audio Output and Speakers control panel in the Audio menu. If using an S-VHS component, remember to also connect the component’s L and R AUDIO OUT jacks to the TV’s L and R INPUT jacks. Can’t select certain channel • • Channel may be blocked or not approved in the Parental Controls menu.
Reference Limited Warranty (Direct View 5”-36”) What your warranty covers: • Defects in materials or workmanship. For how long after your purchase: • 90 days from date of purchase for labor charges. • One year from date of purchase for parts. • Two years from date of purchase for the picture tube. The warranty period for rental units begins with the first rental or 45 days from date of shipment to the rental firm, whichever comes first.
Reference Limitation of Warranty: • THE WARRANTY STATED ABOVE IS THE ONLY WARRANTY APPLICABLE TO THIS PRODUCT. ALL OTHER WARRANTIES, EXPRESS OR IMPLIED (INCLUDING ALL IMPLIED WARRANTIES OF MERCHANTABILITY OR FITNESS FOR A PARTICULAR PURPOSE) ARE HEREBY DISCLAIMED. NO VERBAL OR WRITTEN INFORMATION GIVEN BY THOMSON MULTIMEDIA INC., ITS AGENTS OR EMPLOYEES SHALL CREATE A GUARANTY OR IN ANY WAY INCREASE THE SCOPE OF THIS WARRANTY.
Reference What your warranty does not cover: • Customer instruction. (Your Owner’s Manual describes how to install, adjust, and operate your television. Any additional information should be obtained from your dealer.) • Installation and related adjustments. • Signal reception problems not caused by your television. • Damage from misuse or neglect. • Batteries. • Images burnt onto the screen.
Reference Accessory Information Antenna (or cable-TV) connections are made with either coaxial antenna cable or twin-lead cable. Coaxial cables are shielded so they are less susceptible to hum or interference from adjacent cables. Most audio/video connections between components can The following accessories are available from most dealers and electronics supply stores in case you want to position your components farther apart or need additional cables.
Reference VC R1 DV D VC R2 MU TE VO L CH + C HGO OK TV AU X SA T•C AB LE SK IP VOL SO UN D GU IDE ON OFF BA INFO CK MEN U CLE AR Remote Control This is the remote control that came packed with your TV. Replacements or spares can be ordered as needed. Accessory Order Form WH O•IN PU T REV ER SE REC •VC R+ PIP SW AP PL AY AN TE NN A FO RW AR D ST OP PA USE CH CTR LR ES ET CRK76TA1 2-way Signal Splitter helps you connect to a second TV or VCR. Splitter VH47 Qty Total Price $3.
Reference Placing an Order Charge your order on your VISA, MasterCard, or Discover Card by filling in below To place your order by phone, have your Visa, MasterCard or Discover Card ready and call the toll-free number listed below. USE YOUR CREDIT CARD ® IMPORTANT: Copy complete account number from your VISA card Use this number only to place on order for accessory items listed on this order form.
Reference A Accessories 58 Advanced Connections 6 Convergence 33 Age-Based Ratings 37 Audio Menu 29 Audio Output Volume & Speakers 30 Audio Processor 29 Audio remote codes 26 Audio/Video cables 7 Auto Channel Search 13, 34 Auto Color 31 Auto Tuning 16, 34 DVD Channel 18, 34 SAT/Cable Channel 19, 34 VCR1 Channel 16, 34 VCR2 Channel 17, 34 B Back of the TV 6 Basic Connection 5 Basic Picture Controls 30 Batteries 10 Black Level 30 Buttons, remote 22 C Cable Box remote codes 26 Channel labeling 20 Lineup 43 m
Visit the RCA web site at www.rca.com Please do not send any products to the Indianapolis address listed in this manual or on the carton. This will only add delays in service for your product. Thomson multimedia Inc. 10330 North Meridian Street Indianapolis, IN 46290 ©2001 Thomson multimedia Inc.