VCR USER'S ¸%¸,¸ MANUAL • / < PROSCAN _ ii _¸¸¸¸ • ,q 'k MODEL PSVR85
WARNING COVER (OR BACK). NO USER SERVICEABLE PARTS INSIDE. TO REDUCE THE RISK OF ELECTRIC SHOCK,PERSONNEL. DO NOT REMOVE REFER SERVICING TO QUALIFIED SERVICE To reduce risk of fire or shock hazard, do not expose this product to rain or moisture. A Cautions instructions accompanying the his symbol indicates important product. A This symbol indicates "dangerous voltage" inside the product that presents a risk of electric shock or personal injury.
First Things First ................................................................................... 3 Using the QuickSet Guide ...................................................................5 Setting Up theVCR ............................................................................. 7 Using the Menus to SetUp Features................................................ 8 Language........................................................................................ 8 Cable Box Setup........
Program The Remote ......................................................................39 Testing the Remote ............................................................................. 40 Programming the Remote to Control aTV, Satellite Receiver, or Cable Box ...................................................40 Using Direct Entry ...................................................................... :.. 4 I To Control an Auxiliary Component ..............................................
TO WELCOME YOUR I 1 NEW VCR... To help you get started using yourVCR with as FIRST THINGS FIRST V little reading as possible, we've put all the basic information needed in the first three sections.To help you along, there's even a QuickSet Guide which walks you through several setup steps at once.
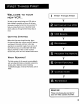
STEP 1: WHAT'S The following items come packed • VCR • Remote control • RF coaxial STEP Follow 1. 2. 3. in the box: ! _.,ii INSTALL REMOTE BATTERIES IN ,."._i , CONTROL these steps whenever batteries BOX? cable 2: THE IN THE *,+Q 4, you need to install or change the in your VCR's remote. Remove the cover of the battery compartment. Place the batteries into the remote's back panel.
STEP 5: TUNE THE Tune the TV to the VCR viewing channel is channel TV channel. The VCR viewing 3 or 4 or the TV's video input. If you connect your VCR using the ANT. IN and RF OUT jacks with RF coaxial cable, set the 3 CH 4 switch to channel 3 or channel 4--the channel you want to use on your TV. If you connect your VCR using the AUDIO/VIDEO with audio/video jacks cables, select the TV's video input with the remote's TV and INPUT buttons to see the signal.
((]mlinued troth IJ, l_l'l plevitlus if the menu does not appear: • Make sure theIV is tuned to the same channel 4 switch or the ]V's video input "channel" as the 3 CH (see "How to Find Your lV's Video Input Channel" in the References section of this manual for more information). • Make sure the VCR indicator connected • is on in the VCR display if you your VCR using the ANT. IN and RF OUT jacks. Check your corlnections.
SETUP FEATURES Below is a list of features the most covered that need to be set up to get out of yourVCR. during the QuickSet Guide, but if you ever 2 want to change a menu, refer to this section.
USING UP THE MENUS TO SET FEATURES You set up features by using the menu system as discussed in the previous section. Each feature that appears in the QuickSet Guide is exp(ained in this section as well as a few other features you should set up before you begin using your VCR. LANGUAGE Selecting your preferred language determines how the on- screen displays will appear. To change the language: 1. 2.
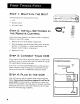
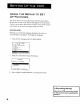
CABLE BOX SETUP This setup applies only when all channels the cable box. 1." Press MENU to display the VCR MAIN 2. I 2 3 VCR MAIN MENU VCR PLus+ Timer Recordings Time 5 6 7 8 0 Setup Preferences Audio Language Exit Press 4 to display the CHANNELS are received through MENU. menu. CHANNELS 1 Auto Channel Search 2 Add/Remove Channels 3 Signal Type: CABLE 6 VCN Plus+ Setuo I 0 Exit 3. Press5 to displaythe CABLE BOX one of the threechoices. CABLE BOX SETUP menu.
I( I*tltltlllt'l/ hlllll prl'viou_ /J,l_I') CABLE "he VCR will receive from the on BOX now all signals cable box channel Press SETUP 04. MENU to continue Once you complete the setup, the on-screen that the VCR will re/eive channel. VCR CHANNELS all signals on the designated LIST If you use a cable box for all channels, Your VCR may come with a channel Even though menus confirm this step is not necessary. list preset at the factory.
AUTO CHANNEL What type of are you using? 1 Cable 2 Antenna 0 SEARCH signal TV Cancel 4. Select one of the three AUTO CHANNEL • Cable TVsearches • Antenna • Detect Automaticallywi[I for cable stations fronl a single channel searches for local broadcast AUTO CHANNEL SEARCH options. stations on all channels make this decision for you Detect Automatically A strong cable or antenna signal in your area may cause Auto Detect to mis-detect.
ADDING OR REMOVING CHANNELS You may want to add or remove channels channel search, especially content if channels after you auto have weak signals or you don't want to watch. To achieve this: Press MENU to display the VCR MAIN MENU 2. Press 4 to display the CHANNELS 3. Press 2 to display the ADD/REMOVE CHANNELS screen.
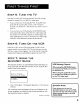
SETTING 1. THE Press MENU VCR 1 ; 2. VCR TIME ZONE to display MAIN the VCR MAIN MENU. MENU PLus+ Timer Recordinls 4 Channels 5 6 Setup Preferences 7 Audio 8 0 Language Exit Press 3 to display the TIME menu. 1 2 TIME Set Time and Date Auto Clock Set: 4 Set 0 Exit Daylight ON Savings 3. Press3 to displaythe SET TIME ZONE screen, SET TIME ZONE What is your Time Zone? 1 Eastern 2 Central 3 Mountain 4 Pacific 5 Alaska 6 Hawaii Press .
2. Press 3 to display the TIME menu. 1 2 3 ] _irJl4.11HIalLillRli_..ILYliinlltl.a. * 0 3. TIME Time and Date CLock Set: Time Zone Set Auto Set ON . Exit Press 4 to display the SET DAYLIGHT SET Does DAYLIGHT your I 2 Yes, NO observe Savings Time to October? DST Press SAVINGS area Daylight from April MENU is observed to continue Spring 4. Select one of the options. • DST stands for Daylight • If you choose Automatic, DST information SETTING SAVINGS menu. Savings Time.
SET Time TIME AND DATE --:-(hh:mm) Date Time/Date --/-_/-- Press MENU to Display Pressing INFO displays the time and date on the screen cancel temporarily. 4. Enter the data using the number single-digit numbers exit the menus. SET TIME Time 12:34 Date 11/16/00 Press CLEAR Press MENU AND and follow buttons. to PN Thursday to to correct set PROGRAMMING The VCR Plus+ SILVER programming by setting and updating you.
MAPPING VCR PLUS+ SYSTEM CHANNELS TWOmDigitVCR Plus+ System Channel Numbers for MANUALLY Using the VCR Plus+ SILVER programming system can make Cable (U.S. List) 35 American VCR Plus+ SILVER system setup failed during the QuickSet, then 39 Arts you will need to map the channels for your local service manually. 57 Black A worksheet and abbreviated codes for typical cable services in 54 Bravo the U.S. and Canada are provided.
VCR PLUS+ SYSTEM Broadcast or Cable-TV Station Name WORKSHEET VCR Plus+ Channel Number** HBO 33 ESPN 34 Channel Number You Receive the Station On* Two-DigitVCR Channel CableTV Check your local or cable listing for tl)e chaone/ *" Check your/ocel listing for broadcast number Plus+ Numbers System for (Canadian List) 67 Allarcom Pay Television/ Superchannel 44 Arts 72 Cable News NetworkHeadline News 61 Cable 70 Canadian Network 56 Canal 69 Cathay International Television Inc.
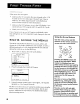
ADDITIONAL PREFERENCES SET UP FEATURES MENU IN THE The features in this section are all accessed through the PREFERENCESmenu. 1. Press MENU to display the VCR MAIN MENU. I 2 3 4 VER MAIN MENU VCR Plus+ Timer Recordings Time Channels 5 Setup ...... || ? Audio 8 Language 0 Exit 2. Press 6 to display the PREFERENCES menu.
The VCR will only respond to the VCR2 button. To change the remote setting back to VCR1, display the PREFERENCES menu, press 1, and then press the VCR1 button on the remote. AUTO PLAY This feature allows the VCR to automatically you insert a tape with the safety tab removed. between ON or OFF. • when Press 2 to switch Select ON if you want a tape with its safety tab removed start playing • start playing automatically to when the tape is inserted.
FRONT PANEL (VCR BRIGHTNESS DISPLAY) You can change the brightness level of the fluorescent display panel on the front of the VCR. Press 5 to switch between the options. • AUTO brightens the display when the VCR is on and dims the display when the VCR is off. • BRIGHT keeps the display • DIM keeps the display at a low brightness TAPE bright. level. SPEED You can select a preferred tape speed for recording.
• The "Press CLEAR to turn off" message will appear only after the first number has been entered into the end time. • Auto Repeat is set back to -:-- by resetting the dialog box, by cassette ejecting power interruption, When a duration • or insertion, by powering or by recording off the VCR, by start. time has been set: The VCR will automatically switch to rewind if the counter meets or goes past the Auto Repeat set duration.
22
LEARN YOU THE BASICS TO GET STARTED V TheseVCR basics should be enough for you to begin enjoying yourVCR. Learning the remote control functions, playing a recorded tape, and recording a program should do just that. V However, there are other features that enhance the enjoyment of yourVCR, but they aren't necessary to get you started. If you want to learn more about yourVCR, just keep reading.
REMOTE Your backlit BUTTONS remote has a light button (0) that glows in the VCR1 dark. Press this button to light the buttons on the remote. The remote buttons remain lit when they are pressed within ON- OFF TV a few seconds of each other. If a button is not pressed within approximately seven seconds, the light turns off to conserve MUTE SEARCH battery power. The remote control is capable VCR.
VCR FUNCTION ANTENNA BUTTONS Switches the picture signal so that it either comes from the VCR or cable/antenna system. Turns VCR indicator in VCR display panel on or off. Arrow Buttons (,;>) Allow you to move through the menus, enter data, and change settings of selected features. CH + andchannel Selects next higher or lower channel CLEAR Resets time counter to 0:00:00. entries when setting the clock or a timer EDIT in the VCR's memory. Simultaneously Allows you to change recording.
SEARCH Displays MOVIE ADVANCE screen for prerecorded movies or displays index and Zero search menus on TV screen. Starts COMMERCIAL ADVANCE skipping SPEED Selects a recording STOP Stops the current VCR function playback, rewind, VCR1 during playback speed (SP or SLP). or fast forward. CVD and + Lets you manually TV "jitter" during stop-action FUNCTION ANTENNA SAT'CABLE SEARCH 0 Reduces (paused) playback.
PLAYING 1. A TAPE Tune the TV to your VCR viewing channel (3, 4, or TV's video input). 2. Insert a tape in the VCR. If the Auto Play feature is set to ON, the tape automatically begins playback • (if the safety tab on the cassette is removed). Press FWD or REV (FORWARD to position or REVERSE on the remote) the tape. • Press PLAY (if necessary) to begin tape play. • Press PAUSE for stop action.
RECORDING If you want to record something use basic recording. 1. that you're watching, you can Set the tape speed by pressing the SPEED button on the remote. (See "Tape Speed" in Setting Up the VCR section for information about tape speeds.) 2. Press the RECORD button to begin recording. 3. Press STOPto stop recording. If you just want to pause the recording during a commercial), CHECK THE No matter which press PAUSE instead of STOP.
SEVERAL RECORDING OPTIONS Now that the have been examined, recording necessary features steps it's time available to to to operate look suit at the various V the VCR different recording needs.
RECORDING FEATURES There are five ways to record programs: • Recording lets you press one button to start recording program (See VCR Basics section). • Express Recording (XPR) allows recording to start while a program is being watched, and automatically recording after a designated period of time. lets you program the VCR's front panel controls. Program Express stops a timer recording Timer Recording allows the VCR to be programmed automatic recording, predetermined time.
PROGRAM EXPRESS Program Express allows you to quickly program the VCR for a complete one-time recording using the VCR's control panel instead of the on-screen menus. The VCR automatically at the end of the recording. remote control menus. . turns off You can use the arrow keys on the or the VCR's front pane[ to move through these Insert a tape with the safety tab in place. Make sure the clock is set correctly. 2. Open the control door in the lower left corner of the VCR's front panel. 3.
TIMER RECORDINGS b_l_mm_n 3. _ 2 3 Review Use VCR 0 Exit _lox_n Existing Plus÷ _nnJ_ Progs. Code Select 1 to create a New Program. Timer HOW often program 4. should Clock must this 2 Daily 3 Weekdays (every 4 Weekly 0 Cancel day) (once 1 per week) (One The output of your cable box appears in the Channel item of the timer recording menu if you've set up theVCR for a cable box for all channels. to record.
TIMER RECORDING PROGRAMMING WITH VCR THE PLUS+ SYSTEM You can use VCR Plus+ to simplify timer programming by using the PlusCode" programming number shown in your local television programming guide. SETTING UP THE CHANNEL VCR 1 VCR 2 3 Timer Time MAIN / MENU I Plus+ Recordings LIST CHANNELS If you did not set up the VCR Plus+ channel it now. list, you can do 1. Display the CHANNELS menu from the VCR MAIN 2. Display the VCR Plus+ Channel 3.
IE])nfinu_d triJill prevlllu_ paA, eJ VCR PlusCode Enter (from 4. Number TV 412876 Press CLEAR Press MENU listing) to correct when done Press MENU to enter the VCR PlusCode system number. How often should program this record? Iiimmr 5. PLUS+ -- 2 Daily 3 Weekdays (every 4 Weekly 0 Cancel day) (M-F) (once per week) Indicate how often you want the program Program I (One Channel Start End Time Start Date Tape Speed Press Press time) 03 Time to be recorded.
STOPPING A TIMER RECORDING To stop or cancel a timer recording in progress (even an Express Recording): " Press and hold the STOP button for several seconds until STOP appears. REVIEWING AND CLEARING PROGRAMS To review programs that you have already set up: 1. Press 2 when the VCR MAIN MENU the TIMER RECORDINGS menu. TIMER I Create 3 Use 0 2.
RECORDING SAP BROADCAST (SECOND STEREO AUDIO TV OR PROGRAM) Some TV programs are broadcast with stereo audio or SAP (Second Audio Program/. 1. Turn on the TV and tune it to the VCR viewing channel (either 3, 4, or TV's video input). 2. Insert a tape with safety tab in place. 3. ff your VCR viewh_g channel is 3 or 4, make sure the VCR indicator appears in the VCR's display panel. If not, press TV,VCR on the VCR or ANTENNA on the remote to turn it on.
PLAYING BACK AUDIO ONLY To get stereo sound, connect the AUDIO OUT jacks of the VCR to the appropriate input on your amplifier or receiver. Do not use the phono input. Refer to your amplifier USING EDITING TWO VCRS TAPES FOR Use one VCR as the playback recording 1. , 3. or receiver user's guide. COPYING VCRand AND the other as the VCR. Caution: Turn on the TV and VCRs. Tune the TV to the VCR viewing video input).
USING DUAL REMOTE Use this VCR as the playback on the remote as described your other compatible respond to VCR1. WITH AUTOEDIT VCR and set it to respond to VCR2 in Setting Up the VCR section. VCR as the recording VCR, which 1. Follow step 1 4 in the "Using Two VCRs for Copying Editing Tapes." 2. Press VCR1 on remote to control recording should and VCR. Press RECORD (REC), then PAUSE, to put recording pause mode. VCR in 3. Press VCR2 on remote to control playback 4.
CONTROLLING OTHER The remote'sTV YOUR COMPONENTS... V and SAT, CABLE buttons can be programmed to control other brands of remote controllableTVs, digital satellite receivers, and cable boxes. The remote is already programmed to operate most ProScan, RCA, and GE televisions and satellite receivers. TheAUX button can be programmed V to control a ProScan or RCA auxiliary component.
ABOUT REMOTE PROGRAMMING THE The universal remote's TV and SAT.CABLE buttons can be programmed to control other brands of remote controlled TVs, digital satellite receivers, and cable boxes. Your remote is already programmed to operate most ProScan, RCA, and GE televisions as well as digital satellite receivers. The AUX button can be programmed RCA auxiliary component.
To cancel Code Search, press and hold CLEAR until the LED turns off. There are 20 total sets of codes. If the device does not turn off after pressing PLAY 20 times, the remote cannot control that particular If the component 1. component. you want to control does turn off: Press and release REVERSE, then wait two seconds. Repeat this step until the component turns back on. This means the remote has identified the correct code. 2. To finish, USING press and hold STOP until the LED turns off.
PROGRAMMING TO CONTROL COMPONENT THE REMOTE AN AUXILIARY 0N'0FF Your remote can also control the brands of the equipment listed, AUX such as a radio, CD player, tape player, or phonograph. It is already programmed to control some ProScan and RCA amplifiers and audio/video receivers. 1. Turn on the component 2. Look up your component's 3. Press and hold the AUX button. 4, Enter the 4-digit code from the code list on the next page. 5. to be programmed. code number on the code list.
Midland ......................................... 1054, 1151.I171,1172.1181 Archer ...................................................S008,5009, SOI 0, 501 I Minutz ...................................................................................... 1052 Cablezenna ............................................................................. 5008 Mitsubishi ............................................... 1004, 1005. 1006, 1019, Cab_eview ....................................................................
44
FEATURES VCR TO ENHANCE OPERATION Commercial V Advance Movie Advance Picture Search Options Pro-Tect Plus TM V Locking Tracking Time Counter V On-Screen Displays Audio Reception AudioTape Playback ¥ ¥ 16 OTHER FEATURES ¥ ¥ 45
COMMERCIAL ADVANCE The feature, Commercial Advance, is patented techno{ogy detects and marks most commercials recording ® that on your tape for any that is more than 15 minutes long. After recording, the VCR rewinds the tape to the beginning of the recording and determines where the commercials are located. It then marks the beginning and end of the detected when finished, commercial segments, and returns the tape to the end of the recording. It does not erase commercials from the tape.
PREFERENCES 3. 1 Remote 2 Auto Play: Control: OFF VCRI 3 Auto TV/VCR: OFF 4 EnergySaver: 2:00 5 Front BRIGHT G Tape 7 Set 0 Exit Panel: Speed: SLP Auto Repeat Press 7 to display the COMMERCIAL COMMERCIAL ADVANCE menu. ADVANCE I Marking: ON 2 Playback: AUTO 3 Display: BLUE 0 Exit Now you can select one of the COMMERCIALADVANCE features.
COMMERCIAL ADVANCE Press 2 to switch between • PLAYBACK Playback: AUTO and MANUAL. Select AUTO to have the VCR automatically through the blocks of marked commercials. * It works with most 30, 45, and 60-second * A commercial advance commercials. group starting with the first two minutes or last two minutes skipped.
MOVIE " ADVANCE e The Movie Advance feature helps you locate certain parts of prerecorded movies (rented or purchased). This feature works two ways: 1) you can go to the beginning of the movie, or, 2) you can skip from one preview to the next. The feature works only on cassettes recorded removed. 1. in the SP speed with the safety tab To select the Movie Advance safety tab removed feature, insert a tape with the and press SEARCH.
(('¢lnhnued • I_(_tn prevl_lu_ tl,lgl_; Press 1 to Go To Movie and bypass all previews. following screen MOVIE with a blue background: ADVANCE Searching of movie.., for Rewinding tape Press appears The STOP start to cancel When the movie is found, the following MOVIE screen is displayed: ADVANCE The movie is ready. Press PLAY to start. Press • STOP to cancel Press 2 to go to the first preview.
PICTURE SEARCH OPTIONS The most basic way to search during playback is using the FORWARD or REVERSE buttons (FWD and REV on the VCR). This section contains searching several other options available a tape. FORWARD AND REVERSE SEARCH You can search a tape during playback. during for Sound is turned off picture search, Search works well for tapes recorded at the SP or SLP speed. 1. Press FORWARD (FWD) to search forward or REVERSE (REV) to search in reverse. 2.
FRAME ADVANCE Frame advance lets you view one-stop action frame after another during playback. recorded 1. Frame advance works well for tapes at the SP or SLP speed. Press PAUSE on the remote (PLAY/PAUSE on the VCR to freeze the action. 2. Press FR. ADV on the remote each time you want to wew the next frame of the scene. 3. Press PAUSE or PLAY on the remote (PLAY/PAUSE on the VCR) to return to normal VARIABLE SPEED SHUTTLE playback.
INDEX SEARCH The VCR has a "VHS Index Search System" that automatically INDEX records an index mark on the tape every time you start a recording. During playback you can locate the program Press want to play by the number of index marks or by scanning. VCR will search forward or reverse from the location The you are on the tape. TO SEARCH l. Press STOP. 2. Press SEARCH on the remote to display the INDEX SEARCH screen on the TV screen. 3.
r( flntinlu'd 3. tronl prevunls pagel Press number buttons to enter the hour(s) and/or minutes of the counter reading you want the VCR to "go to". Press GO-TO CLEAR on the remote to correct an entry. Current 4. Press FWD to search forward 5. Press STOP to stop Go-To searching. PRO-TECT FEATURE PLUS or REV to search in reverse.
TIME COUNTER Hours Minutes / The time counter program or play back a segment of a recorded locate the beginning beginning program Seconds tape. It helps or end of l_rograms you taped. The time counter resets to 0:00:00 whenever the VCR. For example, 'b:3o=ooI shows the actual time it takes to record a the tape is ejected from if you record a 30-minute program at the of the tape and you want to go to the end of that to begin another recording, you would: 1.
SET-UP AUDIO FEATURES The audio setup features affect your tape playback recordings. AUDIO 1. menu and are shown in the displays Press MENU to bring up the VCR MAIN I 2 3 4 5 6 and The features in this section are accessed through the below. MENU. VCR MAIN MENU VCR Plus+ Timer Recordings Time Channels Setup Preferences 8 Language Q Exit 2. Press 7 to display the AUDIO menu. AUDIO II I • 2 Tape 0 Exit Playback: HI-FI Now you are ready to select an item from the menu to set up.
TAPE PLAYBACK The VCR records the same audio on both the Hi-Fi stereo and linear tracks on the tape. Hi-Fi sound is recorded on separate left and right stereo channels. Monaural sound is recorded on the linear track. Press 2 to switch between Tape Playback: HI-FI, LINEAR, and MIX. To enjoy Hi-Fi sound, connect amplifier/receiver your VCR to a stereo television or using the audio jacks. The Tape Playback feature lets you select which audio you play back.
58
THINGS KNOW TO CONNECTING PROTECT FROM COMPONENTS YOUR SURGES all components power cords turn before you connect AVOID before plugging any ¥ into the wall outlet. Always POSITION V COMPONENTS POWER Connect BEFORE off the TV and other or disconnect CABLES AUDIO components any cables. CORRECTLY HUM OR V TO INTERFERENCE Insert all cable plugs firmly into their lacks.
CONNECTING YOUR Refer to these pages to help you connect JACKS RF AND JACKS VCR your VCR. CABLES AND ANTENNA CABLES (F-TYPE) The RF jacks provide good picture and mono sound quality, and must be used if audio/video connections are not available for your TV. O RF Jack These jacks are required for antenna or cable-TV connections. The RF jacks on the VCR are labeled IN FROM ANT. and OUT TO TV. The antenna cable supplied connect input.
CHOOSING VCR A There are several different CONNECTION ways to connect your VCR, depending on whether or not you have cable service, if you have a cable box to see this service, whether some of the cable channels are scrambled, Five connections should provide and so on. are described in this section and one of them you with a VCR connection that works.
TV WITH RF JACK ONLY This connection assumes: • You are connecting • Your television antenna, cable, or cable box system. has only an RF input jack. This connection provides: • Mono sound playback • Record one channel while watching another (except when using a cable box for all channels). To use this connection, • from VCR. you must have: One coaxial cable for cable or antenna connection; cables for a cable box two To connect: 1. Connect cables as shown. 2.
TV WITH AUDIONIDEO JACKS This connection assumes: • You are connecting * Your television an antenna, has audio/video cable, or cable box system. jacks. This connection provides: • Stereo sound playback • Record one channel from VCR. while watching another (except when using a cable box for all channels). To use this connection, • (1) coaxial cable box you must have: cable for cable/antenna (3) audio/video connection; (2) for cables To connect: 1. Connect cables as shown. 2.
TV WITH TO UNSCRAMBLE AUDIO/VIDEO JACKS PAY AND CHANNELS CABLE BOX ONLY This connection assumes: • You are using a cable box only to unscramble channels. • Your TV has audio/video premium input jacks. This connection provides: • Stereo sound playback • Recording a scrambled or unscrambled channel through cable box while watching an unscrambled channel. To use this connection, • (3) coaxial • (3) audio/video • (1) splitter from VCR.
TV WITH RF JACK AND DIGITAL SATELLITE RECEIVER This connection assumes: • You have a basic digital not have audio/video This connection • provides: Mono sound playback receiver, and recording watching another. To use this connection, • satellite system and your TV does input jacks. from VCR, recordin from a satellite one off-air or cable channel while you must have: (4) coaxial cables and (3) audio/video cables To connect: 1. Connect cables as shown. 2.
TV WITH AUDIONIDEO SATELLITE RECEIVER This connection • DIGITAL assumes: system and your TV provides: Stereo sound playback while watching from VCR, recording cable or off-air channel, cable or off-air channel To use this connection, • AND You have an advanced digital satellite has audio/video input jacks. This connection • JACKS while watching from receiver and recording one another. you must have: (3) coaxial cables and (6) audio/video cables To connect: 1.
This section gives you some additional information the VCR, including a description and displays. about of the unit's controls V You will also find the section, TroubleshootingT_ps,and a question and answer section about Commercial Advance in this Appendix.These areas might help resolve some of those simple problems. V Finally, this section of the manual also contains your warranty information.
FRONT PANEL I \ ® (Front Panel door open) AUDIO K(,nlot{, (R and L MONO) camcorder CHANNEL*TRACKING channel and VIDEO when it is connected In Jacks _(,n_or Receives signals from another component like a VCR or to these jacks. Use INPUT to select L2 to record from these jacks. and Up • and Down • memory. Adjusts tracking Selects next higher or lower channel when a tape is playing. in the VCR's Used for program express and moving through menu system.
DISPLAY PANEL PWRTIMERHI-FI VCR PLR_ ' FuilcticJns Clock/Counter channels. FUNCTION BYE nn.nn, I_lU PM UU. ('/ock/Ci1uilter Displays current time, time counter, tape speed, or channel numbers when switching DISPLAYS: Power off CLOCK, TIMER, CHAN, Express Recording.
BACK PANEL [ '11 IG_LT___N CH. 3/4 switch Determines IL the channel be tuned in order to see the VCR's picture. connecting AUDIO R_T to which the TV must Not used when the VCR to the TV using Audio/Video (R and L/MONO) signals from another when connected and VIDEO component, IN jacks cables. Receives such as a VCR or camcorder, to these jacks. Use the INPUT button on the VCR or remote control to select the video line input (L1) and record from these jacks.
QUESTIONS AND COMMERCIAL THE WILL COMMERCIALS ARE COMMERCIALS Yes. The recorded MANUAL. WHAT THROUGH IF THE STILL RECORDED program, VCR including SCANS VCR SCAN THROUGH break is scanned through IF I WANT commercials, FORWARD OF RECORDINGS? segments until after recording ADVANCE commercial FEATURE ONLY ON PLAYBACK and mark commercial FAST DOES A COMMERCIAL In SLP tape speed, a 3-minute takes about 25-35 seconds. ABOUT ADVANCE BE SCANNED Yes.
TROUBLESHOOTING TIPS NO POWER • • Check to make sure it is plugged into an operating Check to make sure your connections are correct. VCR DOES RESPOND TO REMOTE • Press VCR1 (VCR2) to set remote to con.trol the VCR. • Check to make sure there are no objects between the VCR and remote. • The batteries may need changing. • Make sure to press the VCR1 or VCR2 button on the remote to operate the VCR--whichever corresponds to the Remote VCR1/VCR2 setting.
WILL NOT RECORD OR PLAY • Check to make sure there is a tape in the VCR. • Try ejecting • Check to make sure the tape is not broken. • Check to make sure the VCR is not in pause hlode. normal playback. Check the Pro-Tect Plus TM feature. • WILL • and reinserting the cassette. Press PAUSE or PLAY to return to NOT RECORD Check to make sure the safety tab is intact.
TAPE • PLAYS BACK IN SLOW Press PLAY to return to normal CASSETTE • OR TAPE feature is set to ON. FLASHES DISAPPEARS DURING MENUS APPEAR Check LANGUAGE SOUND DURING Must use the AUDIO/VIDEO AUDIO TOO NOISY Stereo signal is weak. Set Reception: • Press one of the TRACKING AND ZERO ACCESS STEREO/SAP/MONO SEARCH FEATURES MOVIE feature to MONO.
HOW TO FIND VIDEO YOUR TV's CHANNEL INPUT TV Button You need to tune your TV to the Video Input Channel using the VCR's AUDIO/VIDEO TV's AUDIO/VIDEO "channel" INPUT if you are OUT jacks to connect to the jacks. You must select this VCA1 ON'OFF before you can see the VCR's menus, the cable or antenna reception, and the content The Video Channel DVD that's on a tape. on TVs varies for different VCR2 AUX brands and MUTE different • models.
SPECIFICATIONS Format: VHS Record/Playback Video: System: Audio: VHS Hi-Fi record/playback 4-head system Video Signal System: EIA standard: NTSC color Antenna: 75-ohm external VHF/UHF combined antenna terminal Tuner: USA: 181 channels capability* (125 cable channels) Canada: 178 channels capability* (122 cable channels) Type: AutoProgramming Power Requirement: 120V AC, 60 Hz Power Consumption: 17 watts (standby < 3.3 watts) Dimensions: 3.
WARRANTY LIMITED What your warranty covers: Any defect in materials or workmanship. For I_ow long after your purchase: • 6 months for labor charges. • One year for parts. The warranty period for rental units begins with the first rental or 45 days from date of shipment to the rental firm, whichever comes first. What we will do: • • Pay any Authorized ProScan VCR Service Center the labor charges to repair your VCR.
GLOSSARY AutoEdit Lets you control two VCRs simuhaneously with a single remote. Useful when making a copy of a video tape. A/V Cables & Jacks Commonly Improves called "RCA-type" picture and sound quality. Required cables. for stereo audio. Code Search Simplifies programming the [emote control requiring you to identify and enter a code to operate a by not component. Commercial Advance tape playback.
A C Accessories Cable box codes 43 included 4 ADD/REMOVE CHANNELS screen 12 ANTENNA button 19, 25, 36, 61, 62, 63, 64, 65, 66 Arrow buttons 6, 24, 25, 68 Audio playback type 56 selecting 56 Audio code list 42 Audio features, set up 56 AUDIO menu 56 Cable box setup Cables 9 Date and time setting 12 Design specifications 76 types of 60 CH + and _ buttons Display panel 69 Displays, on screen 55 Dual remote with AutoEdit DVD button 24 positioning 59 38 25, 26, 40, 42 CHAN buttons II Channel 3/4 sw
I O R IN (FROM ANT) jack 4, 5, 6, 19, 37, 60, 61, 62, 65, 70 Included accessories 4 OK button 24 ON'OFF button REC button Index search OUT 53 Indicators in display panel 69 INFO button 15, 25, 26, 35, 55 INPUT button 5, 25, 32, 36, 37, 68, 75 J 24, 25, 26, 40, 42, 54 On-screen displays 55 (TO TV)jack 4,5,_ 19, 37, 60, 6i, 62, 65, 70 Overheating 59 P 51 2_ 27, 37, 3a 4Q 51, 52, 6Z 63, L PLAY display 69 PLAY/PAUSE button LI indicator 36, 37, 65, 66 L2 indicator 36, 37, 65, 66 LANGUAGE cho
Satellite receiver codes 43 Search forward 5 I reverse SI SEARCH button 26, 53 searching tapes Go-To 53 Sensor, remote 68 Set up auto play feature 19 autoTV/VCR feature 19 cable box 9 daylight-savings 13 EnergySaver feature 19 features in PREFERENCES menu 18 front panel (VCR display) 20 language feature 8 remoteVCRI/VCR2 option 18 tape speed feature 20 time and date 12 time and date manually 14 time zone 13 using menu system 8 VCR Plus+ channels 16 Shuttle ring 52, 68 Signaltype changing II selecting I I Sk
82
83
84
85
PROSCAN An RCA Entertainment Product If your VCR needs service, please contact your dealer or the nearest Service Center from the yellow pages. Please do not send any products to the Indianapolis address listed in this manual or on the carton. This will only add delays in service for your product. €4_"n.IOMSON CONSUMER ELECTRONICS 10330 North Meridian Indianapolis, Street IN 46290 © 2000 Thomson Consumer Electronics, Trademark(s)® Registere_ Marca(s) Registrada(s) MODEL Printed in the U.S.A.