RBA27500, RCA27000 USER’S GUIDE It is important to read this manual before operating this unit for the first time.
Important Information WARNING To reduce the risk of fire or shock hazard, do not expose this product to rain or moisture. WARNING RISK OF ELECTRIC SHOCK DO NOT OPEN TO REDUCE THE RISK OF ELECTRIC SHOCK, DO NOT REMOVE COVER (OR BACK). NO USER SERVICEABLE PARTS INSIDE. REFER SERVICING TO QUALIFIED SERVICE PERSONNEL. This symbol indicates “dangerous voltage” inside the product that presents a risk of electric shock or personal injury. This symbol indicates important instructions accompanying the product.
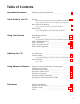
Table of Contents Important Information Warning, Product Registration Quick Guide to Your TV Startup ____________________________________ ____________________________________________________________________ i 2-3 Hook up your TV, Plug in the TV, Put Batteries in the Remote, Turn on the TV, Place Channels in Memory, Set the Time Basic Tour of the Remote 4 ____________________________________________ Power, Volume, Channel, Components buttons Menu Basics 5 ______________________________________
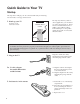
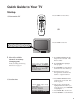
Quick Guide to Your TV Startup The steps below will get your TV connected and ready for watching. For more details, see the page numbers listed. 1. Hook up your TV Details are in the Connections Guide. Use This Book First! CONNECTIONS GUIDE THIS GUIDE SHOWS HOW TO HOOK UP YOUR TV Hook up any antennas, cables or other equipment to your TV before you follow the steps below. This is where to find the instructions for SVHS, a super VHS recording format that improves the picture quality.
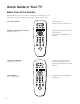
Quick Guide to Your TV Startup 4. Turn on the TV Press POWER on the remote. • VCR1 SAT CABLE TV POWER • VCR2 LD AUDIO REW PLAY FF STOP PAUSE DISPLAY CHAN SKIP VOL VOL REC CH A N MUTE PREV CH 1 2 3 4 5 6 7 8 INPUT 0 9 ME RESET OG NU ANTENNA • PR CLEAR OR MOVE MENU CH CH VOL– Press POWER on the TV. VOL+ POWER 5. Place all available 13 channels in memory (Autoprogram) Details for adding and deleting channels are on page 19.
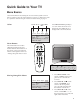
Quick Guide to Your TV Basic Tour of the Remote Basic information about your remote is shown below. This will give you a general idea of how your remote works. For more details, see pages 6–15. TV Power Button • VCR1 SAT CABLE TV POWER Sets the remote to control the TV. • VCR2 LD AUDIO REW Volume and Channel Controls PLAY FF REC STOP DISPLAY CHAN SKIP CH A N PREV CH PAUSE VOL VOL Details are on page 6.
Quick Guide to Your TV Menu Basics General information about using the on-screen menu system is shown below. Details on using the remote buttons are on pages 6-7. Many menu items are explained in detail in Using the Advanced Features starting on page 19. Colors Yellow Green Light White Blue 13 Press MENU•PROG repeatedly to see each of the four menu colors. Each menu has a different color background as shown at the left.
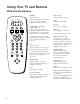
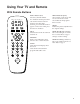
Using Your TV and Remote With Remote Buttons POWER Turns off the TV. • VCR1 SAT CABLE TV POWER Turns on a component after a component button is pressed. • VCR2 LD AUDIO REW PLAY FF STOP PAUSE DISPLAY CHAN SKIP VOL VOL REC CH A N MUTE PREV CH 1 2 3 4 5 6 7 8 9 OG ME • PR CLEAR 0 MOVE AUDIO, VCR1, VCR2•LD, SAT•CABLE, TV Sets the remote to control the component. VCR2•LD can only be programmed for one component: either a VCR or a Laserdisc Player.
Using Your TV and Remote With Remote Buttons Number Buttons (0-9) Selects any channel number. • VCR1 SAT CABLE TV POWER • VCR2 LD AUDIO REW PLAY FF STOP PAUSE DISPLAY CHAN SKIP VOL VOL REC CH A N MUTE PREV CH 1 2 3 4 5 6 7 8 9 ANTENNA Used as TV/VCR button when remote is set to control the VCR. Sets VCR clock and programs timer on VCR. RESET Returns the picture adjustments to the original settings. MOVE F and E (left and right) Moves left and right on a menu line.
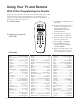
Using Your TV and Remote With VCRs: Programming the Remote Refer to the Connection Book or the VCR’s owners manual to hook up your VCRs. The remote may need to be programmed for your VCR, but may not operate all models of the brands listed below. Use the codes below or on the sheet packed in with your remote. 1. Test the remote • VCR1 SAT CABLE TV POWER • VCR2 LD AUDIO REW PLAY FF STOP CHAN PAUSE SKIP CH A N PREV CH your VCRs MUTE 1 2 3 4 5 6 7 8 9 INPUT 0 RESET D. Press POWER.
Using Your TV and Remote With VCRs: Setting the VCR 1 Channel The VCR 1 Channel works with VCR1 button on the remote. If the VCR 1 Channel is set, pressing VCR1 selects the channel to see the VCR picture. The VCR 1 Channel setting depends on which diagram you have used from the Connection Guide. If you want to turn this feature off, set the VCR 1 Channel to Disable. Refer to the chart below for your setting. 1.
Using Your TV and Remote With VCRs: Basic Operation If the remote operates your VCR, this page will show you how to use it for basic functions. See pages 6-7 for more details on buttons used with your VCR.
Using Your TV and Remote With a Satellite Receiver: Basic Operation You may also be able to use the TV’s remote with your satellite receiver. Refer to your Satellite Receiver owner’s manual to hook up your Satellite Receiver. The remote may need to be programmed for other brands of satellite receivers, but may not operate all models of the brands listed below. Use the codes below or on the sheet packed in with your remote. Follow the instructions below for basic operation of your receiver.
Using Your TV and Remote With a Cable Box: Programming and Basic Operation Refer to the Connection Book or contact your cable company to hook up your cable box. If you have a cable box with its own remote, then you may also be able to use the TV’s remote with your cable box. This remote may not operate all models of the brands listed below. Use the codes below or on the sheet packed in with your remote. Program the remote for your cable box • VCR1 SAT CABLE TV POWER • VCR2 LD AUDIO REW PLAY FF A.
Using Your TV and Remote With a Cable Box: Setting the Cable Channel The Cable Channel works with SAT•CABLE button on the remote. If the Cable Channel is set, pressing SAT•CABLE selects the channel to see cable channels. The Cable Channel setting depends on which channel your cable box must be on to see cable channels. The channels usually used are 02, 03, 04, 05 or 06. Consult your cable company for more information. 1.
Using Your TV and Remote With a Laserdisc Player: Programming and Basic Operation Refer to your Laserdisc Player owner’s manual to hook up your Laserdisc Player. The remote may need to be programmed for your laserdisc player, but may not operate all models of the brands listed below. Use the codes below or on the sheet packed in with your remote. Program the remote for your Laserdisc Player • VCR1 SAT CABLE TV POWER • B. Enter the code for your brand from the code list below.
Using Your TV and Remote With Audio Equipment: Programming and Basic Operation Refer to the Connection Book or your Audio equipment owner’s manual to hook up your audio equipment. Your remote controls some audio equipment such as a radio, CD player, tape player, turntable, or amplifier. The remote may need to be programmed for your equipment, but may not operate all models of the brands listed below. Use the codes below or on the sheet packed in with your remote. A.
Adjusting Your TV Overall Picture Follow the steps below to lighten or darken the overall picture without changing the color levels. 1. Select the Controls Menu Press MENU•PROG to select the Controls menu. This menu is yellow. Controls Alarm Adjust Setup Sleep Timer: -:-Closed Captioning: Off Picture -..... I .....+ Stereo: On Tone: High Press MOVE H to highlight Picture. 2. Highlight Picture Controls Alarm Adjust Setup Sleep Timer: -:-Closed Captioning: Off Picture -..... I .....
Adjusting Your TV Picture Settings Follow the steps below to change the picture on the screen to your personal setting. The chart at the bottom of the page explains your options. Press MENU•PROG repeatedly to select the Adjust menu. This menu is light blue. 1. Select the Adjust Menu 2. Highlight item to change Controls Alarm Adjust Setup Color -..... I .....+ Tint G..... I .....R Bright -..... I .....+ Sharp -..... I .....+ Autocolor: On Press MOVE H to highlight the picture item you want to adjust.
Adjusting Your TV Sound Settings: Stereo and Tone Follow these steps to adjust the Stereo or Tone of your TV. The chart below explains your options. XS® Stereo An Innovative Method for Providing Stereo Sound Effect The sound delivered by your television is XS® Stereo. This patented process suppresses noise, restores the dynamic range and electronically expands the stereo signal to create a more spacious sound effect. Press MENU•PROG to select the Controls menu. This menu is yellow. 1.
Using Advanced Features Placing Channels in Memory (Autoprogramming) Only channels 2–13 appear in the TV’s memory when you first turn it on. The channels available in your area must be programmed into the TV's memory when you hook up your TV. Using CHANNEL up and down allows you to scan through these channels. You may want to add or delete a few channels if some stations have weak signals or were off the air when the TV was programmed. Refer to the Add or Delete Channels section below. 1.
Using Advanced Features Naming the Channels You can name at least 20 channels with four characters in each name. Full appears beside Label when the memory is used up. Fixed appears when a channel number cannot be named. Below are the characters that can be used in a name. 1.
Using Advanced Features Setting the Sleep Timer You can set your TV to turn itself off. If you’re watching TV at night and fall asleep, the TV will turn off for you. A. Press MENU to select the Controls menu and highlight Sleep Timer. This menu is yellow. 1. Set Sleep Timer Controls Alarm Adjust Setup Sleep Timer: – : –– Closed Captioning: Off Picture -..... I .....+ Stereo: On Tone: High 11:00 PM Sleep B. Press VOLUME + to enter the amount of time you want to watch TV before it shuts off.
Using Advanced Features Setting the Alarm Clock The TV can be set to turn on each day like your alarm clock. You can set it to turn on to your favorite channel at a certain time. You can also set it to turn itself off again. The Alarm cannot be used until the clock is set. 1. Turn on the Alarm 12:34 AM Alarm 13 Controls Alarm Adjust Setup Alarm: On Alarm Channel: 07 On Time: Disabled Off Time: Disabled Clock: 12 : 34 AM 2.
Using Advanced Features Selecting a Language The on-screen displays in this TV can be displayed in three languages: English, Spanish, and Portuguese. When you select a language, most of the displays will be shown on the screen in your preferred language. 13 1. Select the Setup menu 2. Select Language Controls Alarm Adjust Setup English Français Português Autoprogram Label: 13 Clear Channel Memory: 13 Stored Cable/Air: Cable Press MENU•PROG repeatedly to select the Setup menu. This menu is white.
Using Advanced Features Setting Your TV for Antenna or Cable Your TV automatically adjusts this feature when the TV places channels in memory (Autoprogram). Follow the steps below to change the setting as needed. 1. Select the Setup menu 13 Press MENU•PROG repeatedly to select the Setup menu. This menu is white. Controls Alarm Adjust Setup English Français Português Autoprogram Label: 13 Clear Channel Memory: 13 Stored Cable/Air: Cable 2. Highlight Cable/Air 13 Press MOVE H to highlight Cable/Air.
References Front Panel Buttons The CHANNEL up and down and VOL + and - buttons, not only change the channels and volume of the TV, but work like the MOVE buttons when you are in the TV Menu. For details on using buttons with menus, see Menu Basics on page 5. MENU CH MENU CH VOL– VOL+ POWER Shows menus on screen. Moves from menu to menu. CH 2 and 1 Channel up and down. Scans up and down through channels in the TV’s memory. Moves up and down menus.
References Displays on the Screen Your TV shows the settings of several features on the screen. To see what features have been set on your TV, press DISPLAY on the remote. 12:00 AM Alarm Sleep KNBC 13 Volume – . . . . . . . I . . . . . . . + Mute Stereo 1:55 26 or Video 00 or Unusable Signal Screen Display Description 12:00 AM Time of the clock. Details are on page 3. KNBC Name you chose to describe the channel. Details are on page 20. 13 Channel number you are watching.
References Trouble Checks You may have problems that can be fixed with a few minor adjustments. Look for the type of problem you are having below and then try the suggestions to get your TV going again. Trouble Checks and Adjustments Power TV will not turn on Plug TV in. Plug something else into the outlet to make sure it is working. Make sure batteries in the remote are not dead. Aim the remote at the TV and press POWER. Make sure batteries are placed in the remote the right way.
References Trouble Checks Trouble Checks and Adjustments Remote Buttons don’t work when you press them Press TV to set the remote to control the TV. See buttons on page 6. Remote lockup Remove batteries and hold down one or more buttons for several seconds to drain the microprocessor inside the remote and reset it. Re-install the batteries and try remote again. Works part or none of the time Clear the path between the remote and TV of any objects.
References Index A Adjust Menu Autocolor...................................17 Bright..........................................17 Color...........................................17 Picture Reset..............................17 Sharpness...................................17 Tint..............................................17 Air or Cable Feature....................24 Alarm Clock .................................22 Alarm Display..............................26 Alarm Menu .................................
Printed in the U.S.A.