digital video disc player the ultimate movie experience! user's manual RC5231Z RC5200P
CAUTION RISK OF ELECTRIC SHOCK DO NOT OPEN TO REDUCE THE RISK OF ELECTRIC SHOCK, DO NOT REMOVE THE COVER (OR BACK). NO USERSERVICEABLE PARTS ARE INSIDE. REFER SERVICING TO QUALIFIED SERVICE PERSONNEL. This symbol indicates “dangerous voltage” inside the product that presents a risk of electric shock or personal injury CAUTION: . CAUTION CAUTIONS Caution: To prevent electric shock, match wide blade of plug to wide slot, fully insert.
Table of Contents Setup & Connections ..................................... 3 Unpack the Box ................................................................ 4 Install Batteries in the Remote ......................................... 4 Important Battery Information ......................................... 4 Types of Discs the Player Can Play ................................. 5 Consider the Location of Your Player ............................. 5 Protect Components from Power Surges ........................
Table of Contents Changing the Menu Language .................................... 57 Display ......................................................................... 58 Sound ........................................................................... 59 Audio Equipment ........................................................ 60 The System Test .......................................................... 60 Glossary .......................................................................... 61 Divx ...........
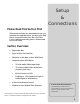
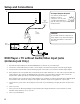
Setup & Connections Please Read This Section First This section includes key information to get you started in the right direction. You’ll get your DVD Player set up and connected. The rest of this User’s Guide discusses the player’s features and how to use them.
Setup and Connections Unpack the Box Carefully unpack the items in the box: • DVD player • Remote control and batteries • Audio/Video cables • S-Video cable • Power cord • Telephone line cord • Telephone jack splitter (2-in-1 Modular Adapter) Install Batteries in the Remote 1. Open the battery door on the back of the remote. 2. Insert fresh batteries. Make sure that the polarities (+ and –) are aligned correctly. 3. Replace the battery door.
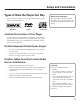
Setup and Connections Types of Discs the Player Can Play This DVD Player is capable of playing the following types of discs with the corresponding logos. Divx discs DVDs DO NOT Use CD-R Discs! The wavelength of the pickup of this DVD Player may cause CD-R discs to be erased. DO NOT play CD-R discs in this player! Audio CDs Consider the Location of Your Player You must connect your DVD Player to a telephone jack in order to play Divx discs.
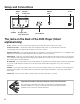
Setup and Connections VIDEO OUT DIGITAL AUDIO OUT VIDEO OUT S-VIDEO S-VIDEO PHONE JACK AC IN AUDIO OUT R L DIGITAL AUDIO OUT R (right) and L (left) AUDIO OUT RF ADAPTER AC IN PHONE JACK RF ADAPTER The Jacks on the Back of the DVD Player (listed alphabetically) AC IN – Insert the AC power cord into the DVD Player and plug the other end into an AC outlet.
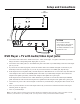
Setup and Connections CABLE OR OFF-AIR SIGNAL TV AUDIO OUT R L AUDIO IN VIDEO IN L ANT IN R S-Vid eo ca ble i s opt iona l S-VIDEO DVD PLAYER VIDEO OUT OUT S-VIDEO CAUTION AUDIO OUT L L DIGITAL AUDIO OUT RF ADAPTER AC IN PHONE JACK To AC Outlet Do not stack electronic components or other objects on top of the DVD Player. See Safety Information on the inside front cover. To Telephone Outlet DVD Player + TV with Audio/Video Input Jacks 1.
Setup and Connections TV RF Output Adapter Required ANT IN CABLE OR OFF-AIR SIGNAL RF OUTPUT ADAPTER You must buy an RF Output Adapter to use this connection. You can order your RF Output Adapter on page 89, or buy one at your local electronics store. CAUTION Do not stack electronic components or other objects on top of the DVD Player. See Safety Information on the inside front cover.
Setup and Connections TV AUDIO OUT Don’t Connect VCR directly to Your DVD Player R L AUDIO IN VIDEO IN L ANT IN R Many DVD discs are encoded with copy protection. Because of this, you should only connect your DVD Player directly to your TV, not to a VCR. Connecting to a VCR results in a distorted picture from copy-protected discs.
Setup and Connections DVD Player + TV + Dolby Pro Logic or Dolby Digital or DTS Receiver To Connect the DVD Player 1. Connect the left and right audio cables to your audio/video receiver and to the AUDIO OUT L (left – white) and R (right – red) jacks on the back of your DVD Player. 2. If you have a Dolby Digital or DTS receiver, insert an optical digital cable (not provided) to the DIGITAL AUDIO OUT jack on the DVD Player and to the Digital Input jack on the back of the receiver.
Setup and Connections DVD Player + TV + Dolby Pro Logic or Dolby Digital or DTS Receiver CABLE OR OFF-AIR SIGNAL TV AUDIO OUT R L AUDIO IN VIDEO IN L ANT IN R S-Vid eo ca ble i s opt iona l S-VIDEO DVD PLAYER VIDEO OUT S-VIDEO AUDIO OUT R L DIGITAL AUDIO OUT RF ADAPTER AC IN PHONE JACK To AC Outlet To Telephone Outlet AUDIO/VIDEO RECEIVER DIGITAL IN AUDIO IN L R CAUTION Do not stack electronic components or other objects on top of the DVD Player.
Setup and Connections Set the Menu Language After you turn on your DVD Player the first time, the menu language screen appears. By default, the player’s menu language is set to English. If you want the on-screen menus to appear in English, press OK. To change the language, press the down arrow button on the remote until the appropriate language is highlighted. Press OK. Other Language Options The Menu Language feature sets the language for the text that appears on the menu screens.
Setup and Connections Register with Divx In order to play Divx discs, you must register your player with Divx. Turn on your TV and your DVD Player. 1. Turn your TV to its Video Input Channel (if you don’t know which channel on your TV is the Video Input Channel, see page 14). 2. If the DVD Player’s main menu (shown at right) isn’t on the screen, press STOP on the remote. 3. Press the arrow down button until Divx is highlighted, and press OK (the registration screen appears).
Setup and Connections How to Find Your TV’s Video Input Channel You need to tune your TV to the Video Input Channel (or S-Video Channel if you connected the S-Video cable to your TV and to your DVD Player) to see the DVD Player’s menu and to see the content that’s on a disc. The video channel on TVs varies for different brands and different models. Below are some things to try. If your TV brand is RCA, GE, or PROSCAN, press the TV button on the remote that came with your DVD Player.
Setup and Connections Tour of the Remote Control You can use this remote to control compatible components. The component buttons are programmed to operate most PROSCAN, RCA, and GE components. The remote can also operate other brands of electronics components, but you must manually program it to do so. (See “Programming the Remote” on page 84.) DVD Press this button to turn on the DVD Player and to set the remote to control the DVD Player.
Setup and Connections Other Remote Control Buttons (listed alphabetically) DVD ANTENNA Lets you change the source of the video signal from satellite signals to an off-air antenna or cable signal and vice versa. VOL CH + CH REPEAT GO BACK GUIDE INFO OK Example: When the remote is operating the DVD Player, pressing CH+ takes you to the beginning of the next chapter or track on the disc. When the remote is operating the TV, pressing CH+ takes you to the next channel.
Setup and Connections FRAME- Takes you to the previous frame when you’re playing a disc. GO BACK When you’re using the DVD Player’s menu system, press this button to return to the preceding menu screen. DVD GUIDE Allows you to see the titles that are available on the current disc (if the disc contains a guide menu). INPUT VCR2 VOL CH + CH REPEAT GO BACK GUIDE INFO OK MENU Press this button to see the disc’s menu when you’re playing a disc (press it again to resume playback).
Setup and Connections Helpful Hints about the Remote Pick the Right Mode VCR2 PLAY MODE MUTE Component buttons: VCR1, TV, DVD, VCR2, AUX, SAT•CABLE AUX SAT CABLE CH + VOL The Universal Remote Control packed with your player is able to operate many different components, but you have to tell the remote which component you want it to operate. If the remote is operating the TV, it’s in TV mode. If it’s operating the VCR, it’s in VCR mode, etc.
Playing Digital Video Discs A New Way of Looking At Things In this section you’ll learn how to use your DVD Player to play Digital Video Discs. Detailed information about Divx discs in the next section. You’ll use the on-screen Info Display while you’re playing a disc to use the different playback features of each disc. Please remember, an Info Display option will only work if the disc was programmed to support that option when it was made.
Playing Digital Video Discs Loading and Playing a Disc • Video CDs • Laserdiscs • CD-I, CD-ROM, CD-R, DVD-ROM • MiniDiscs • Discs recorded using other broadcast standards (i.e. PAL or SECAM) This is a single-sided disc (label side up) Label 1. Press the OPEN•CLOSE button on the front of the DVD Player (the disc tray opens). 2. Place a disc gently into the tray with the disc’s label facing up (double-sided discs have a label on both sides near the center). 3.
Playing Digital Video Discs Using a Disc Menu ON OFF VCR1 A disc is capable of having a menu—its own on-screen menu system is separate from the player’s menu system. The disc menu may allow you to change features such as language and playback settings. DVD VCR2 AUX SAT CABLE PLAY MODE MUTE CH + VOL V OL Although the content and operation of disc menus vary from disc to disc, the following example should give you a pretty good idea of what to expect. TV CH - 1.
Playing Digital Video Discs Disc Playback Features DVD Fast Motion Playback (Picture Scan) 1. 2. VCR2 VOL CH + CH - REPEAT GO BACK GUIDE INFO Press the REVERSE or FORWARD button on the remote when you’re playing a disc. OK SELECT Press the button again to scan at a faster speed. Press the PLAY button at any time to resume normal playback. Notes: AUX SAT CABLE PLAY MODE MUTE MENU CLEAR 3 2 1 3.
Playing Digital Video Discs Using the On-Screen Info Display The on-screen Info Display contains many playback features. To see the Info Display, press INFO while a disc is playing. Use the arrow buttons to move through the different features in the Info Display. Each feature is illustrated with an icon. Use the arrow buttons to highlight an Info Display icon. When an icon is highlighted, press OK to select it. Please remember, you can only access the Info Display when you’re playing a disc.
Playing Digital Video Discs Selecting a Chapter Because DVD discs use digital technology, a title can be divided into individual chapters (similar to tracks on a CD). You can skip to a specific chapter by using the Chapter section in the Info Display. 2. While a disc is playing, press INFO on the remote. 3. Press the arrow right button until the Chapter icon is highlighted. 4. Use the number buttons on the remote to enter the number of the chapter you want to play. 5. Press OK.
Playing Digital Video Discs Selecting Different Play Modes ON OFF VCR1 DVD VCR2 TV AUX SAT CABLE There are three play modes available in the Info Display: PLAY MODE MUTE • Random • Program CH - To change the way a disc plays: 1. 2. Press INFO on the remote. Press the arrow right button until the Play Mode icon is highlighted, and press OK (the Play Mode menu appears). CH + VOL Standard VOL • REPEAT GO BACK GUIDE INFO OK Arrow buttons SELECT MENU 3.
Playing Digital Video Discs To Use Repeat: ON OFF VCR1 Make sure your remote control is in DVD mode (by pressing the DVD button on the remote). While a disc is playing, press INFO on the remote (the Info Display appears). 3. Press the right arrow button until the Repeat icon is highlighted. Press OK (the Repeat menu appears). VCR2 AUX SAT CABLE PLAY MODE MUTE CH + VOL 2. DVD TV VOL 1. CH - REPEAT button REPEAT GO BACK GUIDE INFO INFO button OK SELECT 4.
Playing Digital Video Discs How to Cancel Repeat ON OFF VCR1 TV There are three ways to cancel Repeat: DVD • Go to the Repeat Menu in the Info Display and select Off. • Eject the disc. VCR2 AUX SAT CABLE PLAY MODE MUTE CH + VOL Press STOP twice. VOL • CH - Changing the Subtitle Language REPEAT GO BACK GUIDE INFO INFO button OK You can change the Subtitle language while you’re watching a disc (but only if the disc was created with subtitles). 1. 2.
Playing Digital Video Discs Changing the Audio Language ON OFF VCR1 DVD If the disc was created with different language tracks, you can use the Info Display to temporarily change the DVD Player’s Audio setting. 2. Press INFO on the remote. Press the arrow right button until the Audio icon on the Info Display is highlighted. 3. PLAY MODE MUTE CH + VOL Make sure your remote control is in DVD mode (by pressing the DVD button on the remote). AUX SAT CABLE VOL 1.
Playing Digital Video Discs Changing the Camera Angle DVD Some discs contain multiple angles of a particular scene or sequence. If the disc only has one angle, this feature won’t work. 2. While a disc is playing, press INFO on the remote (the Info Display appears). 3. AUX SAT CABLE PLAY MODE MUTE CH + VOL Make sure your remote control is in DVD mode (by pressing the DVD button on the remote). VCR2 TV VOL 1.
Playing Digital Video Discs Storing a Bookmark (continued from previous page) 3. Use the right arrow button to highlight the Bookmark icon. 4. Press OK (the Bookmark Menu appears). 5. When you reach the scene you want to mark, press OK. 6. Press the arrow down button to highlight Done. Press OK. 7. Press CLEAR on the remote to make the Info Display disappear from the screen. Recalling a Bookmarked Scene 1. While you’re playing a disc, press INFO on the remote (the Info Display appears). 2.
Your Divx1-enhanced DVD Player provides you with the newest in home entertainment technology. The Divx feature enables you to enjoy your favorite movies at home with convenience, flexibility, and affordability. To use the Divx feature, please make sure that you have connected a working telephone line to your DVD Player and that you have registered with Divx: 1-888-NEW-DIVX (1-888-639-3489). Instructions for Divx Registration are in the “Setup and Connections” section, page 13.
All About Divx How to Play Divx Discs 1. Turn on your DVD Player. 2. Press OPEN•CLOSE on your DVD Player. 3. Place the Divx disc into the tray (Divx logo facing up and make sure the disc lays flat). 4. Press PLAY on your remote (the disc tray closes). Connect the Telephone Line Cord You must connect the telephone line cord to the back of your DVD Player and to a working phone jack in order to use all of the Divx features. (See p. 4).
All About Divx View Movie Settings View Movie Settings shows the rating level and format selected for the Divx disc that’s in your player. To see the Movie Settings: 1. Insert a Divx disc into the player and press OPEN•CLOSE. Highlight the View Movie Settings option on the authorization menu and press OK. (See p. 32.) – – OR – – 1. While you’re playing a Divx disc, press MENU on the remote (the disc menu appears). 2.
All About Divx View Movie Status View Movie Status shows you how much time, if any, is remaining on the Divx disc’s viewing period. To see Movie Status: 1. While you’re playing a Divx disc, press MENU on the remote. 2. Press the appropriate arrow button(s) on the remote to highlight View Movie Status and press the OK button on the remote (the Movie Status menu appears). 3. To exit the Movie Status menu, press OK on the remote. 4.
All About Divx 3. If you agree with the price to convert the disc, press OK on the remote (the terms of purchase appear on the screen). 4. If you agree with the terms, press OK (the main menu appears). If you don’t want to convert the disc at this time, use the appropriate arrow button on the remote to highlight Cancel. Press OK. 5. $15.00 Press the appropriate arrow button(s) to highlight Resume Play, and press OK.
All About Divx All About Divx Mail Divx Mail provides you with general information about your Divx account, coming attractions, and Divx retailers in your area. The telephone line cord you connected to your player enables your player to update Divx mail. Divx Mail icon The front panel display on your DVD Player signals you if you have new mail (the envelope icon lights up). How to View a Divx Mail Message You access Divx mail from your DVD Player’s main menu. 1.
All About Divx How to Erase A Mail Message There are two ways to erase a mail message: • from the first mail menu screen (the Mail summary screen) • when the entire message is on the screen To erase the message from the Mail summary screen: 1. Press the arrow up or down button on the remote to highlight the message you want to erase. 2. Press the arrow right button and the arrow down button to highlight Erase. Press OK. 3. Highlight Exit and press OK to return to the previous menu.
All About Divx Viewing a Specials Message Specials messages describe special promotions, special offers, maybe even contests. 1. If a disc is playing, press STOP (The DVD Player’s main menu appears). 2. Press the arrow down button to highlight Divx and press OK (the Divx choices appear). 3. Press the arrow up button to highlight Specials and press OK (the Specials summary screen appears). 4.
All About Divx Viewing Your Divx Statement Your Electronic Statement can be viewed on your TV screen, for up to three months after the statement date. (If you prefer, you may call the Divx Customer Service Center to request a printed copy of your statement.) To see your statement: 1. If a disc is playing, press STOP (The DVD Player’s main menu appears). If you’re not playing a disc, make sure the player is on and press the DVD button on the remote (the DVD Player’s main menu appears). 2.
All About Divx How to Set a Dialing Prefix If you have to dial a special number to get an outside line, then you need to tell your Divx Player what that number is so it can communicate with Divx. 1. If a disc is playing, press STOP (The DVD Player’s main menu appears). If you’re not playing a disc, make sure the player is on and press the DVD button (the DVD Player’s main menu appears). 2. Press the arrow down button to highlight Divx and press OK (the Divx selections appear). 3.
All About Divx How to Get Help (Customer Service) Before you call Divx for help, please check the following: • Make sure a working telephone line is connected to your DVD Player. • Check the troubleshooting section (pages 74-77) to see if some solutions to your problem are listed there. To access Divx Customer Service: 1. If a disc is playing, press STOP (The DVD Player’s main menu appears).
All About Divx How to Set Divx Limits Divx Limits enables you to set rating limits for Divx discs, restrict purchases of Divx discs (DivxSilver), and restrict purchases of additional viewing periods (Rentals). All of the settings for Divx Limits are in the Lock section of the DVD Player’s main menu. Your DVD Player must be locked in order for the Divx Limits to be enforced. See page 50 for instructions on locking your player. To Set Rating Limits 1.
All About Divx To Restrict Rentals You can purchase an additional viewing period after you’ve used your initial viewing period. To restrict purchases, you can set your player to require a password before an additional viewing period can be purchased. 1. If a disc is playing, press STOP (the DVD Player’s main menu appears). If you’re not playing a disc, make sure the player is on and press the DVD button on the remote (the DVD Player’s main menu appears). 2.
All About Divx Important Account Information If you move or change your phone number If you move to another residence or change phone numbers, please call Divx at 1-888-456-DIVX (1-888-456-3489) so your account information can be updated properly. If you dispose of your player If you dispose of your player (i.e., sell it or give it away), it is imperative that you disconnect from Divx properly to ensure that you are not billed for Divx services that were incurred by somebody else.
Using the Features in the Menu System Putting You In Control This section describes other features and settings that are accessed in your DVD Player’s main menu. This menu system lets you customize your DVD player — set up rating limits, choose various language preferences, change the TV image setting, and more! I’ve written specific steps for each menu item, but you can also play around with the menus by following a couple of navigational rules that are described on the next page.
Using the Features in the Menu System Let’s Talk About Navigation ON OFF VCR1 How to use your Remote to Move through the Player’s Menu System DVD VCR2 VOL CH + VOL Highlighted means that a particular item stands out from the other items on the screen. In your DVD Player’s menu system, a highlighted item appears brighter than the other options on the screen. CH REPEAT GO BACK GUIDE INFO Press OK to choose an item that you’ve highlighted.
Using the Features in the Menu System Static menu items are used in two ways: With a static menu item, what you see is what you get. When a static menu is highlighted, press OK and that action is taken. Disc Guide on your player’s menu system is an example of a static menu item. Press OK when Disc Guide is highlighted, the disc guide (the disc’s menu) appears. Sometimes a static menu is used as a “toggle.” You highlight the static menu, press OK, and the selection changes from one choice to another.
Using the Features in the Menu System The Play Menu Options The DVD Player’s Play menu enables you to choose different ways to play the disc. To see the Play menu options, a disc must be in the DVD player. 1. Make sure your remote is in DVD mode (press the DVD button). 2. If the disc is playing, press STOP (the DVD Player’s main menu appears). 3. If the Play path item isn’t highlighted, press the up arrow button to highlight it. 4. Press OK (the Play menu items appear).
Using the Features in the Menu System How to Delete or Edit a Program: 1. After selecting the Play menu, press the arrow down button until Edit Program is highlighted. 2. Press OK (the Playlist menu appears). Press the appropriate arrow buttons to highlight the entry in the playlist that you want to delete. Press OK. 3. Press the appropriate arrow button to highlight Delete. 4. Press OK (the playlist item that is highlighted is deleted). 5. Continue deleting playlist items as explained above.
Using the Features in the Menu System How to Use the Lock Menu The padlock icon tells you whether your player is locked or unlocked. Locked: A password is needed in order to play discs that aren’t included in the rating limits you have set. Nobody can access the Lock Menu items (Unlock Player, Change Password, etc.) without entering the password. Unlocked: A password isn’t required to play discs. To Lock your DVD Player: 1. Make sure your remote is in DVD mode (press the DVD button). 2.
Using the Features in the Menu System To Unlock the Player: 1. Make sure your remote is in DVD mode (press the DVD button). 2. If the disc is playing, press STOP (the DVD Player’s main menu appears). 3. Press the arrow down button until Lock is highlighted. 4. Press OK (Enter Password appears on the screen). 5. Enter your password and press OK. 4. Use the arrow button to highlight Unlock Player and press OK (the lock icon appears unlocked).
Using the Features in the Menu System How to Set Divx Limits All of the Divx features are explained in the section called “All About Divx.” How to set Divx Limits is on page 42. Setting the Rating Limit The DVD Limits feature is a rating limit system. It works in conjunction with DVDs that have been assigned a rating—which helps you control the types of DVDs that your family watches. How to Set DVD Limits 1. Make sure your remote is in DVD mode (press the DVD button). 2.
Using the Features in the Menu System Rated Titles This part of DVD Limits lets you determine how your player will react to discs that contain movies that are rated (in the U.S.A. the Motion Pictures Association of America rates movies as G, PG, PG-13, etc.) You decide which ratings require a password and which ones don’t. This system ranks the ratings 1 through 8 in order to accommodate different countries’ ratings systems (1 is considered a movie title with the least offensive material). 1.
Using the Features in the Menu System Unrated Titles: Some Titles (movies) aren’t rated. You decide how you want the DVD Limits feature of your player to handle these discs: free access or password required. To choose the Unrated Titles options: 1. Highlight DVD Limits within the Lock menu, and press OK. 2. Press the arrow down button until Unrated Titles is highlighted. 3. Press OK (the Unrated Titles options appear). 4.
Using the Features in the Menu System Changing the Audio Language Preference The Audio Language menu enables you to choose which language you want the discs to use. 1. From the Language Prefs menu (within the Setup menu), press the arrow up button to highlight Audio. 2. Press OK (the audio language options appear). 3. Press the arrow up or down button until the language you want to use for the audio portion of each title is highlighted. 4.
Using the Features in the Menu System Changing the Subtitle Language Preference The Subtitles menu enables you to choose the language of the subtitles. 1. From the Language Prefs menu (within the Setup menu), press the arrow down button to highlight Subtitles. 2. Press OK (the subtitle options appear). 3. Press the arrow up or down button until the language you want to use for the subtitles of each title is highlighted. 4.
Using the Features in the Menu System Changing the Menu Language You can choose one of three languages for the text that appears within the on-screen menu system. 1. From the Language Prefs menu (within the Setup menu), press the arrow down button until Menu is highlighted. 2. Press OK (the language choices for the DVD Player’s menu appear). 3. Press the arrow up or down button until the language you want to use for the menu items is highlighted. 4.
Using the Features in the Menu System Display The display menu contains the settings for your TV and the illumination of the front panel. TV Image The TV Image menu adjusts the way a movie appears on your TV. Standard TVs are 4 x 3 format. Depending on the type of television you have, you may want to adjust the screen setting (also called, the aspect ratio). 1. From the DVD Player’s main menu (player ON, no disc playing), press the arrow down button until Setup is highlighted.
Using the Features in the Menu System 4. Press the arrow up and down buttons to highlight the setting you want to use. 5. Press OK (the previous menu appears with your selection next to the Front Display path menu). 6. Press CLEAR to return to the main menu or press GO BACK to return to the previous menu screen. Note: When you set Front Display to Auto, the display is dim when the player is off and bright when the player is on.
Using the Features in the Menu System Audio Equipment If you’ve connected a Dolby Pro Logic, Dolby Digital, or DTS receiver, you must adjust this setting. 1. From the DVD Player’s main menu (player ON, no disc playing), press the arrow down button until Setup is highlighted. Press OK (the Setup selections appear). 2. Press the arrow down button until Sound is highlighted. Press OK (the Sound Logic menu and the Audio Equipment menu appear on the screen). 3.
Using the Features in the Menu System Glossary The glossary contains information about the features and controls on your DVD Player. 1. Make sure your remote is in DVD mode (press the DVD button). 2. If the disc is playing, press STOP (the DVD Player’s main menu appears). 3. Press the arrow down button until Glossary is highlighted. 4. Press OK (the Glossary appears). 5.
Language Codes Don’t forget to press the OK button after you enter the code.
Playing CDs Just Like Your CD Player If you’ve used a CD player, you’ll probably notice that your DVD player has many of the same features as a CD player. This section explains how to play CDs and how to use the on-screen Info Display to access various playback features.
Playing Audio CDs Loading and Playing an Audio CD Before you load a disc, make sure that it is compatible with the player. Note that the following discs CANNOT be used with this player: • Laserdisc • CD-I, CD-ROM, CD-R, DVD-ROM • MiniDisc To Load and Play an Audio CD itous Surf Sou iqu e Pacific North nds b we U f th 1. Press OPEN•CLOSE on the front of the DVD player (the disc tray opens). 2. Place a disc gently into the tray with the disc’s label facing up. 3.
Playing Audio CDs Audio CD Playback Features When playing audio CDs, your DVD player has many of the same features that your CD player has, including track skip, repeat play, and programmed playback. The on-screen Info Display lets you choose various playback features. Track Repeat Play Mode Clock IntroScan Time Display Bookmarks Play Direction Using the Info Display To access the Info Display, while the CD is playing, press INFO on the remote (the Info Display appears).
Playing Audio CDs Selecting a Specific Track 1. Press INFO on the remote (the Info Display appears). 2. If necessary, press the arrow buttons to highlight the Track icon. 3. Use the number button(s) on the remote to enter the track number you want to play (you may need to press the OK button on the remote after you enter a single digit, track number). Selecting a Play Mode The Play Mode feature lets you set up the order in which you want the tracks on the CD to play.
Playing Audio CDs Program Playback To use the Program playback option, you must enter the order in which you want the tracks on the CD to play. 1. Make sure the CD is in the player, but not playing. 2. Make sure Play is highlighted in the DVD Player’s main menu and press OK (the Play menu items appears). 3. Press the arrow down button to highlight Edit Program, and press OK (the program menu appears). 4.
Playing Audio CDs Repeat Play You can tell the player to repeat the entire disc, a track, or you can set A•B repeat. ON OFF VCR1 DVD To repeat the disc or a track: VCR2 Press the arrow right button until the Repeat icon is highlighted. Press OK. 3. Highlight the Disc selection or the Track selection. 4. Press OK. 5. Press the down arrow button to highlight Done. 6. Press OK (the player will play the CD or the track over and over again). V OL 2.
Playing Audio CDs A•B Repeat Deserves Some Extra Instruction A•B Repeat lets you repeat a specific segment on the CD that you define. For example, if you want to listen to a particular guitar riff within a song, you can set the A•B Repeat to play that part of the song over and over. ON OFF VCR1 DVD VCR2 Press the arrow buttons to highlight the Repeat icon, and press OK. (The Repeat menu appears.) V OL 2. CH + REPEAT button VOL Press INFO on the remote (the Info Display appears).
Playing Audio CDs Using IntroScan IntroScan plays the first few seconds of each track on the CD– similar to the scan feature that’s on many car radios. To use IntroScan: 1. Press INFO on the remote (the Info Display appears). 2. Press the right arrow button to highlight the IntroScan icon. Press OK (the first few seconds of each track play). • After IntroScan goes through all of the tracks, it stops.
Playing Audio CDs Recalling a Bookmark 1. While you’re playing a disc, press INFO on the remote (the Info Display appears). 2. Press the right arrow buttons until the Bookmark icon is highlighted. 3. Press OK. 4. Use the up arrow button (and right arrow button if necessary) to select the bookmark. 5. Press OK to activate the bookmark. 6. To return to the Info Display, press the down arrow button until Done is highlighted and press OK. 7.
Playing Audio CDs The Play Menu Items All of the items in the Play menu (of the DVD Player’s main menu), except Dub Assist, have already been explained in the section “Using the Features in the Menu System.” Standard Play: page 66 Random Play: page 66 Edit Program: page 67 IntroScan: page 70 To access the Play menu items for your CD, highlight Play and press OK.
Section Overview: Assistance Troubleshooting If you’re having any problems with your DVD Player, read the troubleshooting section to find a solution. Troubleshooting is divided into three categories: • Common problems • Disc problems • Divx problems Care and Maintenance • Handling Cautions for the Player • Maintenance of the Cabinet • Formation of Condensation • Cleaning and Handling Discs Limited Warranty The Limited Warranty includes information on getting service for your DVD Player.
Assistance Section How to Resolve Product Performance Problems If you are experiencing product operation problems, please review the troubleshooting section before you call for service. If your operation problem relates to playing a Divx disc or Divx features but you are able to play regular CD audio and DVD discs, please call Divx toll-free at 1-888-456-DIVX (1-888-456-3489). If you are experiencing a problem that doesn’t relate to Divx discs or other Divx features, please refer to the Limited Warranty (p.
Assistance Section Troubleshooting Common Problems Solutions Remote control won’t work • • • • • You might be in the wrong mode. To operate your DVD Player, press DVD on the remote before you press any other buttons. If you’re operating the TV, press the TV button first, etc. Insert new batteries in the remote. Operate the remote control at a distance of no more than 20 feet. Remove any obstacles between the remote and the DVD Player or other component.
Assistance Section Troubleshooting 76 Common Problems Solutions Subtitle and/or audio language is not the one selected from the initial setting If the subtitle and/or audio language does not exist on the disc, the initial settings will not be seen/heard. The disc’s priority language is selected instead. Set the subtitle and/or audio language manually through the Info Display. The menu is displayed in a foreign language The Menu Language preference is set to that language.
Assistance Section Troubleshooting Divx Problems Solutions Player won’t play Divx discs, but it plays regular discs • If you haven’t set up an account with Divx, call 1-888-NEW-DIVX. • Make sure you’ve connected the telephone line cord. • Follow any instructions that appear on the screen. Can’t connect to Divx • Make sure phone service is active. • Make sure the phone line is securely connected to the back of your player. • Somebody else may be on the phone.
Assistance Section Handling Cautions • Before connecting other components to this player, be sure to turn them all off. • Do not move the player while a disc is being played, or the disc may be scratched or broken, and the player’s internal parts may be damaged. • Do not put a flower vase filled with water or any small metal objects on the player. • Be careful not to put your hand into the disc tray. • Do not place anything other than the disc in the disc tray.
Assistance Section How to Resolve Product Performance Problems If you are experiencing product operation problems, please review the troubleshooting section before you call for service. If your operation problem relates to playing a Divx disc or Divx features but you are able to play regular CD audio and DVD discs, please call Divx toll-free at 1-888-456-DIVX (1-888-456-3489).
Assistance Section To receive a replacement unit before you return yours: Direct to Consumer Exchange 1. Provide your Discover, MasterCard or Visa account number and expiration date to your phone representative. This is for security purposes only and your account will not be charged at this time. 2. We will send you a replacement unit. 3.
Section Overview: Reference About the DVD Player • Description of the front panel • Description of front panel display lights • Basic use and care guidelines Programming the Remote This section describes how to program the remote control to operate other components (TV, VCR, etc.) The remote automatically operates most RCA, GE, and PROSCAN components. Detailed information about the remote control buttons is in the Setup and Connections section (pp. 15-18).
Reference Front Panel Controls OKŁ ON OFF SELECT OPEN • CLOSE VOLUME Headphones jack MENU SKIP REV P L AY SKIP FWD GO BACK STOP PAUSE Disc tray Disc Tray Press OPEN•CLOSE to open and close the disc tray. Front Panel Display (See following page for details.) Headphones Jack You can attach headphones here for private listening. ON•OFF Button and ON•OFF Indicator Light Turns the player on and off. The ON•OFF indicator lights when the player is on.
Reference Front Panel Display Display lights listed from left to right (top row first) 1. 2. 3. 4. 5. 6. 7. 8. 9. 10. NO DISC There isn’t a disc in the disc tray. DIVX Lights when you play a Divx disc. DVD Lights when you play a DVD disc. VIDEO Not applicable. TITLE Indicates the title that is playing. PROGRAM The disc is playing the chapters (or tracks) in the order you programmed. CHAPTER Indicates the chapter that is playing. PBC Not applicable.
Reference Programming the Remote The universal remote can be programmed to control most brands of remote controllable TVs, VCRs, satellite receivers and cable boxes. The remote is already programmed to control most RCA, PROSCAN, and GE TVs, VCRs, DVD players and satellite receivers. Testing the remote To determine whether the universal remote needs to be programmed, turn a device ON, such as a VCR, point the remote at the VCR, and press the VCR1 button.
Reference Using Direct Entry ON OFF VCR1 1. Turn on the component to be programmed. 2. Look up the brand and code number(s) for the component on the code list in this section. DVD 4. Press and hold the component button on the remote you want to program. 5. Enter the code from the Remote Control code list (pp. 86-87). 6. Release the component button, and then press ON•OFF to see if the component responds to the command. If it doesn’t, try pressing the component button and then ON•OFF again. 7.
Remote Control Code List TV Codes Abex .............................................................................. 1172 Admiral .......................................................................... 1001 Aiko ............................................................................... 1016 Alleron ........................................................................... 1046 Amtron .......................................................................... 1038 Akai ..............................
Remote Control Code List VCR Codes Admiral .......................................................................... 2131 Adventura ...................................................................... 2026 Aiwa ..................................................................... 2002, 2026 Akai ................................................. 2003, 2004, 2111, 2113 American High ............................................................... 2021 Asha ...................................................
Reference FCC Registration Information Your DVD Player is registered with the Federal Communications Commission and is in compliance with parts 15B and 68, FCC Rules and Regulations. 1. Notification to the Local Telephone Company/REN Number On the bottom of this equipment is a label indicating among other information, the FCC Registration number and Ringer Equivalence Number (REN) for the equipment. You must, upon request, provide this information to your telephone company.
Reference Accessories and Order Form Accessory Order Form for Your DVD Player Optical Plug to Optical Plug DV3 (3 ft.) DV6 (6 ft.) Optical Plug to Mini Plug DV3M (3 ft.) DV6M (6 ft.) Description Part No. Price Optical Plug to Optical Plug (3 ft.) DV3 $29.95 Optical Plug to Optical Plug (6 ft.) DV6 $39.95 Optical Plug to Mini Plug (3 ft.) DV3M $29.95 Optical Plug to Mini Plug (6 ft.) DV6M $39.95 RF Output Adapter CRF 800 Remote Control (CRK76DA1) 240897 $29.
Reference United States and Canada Orders Charge your order on your VISA, MasterCard, or Discover Card by filling in below To place your order by phone, have your Visa, MasterCard or Discover Card ready and call the tollfree number listed below between 8 AM and 10 PM (EST) Monday through Friday or between 9 AM and 5 PM (EST) Saturday. USE YOUR CREDIT CARD ® IMPORTANT: Copy complete account number from your VISA card Use this number only to place on order for accessory items listed on this order form.
Index Symbols MUTE 17 Numbers (0-9) 17 OK 17 ON•OFF 17, 82 OPEN•CLOSE 82 PAUSE 17, 82 PLAY 17, 82 PLAY MODE 17 REPEAT 17 REVERSE 17 SAT•CABLE 15 SELECT 17 SKIP FWD 82 SKIP REV 82 STOP 17 SUBTITLE 17 TV 15 VCR 1 15 VCR 2 15 Vol 17 VOLUME 82 16 x 9 Widescreen 58 4 x 3 Letterbox 58 4 x 3 Standard 58 A A•B Repeat 25 AC IN jack 6 Accessories 89 Adapter, telephone jack 4 Additional viewing period 43 ANGLE button 16, 29 Angle, camera 29 Angle icon 83 ANTENNA button 16 Arrow buttons 16, 46 Aspect ratio 58 Audio
Index F J N Fast motion playback 22 FORWARD button 16 Frame advance 22 FRAME- button 17 Free Access 42 Freeze frame (pause) 22 Front Display menu 58 Front panel controls 82 Front panel display 83 Front panel icons angle 83 locked 83 mail 83 play direction 83 repeat 83 unlocked 83 Jacks AC IN 6 AUDIO OUT R L 6 DIGITAL AUDIO OUT 6 PHONE JACK 6 R and L 6 RF ADAPTER 6 S-VIDEO 6 VIDEO OUT 6 Navigation 12, 46 Number buttons 17 G Glossary 61 GO BACK button 17, 46 Go back icon 47 Grayed out 23, 47 GUIDE butto
Index Program creating 48 deleting 49, 67 editing 49 Programming the remote to control components 84 Purchases 43 Purchasing Unlimited Play 34 R R and L jacks 6 Rated Titles 53 Rating Limits 42, 52 Recalling bookmarks 30 Regional coding 19 Register with Divx 13 Remote control using to move through menus 46 Remote control code list 87 component buttons 15 helpful hints about 18 modes 85 other buttons 16 pointing 18 Programming 84 Remote, installing batteries 4 Rentals 43 Repeat A•B 25 cancelling 27 REPEAT b
10330 North Meridian Street Indianapolis, IN 46290 ©1998 Thomson Consumer Electronics, Inc.