4 Line Intercom Speakerphone User’s Guide Please read this manual before operating this product for the first time.
Important Information Equipment Approval Information Your telephone equipment is approved for connection to the Public Switched Telephone Network and is in compliance with parts 15 and 68, FCC Rules and Regulations and the Technical Requirements for Telephone Terminal Equipment published by ACTA. 1 Notification to the Local Telephone Company On the bottom of this equipment is a label indicating, among other information, the US number and Ringer Equivalence Number (REN) for the equipment.
Important Information FCC RF Radiation Exposure Statement This equipment complies with FCC RF radiation exposure limits set forth for an uncontrolled environment. This equipment should be installed and operated with a minimum distance of 20 centimeters between the radiator and your body. This transmitter must not be co-located or operated in conjunction with any other antenna or transmitter.
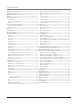
Table of Contents EQUIPMENT APPROVAL INFORMATION ........................................................ 2 INTERFERENCE INFORMATION .................................................................... 2 FCC RF RADIATION EXPOSURE STATEMENT ............................................... 3 LICENSING ........................................................................................... 3 HEARING AID COMPATIBILITY .................................................................. 3 PARTS CHECKLIST .......
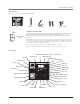
Connections & Setup Parts Checklist Make sure your package includes the following items: INTERCOM/MEMORY LOG INT. DIRECTORY 1 MEM. INT. 2 MEM. MENU INT. 3 MEM. INT. STORE 4 MEM. INT. 5 DELETE EXIT SELECT/SAVE DIAL NEW MESSAGE MEM. INT. 6 MEM. INT. 7 PRIVACY INTERCOM REVIEW INT. 8 PAGE CONFER 1 2 ABC 5 JKL 3 DEF 6 MNO INT. 9 LINE 4 GHI MEM. MEM. TRANSFER 4 MEM. INT. 10 MEM. INT. 11 PAUSE REDIAL LINE 3 MEM. INT. 7 8 PQRS TUV 9 12 WXYZ MEM. LINE 2 INT.
Connections & Setup Important Installation Information • Never install telephone wiring during a lightning storm. • Never install telephone jacks in wet locations unless the jack is specifically designed for wet locations. • Never touch non-insulated telephone wires or terminals, unless the telephone line is disconnected from the network. • Use caution when installing or modifying telephone lines. • Temporarily disconnect any equipment connected to the phone such as faxes, other phones, or modems.
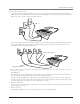
Connections & Setup 4. Connect the telephone line cords: If you have two dual line wall jacks installed in your home or office, plug one end of the straight telephone line cord tagged as “LINE 1+2” into the jack marked LINE 1 + 2 and one end of the other straight line cord into the other jack on the back of the base. Plug the other end of each line cord into the dual-line wall jacks.
Connections & Setup Data Port This phone has a data port jack to connect an auxiliary phone device, such as a fax machine, computer modem, answering machine, or even a cordless phone. The data port switch on the back of the phone controls the data port jack so you can choose line 1, line 2, line 3, or line 4. Use the data port to hook up your fax machine, for example, and then set the data port switch to line 4 in order to receive faxes on the phone number for line 4.
Connections & Setup Priority Line A priority line (one of the four lines) must be established to have precedence over the other three lines. When the handset is picked up or the SPEAKER button is pressed the unit automatically selects the priority line first, followed by the next available line if the priority line is in use by another party. 1. Press the MENU button while in standby mode. 2. Use the < REVIEW > button to scroll to SET PHONE OPTIONS. 3. Press the SELECT/SAVE button. 4.
Connections & Setup Intercom Auto Answer For “hands-free” operation, the phone can be set to automatically answer an intercom call using the speaker. TIP: You may also use this feature for room monitoring. 1. Press the MENU button while in standby mode. 2. Use the < REVIEW > button to scroll to SET PHONE OPTIONS. 3. Press the SELECT/SAVE button. 4. Use the < REVIEW > button to scroll to INTERCOM AUTO ANS. 5. Press the SELECT/SAVE button. 6. Use the < REVIEW > button to choose YES or NO. 7.
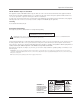
Connections & Setup Display Contrast Adjust the display contrast to one of four contrast levels. 1. Press the MENU button while in standby mode. 2. Use the < REVIEW > button to scroll to SET LCD CONTRAST. 3. Press the SELECT/SAVE button. The MIN and MAX contrast scale shows on the display. 4. Use the < REVIEW > button to adjust the contrast. The display instantly adjusts with each press of the < REVIEW > button. 5. Press the SELECT/SAVE button to save the desired contrast level.
Operation 8. Use the < REVIEW > button to select the minutes. 9. Press the SELECT/SAVE button, and the cursor moves to the month field. 10. Use the < REVIEW > button to select the month. 11. Press the SELECT/SAVE button, and the cursor moves to the date field. 12. Use the < REVIEW > button to select the date. 13. Press the SELECT/SAVE button, and the cursor moves back to the hour field. 14. Press the EXIT button. NOTE: You may press EXIT at any step in the process.
Operation Making Calls with the Optional Headset 1. Connect the headset plug to the HEADSET jack on the side of the base. 2. Adjust the headset to rest comfortably on top of your head and over your ear. 3. Move the microphone to approximately 2 to 3 inches from your mouth. 4. Press the HEADSET button and the phone automatically selects the priority line. If the priority line is occupied, it selects an open line. 5. Wait for a dial tone, then dial a phone number. 6. Press HEADSET when finished.
Operation Hold Placing a Call on Hold Press the HOLD button to put the line in use on hold. The line indicator for the line on hold flashes green. The phone emits a beep every 30 seconds as a reminder. At the other stations, the indicator blinks red but no beep is heard. NOTE: If you put a call on HOLD while in PRIVACY mode, no one but you can access the line on hold. Anyone trying to access the line receives an error tone.
Operation Privacy While in use, a line can be secured so that no one else can listen to the conversation. This feature only applies to model 25403, 25404, 25413, and 25414 phones. However, other phone which are not compatible with these models can still access the line. Providing Privacy At any time during a conversation, you can use the privacy feature to secure the line. 1. While on a line, press the PRIVACY button. The indicator turns on. 2. To cancel, press PRIVACY again or hang up.
Operation Answering an Intercom Call When you receive an INTERCOM call, the INTERCOM indicator flashes red, and the display shows the caller’s name and phone ID. NOTE: If you want to answer with the speakerphone, press the INTERCOM or SPEAKER button. If you want to answer by headset, press the HEADSET button (the headset must be connected). To answer by handset, lift the handset. NOTE: Press SPEAKER or lift the handset to automatically select a party.
Caller ID Receiving and Storing CID Records This unit receives and displays information transmitted by your local phone company. This information can include the phone number, date and time; or the name, phone number, date and time. The unit can store up to 99 calls for later review. When the memory is full, a new call automatically replaces the oldest call in memory. NEW appears in the display for calls received that have not been reviewed. The line number for the call received is also displayed.
Memory Call Waiting Caller ID This feature allows you to see who is calling when you hear the call waiting beep. The caller identification information appears in the display after you hear the tone. • Press the FLASH button to put the person to whom you’re talking on hold and answer the incoming call. IMPORTANT: To use all the features of this unit, you must subscribe to either the standard Name/Number Caller ID Service or Caller ID with Call Waiting Service.
Memory Editing a Name or Number Stored in the Intercom/Memory Log (Memory Location) 1. Press the DIRECTORY button. 2. Press the INTERCOM/MEMORY LOG button (1-16). 3. Press the SELECT/SAVE button and edit the content according to the steps in the Storing a Name and Number in Memory section. Storing the Last Number Dialed 1. When the phone is idle, press the REDIAL/FORMAT button. 2. Use the < REVIEW > button to view the last six previously dialed numbers. 3.
Other Information Chain Dialing This process allows you to dial a succession of stored numbers from separate memory locations. This is useful when you must dial several sequences of numbers, such as with frequent calls via a telephone company long distance provider. For example Memory location Local access number of long distance company 6 Authorization code (ID) 7 Long distance phone number 8 1. Press the line you want. 2. Press memory location 6. 3. Press memory location 7. 4.
Other Information You cannot be heard by the other party. • Make sure the handset or headset cord is inserted properly and securely. • Make sure the MUTE feature is not turned on. Phone does not ring. • Make sure the ringer is turned on. • Make sure the Do Not Disturb feature is not activated. • You may have too many extension phones on your line. Try unplugging some phones. • See solutions for “No dial tone.” Incoming voice too low or none at all. • Check volume setting.
Other Information Limited Warranty What your warranty covers: • Defects in materials or workmanship. For how long after your purchase: • One year, from date of purchase. (The warranty period for rental units begins with the first rental or 45 days from date of shipment to the rental firm, whichever comes first.) What we will do: • Provide you with a new or, at our option, a refurbished unit. The exchange unit is under warranty for the remainder of the original product’s warranty period.
Accessory Information Accessory Information AC power adaptor Headset 5-2651 5-2425 To place order, have your Visa, MasterCard, or Discover Card ready and call toll-free 1-800-338-0376. A shipping and handling fee will be charged upon ordering. We are required by law to collect appropriate sales tax for each individual state, country, and locality to which the merchandise is being sent. Items are subject to availability. *Prices are subject to change without notice.
Index A I R Accessory Information 23 Answering an Intercom Call 16 Answering Calls 13 Call Alert Tone 10 Call Waiting Caller ID 18 Caller ID (CID) 17 Chain Dialing 20 Clear All Memories 20 Conference Calls 15 If You Did Not Program Your Local Area Code 18 If You Programmed Your Local Area Code 17 If you receive a call on a line other than the priority line 13 If you receive a call on the priority line 13 Important Information 2, 3 Important Installation Guidelines 6 Important Installation Information 6
Visit the RCA web site at www.rca.com Please do not send any products to the Indianapolis address listed in this manual or on the carton. This will only add delays in service for your product. ATLINKS USA, Inc. 101 West 103rd Street Indianapolis, IN 46290 ©2005 ATLINKS USA, Inc. Trademark(s)® Registered Marca(s) Registrada(s) Model 25413/14 00000553 (Rev.