TV/DVD User's Guide MODEL:RCRVD2022 1645837B_20F510TD_Cvr.
Important Information CAUTION RISK OF ELECTRIC SHOCK DO NOT OPEN This symbol indicates that this product incorporates double insulation between hazardous mains voltage and user accessible parts. When servicing use only identical replacement parts. Caution: To reduce the risk of electric shock, do not remove cover (or back). No user serviceable parts inside. Refer servicing to qualified service personnel. This symbol indicates important instructions accompanying the product.
Table of Contents Connections and Setup Things to Consider Before Connecting Components .................. 2 Explanation of Jacks and Cables......... 3 Front Panel Controls............................. 4 Putting Batteries in the Remote ......... 4 The Remote Control The Buttons On the Remote control .. 5 TV Function Buttons .........................................5 DVD Function Buttons .....................................6 Using TV Menus TV Menus ...............................................
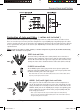
Connections and Setup Things to Consider Before Connecting Components Important Stand and Base Safety Information Choose the location for your TV carefully. Place the TV on a stand or base that is of adequate size and strength to prevent the TV from being accidentally tipped over, pushed off, or pulled off. This could cause personal injury and or damage the TV. Refer to the Important Safeguards sheet packed with your TV.
Connections and Setup TV/DVD Explanation of Jacks and Cables ( cables not included ) You can connect other components to your TV/DVD player such as a VCR, video camera, or audio receiver. There are several ways to connect your other components to your TV/DVD player depending upon the cables you have and the jacks that are on the back of the components. Different jacks and cables provide a different level of performance.
Connections and Setup Digital Audio Out/Coaxial Jack Use this jack to connect your TV/DVD Player to a Dolby* Digital or DTS receiver or decoder. *Manufactured under license from Dolby Laboratories. “Dolby” and the double-D symbol are trademarks of Dolby Laboratories. DTS is a registered trademark of Digital Home Theater Systems, Inc. Front Panel Controls (from left to right) If you cannot locate your remote, you can use the front panel buttons of your TV to operate many of the TV/DVD’s features.
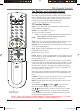
The Remote Control The Buttons on the Remote Control The remote control contains buttons that are dual purpose depending on which function (TV or DVD) is being used. In addition, some of the DVD buttons can be hidden when the remote is being used for the TV function. Slide the bottom portion of the remote control downward to reveal additional DVD buttons. Note: The red button labels are used for DVD features. TV Function Buttons MUTE Lowers the volume to the minimum level.
The Remote Control DVD Function Buttons Note: The red button labels are used for DVD features. POWER Turns the TV/DVD on and off. DVD Puts the remote in DVD mode. (Press “DVD ” button to activate DVD function on remote control.) (OPEN/CLOSE) Press this button to open and close the DVD tray. (STOP) Stops disc play. TITLE Press to display the Title menu during disc playback, if available. (REVERSE) Searches backward through a disc during playback. Press repeatedly to increase speed.
Using TV Menus TV Menus TV menus let you control picture quality and features available for TV viewing. There is a different menu system for DVD features, described on page 16. Note: Remember to use the TV arrow buttons when accessing the TV’s menu system. TV Menu Navigation 1. To bring up the TV’s menu system, press the MENU button. 2.
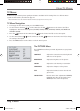
Using TV Menus SOUND PRESET BASS TREBLE BALANCE SURROUND The SOUND Menu USER 50 50 0 OFF The SOUND menu offers different audio options. PRESET Provides four preset audio settings (USER /SPEECH/THEATER/MUSIC). BASS Decreases/increases low-pitched sound. TREBLE Decreases/increases high-pitched sound. BALANCE Adjusts left/right speaker balance. SURROUND Turns the surround sound on or off. The TIMER Menu TIMER The TIMER menu is used to set the SLEEP TIMER.
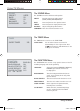
Using TV Menus TUNING SOURCE CHANNEL CHANNEL NAME DELETE CH FINE TUNE AUTO SEARCH PASSWORD PASSWORD Using TV Menus 20F510TDr.indd 9 The TUNING Menu AIR 8 < > YES The TUNING menu is used to adjust the signal source, channel setup, and reception of the TV. SOURCE Selects AIR or CABLE. Select AIR to receive a broadcast signal. Select CABLE to receive a CATV signal. CHANNEL Use the VOL / buttons on the remote (or the VOL / buttons on the front of the TV) to scroll through the channels available.
Using TV Menus Parental Control and V-Chip The PARENTAL GUIDE menu allows you to program your TV/DVD so that children cannot see certain programs and channels. The software inside your TV/DVD (V-Chip) allows you to “block” TV programs and movies based on violence, sex, or other content you think children should not view. It lets you program your TV so it will not display certain programs. You can “unblock” programs by entering a password.
Using TV Menus 3. Press the button on the remote to highlight PASSWORD, then press the password entry. button to access the 4. Enter your password using the number buttons on the remote (the PARENTAL GUIDE menu appears). 5. Press the button to highlight PARENTAL GUIDE. 6. Press the button to turn it on. Now you can select the TV and Movie Ratings.
Using TV Menus Rating Description and Content Themes for Age-Based Ratings TV-MA Mature Audience Only. Specifically designed to be viewed by adults; may be unsuitable for children under 17. Contains one or more of the following content themes: crude indecent language (L), explicit sexual activity (S), or graphic violence (V). TV-14 Parents Strongly Cautioned. Contains some material that parents would find unsuitable for children under 14.
Using TV Menus MPAA RATING G PG PG-13 R NC-17 X V-Chip Movie Rating Limit B B B B B B Set movie rating limits by blocking movies rated above a specified level. To access the MPAA RATING (Movie Rating Limit) menu: 1. Press MENU on the remote control (the PICTURE menu appears). 2. Press the button until the PASSWORD menu appears. 3. Press the press the button until PASSWORD is highlighted, then button to access the password entry. 4.
Playing Discs DVD Basics Regional Coding The DVD player and the discs are coded by region. These regional codes must match in order for the disc to play. This unit’s code is Region 1. Discs with other regional codes can’t be played in this unit. Using Different Menus Each disc is programmed with different features. There are two separate menu systems that you can use to access DVD features: the disc’s menu and the DVD player’s menu (separate from the TV’s menu system).
Playing Discs Search Options You can use the following search features with some discs: Picture Scan When you’re playing a disc, each time you press (Forward) or (Reverse), your DVD player scans the disc . faster until you reach the fastest scan speed. To resume normal playback, press Chapter Advance While a DVD is playing, press previous title or chapter. to advance to the next title or chapter.
Playing Discs DVD Info Menu You can display information about the disc during playback using the SKIP button. It allows you to access certain functions. Remember to use the DVD arrow buttons when changing the functions--not the TV. Select an option using the and buttons and press OK to bring up the submenu, if supported by the DVD. Then use the and buttons on the remote control to scroll through the submenu options or the numeric buttons to enter numbers. Press OK to confirm the selection.
Playing Discs Angle Some discs offer different camera angles for specific scenes. To change the camera angle during playback: 1. Select Angle with the buttons and press the OK button. and 2. Enter an angle number using the numeric buttons. Notes: You can also change a camera angle by pressing the ANGLE button. If the disc was recorded using a single camera angle, this function is not available. There are very few discs offering more than one angle.
Playing Discs DVD Menu Navigation 1. Make sure the remote is in the DVD mode by pressing the DVD button. 2. Press GUIDE. The General Setup Page menu is displayed. 3. Use the and buttons to display the different setup menus. 4. Use the and buttons to highlight a menu or option item. Use button to access the submenu and the and buttons to highlight your selection. (Use the to go back through the menu.) 5. Press the OK button to confirm your selection. 6. Press GUIDE to exit the DVD menu system.
Playing Discs Screen Saver The Screen Saver is a graphic that randomly moves around the screen to guard against screen burn-in. • ON: Screen saver turned on. • OFF: Screen saver turned off. Last Memory The Last Memory feature enables you to resume play at the same point at which you stopped playback, even if the disc is removed and re-inserted. • ON: Resumes play from where the disk was last stopped. • OFF: Plays from the beginning.
Playing Discs Dynamic -- Speaker Setup Page -- - FULL Downmix - Dual Mono - - 3/4 Dynamic - - - 1/2 - - - 1/4 - - - OFF This feature allows you to reduce the range between loud and low sounds to your personal preference. It increases the lowest sounds and quiets the loudest sounds. Default setting is OFF. Use the arrow buttons to access and change the dynamic setting and press OK to confirm.
Playing Discs Disc Menu This option allows you to select a default language for the disc’s menu. Language choices are: English, French, German, Spanish, Chinese, Japanese, Korean Russian. Parental Control You can control access to the player and the type of discs your family watches with the Parental Control feature. DVD viewing is blocked if its rating exceeds the level that you selected. A four-digit password is required to change the level, disable the feature, or view the DVD.
Playing Discs Playing mp3 Discs When an mp3 disc is inserted in the player, the Disc Navigation screen appears automatically. You can change folders and songs through the Disc Nav screen. The player plays the songs in the order they were burned onto the disc. 1. Insert the mp3 disc. The folder selection screen appears. 2. Use the button. / buttons to select the folder you want to play and press the OK 3. Use the / / / buttons to select the files (or tracks) you want to play and press the OK button.
Other Information Troubleshooting Most problems you encounter with your TV/DVD can be corrected by consulting the following troubleshooting list. TV Problems TV won’t turn on • Press the POWER button. • Make sure the TV is plugged in. • Check the wall receptacle (or extension cord) to make sure it is “live” by plugging in something else. • Something might be wrong with your remote control. Press the POWER button on the front of the TV.
Other Information The Remote Control Doesn’t Work • Something might be between the remote and the remote sensor on the component. Make sure there is a clear path. • Maybe batteries in remote are weak, dead, or installed incorrectly. Put new batteries in the remote. • You might need to reset the remote: remove batteries and press the number 1 button for at least 60 seconds. Release the 1 button, and replace the batteries. • Make sure remote is in the correct mode (TV or DVD).
Other Information The menu is displayed in a foreign language • The OSD Lang option is set to that language. Go to the General Setup Page menu and select the OSD Lang. Select the language you prefer. Play doesn’t begin • The rating of the title on the disc exceeds the rating limit set in the PARENTAL feature. Go to the Preference Page menu and select the Parental. Change the rating limit in the menu.
Other Information Recommendations and Information Concerning Discs CD-R and CD-RW Discs This player can play most CD-R and CD-RW discs. However, depending on the recorder of the discs of your personal computer, the type of disc and recording method used, some discs might not play, or the performance might not meet the expected standard of quality. When playing a CD-R disc, it is completely normal for the unit to take up to 20 seconds to recognize the disc before it plays.
Other Information Additional Information Maintenance of Cabinet For safety reasons, when cleaning the cabinet be sure to disconnect the AC power cord from the AC outlet. • Do not use benzene, thinner, or other solvents for cleaning. • Wipe the cabinet with a soft cloth. Formation of Condensation • Due to sharp changes in temperature and humidity, condensation may form if warm air comes in contact with any cold parts inside the player.
39033767 20F510TDr.