www.LyraZone.
Important Safety Information Be sure to read all the safety information before you begin to use this product. IMPORTANT NOTE: To reduce the risk of fire or shock hazard, do not expose this player to rain or moisture. CAUTION RISK OF ELECTRIC SHOCK DO NOT OPEN This symbol indicates "dangerous voltage" inside the product that presents a risk of electric shock or personal injury. ATTENTION RISQUE DE CHOC ELECTRIQUE NE PAS OUVRIR This symbol indicates important instructions accompanying the product.
Introduction Your LYRA2 personal digital player is designed to give you hours of listening pleasure. To get the most out of your new purchase, we suggest that you take a few minutes right now to read through this instruction manual. If you have any questions or problems, consult the Troubleshooting Guide or visit www.lyrazone.com for help and recent updates. Table of Contents Important Information . . . . .3 Save CD Tracks to Play on Your PC or LYRA2 Player . . . . . . . . . . . .
Table of Contents Create a Playlist for Playing or downloading . . . . . . . . . . . . . . . .29 Mode Menu . . . . . . . . . . . . . . . . . .45 Repeat and Shuffle Features . . . .45 Create an Auto-Playlist . . . . . . . . .30 Program Feature . . . . . . . . . . . . . .46 Searching for Tracks . . . . . . . . . . .30 Radio . . . . . . . . . . . . . . . . . . . . . .31 Transfer the Audio Files to the CompactFlash Card . . . . . . . . . . . .32 DSP (Digital Signal Processor) Menu . . . . . . . . . . . . . .
Important Information The LYRA2 player works with your computer to let you play your favorite music from files recorded on removable CompactFlash cards. The player plays files encoded with the popular MP3, Windows Media* Audio and RealNetworks** G2 audio formats and may allow for future upgrades of some alternative audio compression formats. Because the player has no moving parts, the audio can be played back virtually anywhere without skipping.
Important Information Computer System Requirements Minimum Optimum • Pentium 166 MHz or faster • Pentium II 300 MHz or higher • 32MB RAM • 64 MB RAM • Windows* 98 or Windows 2000 (Parallel Port also available for Windows 95) • Windows 98SE or Windows 2000 • 45 MB free hard disk space plus 1 MB for every minute of CD quality music you store on your hard drive • 50 MB free hard disk space plus 1 MB for every minute of CD quality music you store on your hard drive • CD-ROM Drive • CD-ROM Drive • US
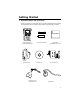
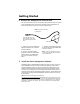
Getting Started 1. Unpack the player and accessories. When you unpack your new player, be sure you have removed all the accessories and information papers. The items shown below are packed with your player. max enter vol LCD Display + min play / pause f.skip b.
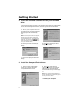
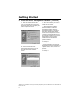
Getting Started 2. Insert the included software CD into your CD-ROM drive. Use the software setup program on the included CD to install the CompactFlash drivers, Music Management software, and User’s guide and documentation. A. Turn on your computer and insert the software CD. The LYRA2 Software Setup program will automatically run. Note: If the setup screen does not appear, double click My Computer, double click your CD-ROM drive icon, and double click setup.exe.
Getting Started 4. Connect the CompactFlash external drive. The external drive allows you to transfer MP3, Windows Media audio, or G2 files to the CompactFlash card. The drivers for this drive must be installed first so Windows can find them when you connect the external drive. Note: Actual items may differ in appearance. Attach to USB port of computer. (Symbol on plug typically matches symbol on USB port.) Yellow LED A.
Getting Started 5. Install the music management software. (continued) A. Insert the LYRA2 software disc into your CD-ROM drive. Follow the directions under Step 2 to display the Select Components screen. C. Select the software you want to install and click Install. • Select MusicMatch Jukebox (Recommended) to install the MusicMatch Jukebox software. MusicMatch Jukebox is capable of MP3, WAV, and Windows Media audio format compression. Musical content is provided by EMusic.
Getting Started 6. Install the MusicMatch Jukebox™ software. A. Display the Select Music Software screen as described in Step 5. Make sure MusicMatch Jukebox is highlighted and click Install. QUICKSTART screen will appear after installation has started. Click on Install MusicMatch Jukebox 5.1. Notes: Enter an Email address or yourname@home.com if you don’t have email. You must enter an email address to proceed.
Getting Started Install the MusicMatch Jukebox™ software. (continued) C. Click Next to display Installation Options dialog. Select the installation option you wish to use. Express Setup is recommended. Click Next to continue. D. After the installation is complete, click Finish to complete setup. If necessary, close the main setup screen. You may need to restart your web browser. Reboot your computer if any other software was installed specifically USB compact flash drivers.
Getting Started Set MusicMatch Jukebox basic preferences. (continued) A. Start the MusicMatch Jukebox software. B. The Search for Music screen appears asking if you want the program to search for existing compatible music files. Note: You can access the Options menu at almost any time by pressing the right mouse button. Click OK, to have the files found appear in the Music Library. C. Display the Settings menu by choosing Settings under the Options menu.
Getting Started Set MusicMatch Jukebox basic preferences. (continued) D. Click the Recorder tab to display the Recorder settings. E. Select the recording Quality level. CD Quality MP3 (128Kbps) is the recommended quality level. MP3 and Windows Media formats are supported by MusicMatch Jukebox for the LYRA2 player. 12 • MP3 audio is MPEG Layer-3 Audio available at various compression levels. The highest compression level has the best quality sound, but uses the most disk space.
Getting Started Set MusicMatch Jukebox basic preferences. (continued) • Windows Media audio is a compression format created by Microsoft. This audio format incorporates digital rights management. • WAV audio is unencoded music that is not compressed. This format has the best quality sound but requires the largest file size, as much as 650MB per CD. WAV audio files are much larger than MP3 audio files. G. Select a default Recording Source.
Getting Started Learn the MusicMatch Jukebox basic controls. Listed below are the basic functions of the main controls for the program. Playlist Controls Docks and Undocks Playlist Window Menus Options, Register, Sites and Help Current Selection Display Area PLAY Button (Press to start playback. OPEN, SAVE, CLEAR, and CD-R PAUSE Button (Press to pause playback) Playlist Window PREV and NEXT Buttons (Use to select the next or previous song in the playlist.
Getting Started Save CD tracks to play on your PC or in your LYRA2 player. A. Insert a CD into your CD-ROM drive. If you are connected to the Internet, MusicMatch Jukebox will retrieve information about the CD in the CD-ROM drive. If you are on a LAN system and the titling feature does not work, contact your administrator. Make sure the Enable CDDB CD lookup service is selected on the CDDB Preferences page if you are able to make a connection to the Internet.
Getting Started Save CD tracks to play on your PC or in your LYRA2 player. (continued) C. Press the REC button if the Recorder window is not open. Press REFRESH if the songs are not listed. Stop Button Cancel Button Eject CD ALL Button NONE Button REFRESH Button RECORD Button CD Info Display Area Song Selection Area D. Select the tracks you want to record. • To start recording, click RECORD. • To stop recording the current track, click stop.
Getting Started Use MusicMatch Jukebox to play Radio on your PC. A. Click the Radio button to open the Radio window. Note: You can also select Show MusicMatch Radio from View in the Options menu to display this window. B. Click on STATION SELECTOR to open the following window. • If you want to search for a certain station, use the SEARCH feature on the bottom of the window. C. Click once on a station to display it. Click twice on the station (or click PLAY) to play music from the station.
Getting Started Organize the Music Library. You can choose how to view your music library. You can select as many as seven categories to display at one time. A. Click the Music Library button from the Main window to display the Music Library window. Note: you can also select Show Music Library from View in the Options menu. Sort/View Button ADD DELETE TAG Button Button Button FIND Button AUTO DJ Button Preview Button Music Library Window B. Setup the Music Library for your preferences.
Getting Started Create a playlist for playing or downloading. To create a playlist, you can drag and drop files from your Music Library or you can open an existing playlist. Playing Info Undocks and Docks Playlist Window OPEN Button SAVE Button CLEAR Button CD-R Button PLAY Button PAUSE Button Displays Music Library Playlist Window AUTO DJ ADD DELETE TAG FIND Button Button Button Button Button Sort/View Button Preview Button Music Library Window A.
Getting Started Create a Playlist for playing or downloading. (continued) E. To remove a single track from the playlist, click on the track to highlight it, and then press Delete on the keyboard. F. Click Play to play the songs from the playlist. You can also double click the song in the playlist to begin playing. Edit Tags for Your Songs You can edit or delete the tags for the tracks in your Music Library. If you delete the track’s tag, all of the information about the track will be deleted. A.
Getting Started Transfer the audio files to the CompactFlash Card. Use MusicMatch Jukebox to transfer music files to the CompactFlash card for the LYRA2 player. Make sure the external drive is installed properly and the CompactFlash card is inserted. Important Note Removing the card before the data is completely written may cause loss of the entire contents of the card and damage the card. Note: Actual items may differ in appearance from those shown.
Getting Started Transfer the audio files to the CompactFlash Card. (continued) F. After you have selected all of the music you want to record on the CompactFlash card, click the Download button on the bottom of the screen. File size and availability are listed in the status and window displays. Caution The yellow LED on the CompactFlash external drive turns bright yellow when files are being written to the CompactFlash Card.
Getting Started 7. Install the RealJukebox software. After you have installed the external drive and placed the LYRA2 software CD in the CD-ROM drive as described on pages 6-8, follow these directions to install the RealJukebox software. A. Display the Select Music Software screen as described in Step 5. Make sure RealJukebox is highlighted and click Install. B. Click Accept or Cancel after you read the license agreement. Note: You must Accept to continue. C.
Getting Started Set basic preferences. Detailed information, tutorials, and troubleshooting are available through the Help menu and the RealJukebox Internet site (accessed from the Help and Sites menus). Note: We recommend you familiarize yourself with the RealJukebox New User’s Guide and complete the Online Tutorial before using and recording files. We also recommend that you log onto the Internet while using RealJukebox to take advantage of all the features.
Getting Started Set basic preferences. (continued) 2. Check Analog if your CD-ROM drive does not support digital audio extraction. E. With the Preferences menu displayed, click Audio Quality to display the Audio Quality menu. 3. Wave Audio is unencoded music that is not compressed. This format has the best quality sound but requires the largest file size, as much as 650MB per CD. Wave Audio files are much larger than RealAudio and MP3 Audio files. G. Select a Secure Files setting 1.
Getting Started Learn the RealJukebox basic controls. Listed below are the basic functions of the main controls for the program. Play Button Record Button Stop Button Pause Button Next Button Previous Button Menus Continuous Play Button Progress Bar Shuffle Play Button Volume Control Mode Selection Program Information Display Area Save CD tracks to play on your PC or in your LYRA2 player. A. Insert a CD into your CD ROM drive.
Getting Started Save CD tracks to play on your PC or LYRA2 player. (continued) RealJukebox is an internet enabled application and connects to the Internet to retrieve information about the CD in the CD ROM. Make sure the Automatic CD Lookup Information is selected in the Internet Settings Preferences. Choose Internet Setting from Preferences in the Tools menu. If you are on a LAN system and the titling feature does not work, contact your administrator.
Getting Started Save CD tracks to play on your PC or LYRA2 player. (continued) B. Select the tracks you want to play or record. C. After recording is complete, the songs will be stored in the Playlist. • To start or stop playback, click play. • To start or stop recording, click record. • To pause playback, press pause. • To stop playback and recording, press stop. Download music from the Internet. A. Click the Music Guide icon to have RealJukebox connect you to the Internet.
Getting Started Organize the Playlist. A. All tracks can be grouped by Genre, Artist / Album, or all three. Choose Music Files from Preferences in the Tools menu. B. Click Change Sub-Folders... to select the groupings, that you would like to use for your music (any combination of Artist, Album, or Genre). Click OK. C. Click the Genre or Artist/Album icon on the mode selection row to view the groups of songs. To play a song, double click it or highlight it, and press play.
Getting Started Create an Auto-Playlist. A. Click the Auto-Playlist icon in the mode selection mode. Click New Auto-Playlist button on the right of the screen. Click and highlight the the playlist you want to edit. Click Edit Autoplaylist on the right side column to change preferences at any time. B. Fill out the Create a New Auto Playlist form to give specifications as to how songs will be organized in the the new Auto playlist.
Getting Started Radio A. Click on the Radio icon on the Mode Selection banner. A. Click My Stations to view stations that you have bookmarked in the past. B. Click on the Features page to search for stations according to Featured Genre or view Featured Stations. B. To add a station to your My Station list, click on the button beside the station you want to store. Click the Find Station page to search the internet for the type of station you like to find. C.
Getting Started Transfer the audio files to the CompactFlash card. Use RealJukebox to transfer music files to the CompactFlash card so you can take the music with you anywhere. Important Note Removing the card before the data is completely written may cause loss of the entire contents of the card and damage the card. Note: Actual items may differ in appearance from those shown. Yellow LED Insert card top first with front (dogs) facing up. A.
Getting Started Transfer the audio files to the CompactFlash card. (continued) E. After you have selected all of the music you want to record on the flash card, double click the Flash Card icon. File size and availability are listed in the status and window displays. Notes: The card operates like a floppy drive. The same drag and drop or copy methods apply. Transfer all your MP3 or G2 files in groups to prevent reloading the appropriate driver for each type. F.
Getting Started 8. Install the LYRA2 user’s guide and documentation. After you have installed the external drive and placed the LYRA2 software CD in the CD ROM drive as described on pages 6-8, follow these directions to install the LYRA2 User’s Guide and documentation. A. Display the Select Components screen. Click the Install the Lyra2 User’s Guide and documentation button. B. Select the Destination folder where you want the LYRA2 User’s Guide installed and click Next. 34 C.
Getting Started Battery Compartment Door (Insert two alkaline "AA" batteries.) EJECT OPEN 10. Insert the alkaline batteries into the player. Before you can use the player, you must insert two alkaline "AA" batteries. C. Close the door to the battery compartment. A. Slide the battery compartment door in the direction of the arrow and lift up. Low Battery Indicator ( B.
Getting Started 11. Insert the CompactFlash™ card in the player. Before you use the digital audio feature, you must insert the removable card with the MP3, Windows Media Audio or G2 music files into the player. CompactFlash memory card EJECT CompactFlash OPEN max enter vol LCD Display min stop (A.) Check to make sure the unit is turned off. (B) Insert the card top first into the player with the front of the card facing the front of the player as shown.
Player Features Controls CompactFlash memory card 1 15 max 2 enter de mo ll a rec vol LCD Display 8 SP D min 3 play / pause ht lig f.skip b.skip 4 6 digital 5 PLL 9 lock on off 10 7 ON tune stop /off tune FM radio V 4.
Player Features Controls (continued) 1. Headphone Jack ( ) Insert the plug from the headphone in this jack on the top of the player. 2. MODE / RECALL Button • Selects Playback mode: Press to select a playback mode (NORMAL, REPEAT 1, REPEAT ALL, SHUFFLE, REPEAT ALL SHUFFLE, PROGRAM, or REPEAT ALL PROGRAM). Press twice to adjust the contrast of the LCD display. • Contrast Adjustment: When in stop mode, you can adjust the contrast between the light and dark images in the LCD display.
Player Features Controls (continued) 7. F. SKIP / Tune Up Button • Player Playing: Press once momentarily to skip to the next track. Press and hold to search forward within saved tracks. • Player Stopped: Press to move the cursor forward to an item. • Player with Equalizer Displayed: Press to cycle through the five frequency bands of the equalizer. You can adjust the gain of the selected band with the SELECT/VOLUME control. • Tuner On Mode: Press to tune up radio frequency. 8.
Player Features Remote control 1 2 3 play stop volume 4 f.skip ON off pause tune 1. Volume Control lock on 5 2. Stop / Off Button 3. Play / Pause / On Button 4. f.skip Button off 5. Lock Button Connecting the Remote Control • Plug the remote into the headphone jack on top of the player. Note: When using the remote control to operate the player, it is best to lock buttons on the main unit to avoid accidentally pressing them. • Shift the LOCK button on the main unit to the ON position.
Player Features Playing a CompactFlash Card (Insert removable card top first -front facing front of player) CompactFlash Headphones Jack ( ) max enter PLAY button vol LCD Display SELECT / VOLUME Control min play / pause f.skip b.skip B.SKIP (Reverse) Button stop /off ON tune digital 1. Make sure batteries are installed in the player. 2. Insert the headphone cable plug into the headphone jack ( ) on top of the player. Please refer to GETTING STARTED NO.12 (pg 36) for further instructions 3.
Player Features Playing a CompactFlash Card 6. Press PLAY again to start playing the first track in the list. Detailed information about the track that is playing appears in the LCD display. Fire and Snow-Jo di Ward NORMAL Trk=03 128K FLAT 1:38 (continued) Search in Playback To play the next or previous track while the player is playing, press F.SKIP or B.SKIP. 7. During playback, adjust the volume by turning the SELECT/VOLUME control up or down. The Volume level selected appears in the display.
Player Features Playback Features max PLAY / PAUSE Button SELECT/ VOLUME Control min play / pause f.skip b.skip b.skip (Reverse) Button enter vol LCD Display stop /off ON tune digital tune PLL FM radio lock on off f.skip (Forward) Button Pause Feature Auto Resume Feature During Digital Music playback, you can pause the player and mute the volume. The player will automatically turn off if no buttons are activated for approximately one minute.
Player Features Playback Features Skip and Search Features Skip Feature • During playback, press, hold and release B.SKIP to search in reverse at a faster speed. When the file list is displayed, F. SKIP and B.SKIP. or the SELECT/VOLUME control allows you to select which track to play using the file list. Notes: If you search in reverse beyond the beginning of the playing track, the player will start playing. • Press F. SKIP. to move the cursor down the list. • Press B.SKIP. to move up the list.
Player Features MODE Menu You can use the MODE menu to select several playback features (REPEAT 1, REPEAT ALL, SHUFFLE, REPEAT ALL SHUFFLE, PROGRAM, and REPEAT ALL PROGRAM). These are described on the next two pages. • Select REPEAT ALL to play all the tracks in the selected playlist over continuously. max vol LCD Display min play / pause f.skip b.skip stop /off ON tune digital tune PLL FM radio lock on off Repeat and Shuffle Features 1.
Player Features MODE Menu (continued) Program Feature 1. Display the MODE menu, and press F. SKIP to move the cursor to PROGRAM 4. Press PLAY to start the program playing. Fire and Snow-Jo di Ward NORMAL REPEAT 1 REPEAT ALL SHUFFLE PROGRAM M O D E PROGRAM Trk=03 128K FLAT 1:38 5. Press MODE to select PROGRAM REP to have the program keep repeating over and over. 2. Press the SELECT/VOLUME control in to display the list.
Player Features DSP (Digital Signal Processor) Menu You can use the DSP menu to select several DSP modes (FLAT, BASS BOOST, ROCK, POP, JAZZ) or adjust the equalizer (EQ). Ice and Snow-Joe Jones max LCD Display DSP Button enter vol NORMAL Trk=03 128K EQ 1:38 min play / pause f.skip b.skip stop /off Equalizer Feature ON tune digital tune PLL FM radio lock on off DSP Modes 1. Display the DSP menu, and press F.SKIP to move the cursor to EQ (equalizer). 1.
Player Features Radio Mode max vol LCD Display DSP Button enter RECALL Button min play / pause f.skip b.skip B. SKIP (Reverse) Button stop /off ON tune PLAY Button digital tune PLL FM radio lock on off Multi Function Scroll (SELECT/ ENTER / VOLUME Control) STOP•OFF Button F. SKIP (Forward) Button RADIO Mode Search Features 1. Press the PLAY to turn on the player 2. Selection Menu for Digital Audio and FM Radio appears on the LCD display • Press F.SKIP / B.
Player Features Radio Mode Preset Memory (cont’d) Delete Preset Memory 3. Turn the multi-function scroll (select) button or press f.skip / b.skip to select the desired channel number (1-15) you want to store in. 4. Push ENTER to confirm storage and exit Program mode 1. Press MODE / RECALL to view the current Preset Memory list. 2. Turn the dial or press f.skip / b.skip to select the preset memory you want to delete. 3.
Included Accessories CompactFlash™ Memory Cards The player uses Type I and II CompactFlash memory cards. Make sure you use only these cards. Use of the wrong card could damage your player or CompactFlash Card reader. We recommend the use of RCA memory cards available from your local dealer or by phone order on page 52. The cards can be used over and over again. Use Music Match Jukebox or RealJukebox to delete the old tracks and then transfer the new tracks to the card.
Included Accessories Car Kit The car kit is included with Model RD2211. It can also be purchased as an optional accessories from your local dealer or by phone on page 52. This accessory kit includes a car cord adapter (#54095) and a cassette adapter (#54097). The car cord adapter lets you power your LYRA2 from the cigarette lighter socket of a car, truck, or RV. It converts 12-volts to a 4.5-volt output.
Optional Accessories Pricing information and ordering instructions can be obtained by calling 1-800-338-0376 or visit www.lyrazone.com. CompactFlash Memory Card External CompactFlash Drive CompactFlash No. PC32CF, PC48CF, and PC64CF Any of these CompactFlash memory cards can be used with your player. No. PC 2200U / PC 2200P USB Parallel The PC 2200U external CompactFlash Drive attaches to the universal serial bus port on your computer.
Optional Accessories Rechargeable Batteries + + Car Kit (Cassette and Car Cord Adapters) - No.PC202MH These nickel-metal-hydride batteries are rechargeable. They operate the LYRA approximately 1/2 as long as new alkaline batteries. These batteries can be charged over and over again. To charge these batteries, you need the AC power adapter #PC611. Caution Use of other nickel-metal-hydride batteries may void your warranty. No. 54097 and No. 54095 Each of these items is purchased separately.
Specifications Player Size: (H) 4.11 x (W) 2.5 x (D) 0.75 inches Weight: 3.2oz. without batteries or memory card Solid state memory Batteries: 2 alkaline "AA" Signal-to-noise ratio: > 70 db (MP3 mode) 55db (radio mode) Slot: 1 external CompactFlash slot: supports Type I or Type II CompactFlash cards.
Troubleshooting Guide Trouble Checks and Adjustments No power to external drive • Check all connections. See page 4. • Make sure computer is turned on and plugged into an operating outlet. Player does not operate • Batteries may be weak. Install new batteries. • Remove batteries and hold down one or more buttons for several seconds to drain the microprocessor inside the player to reset it. Reinstall the batteries and try player again.
Limited Warranty (For US) What your warranty covers: • Any defect in materials or workmanship. For how long after your purchase: • 90 days - Unit exchange, which includes parts and labor. • 91 days to 1 year - Unit exchange, which includes parts only; you pay the labor. • The warranty for rental units begins with the first rental or 45 days from date of shipment to the rental firm, whichever comes first.
Limited Warranty (For US) Option II: • Batteries. • Write the RA number on the outside of the carton used to return the unit. Make sure you insure your shipment in case of damage or loss. • Units purchased, serviced or operated outside the U.S.A. • Carefully pack the unit using the original box and packing material if possible. Please retain all non-defective accessories that were included with your unit such as the headphones. • Installation. DO NOT return the CompactFlash card.
Limited Warranty (For Canada) Thomson Consumer Electronics Canada, Inc. warrants to the purchaser or gift recipient that if any manufacturing defect becomes apparent in this product within 1 year from the original date of purchase, it will be replaced free of charge, including return transportation. This warranty does not include damage to the product resulting from accidents misuse or leaking batteries. Should your product not perform properly during the warranty period, either: 1.
Index A F AC adaptor 53 Accessories included 5, 50, 51 optional 52, 53 Auto resume feature 43 Features 36 auto resume 43 DSP (digital signal processor) 47 MODE menu 45, 46 pause 43 scroll 44 search 44 skip 44 B Batteries indicator 35 inserting 35 safety precautions 35 Belt clip 39, 50 Belt clip, attaching 50 Browse button 32 B.
Index Radio 17 Radio window 17 REC button 16 Recorder window 14, 16 recording quality level 12, 13 REFRESH button 16 registration 9 SAVE button 19 save CD tracks 15, 16 search for music 11 Security feature 13 set basic preferences 10, 11 STOP button 14 track information window 14 transfer music files 21, 22 VOLUME control 14 M Memory Recall 49 MODE button 38, 45 MODE menu 45, 46 MP3 audio 12 Multi function scroll 39 Music management software 7, 8 MusicMatch Jukebox 14 basic controls 14 basic preferences 10
Index R S Radio mode 48 RealJukebox basic controls 26 CompactFlash card 32 continuous play button 26 create an autoplaylist 30 create a playlist 29 download music from the Internet 28 eject button 26 email address 23 install 8, 23 Lyra2 CD Music window 32 next button 26 organize your playlist 29 pause button 26 play button 26 previous button 26 progress bar 26 radio 31 record button 26 recording preference 24, 25 saving CD tracks on CD or Lyra2 26 search 30 set basic preferences 24 shuffle play button 26
THOMSON CONSUMER ELECTRONICS 10330 N. meridian St. Indianapolis, IN 46290 ©2000 Thomson Consumer Electronics, Inc. Trademark(s) © Registered Marca(s) © Registrada(s) Marque(s) © Deposée(s) 55089180 (REV. 1) www.rca.