Specification &DSDFLW\ SODFH VHWWLQJV &\FOHV +HDY\ 1RUPDO (FR *ODVV 0LQ 5DSLG (QHUJ\ FRQVXPSWLRQ N:K DQQXDO 1RLVH OHYHO G% Dimensions 3URGXFW : [ ' [ + PP î î 3DFNDJLQJ : [ ' [ + PP î î /RDGLQJ TXDQWLW\ +4 RDW1809-B-WHITE
Important Safety Information READ AND FOLLOW ALL SAFETY INSTRUCTIONS GROUNDING INSTRUCTIONS SAFETY REQUIREMENTS This appliance must be grounded. In the event of an electrical short circuit, grounding reduces the risk of electrical shock by providing an escape wire for the electrical current. • Children should be supervised to ensure that they do not play with the appliance. • Do not stand, sit or lean on the door or dish rack. Do not place heavy items on the door when it is open.
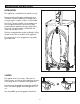
INSTALLATION INSTRUCTIONS INSTALLATION This appliance is intended for household use only. Remove interior and exterior packaging prior to installation. Place the appliance on a floor that is strong enough to support it when it is fully loaded. The Quick Connect assembly, faucet adapter and hose storage bracket are in an accessory bag stored inside the appliance during transportation. The Quick Connect assembly includes both the water inlet and drain hoses.
INSTALLATION INSTRUCTIONS CONNECTING THE DISHWASHER DISCONNECTING THE DISHWASHER To connect the dishwasher to the water source: When the wash program is complete, turn off the water source before attempting to disconnect the appliance. 1. Two thick washers and one thin washer are provided with the faucet adapter to accommodate different types of faucets. Remove the aerator from the faucet and screw the faucet adapter onto the faucet.
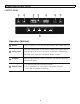
OPERATING INSTRUCTIONS CONTROL PANEL 1 2 5 6 7 3 4 8 Operation (Button) Power Press this button to turn on your dishwasher, the screen lights up. 2 Delay start Press the Delay button to increase the delay start time. Delay a cycle for up to 24 hours in one-hour increments. After setting the delay time, press the Start/Pause button to start. 3 Program Select the appropriate washing program, the selected program indicator will be lit. Start/Cancel 1. To start the selected washing program. 2.
Display Heavy For heavily soiled items include pots and pans. With dried on food. Normal This is the standard program suitable for normally soiled loads, such as pots, plates, glasses and lightly soiled pans. 5 Cycle indicator ECO For normally soiled loads, such as pots, plates, glasses and lightly soiled pans. Glass For lightly soiled crockery and glass. 90 Min For normally soiled loads that need quick wash. Rapid A shorter wash for lightly soiled loads that do not need drying.
OPERATING INSTRUCTIONS Wash Cycle Table The table below shows which programs are best for the levels of food residue on them and how much detergent is needed. It also show various information about the programs. ( )Means: need to fill rinse into the Rinse-Aid Dispenser. Program Heavy Normal (*Test cycle) ECO Glass Detergent Pre/Main Running Time(min) Energy (Kwh) Water (L) 0/17.8g 165 0.76 19 AHAM/NSF: 0/17.8g DOE: 0/8.9g 121-150 0.56-0.64 9.
OPERATING INSTRUCTIONS LOADING THE DISHWASHER LOADING THE UPPER BASKET • This appliance can hold a total of 8 full place settings. • Scrape all dishes to remove any large food residue before placing in this appliance. • Only place dishes in this appliance that are marked as dishwasher safe. • Use a mild detergent. The upper basket is designed for cups, glasses, small plates, bowls and plastic items that are marked dishwasher safe.
OPERATING INSTRUCTIONS DETERGENT DISPENSER RINSE AID DISPENSER The detergent dispenser must be filled before the start of each wash cycle. Add the detergent just before starting the wash cycle. Adding the detergent to the appliance too soon can cause it to become damp and it may not dissolve properly. 1. If the detergent dispenser is closed, press the latch to open it. Rinse aid can be used to prevent water droplets or streaks from forming on dishes.
OPERATING INSTRUCTIONS CARE & MAINTENANCE STARTING A WASH CYCLE ADDING A FORGOTTEN DISH 1. Load the dishwasher as per the loading instructions. A forgotten dish can be added to a running cycle any time before the detergent dispenser has opened. If the detergent has already been released into the appliance, it is recommended not to add more dishes as they will not receive adequate cleaning. 2. Add detergent and rinse aid as required. 3.
CARE & MAINTENANCE FILTER SYSTEM SPRAY ARM The filter system removes food particles from the wash water and traps them. It is highly recommended to empty and clean the filters after every wash cycle. The spray arms should be periodically removed and cleaned to remove any hard water build up. To clean the filter system: To remove the upper spray arm hold the nut in the center and rotate the spray arm counterclockwise. 1. Turn off the dishwasher.
TROUBLESHOOTING PROBLEM No power POSSIBLE CAUSE • A fuse may be blown or the circuit breaker tripped • Power surge • Plug not fully inserted into the wall outlet Water not drained from dishwasher • Door not closed correctly • Kink in drain hose • Filter clogged Detergent left in the dispenser Suds left in the appliance White film or cloudiness on dishes or interior tub • Drain pump malfunction • Dishes blocking dispenser from fully opening; unit may be over loaded • Too much detergent or wrong kind of
To make a warranty claim, do not return this product to the store. Please email support@curtiscs.com or call 1-800-968-9853. 1 Year Warranty This product is warranted to be free from defects in material and workmanship for a period of one (1) year from the date of original purchase. During this period, your exclusive remedy is repair or replacement of this product or component found to be defective, at our option; however, you are responsible for all costs associated with returning the product to us.
Consignes de sécurité importantes LIRE ET SUIVRE TOUTES LES INSTRUCTIONS DE SÉCURITÉ INSTRUCTIONS DE MISE À LA TERRE EXIGENCES DE SÉCURITÉ Cet appareil doit être mis à la terre. En cas de courtcircuit, la mise à la terre réduit les risques de décharge électrique en fournissant un échappatoire au courant électrique. • Les enfants doivent être surveillés pour s’assurer qu’ils ne jouent pas avec l’appareil.
INSTRUCTIONS D’INSTALLATION INSTALLATION Cet appareil est destiné à un usage domestique uniquement. Enlevez l’emballage intérieur et extérieur avant l’installation. Placez l’appareil sur un sol suffisamment solide pour le supporter lorsqu’il est complètement chargé. L’assemblage Quick Connect, l’adaptateur de robinet et le support de rangement de tuyau se trouvent dans un sac d’accessoires rangé à l’intérieur de l’appareil pendant le transport.
INSTRUCTIONS D’INSTALLATION CONNECTER LE LAVE-VAISSELLE DÉCONNECTER LE LAVE-VAISSELLE Pour connecter le lave-vaisselle à la source d’eau: Une fois le programme de lavage terminé, fermez la source d’eau avant de tenter de débrancher l’appareil. 1. Deux rondelles épaisses et une rondelle mince sont fournies avec l’adaptateur de robinet pour accueillir différents types de robinets. Retirez l’aérateur du robinet et vissez l’adaptateur du robinet sur le robinet.
1 2 5 6 7 3 4 8 Délai: Appuyez sur le bouton Delay pour augmenter l'heure de départ différé. Retardez un cycle jusqu'à 24 heures par incréments d'une heure. Après le réglage le temps de retard, appuyez sur le bouton Départ / Pause pour commencer. Pour les charges normalement sales, comme les casseroles, assiettes, verres et casseroles légèrement sales. Pour la vaisselle et le verre légèrement sales. Écran: Pour afficher le temps de rappel, le temps de retard, le code d'erreur, etc.
( ) Énergie (Kwh) 0/17.8g 165 0.76 19 121-150 0.56-0.64 9.7-19 (*Test cycle) AHAM/NSF: 0/17.8g DOE: 0/8.9g ECO 0/17.8g 155 0.53 16 0/17.8g 125 0.60 16 0/17.8g 90 0.83 13 60 0.56 13 Heavy Normal Verre 90 Min 0/17.
CONSIGNES D’UTILISATION CHARGEMENT DE LA LAVE-VAISSELLE CHARGEMENT DU PANIER SUPÉRIEUR • Cet appareil peut contenir un total de 8 places complètes. • Mettez tous les plats au rebut pour éliminer les résidus de nourriture importants avant de les placer dans cet appareil. • Ne placez que des plats marqués au lavevaisselle dans cet appareil. • Utilisez un détergent doux.
CONSIGNES D’UTILISATION DISTRIBUTEUR DE DÉTERGENT DISTRIBUTEUR D’AGENT RINÇAGE Le distributeur de détergent doit être rempli avant le début de chaque cycle de lavage. Ajoutez le détergent juste avant de commencer le cycle de lavage. L’ajout de détergent à l’appareil trop tôt peut le rendre humide et ne pas se dissoudre correctement. Un agent de rinçage peut être utilisé pour empêcher la formation de gouttelettes d’eau ou de traînées sur la vaisselle.
CONSIGNES D’UTILISATION SOINS ET ENTRETIEN COMMENCER UN CYCLE DE LAVAGE AJOUT D’UN PLAT OUBLIÉ 1. Chargez le lave-vaisselle conformément aux instructions de chargement. Un plat oublié peut être ajouté à un cycle de fonctionnement à tout moment avant l’ouverture du distributeur de détergent. Si le détergent a déjà été libéré dans l’appareil, il est recommandé de ne pas ajouter de vaisselle car celle-ci ne fera pas l’objet d’un nettoyage adéquat. 2.
SOINS ET ENTRETIEN SYSTÈME DE FILTRAGE BRAS DE PULVÉRISATION Le système de filtration élimine les particules de nourriture de l’eau de lavage et les emprisonne. Il est fortement recommandé de vider et de nettoyer les filtres après chaque cycle de lavage. Les bras d’aspersion doivent être périodiquement retirés et nettoyés pour éliminer toute accumulation d’eau dure. Pour retirer le bras gicleur supérieur, maintenez l’écrou au centre et faites tourner le bras gicleur dans le sens antihoraire.
DÉPANNAGE PROBLÈME Aucune puissance CAUSE POSSIBLE • Un fusible peut être soufflé ou le disjoncteur a déclenché • Surtension • La fiche d’alimentation n’est pas complètement insérée dans la prise murale Eau non vidangée du lave-vaisselle • La porte n’est pas fermée correctement • Pli dans le tuyau de vidange • Filtre bouché Détergent laissé dans le distributeur Suds laissés dans l’appareil Film blanc ou nébuleuse sur la vaisselle ou l’intérieur du lave-vaisselle Le bruit à l’intérieur de l’appareil lor
Importantes Instrucciones de Seguridad LEA Y SIGA TODAS LAS INSTRUCCIONES DE SEGURIDAD LA CONECIÓN A TIERRA REQUERIMIENTOS DE SEGURIDAD Este artefacto debe ser conectado a tierra. En caso de un corto circuito eléctrico, la conexión a tierra reduce el riesgo de una descarga eléctrica proporcionando un cable de retorno para la corriente eléctrica. • Los niños deben ser supervisados para asegurarse de que no jueguen con el aparato.
INSTRUCCIONES DE INSTALACIÓN INSTALACIÓN Este aparato está destinado únicamente para uso doméstico. Retire el embalaje interior y exterior antes de la instalación. Coloque el aparato en un piso que sea lo suficientemente fuerte como para sostenerlo cuando esté completamente cargado. El conjunto de conexión rápida, el adaptador del grifo y el soporte de almacenamiento de la manguera están en una bolsa de accesorios almacenada dentro del aparato durante el transporte.
Pour faire une demande de garantie, ne retournez pas ce produit au magasin. Veuillez envoyer un courriel électronique à support@curtiscs.com ou appeler le 1-800-968-9853. 1 ans de garantie Ce produit est garanti contre tout défaut de matériel et de fabrication pendant une période de un (1) ans à compter de la date d'achat d'origine.